Table of Contents
Advertisement
Quick Links
Advertisement
Table of Contents

Related Manuals for Dickinson Caribbean

Summary of Contents for Dickinson Caribbean
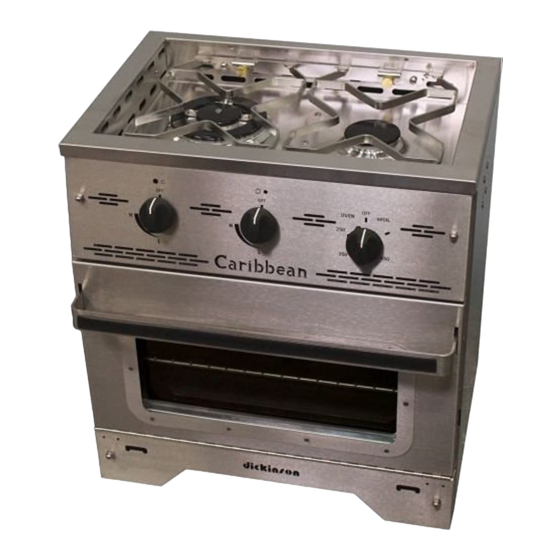
- Page 1 Caribbean/Mediterannean 2 Burner Stove 3 Burner Stove Propane Galley Range Operating and Installation Manual This instruction manual contains important information necessary for the assembly, installation and safe operation of this stove Serial # ____________ Form#7.2-247 Issue#1 Mar 15th 2016...
-
Page 3: Table Of Contents
Table of Contents 4....................General Warnings 6...............LP Gas Cylinder Specs and Installation 7..................About our Dickinson Stove 8....................Stove Specifications 9......................Accessories 10................Standard Cutout Installation 11...................Gimbal Cutout Installation 12................Built In Kit Cutout Installation 13......................Installation 14......................Fuel Systems 15......................Operation 17.......................Maintenance 19................Caribbean Exploded Diagram 20..............Mediterannean Exploded Diagram 21.................Caribbean Wiring Diagram... - Page 4 DO NOT operate under the influence of alcohol or drugs Ÿ Do not use any other regulator than ones supplied or recommended by Dickinson Marine Ÿ This stove becomes hot when in use. To avoid burns - DO NOT attempt to move...
- Page 5 Ÿ A manufactured home (USA only) or mobile home OEM installation must confirm with the Manufactured Home Construction and Safety Standard, Title 24 CFR, Part 3280,or, when such standard is not applicable, the Standards for Manufactured Home Installations, ANSI A225.1/NFPA 501A, or Standard for Gas Equipped Recreational Vehicles and Mobile Housing, CSA Z240.4 Ÿ...
-
Page 6: Lp Gas Cylinder Specs And Installation
LP GAS CYLINDER SPECS AND INSTALLATION Ÿ The stove and its individual shutoff valve must be disconnected from the gas supply piping system during any pressure testing of that system at test pressures in excess of 1/2 PSI (3.5kPa) Ÿ The appliance must be isolated from the gas supply piping system by closing it’s individual manual shut-off valve during any pressure testing of the gas supply piping system in equal or less than 1/2 PSI (3.5kPa) - Page 7 About our Propane Galley Stoves One of our newer appliances, our Dickinson propane galley ranges are clean burning appliances designed for use in marine environment but are adaptable to many applications. With a large range of setting they are ideal for all cooking situations and are great to have in any galley.
- Page 8 450 degrees your oven is capable of cooking a variety of items Triple Burner - The large burner is a patented triple burner design which allows the Dickinson propane galley range to boast the most powerful marine stove burner (11000 BTUs). The Burner can be turned...
-
Page 9: Accessories
Mediterranean - 26-011 Caribbean - 26-010 Cooking Grate - The cooking grate is made of beautifully polished stainless steel and sits tight on four anti-rattle pins. It is equipped with locking slides on the front and back for your pot holder rail as well as 4 adjustable leveling points for your cutting board. -
Page 10: Standard Cutout Installation
If installing your Mediterranean or Caribbean propane stove into a cutout, the cutout needs to be a minimum of 20.5” wide for either stove and 22” deep for the Mediterranean or 16.5” for the Caribbean. A cutout is not necessary as the stove can be freestanding. Once mounted the stove needs to be secured... - Page 11 3) The brackets can be mounted to the sides of the stoves so that they are level with the stove top. Cutout width for this install would be 20.5” to 22.25”. Built In Kit Part # Caribbean - 26-000 Mediterranean -...
-
Page 12: Gimbal Cutout Installation
Gimbal Cutout To install the stove on a gimbal you would need to locate the proper area to mount the gimbal brackets to allow the stove to swing freely with no obstruction. To do this you would need to make a cardboard template of the side of the stove and pierce it where the mounting bolt would screw in. -
Page 13: Installation
Installation The specifics of your installation will differ depending on the method of installation. Fuel lines, securing methods and clearances will depending on if the stove is gimbaled or installed in a cutout secured to the deck. Standard Cut Out/Built in Cut Out In this installation you would secure the stove to the deck using a combination of the tie down bar and screwing down the body. - Page 14 Fuel Supply LPG System Installation **In some cases the solenoid valve is installed on the high pressure side of the system (ie before the LPG regulator). See solenoid manufacturers instruction for proper installation 1. Starting from the propane tank itself, the fuel line attachments should occupy the following positions: 1) Pressure gauge, 2) Low pressure or two stage regulator, 3) Solenoid (optional), 4) The appliance itself 2.
-
Page 15: Operation
Operation First Use Once your stove is installed it is recommended that you use a soapy water solution to check for leaks at the connection at the back. Cover the entire connection in the solution and turn the gas on at the tank. - Page 16 Operation Cooking with the Top Burners It is recommended that you use the appropriate sized pots and pans when cooking. When using a smaller pot on the large burner ensure the flame is adjusted so that it is not burning up the sides of the pot.
-
Page 17: Maintenance
PROLONGED LAY UP The Dickinson Propane Stove has been designed to have a long life, with every day use. However, if you leave your boat unattended for a long period of time, particularly in high heat and humid conditions, or long winter conditions, the high temperature lubricant in the gas control valves may settle, resulting in difficulty in... - Page 18 Maintenance CLEANING ORIFICE The orifices of the burners are accessed by removing the 4 screws on the inside walls of the cooking area and then lift the top off the stove. The large burner cap and body is simply lifted off the burner base support. This reveals the small hole which is the gas inlet orifice.
-
Page 21: Caribbean Wiring Diagram
Caribbean Wiring Diagram Oven/Broiler Large Burner Small Burner Large Burner Small Burner Broiler Oven Oven/Broiler Top Burners Power Wire Ignitor Wire NOTE: Older models may not be wired in this order but the configuration will be the same as the same spark igniters are always paired together... -
Page 22: Mediterranean Wiring Diagram
Mediterranean Wiring Diagram Left Small Large Right Small Oven/Broiler Large Burner GROUND Right Small Left Small Broiler Oven Large Burner Small Burners Oven/Broiler Power Wire Ignitor Wire Ground Wire NOTE: Older models may not be wired in this order but the configuration will be the same as the same spark igniters are always paired together... -
Page 23: Troubleshooting
Troubleshooting Dickinson Marine has a complete and comprehensive set of instructions that can help guide you through any and all minor issues that may arise with your propane stove. Once you have narrowed down your issue, please visit our website, e-mail us or call our tech department to receive a set of instructions to help clear up these issues. -
Page 24: Replacement Parts
Broiler Burner 23-093 Large Burner Gas Valve 23-094 Small Burner Gas Valve 26-057 Oven/Broiler Gas Valve Stove Accessories 26-000 Caribbean Built In Kit 26-001 Mediterranean Built in Kit 26-003 Gimbal Mount Propane System Parts 19-100-10 10ft Low Pressure Propane Hose 19-100-20... - Page 25 This warranty is limited to claims submitted in writing within a one-year period following the date of purchase. If any part of your new product fails because of a manufacturing defect within the warranty period Dickinson offers to replace said parts free of charge, provided, however, that such parts have not been improperly repaired, altered or tampered with or subjected to misuse, abuse or exposed to corrosive conditions.
-
Page 26: Warranty Form
#101-17728 66 Ave, Surrey, B.C. Canada V3S 7X1 WARRANTY FORM I have read and understand the Limited Warranty and the Instruction Manual and agree to the terms and conditions (please print) Date…………………………………………………………………………… Purchaser's Name…………………………………………………………….. Address……………………………………………………………………….. ………………………………………………………………………………... …………………………………………............Model Name...................... Serial Number………………………………………………………………… Date Of Purchase……………………………………………………………..
Need help?
Do you have a question about the Caribbean and is the answer not in the manual?
Questions and answers