Table of Contents
Advertisement
Available languages
Available languages
VDPC174
192-CHANNEL DMX CONTROLLER WITH JOYSTICK
192-KANAALS DMX CONTROLLER MET JOYSTICK
CONTRÔLEUR DMX 192 CANAUX AVEC MANETTE
CONTROLADOR DMX DE 192 CANALES CON PALANCA DE CONTROL
DMX-CONTROLLER FÜR 192 KANÄLE MIT JOYSTICK
USER MANUAL
GEBRUIKERSHANDLEIDING
NOTICE D'EMPLOI
MANUAL DEL USUARIO
BEDIENUNGSANLEITUNG
Advertisement
Table of Contents

Summary of Contents for HQ Power vdpc174
- Page 1 VDPC174 192-CHANNEL DMX CONTROLLER WITH JOYSTICK 192-KANAALS DMX CONTROLLER MET JOYSTICK CONTRÔLEUR DMX 192 CANAUX AVEC MANETTE CONTROLADOR DMX DE 192 CANALES CON PALANCA DE CONTROL DMX-CONTROLLER FÜR 192 KANÄLE MIT JOYSTICK USER MANUAL GEBRUIKERSHANDLEIDING NOTICE D’EMPLOI MANUAL DEL USUARIO...
- Page 2 VDPC174_v2 VELLEMAN...
-
Page 3: Introduction And Features
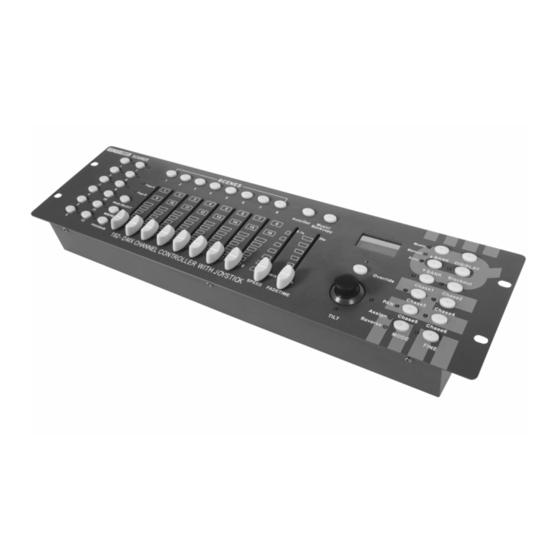
• Keep the device away from children and unauthorised users. 3. General Guidelines • This device is designed for professional use on stage, in discos, theatres, etc. The VDPC174 should only be used indoors and be connected to a current of max. 9-12VDC / 500mA. - Page 4 4. Description a. Front Panel (fig. 1) 1. Scanner Buttons (1 ~ 12) Select the desired fixture. 2. Scene Buttons (1 ~ 8) Press the scene buttons to load or store your scenes. There is a maximum of 240 programmable scenes. 3.
-
Page 5: Display Information
• General The VDPC174 allows you to program 12 scanners with 16 DMX channels each, 30 banks of 8 programmable scenes, 6 chases of 240 scenes and all this by means of 8 channel sliders, a joystick and other buttons. By means of the joystick you can easily and more accurately control the movement of a fixture. - Page 6 LCD Display Description Scene 1 Bank 1 Chase 1 is activated The ninth step of a chase DMX value (000 ~ 255) The current speed is 1 minute and 54 seconds The time of the last two taps is 4.25 seconds Assign DMX channels 4 and 5 Reverse DMX channels 10 and 13 b.
- Page 7 3. Verify that the speed and fade time sliders are positioned at zero. 4. Press the scanner button corresponding to the unit you wish to control. You may control more than one scanner at a time by pressing the button corresponding to the scanner(s) you wish to program. 5.
- Page 8 • Deleting a Scene 1. Enable the PROGRAM mode. 2. Press the desired SCENE button to select the scene you wish to delete. 3. Press and hold down the AUTO / DEL button. While holding the button, tap the SCENE button that corresponds with the scene you wish to delete.
- Page 9 • Deleting a Step 1. Enable the PROGRAM mode. 2. Select the chase that contains the step you wish to delete. 3. Press the TAP / DISPLAY button, the LCD shows the current step. 4. Press the bank UP / DOWN button and scroll to the step you wish to delete. 5.
- Page 10 • Deleting All DMX Channels 1. Switch off the unit. 2. Press the MODE and AUTO / DEL buttons simultaneously. 3. While holding the two buttons, turn the power back on to the unit. All LEDs will flash briefly indicating the requested operation has been performed.
-
Page 11: File Transfer
File Transfer A file transfer allows the user to transfer all information stored in one VDPC174 to a second VDPC174 unit. Connect the units using 3-pin XLR cables. The unit sending the information will have the cable plugged into the DMX OUT plug while the receiving unit will have the cable running into the DMX IN plug. -
Page 12: Technical Specifications
For more info concerning this product, please visit our website www.hqpower.com The information in this manual is subject to change without prior notice. VDPC174 – 192-KANAALS DMX CONTROLLER MET JOYSTICK 1. Inleiding en kenmerken Aan alle ingezetenen van de Europese Unie... - Page 13 • Installeer het toestel weg van extreme temperaturen (zie “Technische specificaties”), vochtigheid en stof. Zorg voor een minimumafstand van 0.5m tussen de lichtuitgang van het toestel en het belichte oppervlak. • Leer eerst de functies van het toestel kennen voor u het gaat gebruiken. Ongeschoolde personen mogen dit toestel niet gebruiken.
- Page 14 Omkeren van kanalen 10 en 13 b. Opstelling • Opstelling van een toestel De VDPC174 kent 16 kanalen per toestel toe. Om uw toestellen aan de scannerknoppen links van de controller toe te wijzen, houd 16 kanalen vrij per ingegeven toestel. VDPC174_v2...
- Page 15 Geef het DMX-adres in volgens volgende tabel: Toestelnummer Digitale DMX-adres Instelling van de DIP-schakelaars van de scanner 1 is ON 1 and 5 are ON 1 and 6 are ON 1, 5 and 6 are ON 1 and 7 are ON 1, 5 and 7 are ON 1, 6 and 7 are ON 1, 5, 6 and 7 are ON...
- Page 16 • Voorbeeld hoe een scène te programmeren 1. Schakel de PROGRAM-modus in. 2. Druk op SCANNER 1 zodat de fader ingeschakeld wordt. 3. Zorg dat pagina A geselecteerd staat. Zoniet, druk op PAGE SELECT om pagina A te selecteren. 4. Plaats de eerste en de tweede fader op hun maximumpositie. 5.
- Page 17 d. Chases • Een chase programmeren Om een scène te kunnen programmeren, moet er eerst en vooral een scène bestaan. Deze functie laat u toe om 240 scènes in een vooraf bepaalde volgorde af te lopen. Het is aangeraden eerst alle chases te wissen vooraleer u chases begint te programmeren.
- Page 18 3. Selecteer met UP en DOWN de as die u wenst toe te kennen (pan of tilt). 4. Gebruik de TAP / DISPLAY-knop om de 16- of 8-kanaals modus te selecteren. 5. Druk op de scanner die wenst toe te kennen. 6.
-
Page 19: Automatische Modus
Bestandsoverdracht Een bestandsoverdracht laat toe alle informatie opgeslagen in uw VDPC174 naar een tweede VDPC174 te zenden. Koppel de toestellen met 3-pin XLR-kabels als volgt: Koppel de DMX OUT van het zendtoestel met de DMX IN van het ontvangsttoestel. -
Page 20: Reiniging En Onderhoud
• Een dump-bestand verzenden 1. Schakel het toestel uit en houd gelijktijdig SCANNER 2 en 3 en SCENE 1 ingedrukt. 2. Schakel het toestel terug in terwijl u de drie knoppen ingedrukt houdt. De LCD geeft TRANSMIT weer om aan te geven dat het toestel klaar staat om de bestanden te verzenden. -
Page 21: Prescriptions De Sécurité
• Transportez l'appareil dans son emballage originel. • Toute modification de l’appareil est interdite pour des raisons de sécurité. • N’utilisez votre VDPC174 qu’à sa fonction prévue. Tout autre usage peut causer des courts-circuits, des brûlures, des électrochocs etc. Un usage impropre annule d'office la garantie. - Page 22 4. Description a. Panneau frontal (voir ill. 1) 1. Boutons scanner (1 ~ 12) Sélection de l’appareil. 2. Boutons scène (1 ~ 8) Chargement ou sauvegarde d’un maximum de 240 scènes programmables. 3. Faders Utilisez ces faders pour régler l’intensité des canaux 1 ~ 8 ou des canaux 9 ~ 16, en fonction de la page sélectionnée.
- Page 23 Opération • En général Le VDPC174 permet la programmation de 12 scanners à 16 canaux DMX, 30 bancs de 8 scènes programmables, 6 poursuites de 240 scènes à l’aide de 8 glissières, d’une manette et d’autres boutons. Il est possible de contrôler le mouvement d’un appareil plus facilement et précisément à...
- Page 24 1, 5, 6 et 8 sur ON • Activation du mode de programmation Pour activer le mode de programmation, maintenez enfoncé le bouton « PROGRAM » pendant quelques secondes jusqu’à ce que la LED s’allume. • Configuration de la manette 1.
- Page 25 7. Enfoncez le bouton de scène 1 pour sauvegarder la première scène. 8. Répétez les étapes 4 à 7 jusqu’à ce que toutes les scènes soient programmées dans le banc 1. 9. Enfoncez le bouton « SCANNER 1 » pour désactiver le contrôle du fondu. 10.
- Page 26 d. Les poursuites • Programmation d’une poursuite Pour pouvoir programmer une poursuite, il faut d’abord programmer des scènes. Cette fonction vous permet de parcourir entre les 240 scènes dans un ordre prédéfini. Il est conseillé de d’abord effacer toutes les poursuites dans le contrôleur avant la première programmation des poursuites.
- Page 27 e. Sélection de la manette / du canal • Configuration de la manette 1. Maintenez enfoncé « PROGRAM » jusqu’à ce que la LED s’allume. 2. Maintenez simultanément enfoncé les boutons « MODE » et « FINE ». La LED « ASSIGN » s’allume. Si la LED «...
- Page 28 ONLY TIME TIME 3. Enfoncez simultanément les boutons « MODE » et « TAP / DISPLAY » pour sauvegarder la configuration dans la mémoire. Si vous ne souhaitez pas sauvegarder la configuration, enfoncez le bouton « BLACKOUT » pour quitter. g.
-
Page 29: Nettoyage Et Entretien
Un transfert de fichiers permet de copier toutes les données sauvegardées dans un VDPC174 vers un deuxième VDPC174. Raccordez les unités à l’aide de câbles XLR à trois broches. Branchez le câble à la connexion « DMX OUT » de l’appareil transférant les données, branchez l’autre fiche du câble à la connexion « DMX IN » de l’appareil recevant les données. -
Page 30: Instrucciones De Seguridad
• Mantenga el VDPC174 lejos del alcance de personas no capacitadas y niños. 3. Normas generales • Este aparato ha sido diseñado para uso profesional en una discoteca, un teatro, etc. El VDPC174 sólo está permitido para una conexión con una fuente de corriente de máx. 9-12VCC / 500mA. - Page 31 4. Descripción a. Panel frontal (véase fig. 1) 1. Botones escáner (1 ~ 12) Seleccionar el aparato. 2. Botones escena (1 ~ 8) Cargar o guardar máx. 240 escenas programables. 3. Faders Utilice los faders para ajustar la intensidad de los canales 1 ~ 8 o los canales 9 ~ 16, en función del rango seleccionado.
- Page 32 • En general El VDPC174 permite programar 12 escáneres de 16 canales DMX, 30 bancos de 8 escenas programables y 6 chases de 240 escenas con los 8 deslizadores, una palanca y otros botones. Con la palanca es posible controlar el movimiento de un aparato de manera más fácil y precisa.
- Page 33 1, 6 y 7 en la posición ON 1, 5, 6 y 7 en la posición ON 1 y 8 en la posición ON 1, 5 y 8 en la posición ON 1, 6 y 8 en la posición ON 1, 5, 6 y 8 en la posición ON •...
- Page 34 7. Pulse el botón de escena 1 para guardar la primera escena. 8. Repita los pasos de 4 a 7 hasta que todas las escenas estén programadas en el banco 1. 9. Pulse el botón « SCANNER 1 » para desactivar el fader. 10.
- Page 35 d. Chases (persecuciones) • Programar un chase Para poder programar un chase, primero, programe las escenas. Esta función le permite hojear en un orden predefinido entre las 240 escenas. Aconsejamos borrar todos los chases del controlador antes de la primera programación de los chases.
- Page 36 e. Seleccionar la palanca / el canal • Configurar la palanca 1. Mantenga pulsado « PROGRAM » hasta que el LED se ilumine. 2. Mantenga pulsado simultáneamente los botones « MODE » y « FINE ». El LED « ASSIGN » se ilumina. Si el LED «...
- Page 37 ONLY TIME TIME 3. Pulse simultáneamente los botones « MODE » y « TAP / DISPLAY » para guardar la configuración en la memoria. Si no quiere guardar la configuración, pulse el botón « BLACKOUT » para salirse. g. Reproducción •...
-
Page 38: Limpieza Y Mantenimiento
Transmitir ficheros Una transmisión de ficheros permite copiar todos los datos guardados en un VDPC174 a un segundo VDPC174. Conecte los aparatos con los cables XLR de tres polos. Conecte el cable a la conexión « DMX OUT » de aparato que transmite los datos, conecte el otro conector del cable a la conexión «... -
Page 39: Einführung & Eigenschaften
VDPC174 – DMX-CONTROLLER FÜR 192 KANÄLE MIT JOYSTICK 1. Einführung & Eigenschaften An alle Einwohner der Europäischen Union Wichtige Umweltinformationen über dieses Produkt Dieses Symbol auf dem Produkt oder der Verpackung zeigt an, dass die Entsorgung dieses Produktes nach seinem Lebenszyklus der Umwelt Schaden zufügen kann. - Page 40 • Eigenmächtige Veränderungen sind aus Sicherheitsgründen verboten. • Verwenden Sie das Gerät nur für Anwendungen beschrieben in dieser Bedienungsanleitung sonst kann dies zu Schäden am Produkt führen und erlischt der Garantieanspruch. Jede andere Verwendung ist mit Gefahren wie Kurzschluss, Brandwunden, elektrischem Schlag, Lampenexplosion, usw. verbunden. 4.
-
Page 41: Bedienung
Zuteilen der Kanäle 4 und 5 Umkehren der Kanäle 10 und 13 b. Aufstellung • Gerät aufstellen Der VDPC174 weist 16 Kanäle pro Gerät zu. Um Ihre Geräte an die Scannertaste links auf dem Steuergerät zuzuweisen, halten Sie 16 Kanäle pro Gerät frei. VDPC174_v2 VELLEMAN... - Page 42 Geben Sie die DMX-Adresse gemäß folgender Tabelle in: Gerätenummer digitale DMX-Adresse Einstellung der DIP-Schalter des Scanners 1 ist ON 1 und 5 sind ON 1 und 6 sind ON 1, 5 und 6 sind ON 1 und 7 sind ON 1, 5 und 7 sind ON 1, 6 und 7 sind ON 1, 5, 6 und 7 sind ON...
- Page 43 • Wie eine Szene programmieren 1. Schalten Sie den Programmmodus ein. 2. Drücken Sie SCANNER 1, sodass Fader eingeschaltet wird. 3. Sorgen Sie dafür, dass Seite A selektiert ist. Wenn das nicht der Fall ist, drücken Sie PAGE SELECT um Seite A zu selektieren.
- Page 44 4. Drücken Sie UP / DOWN um die gewünschte Bank zu selektieren. 5. Drücken Sie MUSIC / BANK COPY, alle LEDs leuchten kurz auf, als Zeichen, dass die Funktion beendet ist. 6. Um den Modus zu verlassen, halten Sie die Programmtaste 3 Sekunden gedrückt. d.
- Page 45 e. Selektieren des Joysticks / des Kanals • Joystick einstellen 1. Halten Sie die Programmtaste gedrückt bis die LED aufleuchtet. 2. Halten Sie gleichzeitig die MODE- und die FINE-Taste gedrückt. Die ASSIGN LED leuchtet auf. Wenn die REVERSE LED leuchtet, drücken Sie erneut FINE und MODE um den ASSIGN-Modus zu öffnen. 3.
-
Page 46: Musikgesteuerter Modus
ONLY TIME TIME 3. Drücken Sie gleichzeitig MODE und TAP / DISPLAY um die Einstellung zu speichern. Wenn Sie die Einstellung nicht speichern wollen, drücken Sie BLACKOUT zum Verlassen. g. Wiedergabe • Wiedergabe von Szenen Es gibt drei Wiedergabemöglichkeiten: MANUELL, AUTOMATISCH und MUSIKGESTEUERT •... -
Page 47: Reinigung & Wartung
Dateiübertragung Eine Dateiübertragung ermöglicht Ihnen, alle gespeicherten Informationen Ihres VDPC174 an einen zweiten VDPC174 zu senden. Verbinden Sie die Geräte mit 3-poligen XLR-Kabeln: Verbinden Sie den DMX OUT des Sendegerätes mit dem DMX IN des Empfangsgerätes. • Eine Dumpdatei versenden 1.