
Subscribe to Our Youtube Channel
Related Manuals for DELLA 050-HA-50138


Summary of Contents for DELLA 050-HA-50138
- Page 1 **WARNING: READ THIS INSTRUCTION MANUAL CAREFULLY BEFORE USE. www.dellaproductsusa.com 909. 344. 2588 36” WALL MOUNTED FIREPLACE INSTRUCTION MANUAL Item No: 050-HA-50138...
-
Page 3: Table Of Contents
OUR BRAND Thank you for choosing a DELLA Infrared Zone Heating System. This owner’s manual will provide you with valuable information necessary for the proper care and maintenance of your new product. Please take a few moments to thoroughly read the instructions and familiarize yourself with all the operational aspects of your new heater. -
Page 4: Important Instructions
IMPORTANT INSTRUCTIONS When using this electric unit, basic safety precautions should always be followed to reduce the risk of fire, electric shock, and injury to persons, including the following: 01. Read ALL instructions before using this unit. 02. CAUTION: Risk of Electric Shock. DO NOT open or try to repair the heater yourself. 03. -
Page 5: Specifications
IMPORTANT INSTRUCTIONS 17. Use only for intended household use as described in this manual. Any other use not recommended by the manufacturer may cause fire, electric shock, or injury to persons. The use of attachments not recommended or sold by unauthorized dealers may cause hazards. 18. -
Page 6: Product Operation Method
PRODUCT OPERATION METHOD OUR BRAND 01. WALL-MOUNTED 02. TABLETOP IN THE BOX • ELECTRIC FIREPLACE • REMOTE CONTROL (INCLUDE BATTERIES) • INSTRUCTION MANUAL • ROCK • WALL HANGING HOLDER • TWO STANDING LEGS • EIGHT 4*16MM SCREWS (TO FIX STANDING LEGS) •... -
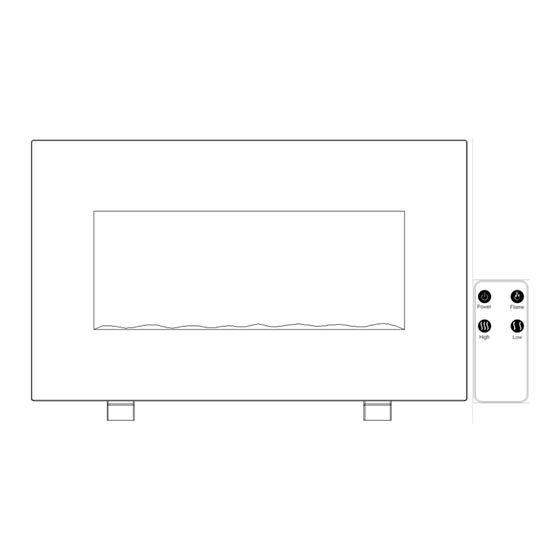
Page 7: Control Panel
CONTROL PANEL Control Panel Indicate light: function indicate light Control Panel Indicate light: function indicate light Flame button: To adjust the flame brightness Low Heat button: To turn on/off low mode heating High Heat button: To turn on/off high mode Flame button: To adjust the flame brightness heating Low Heat button: To turn on/off low mode... - Page 8 PREPARATION The heater can be wall-mounted or placed on the ground, which can be used in the living room or PREPARATION bedroom. Plug the unit into a 120 V 60 Hz electrical outlet, and open the switching power supply. The heater can be wall-mounted or placed on the ground, which can be used in the living room or Bring out the insulating film when used the remote control, see as the following steps.
- Page 9 WALL-MOUNTED INSTALLATION Warning: to prevent fire, there is no other furniture on the top of the fireplace, the following are the minimum distance from the front and side of the heater to the wall. 1.0m 0.5m down 0.5m left 0.5m right Warning: check the wall to ensure that there are no wires, pipes, etc.
-
Page 10: Wll-Mounted Installation
WALL-MOUNTED INSTALLATION Exactly align to hole and hang on the fireplace. Push in this direction after hanging on. Heater hook position screw 4*10�... - Page 11 WALL-MOUNTED INSTALLATION Put in the rock 01. Fix the wall hanging holder on the wall by using the 4*45mm screws and screw expansion 1.Fix the wall hanging holder on the wall by using the 4*45mm screws and screw expansion tubes. (As shown in figure A) tubes.
-
Page 12: Operation Instructions
3,Note: if you choose to hang on the wall, you can no longer be fixed to the support of the product. TABLETOP INSTALLATION INSTRUCTIONS 3,Note: if you choose to hang on the wall, you can no longer be fixed to the support of the product. Tabletop installation instructions Tabletop installation instructions 1, Use 4*16mm screws to support the foot fixed on the product, as shown above. - Page 13 In standby mode, press the fire key, it is opened the brightest flame (the heating indicator will light up). The charcoal component will light up, and presses the flame key again, the brightness of the flame decrease. You can set up the whole five gears flame brightness, including close, by pressing the flame key circularly.
-
Page 14: Maintenance
MAINTENANCE 01. Turn off the heater of the power switch. MAINTENANCE 02. Unplug the unit and let it cool completely. 1. Turn off the heater of the power switch. 03. To keep the heater clean, the outer shell may be cleaned with a soft, damp cloth. You may 2. -
Page 15: Warranty
(1) year from the date of purchase. 7 Dissatisfaction due to buyer’s remorse. In no event shall DELLA be liable for indirect, con- 8 Normal wear and tear. sequential or incidental damages of any kind. - Page 16 **WARNING: READ THIS INSTRUCTION MANUAL CAREFULLY BEFORE USE. www.dellaproductsusa.com 909. 344. 2588...
Need help?
Do you have a question about the 050-HA-50138 and is the answer not in the manual?
Questions and answers
what does a green and red flashing light next to the temperature mean