Table of Contents
Advertisement
Advertisement
Table of Contents

Related Manuals for OTT ecoLog 800


Summary of Contents for OTT ecoLog 800
- Page 1 Operating instructions Groundwater Datalogger OTT ecoLog 800 OTT ecoLog 800 3G...
- Page 2 OTT ecoLog 800 3G firmware: V 1.00.0 and later OTT Water Logger Operating Program: V 1.70.0 and later The OTT ecoLog 800 (3G) firmware can be found in the "Advanced operation" mode, "OTT ecoLog 800 (3G)" window of the operating program. The version of the operating program can be found via the "Info"...
-
Page 3: Table Of Contents
10 Determining and displaying instantaneous values (Observer function) 11 Reading data 12 Exporting data 13 Displaying data 14 Protecting the OTT ecoLog 800 (3G) unit and the OTT Water Logger Operating Program using a password 15 Setting date and time 16 Erasing the data memory... - Page 4 19 Error messages 20 Troubleshooting/remedy 21 Repair 22 Notes about the disposal of old units 23 Technical data Appendix A – Note on Declaration of Conformity...
-
Page 5: Scope Of Supply
"OTT Water Logger Software CD-ROM" 56.572.002.9.7 OTT Water Logger Operating Program for PC, and OTT ecoLog 800 (3G) operating instructions (PDF file) External radio antenna cable length: 0.5 m 97.980.062.9.5 cable length: 1.0 m 97.980.061.9.5... - Page 6 0,1 mS/cm; 1000 ml 55.495.350.9.5 – 0,5 mS/cm; 946 ml 55.495.351.9.5 – 1,412 mS/cm; 1000 ml 55.495.352.9.5 – 12,856 mS/cm; 946 ml 55.495.353.9.5 – 47,6 mS/cm; 1000 ml 55.495.354.9.5 for OTT ecoLog 800 (not usable for OTT ecoLog 800 3G)
-
Page 7: Basic Safety Information
Handle the pressure probe cable with care. Do not kink the cable or pull it across sharp edges! Do not make any changes or retrofits to the OTT ecoLog 800 (3G)! If changes or retrofits are made, all guarantee claims are voided. -
Page 8: Introduction
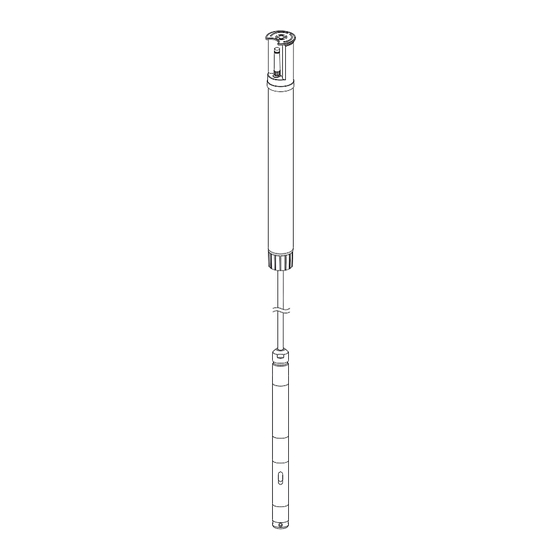
0 … 40 m water column (0 ... 4 bar) 0 … 100 m water column (0 ... 10 bar) Based on a reference value that is input during startup, the OTT ecoLog 800 (3G) default setting provides measurement results in the form of depth values. Alterna- tively, levels or pressure values are possible. - Page 9 Fig. 1: Setup of a groundwater measurement station using the OTT ecoLog 800 (3G). Top cap The OTT ecoLog 800 (3G) essentially con- sists of three components: communication unit, pressure probe cable, and pressure probe with datalogger. OTT ecoLog 800 (3G) system length =...
-
Page 10: Installing, Checking, And Replacing Batteries
The OTT ecoLog 800 (3G) starts measuring after inserting the batteries (there is no ON/OFF switch). If the OTT ecoLog 800 (3G) is to be shut off ¨ remove the batteries. This will prevent the batteries from draining prematurely and will stop any recording of unusable measurements. - Page 11 Chapters 9.2 or 9.3. Select the "OTT ecoLog 800 (3G)" menu, "View Instantaneous values" function ¨ The OTT ecoLog 800 (3G) starts an instantaneous value measurement ¨ The "Observer" window indicates the current battery voltage and the energy drawn from the batteries so far in Ah.
-
Page 12: Power Supply Using Lithium Batteries
Remove the screw fitting from the communication unit. Slide the cap and pipe casing of the communication unit approx. 50 cm towards the pressure probe cable. Fig. 2: Setup of the OTT ecoLog 800 (3G) communication unit. Infrared interface Radio antenna... - Page 13 Connect the lithium battery plug to the socket of the electronic unit, as shown in figure 3. Fig. 3: Inserting the lithium battery. Lithium battery, D type Lithium battery, DD type Plug Socket Velcro strip Battery compartment Electronic unit Open the Velcro strip of the battery compartment. Insert the lithium battery into the battery compartment (D type lithium battery: insert the battery into the right-hand side (top) of the battery compartment;...
- Page 14 Close the top cap/observation well cover. Notes The OTT ecoLog 800 (3G) stores the measured values in a non-volatile memory. There is no loss of data when changing batteries. This also applies to storage without batteries for a long period.
-
Page 15: Power Supply Using Alkaline Batteries (Ott Ecolog 800)
5.2 Power supply using alkaline batteries (OTT ecoLog 800) Notes Alkaline batteries can only be used in the OTT ecoLog 800. They cannot be used in the OTT ecoLog 800 3G! At 0 °C, alkaline batteries have approx. 50 % of their original 20 °C capacity and at –10 °C, they have approx. - Page 16 Insert the lithium battery as described in Chapter 5.1. Notes The OTT ecoLog 800 (3G) stores the measured values in a non-volatile memory. There is no loss of data when changing batteries. This also applies to storage without batteries for a long period.
-
Page 17: Inserting A Sim Card
Make sure not to touch the gold-colored contacts of the SIM card! – OTT ecoLog 800: Insert the SIM card into the SIM card slot as shown in Fig. 5: press bevelled edge against the latch so that the latch slightly moves to the left allowing the SIM card to engage. -
Page 18: If Required: Connecting An External Radio Antenna
If the local signal strength of the cellular network prevents transmitting from the closed observation well, an external radio antenna (accessory) is to be connected to the OTT ecoLog 800 (3G). In this case, only the dedicated external radio antenna specified by OTT must be used for this particular application (cable length max. -
Page 19: Installing The Ott Ecolog 800 (3G) Unit
8 Installing the OTT ecoLog 800 (3G) unit The OTT ecoLog 800 (3G) is installed by hanging it into the observation well. The necessary accessories and type of installation vary depending on the diameter of the observation well and the design of the top cap: 2"... -
Page 20: Installing The Unit Into 2" Observation Wells, Top Cap With Cut-Out
Fig. 8: Accessories for installation – Part 2 Universal suspension bracket 1 = drilled hole for OTT ecoLog 800 (3G) 8.1 Installing the unit into 2" observation wells, top cap with cut-out Required accessories: 2" OTT top cap with cut-out... -
Page 21: Installing The Unit Into 3", 4" Or 6" Observation Wells, Top Cap With Cut-Out For Adapter Plate
8.2 Installing the unit into 3", 4" or 6" observation wells, top cap with cut-out for adapter plate Required accessories: OTT top cap with appropriately sized cut-out and compatible adapter plate (incl. O-Ring). How to install the OTT ecoLog 800 (3G) Preliminary work: If not already done, install batteries and SIM card, refer to Chapter 5. - Page 22 OTT ecoLog 800 (3G) Communication unit Top cap Pressure probe cable Pressure probe Fig. 12: Installing the OTT ecoLog 800 (3G) into a 3" , 4" or 6" observation well. OTT top cap Example: 4" observation well. 4" adapter plate...
-
Page 23: Installing The Unit Into Observation Wells Of 3" In Diameter And Above, Top Cap Without Cut-Out For Adapter Plate
8.3 Installing the unit into observation wells of 3" in diameter and above, top cap without cut-out for adapter plate For this installation case, an individual solution to fasten the OTT ecoLog 800 (3G) must be found depending on the station. Example: fix the universal suspension bracket using an M6 hex head bolt/hex nut laterally to the upper end of the observation well. - Page 24 Universal suspension bracket 2x hex Observation well head bolt Fig. 14: Installing the OTT ecoLog 800 (3G) into observation wells of 3" diameter and above with a top cap without cut-out. Example: 4" observation well. Communication unit upper part Universal suspension...
-
Page 25: Installing The Unit Into Observation Wells Of 3" In Diameter And Above, Without Top Cap, Universal Installation
8.4 Installing the unit into observation wells of 3" in diameter and above, without top cap, universal installation For this installation case, an individual solution to fasten the OTT ecoLog 800 (3G) must be found depending on the station. Example: fix the universal suspension bracket using an M6 hex head bolt/hex nut laterally to the upper end of the observation well. -
Page 26: Setting Ott Ecolog 800 (3G) Operating Parameters
(on site) In the following chapters, establishing a communication link between the OTT ecoLog 800 (3G) and a PC is described, which is a pre-requisite for the sub- sequent steps. The following description illustrates the various methods of estab- lishing this communication link. -
Page 27: Establishing The Communication Link From Remote (Ott Ecolog 800)
– Establishing up a communication link to the OTT IrDA-Link USB reading head: Connect the OTT IrDA-Link USB reading head to a USB port on the PC. (USB interface drivers must be installed, refer to separate installation instructions.) Place the OTT IrDA-Link USB reading head onto the OTT ecoLog 800 (3G) infrared interface, refer to Fig. -
Page 28: Setting Ott Ecolog 800 (3G) Operating Parameters
Please note: The operating program automatically corrects any Daylight Saving Time setting on the PC. Click the "Save to device" button ¨ "Warning: Reset OTT ecoLog 800 (3G) and delete data memory additionally?" Confirm by clicking "Yes" (recommend- ed for initial installation and reinstallations). - Page 29 For further information, refer to online help. Fig. 17: Setting the OTT ecoLog 800 (3G) operating parameters using the OTT Water Logger Operating Program. The "Advanced operation …" button is only visible, if the "Advanced operation …" check box is enabled in the "Options" window.
- Page 30 Enter reference pressure Sample interval 5 s … 24 h: time delay at which the OTT ecoLog 800 (3G) records measured val- ues and stores them (store only, if sample interval = mean interval). The sample interval is set to a fixed time pattern (e.g. sample interval of 10 minutes, time pat- tern …, 00:10, 00:20, 00:30, …...
- Page 31 Disabled SMS data transmission active Disabled GPRS(/3G) data transfer active Disabled Store GSM signal strength Disabled In addition, the OTT ecoLog 800 (3G) records the supply voltage at a sample and storage interval of 1 hour (refer to online help).
-
Page 32: Saving/Loading An Ott Ecolog 800 (3G) Configuration
¨ The operating program loads the configuration. 9.6 Importing/exporting an OTT ecoLog 800 (3G) configuration To transfer an OTT ecoLog 800 (3G) configuration e.g. via USB flash drive or e- mail, the Import/Export functions are available. Similarly, a configuration can be sent via the Export function as an XML file to the OTT Hydras 3 user software. - Page 33 How to export a configuration (OTT Hydras 3) This export type is required to transfer an OTT ecoLog 800 (3G) configuration to the OTT Hydras 3 user software. This " * .XML" file is read in via the Hydras 3 function "File", "Import Station Configuration (XML)".
-
Page 34: Determining And Displaying Instantaneous Values (Observer Function)
10 Determining and displaying instantaneous values (Observer function) For determining and displaying instantaneous values, the operating program includes a so-called "Observer". The Observer also allows a manually determined measured value, e. g. contact gauge value, to be entered into the datalogger (Observer registration). - Page 35 "View Instantaneous values" or "Setup device" and in the sub - sequent window, select the "View Instantaneous values" function in the "OTT ecoLog 800 (3G)" menu ¨ The OTT ecoLog 800 (3G) starts an instan - taneous value measurement and the "Observer" window opens: Fig.
-
Page 36: Reading Data
Click the "Connect" button ¨ The operating program copies the measured val- ues from the OTT ecoLog 800 (3G) to the PC. The data is then available in the raw data directory of the operating program. -
Page 37: Exporting Data
CSV – Structured text file in CSV format (Comma-Separated Values); Excel – Microsoft Excel spreadsheet program; OTT Hydras 3 – Raw data format for the OTT Hydras 3 user software; OTT MIS – OTT-specific file format for automatically importing into the mea- surement database of the OTT Hydras 3 user software. -
Page 38: Displaying Data
6 will be displayed). Click on the "Table" button ¨ the operating program displays the window with the numerical view of the data in the OTT data protocol; – Only display measured values: select "Values". – Highlight special areas (only with information data): Select "Observer &... -
Page 39: Protecting The Ott Ecolog 800 (3G) Unit And The Ott Water Logger Operating Program Using A Password
800 (3G) on this PC. If this occurs contact OTT HydroService. The password assigned here only applies to the operating program installed on this PC. The OTT ecoLog 800 (3G) unit is not protected by this password! How to unlock a password-protected operating program Start the operating program. - Page 40 Click the "Connect" button. From the tree view, select "Communication Interface". Enter a password of maximum eight characters into the "OTT ecoLog 800 (3G) password" input box. Allowed characters 0 … 9, A … Z. (This password is independent of the operating program password.) Click the "Save to device"...
-
Page 41: Setting Date And Time
The internal clock of the OTT ecoLog 800 (3G) is a high-accuracy realtime-clock. It runs as soon as batteries are installed in the OTT ecoLog 800 (3G). After the batteries are removed, the clock will continue to run for approximately 10 min- utes. -
Page 42: Erasing The Data Memory
"Yes"¨ The operating program erases the complete data memory of the OTT ecoLog 800 (3G) (all measurement channels including the info chan- nel). The OTT ecoLog 800 (3G) then determines and stores the water level, the water temperature and the specific conductivity again using the sample interval settings set. -
Page 43: Maintenance Work
How to clean the pressure probe Open the top cap/observation well cover. Completely remove the OTT ecoLog 800 (3G) from the observation well. Remove the black protective cap. Clean the pressure sensor carefully using a brush and water. Clean graphite electrodes and temperature sensors for the conductivity sensor with soapy water and cotton buds. -
Page 44: Replacing The Desiccant Capsules
18.2 Replacing the desiccant capsules Recommended interval: Depending on the level of air humidity at the station, every 12 to 24 months and when replacing the batteries. There is a humidity indicator on the desiccant capsule. When this indicator changes its color from blue to pink the desiccant capsule has to be replaced, irrespective of the time elapsed. -
Page 45: Checking/Replacing The Batteries
B) Desiccant capsule for communication unit Remove the exhausted desiccant capsule of the communication unit, as shown in Figure 29. Install new desiccant capsule. Fig. 29: Replacing the communication unit desiccant capsule. Communication unit desiccant capsule Slide the pipe casing of the communication unit back up to the stop. Please note: Do not bend or pinch the battery lead. - Page 46 Avoid water entering the calibration solution! Always dry the calibration con- tainer carefully after calibration. Calibration solution can be disposed of in the normal public sewer system! The OTT ecoLog 800 (3G) saves the last three cell constants in a history (see "Advanced operation ...", channel "Conductivity").
-
Page 47: Error Messages
19 Error messages When faulty measurements or a malfunction occur, the OTT ecoLog 800 (3G) stores one of the following error messages in the data memory instead of a mea- sured value. Err 00 Internal error (automated measurement) Err 01... - Page 48 ¨ Check whether an external radio antenna should be used, refer to Chapter 7. No measured values present (by transmitting data) ¨ Wait for the next data interval. * The default factory configuration is located on the "OTT Water Logger Software" CD-ROM.
-
Page 49: Repair
EU guideline 2002/96/EC of your country. For all other countries After putting the unit out of service, properly dispose of the OTT ecoLog 800 (3G). Observe the regulations applicable in your country for the disposal of electronic devices. -
Page 50: Technical Data
Accuracy ±8 seconds/month (at +25 °C) Buffer period for battery replacement 7 minutes max. For value ranges ±32.750 m; ±3275.0 cm; ±327.50 ft; ±3275.0 inch; ±3.2750 bar; ±32.750 psi for OTT ecoLog 800 (not suitable for OTT ecoLog 800 3G) - Page 51 Interface Infrared (IrDA) Cellular network modems/frequencies OTT ecoLog 800 GSM/GPRS 900/1800, 850/1900 MHz; OTT ecoLog 800 3G GSM/GPRS; UMTS/HSPA+ 900/1800, 850/1900 MHz; 800/850, 900, AWS 1700, 1900, 2100 MHz SIM card 1.8 / 3 V OTT ecoLog 800 Mini-SIM (UICC; 2FF) OTT ecoLog 800 3G Micro-SIM (Mini-UICC;...
- Page 52 Temperature range Temperature class 2 Relative air humidity Class 1 EU directives compliance the OTT ecoLog 800 (3G) complies with the EU directives applicable at the time of production; for details, see Declaration of Conformity (www.ott.com/resources) FCC ID OTT ecoLog 800...
-
Page 53: Appendix A - Note On Declaration Of Conformity
Appendix A – Note on Declaration of Conformity If necessary, you can download the current version of the Declaration of Con formity for the OTT ecoLog 800 (3G) from our website as a PDF file: „www.ott.com/resources“! - Page 56 OTT Hydromet GmbH Ludwigstraße 16 87437 Kempten · Germany Phone +49 831 5617-0 +49 831 5617-209 Document number 55.447.001.B.E 04-1016 info@ott.com · www.ott.com...
Need help?
Do you have a question about the ecoLog 800 and is the answer not in the manual?
Questions and answers