
Related Manuals for Molecular Devices FlexStation 3

Summary of Contents for Molecular Devices FlexStation 3
- Page 1 FlexStation® 3 Benchtop Multi-Mode Microplate Reader User Guide 0112-0127 B June 2013 www.moleculardevices.com...
- Page 2 For research use only. Not for use in diagnostic procedures. The trademarks mentioned herein are the property of Molecular Devices, LLC or their respective owners. These trademarks may not be used in any type of promotion or advertising without the prior written permission of Molecular Devices, LLC.
-
Page 3: Table Of Contents
Contents Chapter 1: Description ........7 Introduction..........7 How To Use This User Guide . - Page 4 FlexStation 3 Benchtop Multi-Mode Microplate Reader User Guide Chapter 2: Installation ....... . . 49 General Precautionary Information .
- Page 5 Contents Compound Transfer ........88 Triturate Selection .
- Page 6 FlexStation 3 Benchtop Multi-Mode Microplate Reader User Guide Opening a Drawer Manually ....... 132 Understanding Potential Mechanical Problems .
-
Page 7: Chapter 1: Description
SoftMax Pro Software, see page 41 Introduction The FlexStation® 3 Benchtop Multi-Mode Microplate Reader combines the performance of the Molecular Devices SpectraMax® M5e Multi- Mode Microplate Reader with an integrated 8-channel or 16-channel pipettor into one compact benchtop reader. This integrated system... - Page 8 FlexStation 3 Benchtop Multi-Mode Microplate Reader User Guide Based on the SpectraMax M5e instrument platform, the FlexStation 3 instrument can address detection modalities including absorbance, fluorescence intensity, fluorescence polarization, time-resolved fluorescence, and luminescence. Dual monochromators allow users to target the optimal assay excitation and emission wavelengths, while eliminating the need to change expensive band pass filters between experiments.
-
Page 9: How To Use This User Guide
When operated properly in a safe environment and according to the instructions in this user guide, there are no known hazards associated with the FlexStation 3 instrument. However, proper use requires an understanding of situations that are potentially dangerous and can result in serious injury. -
Page 10: Conventions Used For Precautionary Information
FlexStation 3 Benchtop Multi-Mode Microplate Reader User Guide Conventions Used for Precautionary Information This user guide uses the following conventions to provide technical and safety information of special interest. Note: A note gives background information that is provided to clarify a particular step or procedure. -
Page 11: Service-Trained Users
Molecular Devices personnel. Avoiding Mechanical Problems During Fluid Transfer Because of the complex mechanical nature of the FlexStation 3 instrument, including both fluidics and optical reading, smooth and reliable operation of the system depends on both good design and operator knowledge. - Page 12 FlexStation 3 Benchtop Multi-Mode Microplate Reader User Guide Spilled liquids. Avoid spilling liquids on the system. Fluid spilled into internal components creates a potential shock hazard. Wipe up all spills immediately. Do not operate the system if internal components have been exposed to spilled fluid.
-
Page 13: System Overview
Description System Overview The FlexStation 3 Benchtop Multi-Mode Microplate Reader is a monochromator-based microplate reader that has 6-well, 12-well, 24- well, 48-well, 96-well, and 384-well microplate reading capability for absorbance, fluorescence intensity, fluorescence polarization, time- resolved fluorescence, and luminescence. When using the integrated pipettor, the instrument offers 96-well and 384-well microplate-to- microplate fluid transfer, 8 or 16 wells at a time. - Page 14 Variations in measured fluorescence values are virtually eliminated by internal compensation for detector sensitivity, photomultiplier tube voltage, and excitation source intensity. Using the FlexStation 3 instrument with the PathCheck® Pathlength Measurement Technology allows normalization of variable well volumes to absorbance readings. In addition PathCheck technology allows for pipettor validation, including the online 8-channel and 16-channel pipettors, and to compare experiments from different days.
-
Page 15: System Components
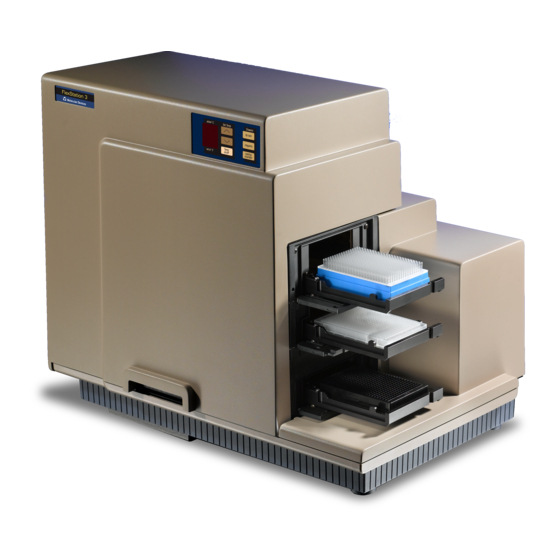
The extreme flexibility and high sensitivity of the FlexStation 3 reader makes it appropriate for applications within the fields of biochemistry, cell biology, immunology, toxicology, molecular biology, and microbiology. - Page 16 FlexStation 3 Benchtop Multi-Mode Microplate Reader User Guide Figure 1-3: Instrument, Front View Figure 1-4: Instrument, Rear View 0112-0127 B...
-
Page 17: Covers And Instrument Panels
Description Covers and Instrument Panels Top Cover The instrument is protected by a molded plastic housing. The large top cover protects the fluidics module and the exposed portions of the detection module. Note: The top cover can be lifted back, as shown in the figure below, for certain limited troubleshooting procedures. - Page 18 FlexStation 3 Benchtop Multi-Mode Microplate Reader User Guide Control Panel The control panel consists of an LCD and six pressure-sensitive membrane keys which can be used to initiate and regulate the temperature and to open and close the drawers. A 2×3-character liquid crystal display (LCD) shows the current instrument temperature at all times, and the set point temperature when the incubator is on.
- Page 19 Description Input/Output Panels There are two input/output panels on the rear of the instrument. • The upper input/output panel, on the back cover, consists of a power switch, fuse box cover, and power cord receptacle. • The lower panel consists of an RS-232 serial port and parallel port (not currently active).
- Page 20 FlexStation 3 Benchtop Multi-Mode Microplate Reader User Guide Lamp Cover The plastic lamp cover provides access to the flash lamp on the right side of the instrument (as viewed from the rear). CAUTION! Flash lamp access and maintenance are restricted to service- trained users.
-
Page 21: Drawers
Description Drawers The instrument has three drawers that open on the right side. The two drawers in the fluidics module open and close to move the pipette tip rack and compound plates (or reservoirs) into and out of the instrument. The reading chamber drawer in the detection module transports the assay microplate into the reading chamber. - Page 22 FlexStation 3 Benchtop Multi-Mode Microplate Reader User Guide CAUTION! Do not obstruct the movement of any of the drawers. If you must retrieve a plate after an error condition or power outage, and if the drawer will not open, it is possible to open the drawer manually. See Opening a Drawer Manually on page 132.
- Page 23 Description Tip Rack Drawer The top drawer holds the pipette tip rack. Only tips specified by Molecular Devices for use with the FlexStation 3 instrument can be safely used. See Parts and Accessories on page 153. CAUTION! Do not use parts and accessories that are not authorized by, specified by or provided by Molecular Devices.
-
Page 24: Fluidics Module
FlexStation 3 Benchtop Multi-Mode Microplate Reader User Guide Fluidics Module The fluidics module houses the pipettor head, several motors, and all the fluidics components. There are two horizontally-moving carriers, one for the pipette tip rack and the other for the compound plate. The pipettor head moves vertically between the drawers. - Page 25 Description Pipettor Head The instrument is configured with an 8-channel pipettor head for use with 96-well microplates or a 16-channel pipettor head for use with 384- well microplates. Figure 1-14: Pipettor Head Installing the Pipettor Head on page The barrels on the pipettor head require periodic cleaning to remove silicone lubricant, dust, and other miscellaneous contamination.
-
Page 26: Detection Module
FlexStation 3 Benchtop Multi-Mode Microplate Reader User Guide Detection Module The detection module is the lower portion of the instrument. This module houses the reading chamber, the optics bench, several cables and optic fibers, the power supply, the flash lamp, and other hardware. - Page 27 Description Optical System The optical system includes a xenon flash lamp, monochromators, excitation bandpass filters, emission cut-off filters, PMTs, and photodiodes. There are a number of cables and fibers that exit the optics bench and enter the reading chamber. They are the excitation fibers (thin and black or red, has a collar and pins), emission fibers (black and fatter, with attached electrical cord), electrical connector to the read head (green with brass fitting).
-
Page 28: Computer
FlexStation 3 Benchtop Multi-Mode Microplate Reader User Guide Computer The FlexStation 3 instrument works as a system with the SoftMax Pro Software. The SoftMax Pro Software must be installed on a dedicated computer to communicate with and control instrument functions. - Page 29 Remove the adapter when using high-profile, 6-well, 12-well, 24-well, or 48-well microplates. Compound Baseplate Molecular Devices provides a metal baseplate that must be placed in the compound plate drawer under the compounds plate to reduce stray light.
-
Page 30: Consumables
Parts and Accessories on page 153. CAUTION! Do not use parts and accessories that are not authorized by, specified by, or provided by Molecular Devices. Using unauthorized parts can damage the instrument. Microplates The FlexStation 3 instrument can accommodate standard 6-well to 384-well microplates and strip wells. - Page 31 Description Figure 1-17: Top View of a 96-Well Microplate For fluorescence, Molecular Devices generally recommends black-walled, clear-bottom microplates for bottom reading, and all-black microplates for top reading, because they have lower backgrounds than clear plates. For luminescence, white microplates can optimize light collection.
-
Page 32: Overview Of Operation
Overview of Operation Using the FlexStation 3 instrument is a process in five stages: • Choosing an Experiment •... -
Page 33: Preparing The Software
Description Preparing the Software • Entering software preferences • Selecting instrument settings • Defining templates, reduction parameters, and display parameters • Confirming hardware and software setup Running the Experiment • Initiating the operation (detection or fluidics plus detection) • Saving the data file Analyzing the Data •... - Page 34 FlexStation 3 Benchtop Multi-Mode Microplate Reader User Guide Mixing Mixing can be accomplished in one of two ways, using either the Trituration or Automix functions. Use of these functions are dependant on the assay performed and the read mode used.
- Page 35 Description Temperature Regulation The instrument regulates the temperature of the microplate reading chamber from 2°C above ambient to 45°C. On power up, when the incubator is off, the temperature in the reading chamber is ambient and isothermal. Turning on the incubator by pressing the Temp on/off key causes the instrument to begin warming the reading chamber and the fluidics module.
- Page 36 FlexStation 3 Benchtop Multi-Mode Microplate Reader User Guide Time-Tagged Data The FlexStation 3 instrument is a single-channel reading system. Although the scan time is very fast (8 wells in about 1.0 seconds; 1 well in about 50 ms), the difference in the exact time each well is read is dependent on the number of rows selected in a column.
- Page 37 Description Optical System The instrument uses excitation and emission filter wheels to decrease interference by stray light, thus augmenting the wavelength selection that is provided by the monochromators. Two independent, single- channel reading heads can service top and bottom reading requirements. Both the top reading head and bottom reading head support coaxial excitation and emission beams.
-
Page 38: Assay Read Types
FlexStation 3 Benchtop Multi-Mode Microplate Reader User Guide Assay Read Types The instrument operates in three integrated fluidics/read (Flex, Endpoint, and Kinetic) read and two read types. The Table 1-1 on page 39 compares the types of operation and features that are available for the different read types. - Page 39 Description Table 1-1: Operation Modes and Features Operation Endpoint Kinetic Spectrum Well Scan Flex Modes Operation Fluidics + Fluidics + Detection Detection Fluidics + Type Detection Detection Detection Read Modes Absorbance, Absorbance, Absorbance, Absorbance, Absorbance, Fluorescence, Fluorescence, Fluorescence, Fluorescence, Fluorescence, Fluorescence Fluorescence Fluorescence...
- Page 40 FlexStation 3 Benchtop Multi-Mode Microplate Reader User Guide Table 1-1: Operation Modes and Features (cont’d) Operation Endpoint Kinetic Spectrum Well Scan Flex Modes Assay plate type Compound plate type Endpoint Reads In Endpoint reads, as well as in Kinetic and Flex reads, you can select from one to four excitation/emission pairs to obtain readings for each well of a microplate.
-
Page 41: Softmax Pro Software
• Analyze data SoftMax Pro software is easy to use, yet is powerful and flexible, and is necessary to access the full capabilities of the FlexStation 3 instrument. SoftMax Pro Software allows you to: • Set Up the Reader and Software Parameters, see page 42 •... -
Page 42: Set Up The Reader And Software Parameters
FlexStation 3 Benchtop Multi-Mode Microplate Reader User Guide Set Up the Reader and Software Parameters • Read microplates in using Flex, Endpoint, Kinetic, Spectrum, or Well Scan read types. Use up to four wavelengths for Flex, Endpoint, Kinetic, and Well Scan reads. -
Page 43: Acquire Data From The Reader
Description • Integrate fluid transfer with Endpoint, Kinetic, and Flex reads. Transfer fluid during the experiment for fast kinetic fluorescence, luminescence, and absorbance assays. Transfer fluid before the beginning of an experiment for endpoint and kinetic applications. Define the reagent source and tip columns to be used for each fluid transfer. -
Page 44: Perform Complex Data Analysis
FlexStation 3 Benchtop Multi-Mode Microplate Reader User Guide Perform Complex Data Analysis • Calculate maximum kinetic rates on non-linear data. • Assign plate, group, or sample blanks. • Customize data analysis for each group in the template. • Create graphs with multiple plots. -
Page 45: User Interface
Description User Interface This section briefly presents the basic features of the SoftMax Pro Software user interface. More instructions regarding how to use the interface appear throughout these instructions during relevant steps. You can control the instrument by using either buttons and icons in the windows and along the tool bars, or by using the menus. - Page 46 FlexStation 3 Benchtop Multi-Mode Microplate Reader User Guide The Status bar allows you to monitor instrument status and access several functions with the click of a button. You can verify communication with SoftMax Pro, and monitor the reading chamber temperature. The Status bar also provides buttons used to begin a reading, open the Incubator dialog box, shake the microplate (Automix), and open or close the instrument drawers.
- Page 47 Description One SoftMax Pro Software file contains at least one experiment, and can contain a section for Notes and one or more Plates. You can enter Notes and edit Plates using the tool bars shown below. Figure 1-21: SoftMax Pro Software Plate Section Toolbar The following icons appear on the Plate Section tool bar.
-
Page 48: Flexstation 3 Benchtop Multi-Mode Microplate Reader User Guide
FlexStation 3 Benchtop Multi-Mode Microplate Reader User Guide 0112-0127 B... -
Page 49: Chapter 2: Installation
Installation This chapter provides information about how to install the FlexStation 3 instrument in your laboratory. Installation must be done by qualified Molecular Devices personnel or a service-trained user. CAUTION! The following procedures must be completed by a service- trained user. Do not attempt the installation procedures if you have not been trained properly by appropriate Molecular Devices personnel. -
Page 50: Unpacking The System
WARNING! The instrument weighs approximately 50 pounds and should be lifted with care. To prevent injury, use at least two people to lift the instrument. Each FlexStation 3 instrument comes with the following components. • Fluidics module and accessories •... -
Page 51: Unpacking The Fluidics Module And Accessories
Installation Unpacking the Fluidics Module and Accessories 1. Remove the fluidics module from the cardboard box inside the wooden crate and take it out of the protective bag. Set it in a safe place. 2. Remove the box (containing the pipettor head) and the bags of accessories. -
Page 52: Removing The Shipping Screws
FlexStation 3 Benchtop Multi-Mode Microplate Reader User Guide Removing the Shipping Screws 1. Locate the two stainless steel shipping screws under the front flange of the detection module that hold down the cover of the instrument. Figure 2-1: Location of Shipping Screws 2. -
Page 53: Installing The Fluidics Module
Installation Installing the Fluidics Module After removing the shipping screws and opening the top cover, you can see the location for the fluidics module hardware. There is a hinged flange (metal plate) to the left side of the exposed reading chamber. There are also two quarter-turn fasteners (Zeus screws) attached to the flange, and two locating pins near the middle of the reading chamber. - Page 54 4. Attach the restraining cable from fluidics module to the right- most mounting tab on the top cover of FlexStation 3 instrument. The restraining cable comes attached to the fluidics module. Figure 2-3: Restraining cable attached to the fluidics module Attach the other end of the restraining cable the right-most mounting tab on the top cover.
- Page 55 Installation A finished installation should look like Figure 2-5. Figure 2-5: Restraining cable installation finished The restraining cable for the fluidics module prevents the module from pivoting too far, and prevents the accidental detachment of the serial communication cable. The restraining cable also holds the module in the open position so that the instrument can be serviced without first detaching the communication or power cable.
-
Page 56: Installing The Pipettor Head
This prevents the accidental disconnection of the cable from the fluidics module due to vibration of the FlexStation 3 instrument. 8. Ensure that all cables and wires are tucked out of the way. - Page 57 Installation 2. Turn the quarter-turn fastener on the inside top cover and then unfold the cover off the fluidics module. Figure 2-7: Opening the Inside Top Cover 0112-0127 B...
- Page 58 FlexStation 3 Benchtop Multi-Mode Microplate Reader User Guide 3. Hold the pipettor head in one hand and the round, black, 14-pin connector in the other. 4. Move the pipettor head into its approximate position under the z-stage plate and red mounting knob.
- Page 59 Installation 7. Press the first four loops of white spiral cord onto the coil hook in the upper left corner of the top panel opening. This secures the cable up out of the way of the pipettor head when it moves about in the fluidics module during operation.
- Page 60 FlexStation 3 Benchtop Multi-Mode Microplate Reader User Guide 12. Remove the cap at the completion of the pipettor installation. CAUTION! Do not discard the nose cone cap. Always store the pipettor with the nose cone cap on. The pipettor head is now installed (see Figure 2-10).
-
Page 61: Setting Up The Computer
CAUTION! Make sure that all assembly is completed before connecting the power cord to a power outlet. Figure 2-11: Computer Cord and Power Cord Locations 1. Locate the instrument power cord (P/N 4400-0002) and the computer serial cable (P/N 9000-0149) in the FlexStation 3 instrument accessories kit. 0112-0127 B... -
Page 62: Installing The Drawer Adapters
FlexStation 3 Benchtop Multi-Mode Microplate Reader User Guide 2. Insert the 8-pin DIN round end of the serial cable into the RS-232 serial port receptacle on the back panel of the instrument. 3. Attach the other end to the COM serial port to the back of the computer. -
Page 63: Compound Baseplate Installation
Installation Compound Baseplate Installation The metal compound baseplate installs in the bottom of the compound plate drawer. 1. Turn on the power to the instrument. 2. Press the Reagents button on the front panel. The compound plate drawer opens. 3. Lower the baseplate into the compound drawer with its cutout corner facing the front left corner of the drawer. - Page 64 FlexStation 3 Benchtop Multi-Mode Microplate Reader User Guide 0112-0127 B...
-
Page 65: Chapter 3: Operating Procedures
Operating Procedures This chapter explains how to start up the system and how to use the control panel and the SoftMax Pro Software to configure instrument settings, define experiment protocols, and run an analysis, as described in the following sections. •... -
Page 66: Overview
FlexStation 3 Benchtop Multi-Mode Microplate Reader User Guide Overview The following list provides an overview of the basic operating procedures required for using the system. 1. Turn on the power to the instrument and then the computer, if they are not already on, and then start the SoftMax Pro Software. -
Page 67: Starting Up The System
Operating Procedures Starting Up the System Normally, you do not need to switch off power at the end of the day. If the system will not be used for more than a day, it is best to turn off the instrument. - Page 68 FlexStation 3 Benchtop Multi-Mode Microplate Reader User Guide After about five minutes, the instrument is warmed up and ready. Figure 3-2: Control Panel Ready Note: No set point temperature appears at this time, since the incubator has not been turned on.
- Page 69 Operating Procedures Figure 3-3: SoftMax Pro Software New Untitled Window • For users new to SoftMax Pro Software: If you are new to SoftMax Pro Software, familiarize yourself with the software by reading about the default protocol, and running the tutorial described in this window. Also, refer to the SoftMax Pro Software User Guide.
-
Page 70: Using The Control Panel
FlexStation 3 Benchtop Multi-Mode Microplate Reader User Guide Using the Control Panel You can interact with the instrument by using the buttons on the instrument control panel. All control panel button functions can also be controlled in the software. Figure 3-4: Detail of Control Panel with LCD The following tables describe the indicators and buttons in the control panel. - Page 71 Operating Procedures Table 3-2: Buttons in the Control Panel Button Description the Temp on/off button enables or disables the incubator. When the incubator is on, both the set temperature and measured internal temperature are shown on the front panel LCD display. The arrow buttons allow you to enter a set point for the temperature in the instrument reading chamber.
-
Page 72: Setting The Temperature
FlexStation 3 Benchtop Multi-Mode Microplate Reader User Guide Setting the Temperature If you want an elevated temperature within the instrument for your experiment, turn on the incubator at least 30 minutes before you plan to start plate reading. Up to 30 minutes can be required for the temperature within the chamber to reach the set point. -
Page 73: Setting The Temperature With The Control Panel
Operating Procedures Setting the Temperature with the Control Panel To enable the incubator, press the Temp on/off button on the control panel. The display indicates that temperature control is on by displaying numbers in the lower half of the LCD. The instrument sets the reading chamber to the default temperature, 37°C. -
Page 74: Setting The Temperature With Softmax Pro Software
FlexStation 3 Benchtop Multi-Mode Microplate Reader User Guide Setting the Temperature with SoftMax Pro Software You can turn on the incubator with software by selecting Incubator from the Control menu. You can also click the Incubator button on the instrument Status bar. -
Page 75: Setting Up The Software
Operating Procedures Setting Up the Software Use the following procedure to check the instrument status and settings. 1. Observe the Instrument Status icon in the left corner of the SoftMax Pro Software Status bar. The icon is purple when the SoftMax Pro Software correctly recognizes the instrument. - Page 76 FlexStation 3 Benchtop Multi-Mode Microplate Reader User Guide 5. Make sure that the serial comm speed is 9600 Baud. Note: After you read an assay plate in Flex mode, the serial communication speed changes to 57600 Baud. If you have correctly configured the settings in the Preferences...
- Page 77 Operating Procedures 7. Make sure that the Flex button on the right is selected. Note: You can select a different read type from the Instrument Settings screen by clicking on one of the other four buttons at the top of the window. The rest of these instructions assume you are remaining in Flex mode.
-
Page 78: Softmax Pro Software Parameters
Some of the parameters are discussed here in the FlexStation 3 instrument User Guide, and they are discussed in more detail in the SoftMax Pro Software User Guide. All possible combinations... -
Page 79: Read Types
Operating Procedures Read Types Choose from five read types. The reading can occur in a each well of a microplate unless otherwise noted. • Flex: Data is collected over a specified period of time at regular intervals and uses integrated fluid transfer to delivery reagents while the wells are being read. -
Page 80: Wavelengths
FlexStation 3 Benchtop Multi-Mode Microplate Reader User Guide Wavelengths Up to four wavelengths can be read per well. Although the arrows open a window showing the six most commonly-used wavelengths, the tunable monochromator allows any excitation or emission wavelength to be entered between a certain range for the particular read mode. -
Page 81: Timing
Operating Procedures The photomultiplier tube (PMT) is a photon detector that detects light, through the use of photoemission and successive instances of secondary emission, to produce enough electrons to generate a strong signal. Timing The Timing setting depends on several settings which appear after it in the list. -
Page 82: Assay Plate Type
FlexStation 3 Benchtop Multi-Mode Microplate Reader User Guide Assay Plate Type Assay Plate Type determines the alignment of the read head with respect to the microplate. For 384-well microplates, it is important that the correct assay plate be chosen to match the microplate that the reader will read. -
Page 83: Wells To Read
Operating Procedures Wells to Read You can choose which plate wells to read in your experiment. You can choose a combination of wells, from one well only to all the wells in a plate. Partial-plate reading can significantly reduce the time required for certain types of readings because the instrument does not have to read the entire plate. -
Page 84: Automix
FlexStation 3 Benchtop Multi-Mode Microplate Reader User Guide If you select a partial-plate for reading, only those wells selected will be visible in the data display. In the figure below, the Plate section reflects that wells A1 through H2 have been selected for reading. -
Page 85: Autocalibrate
Operating Procedures AutoCalibrate This AutoCalibrate check box allows you to disable or enable automatic calibration. The default is enabled. Turn automatic calibration off to allow the instrument to begin or complete readings more quickly. The instrument maintains the most recent automatic calibration settings in memory (NVRAM) until another automatic calibration is performed. -
Page 86: Softmax Pro Software Parameters For Fluid Transfer
SoftMax Pro Software Parameters for Fluid Transfer In addition to defining the parameters to be used during a read, the FlexStation 3 instrument includes distinct parameters only available for use with the integrated pipettor. It is essential that settings for the fluidics operations are correct and correlate with one another. -
Page 87: Compound Source
Operating Procedures Compound Source This setting allows you to select a compound source plate. Compound plates store fluids that are aspirated (withdrawn from the compound plate) and then injected (dispensed) into the assay plate during the run. Make sure that you select a plate type that matches the type and well configuration of the actual compound plate you are using and the number of wells selected in the Assay Plate Type setting. -
Page 88: Compound Transfer
FlexStation 3 Benchtop Multi-Mode Microplate Reader User Guide Figure 3-23: Compound Source Settings Compound Transfer Compound Transfer is an important setting to configure correctly. In addition to configuring precise fluid transfers for your experiments, this setting also helps prevent flooding of the assay plate. - Page 89 Operating Procedures Assay Plate Fluid Initial Volume Type a value in the Initial Fluid field that equals the largest initial volume before compound transfers for any well in the assay plate. For example, this value can be set from 0 μL to269 μL, although typical values are about 10 μL to 200 μL for a 96-well microplate.
- Page 90 FlexStation 3 Benchtop Multi-Mode Microplate Reader User Guide Transfer Settings • Pipette Height: (1 μL to 999 μL) This setting determines the volume of fluid (in microliters, measured from the bottom of the assay plate microplate well) above which the tip of the pipette will remain during the dispensing portion of the transfer event.
- Page 91 Operating Procedures • Time Point: (Minimum Time to 9999 seconds) This setting determines the time after the start of the reading when the fluid is scheduled to begin being dispensed. Your time point will eventually be your baseline time. This is not the time interval between transfers.
-
Page 92: Triturate Selection
FlexStation 3 Benchtop Multi-Mode Microplate Reader User Guide Triturate Selection Note: The choices shown in this section are based on the number of compound transfers you specified in the Compound Transfer settings. If no transfers are enabled, no triturate settings are applicable. -
Page 93: Pipette Tips Layout
384-well, that need to be used for the respective Assay Plate Type that is chosen. CAUTION! Molecular Devices recommends using a full rack of tips each time you perform a fluid transfer to ensure proper pipetting. If you mistakenly enable a pipetting function from a tip that is not present, the instrument can malfunction, potentially causing serious damage. - Page 94 FlexStation 3 Benchtop Multi-Mode Microplate Reader User Guide Compound and Tip Columns Automatically Assigned The SoftMax Pro Software automatically enters information in the Compound & Tip Columns window taking into consideration the number of transfers and the Wells to Read section already selected. The software assumes fluid will be aspirated from the compound plate starting with the first available column.
- Page 95 Operating Procedures Figure 3-28: Compound & Tips Columns Window with Three Transfers In the previous illustration, the instrument is configured for three fluid transfers as follows: • Wells to Read selection of columns 1 through 4. • Compound Source selection of a 12-column compound plate. •...
- Page 96 FlexStation 3 Benchtop Multi-Mode Microplate Reader User Guide Manually Assigning Tips and Compounds Alternatively to automatic assignment, you can assign any tip column and any compound column to correspond to any assay plate column. To assign a tip to an assay plate well, select one or more tip cells and select one of the items available in the Tips Column menu.
-
Page 97: Pipette Tip Air Gap
Operating Procedures Pipette Tip Air Gap The pipette air gap is the volume between the end of the pipette tip and the bottom of the liquid in the tip. Figure 3-29: Pipette Tip Air Gap To set the pipette tip air gap, click Control > Set Air Gap. Figure 3-30: Setting Pipette Tip Air Gap In the Air Gap Settings dialog, the allowed values ares 0 μL to 200 μL for 96-well microplates and 0 μL to 30 μL for 384-well microplates. -
Page 98: Settings Displayed In Plate Sections
FlexStation 3 Benchtop Multi-Mode Microplate Reader User Guide Settings Displayed in Plate Sections The Plate section provides visual feedback on all instrument settings in the Instrument Settings section, the gray area to the far right of the Plate section. Information about wells to read and transfer settings are also displayed in the Data Display section. -
Page 99: Other Software Settings
Setting data display parameters • Using the Template Editor Molecular Devices strongly recommends that you define a template and set the reduction and display parameters before reading the assay plate, because these parameters determine how data is displayed and analyzed. You can set up or modify templates, reduction, and display parameters after collection, but this can be complicated or confusing. -
Page 100: Starting The Reading
FlexStation 3 Benchtop Multi-Mode Microplate Reader User Guide To load tips and microplates: 1. Open the appropriate drawer by either pressing the appropriate drawer button on the instrument control panel, or by using the SoftMax Pro Software. 2. Insert the filled tip rack or plates into the drawer, placing well A1 into the upper-left corner of the drawer as you look at it. -
Page 101: Selecting A Plate
Operating Procedures Selecting a Plate If you have created more than one Plate section, and no Plate section is active, choosing the Read command will display a dialog box requiring you to choose which section to read. Figure 3-33: Selecting a Plate Section Select the correct section and click OK. -
Page 102: Viewing Experiment Progress
FlexStation 3 Benchtop Multi-Mode Microplate Reader User Guide Viewing Experiment Progress During the read, the Status bar displays information about the current reading. Figure 3-35: The SoftMax Pro Software Status Bar During a Read Table 3-3: Status Bar Reading Information... -
Page 103: Shutting Down The System
When a read is completed, you can perform more reads, or shut down the instrument. Shutting down the FlexStation 3 instrument includes the following steps: 1. Save any data files desired in the SoftMax Pro Software. 2. Make sure all three drawers are empty of pipette tips and plates. - Page 104 PMT voltage for varying concentrations of sample in the plate. Temperature Control The reading chamber of the FlexStation 3 instrument is isothermal at ambient as well as at elevated temperatures. The temperature in the reading chamber can be adjusted from 2°C above ambient to 45°C.
-
Page 105: Using Spectral Scanning To Optimize Excitation And Emission Wavelengths For Fluorescence Assays
Operating Procedures Using Spectral Scanning to Optimize Excitation and Emission Wavelengths for Fluorescence Assays Put 200 μL of sample that includes the fluorophore and 200 μL of a buffer control into separate wells of a microplate. Perform the Excitation Scan 1. - Page 106 FlexStation 3 Benchtop Multi-Mode Microplate Reader User Guide Select the optimal excitation wavelength. If the excitation peak wavelength and emission wavelength are separated by more than 80 nm, use the excitation peak wavelength value. If the excitation and emission wavelengths are less than 80 nm apart, use the shortest excitation wavelength that gives 90% maximal emission.
- Page 107 Operating Procedures If you have questions about this procedure please contact Molecular Devices Technical Support and ask to speak to an applications scientist. RFU at 90% of maximum lamda Maximum lambda 90% of maximum lambda Wavelength Figure 3-36: Plot of RFU vs. Wavelength Perform Emission Scan #2: 1.
- Page 108 FlexStation 3 Benchtop Multi-Mode Microplate Reader User Guide Results The optimal excitation and emission wavelengths are those determined in Step 5 Perform the Excitation Scan on page 105 and in Step 2 Perform Emission Scan #2: on page 107. Comments ...
- Page 109 Operating Procedures Figure 3-37 on page 108 shows the effects of different cutoff filters on a scan of fluorescein where excitation was fixed at 485 nm and emission was scanned from 490 nm to 560 nm. Buffer blanks are not shown in this plot.
-
Page 110: Optimizing Time-Resolved Fluorescence Assays
FlexStation 3 Benchtop Multi-Mode Microplate Reader User Guide Optimizing Time-Resolved Fluorescence Assays Time-resolved fluorescence (TRF) assays can be read from the top or bottom of a microplate. Solid white plates are recommended for top time-resolved fluorescence reads, and white plates with clear bottoms are recommended for bottom reads. -
Page 111: Optimizing Fluorescence Polarization Assays
Operating Procedures Optimizing Fluorescence Polarization Assays Fluorescence polarization (FP) can be read only from the top of a microplate. The plastic from a microplate affects the light polarization, precluding bottom reads and reading a covered plate. Solid black plates are recommended for fluorescence polarization reads. If the assay components seem to bind to the microplate, as evidenced by poor mP dynamic range (small difference between bound and unbound tracer), we suggest using polypropylene plates or adding a very small... -
Page 112: Optimizing Luminescence Assays
FlexStation 3 Benchtop Multi-Mode Microplate Reader User Guide Optimizing Luminescence Assays Luminescence can be read from the top or the bottom of a microplate. Solid white plates or white plates with clear bottoms are recommended for luminescence reads. For standard luminescence, a separate light path without monochromators carries the emitted light to a dedicated PMT. -
Page 113: Chapter 4: Maintenance
Example: WARNING! The following procedures must be completed by a service-trained user. Do not attempt the following procedures if you have not been trained properly by appropriate Molecular Devices personnel. 0112-0127 B... -
Page 114: Obtaining Support
Moving the Instrument If you need to relocate the FlexStation 3 instrument, follow these steps. WARNING! The instrument weighs approximately 50 pounds and should be lifted with care. To prevent injury, use at least two people to lift the instrument. -
Page 115: Cleaning The Instrument
Periodically clean the outside surfaces of the FlexStation 3 instrument using a cloth or sponge that has been dampened with water. Do not use abrasive cleaners. -
Page 116: Cleaning Up Spills
FlexStation 3 Benchtop Multi-Mode Microplate Reader User Guide Cleaning Up Spills WARNING! Always make sure the power switch on the instrument is in the OFF position and remove the power cord from the back of the instrument before opening any covers or panels. -
Page 117: Cleaning The Barrels On The Pipettor Head
The barrels on the pipettor head require periodic cleaning to remove silicone lubricant, dust, and other miscellaneous contamination. Molecular Devices recommends that you clean the barrels at least once every three months. The frequency of cleaning depends on how dusty your particular lab is and how often the pipettor head is used. - Page 118 FlexStation 3 Benchtop Multi-Mode Microplate Reader User Guide 3. Turn the quarter-turn fastener on the inside top panel and unfold the panel off the fluidics module to the right. Figure 4-2: Opening of the Top Panel 4. Inside the open chamber, loosen the red retainer nut.
- Page 119 Maintenance 8. Clean the barrels using cotton swabs and OS-2 silicone cleaner or alcohol. Do not touch the barrels with your hands during cleaning. 9. Slide the pipettor head back under its mounting plate inside the fluidics module, making sure that the white spiral cord is secured on its retaining hook.
-
Page 120: Using The Microplate Adapters
FlexStation 3 Benchtop Multi-Mode Microplate Reader User Guide Using the Microplate Adapters Microplate Adapter Installation If you are reading standard 96-well or 384-well microplates, you need to install a microplate adapter in the reading chamber drawer. The black adapter elevates the plate in the drawer for optimum performance with standard 96-well or 384-well microplates in bottom-read and top-read mode. -
Page 121: Using The Compound Baseplate
FlexStation 3 instrument. If you no longer have spare fuses, you can obtain new fuses from Molecular Devices (part number 4601-0029) or from a local hardware store. Make sure fuses are rated slow-blow (6.3A 5 × 20 mm Slo-Blo IEC). - Page 122 FlexStation 3 Benchtop Multi-Mode Microplate Reader User Guide On the left side of the rear panel, viewed from the back, is the power switch, fuse box, and power cord receptacle. Figure 4-5: Fuse Box Location 4. Press to the right of the black plastic cover of the fuse box to release it.
-
Page 123: Replacing The Flash Lamp
SoftMax Pro Software to indicate replacement is necessary. WARNING! The following procedures must be completed by a service-trained user. Do not attempt the following procedures if you have not been trained properly by appropriate Molecular Devices personnel. CAUTION! To avoid damage to the instrument, follow these instructions and any instruction labels on the instrument exactly. - Page 124 FlexStation 3 Benchtop Multi-Mode Microplate Reader User Guide Required Tools • Hex keys: 3/32 inch, 9/64 inch, and 5/32 inch • #2 Phillips screwdriver To replace the flash lamp: 1. Turn off the instrument power switch and unplug the power cord and the computer cable from the rear of the instrument.
- Page 125 Maintenance 4. Use a 9/64 inch hex key to loosen the clamp screw, located on the lamp mounting block and facing the rear of the instrument. Leave the clamp screw in place. 5. Use a 5/32 inch hex key to loosen the two vertical-mounting cap screws that are holding the Litepac mounting block to the baseplate.
- Page 126 FlexStation 3 Benchtop Multi-Mode Microplate Reader User Guide 7. Slide the lamp assembly horizontally out the side of the instrument and lay it on its heat sink fins, leaving the orange electrical cord connected. Figure 4-10: Removing the Flash Lamp Assembly 8.
- Page 127 Maintenance 12. With the copper coil spring in place around the socket, carefully align the lamp pins in the proper orientation according to the pin pattern. Again, do not touch the lamp window. 13. Install the lamp with a gentle rocking motion and steady downward pressure.
-
Page 128: Long-Term Shutdown
FlexStation 3 Benchtop Multi-Mode Microplate Reader User Guide Long-Term Shutdown If you will not be using the FlexStation 3 instrument for an extended period of time, clean the external surfaces of the instrument before storage. See Cleaning the Instrument on page 115. -
Page 129: Chapter 5: Troubleshooting Procedures
Troubleshooting Procedures This chapter provides instructions for troubleshooting problems that can occur with the FlexStation 3 instrument. • Problems During Startup, see page 130 • Opening a Drawer Manually, see page 132 • Understanding Potential Mechanical Problems, see page 133 •... -
Page 130: Problems During Startup
1. Make sure that the FlexStation 3 instrument is plugged in and turned on. 2. Make sure that the instrument has finished its warming up sequence. - Page 131 Troubleshooting Procedures There are two settings in the Preferences dialog that must be correct for the instrument to operate. 4. Make sure the Serial Port selected is the same as the one on the computer to which the instrument is physically connected. It might be COM1 or COM2.
-
Page 132: Opening A Drawer Manually
FlexStation 3 Benchtop Multi-Mode Microplate Reader User Guide Opening a Drawer Manually Under some circumstances it might be necessary to open an instrument drawer manually. 1. If the power is not already off (as can occur with a power failure, or if you are already troubleshooting the instrument with the covers open), turn off the power. -
Page 133: Understanding Potential Mechanical Problems
FlexStation 3 instrument for Flex reads or Endpoint and Kinetic reads. Background The intended function of the FlexStation 3 instrument requires it to have many moving parts. The operator interacts extensively with the instrument by introducing various types of plastic disposable plates, tips, and troughs. -
Page 134: Avoiding Mechanical Problems
Make sure that the red knob that holds the pipettor head in place is securely tightened. • Use only tips specified for the FlexStation 3 instrument in a 96-well or 384-rack configuration. Table 5-1: Molecular Devices Pipettor Tips 96-Well Configuration... -
Page 135: In Case Of Power Failure
Troubleshooting Procedures In Case of Power Failure Interacting properly with the instrument following a power failure is very important. If there is a power failure while the instrument is running, you must manually turn off the power switch at the back of the instrument. To avoid instrument damage, follow the instructions in Recovering from Mechanical Problems in Flex Mode when Using Fluidics on page... -
Page 136: Assessing A Mechanical Problem
FlexStation 3 Benchtop Multi-Mode Microplate Reader User Guide Assessing a Mechanical Problem Depending on when the problem occurs during the fluidics operation, one of several error messages can appear in the SoftMax Pro Software. The error message might not provide complete information about what has occurred. -
Page 137: Opening The Instrument
Troubleshooting Procedures Opening the Instrument CAUTION! To avoid damage to the instrument, follow these instructions and any instruction labels on the instrument exactly. 1. Turn the instrument power off and disconnect the power cords from the instrument and the cables connected to the computer. 2. -
Page 138: Evaluating The Tip Rack
FlexStation 3 Benchtop Multi-Mode Microplate Reader User Guide Evaluating the Tip Rack Inspect the tip rack drawer. The problem might be obvious and visible from the outside if the tip rack drawer is partially open and jammed. Possible scenarios include: •... -
Page 139: Inspecting Inside The Fluidics Module
Troubleshooting Procedures Inspecting Inside the Fluidics Module If there is any chance at all that there could be fluid in the pipette tips, you must remove the pipettor head from the instrument and dispel the fluid or remove the tips outside the instrument. This must be done to avoid spilling fluid in the reading chamber. - Page 140 FlexStation 3 Benchtop Multi-Mode Microplate Reader User Guide After you have determined the status of the pipettor head and tips, there are a number of procedures you might need to follow to resolve the problem. Possible scenarios include: • Pipettor head is in home position, without tips.
- Page 141 Troubleshooting Procedures • Pipettor head is not in home position, with tips. If the pipettor head is somewhere other than home position, and has tips on it, you must proceed carefully. The pipettor head might or might not be obviously jammed. Tips could be jammed in the tip rack, in the compound plate, or in the assay plate.
-
Page 142: Removing The Pipettor Head
FlexStation 3 Benchtop Multi-Mode Microplate Reader User Guide Removing the Pipettor Head You might need to remove the pipettor head to remove empty tips or to dispel liquid remaining in tips after a mechanical failure. To remove the pipettor head, follow the instructions in this procedure. To... - Page 143 Troubleshooting Procedures Figure 5-5: Location of the Pipettor Head Inside the Fluidics Module 6. Slide the pipettor head part way out from under the metal mounting plate, and of the top panel opening, supporting it from underneath. 0112-0127 B...
- Page 144 FlexStation 3 Benchtop Multi-Mode Microplate Reader User Guide 7. Pull the spiral cord off the coil hook behind the pipettor head. This will free the mechanism for easier removal. Figure 5-6: Pipettor Head Coil Hook Note: Note: If you want to dispense liquid from the tips, skip the...
-
Page 145: Expelling Undispensed Fluid From Tips
Troubleshooting Procedures Expelling Undispensed Fluid from Tips WARNING! BIOHAZARD. This procedure includes steps involving potentially infectious biological agents requiring that proper handling precautions be taken. This procedure assumes that you have opened the instrument and accessed the pipettor head as described in the previous procedures. 1. -
Page 146: Recovery Procedure
FlexStation 3 Benchtop Multi-Mode Microplate Reader User Guide Recovery Procedure When there is an instrument malfunction in which fluid was left in the tips, rebooting the instrument does not automatically reset the fluidics module. An additional recover cycle is necessary to restore successful communication between the instrument and the computer. -
Page 147: General Error Messages
These messages are generally self-explanatory. For assistance regarding warning messages, contact your local Molecular Devices representative. Table 5-2: FlexStation 3 Instrument Error Code Ranges Error Code Numbers Possible Causes 100–199 Errors possibly caused by unrecognized commands being sent from the computer to the instrument. -
Page 148: Other Error Messages
FlexStation 3 Benchtop Multi-Mode Microplate Reader User Guide Other Error Messages Follow any instructions in the message. Any time a message persists, or if you cannot return the instrument and software to normal operation, contact Technical Support and be sure to note which error message you observed. -
Page 149: Tilting Or Removing The Fluidics Module
WARNING! The following procedures must be completed by a service-trained user. Do not attempt the following procedures if you have not been trained properly by appropriate Molecular Devices personnel. WARNING! Turn off the power switch and disconnect the power cord... - Page 150 FlexStation 3 Benchtop Multi-Mode Microplate Reader User Guide 2. Press in the handle at the bottom of the top cover and lift the cover back off the detection module, revealing the fluidics module. Figure 5-7: Opening the Top Cover 3. Using the handle, tilt the fluidics module to the left.
-
Page 151: Removing The Fluidics Module
Troubleshooting Procedures Removing the Fluidics Module CAUTION! To avoid damage to the instrument, follow these instructions and any instruction labels on the instrument exactly. 1. Turn the power off to the instrument. Disconnect the power cords from the instrument and the cables connected to the computer. - Page 152 FlexStation 3 Benchtop Multi-Mode Microplate Reader User Guide Figure 5-10: Removing the Fluidics Module 6. Locate and loosen the quarter-turn fasteners in the metal plate where the bottom of the fluidics module is attached to the detection chamber. 7. Lift the fluidics module carefully off the detection chamber and set it on the bench.
-
Page 153: Appendix A: Parts And Accessories
Parts and Accessories CAUTION! Do not use parts and accessories that are not authorized by, specified by, or provided by Molecular Devices. Using unauthorized parts can damage the instrument. Table A-1: Part Numbers and Descriptions Part Number Description 4400-0002 Power cord, US... -
Page 154: Ordering Parts And Accessories
FlexStation 3 Benchtop Multi-Mode Microplate Reader User Guide Ordering Parts and Accessories To obtain parts and accessories, contact Molecular Devices Customer Service or your authorized service representative. Molecular Devices 1311 Orleans Drive Sunnyvale, California 94089 Telephone: +1-408-747-1700 Fax: +1-408-747-3601 U.S. and Canada Toll Free: +1-800-635-5577 Online: www.moleculardevices.com... -
Page 155: Appendix B: Performance Specifications
Performance Specifications Thermal specifications for microplates used in the FlexStation 3 instrument apply to flat-bottom microplates with isolated wells. All other microplate specifications apply to standard 96-well polystyrene flat-bottom microplates. When pathlength compensation is applied to microplate absorbance measurements, the solution volume in the microplate well is between 100 μL and 300 μL. - Page 156 FlexStation 3 Benchtop Multi-Mode Microplate Reader User Guide Table B-3: Absorbance Photometric Performance Item Specification Wavelength range 200 nm to 1000 nm Wavelength selection Monochromator tunable in 1 nm increments 4.0 nm Wavelength bandwidth Wavelength accuracy ± 3.0 nm Wavelength repeatability ±...
- Page 157 Performance Specifications Table B-4: Fluorescence Intensity Performance Item Specification Sensitivity Top Read < 5 pM FITC, 1 fmol/200 μL (96) < 20 pM, 2 fmol/100 μL (384) Wavelength range 250 nm to 850 nm Wavelength selection Monochromators, tunable in 1 nm increments Bandwidth (excitation, 9 nm, 15 nm emission)
- Page 158 FlexStation 3 Benchtop Multi-Mode Microplate Reader User Guide Table B-6: Time-Resolved Fluorescence Performance Item Specification Sensitivity 100 fM europium in 96-well or 384-well microplates (top read) Wavelength range 250 nm to 850 nm Bandwidth (excitation, 9 nm, 15 nm emission) Precision data collection 1 to 100 flashes;...
- Page 159 Performance Specifications Table B-10: Temperature Regulation Item Specification Reading chamber Isothermal when temperature regulation is not enabled Range 2°C above ambient to 45°C when temperature regulation is enabled Ambient temperature must be >20°C to achieve temperature regulation at 45°C Resolution ±...
- Page 160 FlexStation 3 Benchtop Multi-Mode Microplate Reader User Guide Table B-12: Microplate Compatibility Item Specification All modes Standard 6-well to 384-well, flat-bottom microplates low-volume 384-well microplates Absorbance reads Polystyrene microplates above 340 nm Absorbance reads UV-transparent microplates above 220 nm Absorbance reads...
- Page 161 Performance Specifications Table B-15: Environmental Specifications Item Specification Operating temperature 15°C to 60°C Operating humidity 0% to 70%, non-condensing Storage temperature -20°C to 65°C Table B-16: Physical Specifications Item Specification Size (H x W x D) 48 cm × 58 cm × 41 cm )19 in.
- Page 162 FlexStation 3 Benchtop Multi-Mode Microplate Reader User Guide 0112-0127 B...
-
Page 163: Glossary
Glossary Absorbance Absorbance is the amount of light absorbed by a solution. To measure absorbance accurately, it is necessary to eliminate light scatter. In the absence of turbidity, absorbance = optical density. A = log /I) = –log (I/I where I is incident light before it enters the sample, I is the intensity of light after it passes through the sample, and A is the measured absorbance. - Page 164 FlexStation 3 Benchtop Multi-Mode Microplate Reader User Guide Excitation Filter An excitation filter is a band pass filter that reduces the amount of extraneous lamp excitation light before the excitation monochromator. In endpoint reads and emission spectral scans, selection of excitation filter is automatic.
- Page 165 SoftMax Pro Software The SoftMax Pro Software is an integrated software program from Molecular Devices that is used to control and collect data from Molecular Devices microplate readers. 0112-0127 B...
- Page 166 FlexStation 3 Benchtop Multi-Mode Microplate Reader User Guide Stokes Shift The Stokes shift is the difference between the wavelengths of the excitation and emission maxima, or peaks. Time-Resolved Fluorescence Time-resolved fluorescence (TRF) is a measurement technique that depends on three characteristics that lead to better discrimination...
-
Page 167: Index
Index buttons Automix 46 Compounds 63 accessories 28 Drawer 46 part numbers for 154 FLEX 77 unpacking 51 Incubator 46 adapters, microplate 28 Read 46 installing 120 Reading Chamber 62 removing 120 Setup 47 assay plate 40 Stop 46 loading 100 Transfer 89 AutoCalibrate 39 Automix 39... - Page 168 FlexStation 3 Benchtop Multi-Mode Microplate Reader User Guide compound plate 121 detection module 24 for each operational mode 39 unpacking 51 loading 100 Display icon 47 selecting 87 Drawer button 46 compound plate drawer 21 drawers 21 opening and closing 71...
- Page 169 Index Instrument Settings screen 77 AutoCalibrate selection 85 Automix 84 Graph icon 47 AutoRead 85 compound and tip columns 93 compound source 87 compound transfer 88 timing 81 icons triturate selection 92 Display 47 wells to read 83 Graph 47 Instrument Status icon 46 Instrument Status 46 Mask 47...
- Page 170 FlexStation 3 Benchtop Multi-Mode Microplate Reader User Guide microplates 30 Plate sections 102 loading 66 creating and editing 77 reading 99 selecting 101 modes, operational 38 power cord 19 connecting 61 moving the instrument 114 power failure 135 power switch 19...
- Page 171 Index shutdown procedures 103 long-term 128 SoftMax Pro 28 safety information 9 installing 63 conventions in the user guide 10 software settings 75 screens Spectrum mode 41 Instrument Settings 77 starting up the system 67 Plate Section 84 Status bar 46 Preferences dialog 75 during readings 102 Untitled window 45...
- Page 172 FlexStation 3 Benchtop Multi-Mode Microplate Reader User Guide timing for each operational mode 39 setting 81 wavelengths 39 tip rack button 71 well scan editor 39 tip rack drawer 21 Well Scan mode 41 inspecting 138 wells to read opening and closing 71...
Need help?
Do you have a question about the FlexStation 3 and is the answer not in the manual?
Questions and answers