Table of Contents
Advertisement
Advertisement
Table of Contents

Related Manuals for Matica Technologies Espresso II

Summary of Contents for Matica Technologies Espresso II
- Page 1 USER GUIDE...
-
Page 2: Copyright Notice
Copyright Matica Technologies July 2016 All rights reserved Copyright Notice Users must respect the copyright regulations applicable in their own respective countries. Photocopying, translation, reproduction or transmission of this manual, in whole or in part, for any reason and using any electronic or mechanical means whatsoever, without the prior written permission of the Manufacturer company is strictly forbidden. - Page 3 For Europe Warning “This is a Class A product. In a domestic environment this product may cause radio interference in which case the user may be required to take adequate measures.” For US “This equipment has been tested and found to comply with the limits for a Class A digital device, pursuant to part 15 of the FCC Rules.
-
Page 4: Table Of Contents
Table of Contents PRODUCT OVERVIEW....................1-1 GETTING STARTED ....................... 1-1 Unpacking the Printer ........................ 1-2 Functional Description ....................... 1-3 Front View ..........................1-3 Operator Panel........................1-3 Rear View ..........................1-4 Power Supply......................... 1-4 Plastic Cards.......................... 1-4 INSTALLATION PROCEDURES ..................2-1 Installing the Ribbon ........................ - Page 5 PRINTER MAINTENANCE ..................... 5-1 Printer Routine Cleaning ......................5-1 Standard Cleaning ........................5-1 Standard Cleaning Procedure....................5-1 Card Path Advanced Cleaning....................5-3 Advanced Cleaning Procedure ....................5-3 Cleaning Roller Advanced Cleaning ..................5-5 Roller Cleaning Procedure ..................... 5-5 Printhead Cleaning........................5-7 Printhead Cleaning Procedure....................
-
Page 6: Product Overview
Product Overview The printer described in this User Guide provides full color dye-sublimation or monochrome thermal transfer printing on standard 54x86 mm plastic cards. PVC, PVC Composite, PET, ABS and PET cards are supported (accordingly with varnished card product configuration). It is managed from the computer through the USB port or via Ethernet/WiFi. -
Page 7: Unpacking The Printer
Unpacking the Printer The following items are included in the box: Printer Software CD-ROM containing the installer, printer driver and Printer Manager The Placemat Warranty and Customer Service Information Cleaning kit Power cord Power supply ... -
Page 8: Functional Description
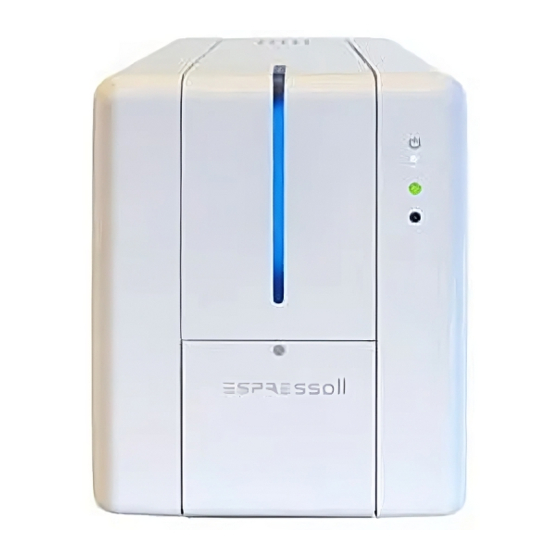
Functional Description Front View The front of the printer is the operator side and features: 1) Front slot (only when this option has been ordered) 2) Input Hopper 3) Operator panel and printer status indicators. Operator Panel The front operator panel consists of: 1) Icon that indicate the ON switch 2) ON/OFF toggle switch 3) 3-color LED (amber, red and green) indicating the printer’s functional status or an error condition. -
Page 9: Rear View
Rear View The following components are located on the back panel: 1) Power cord socket 2) Two USB connectors (Type A and B) 3) Ethernet connector with traffic LED (option) 4) SD card (option) slot 5) Reject bin attachment slots 6) External smart encoder (option) connector 7) Kensington lock. -
Page 10: Installation Procedures
Installation Procedures Installing the Ribbon Original Matica ribbons are to be installed carefully. The ribbon carrier that comes with the printer helps to install the ribbon quickly, easily and accurately. Once the ribbon is in its carrier, the carrier can then be easily dropped into the printer using the yellow guides. -
Page 11: Card Feeding
5) Close the printing module compartment cover. Note: Keep away from the printhead so as avoid damaging it. Card Feeding The input Hopper (automatic card feeder) can hold a maximum of one hundred 0.76 mm thick cards. A label inside the door gives the instructions for correctly positioning and orienting the card. When the single card manual feeder option is present, it can be used without needing to empty the input Hopper. -
Page 12: Adjusting The Card Thickness
Adjusting the Card Thickness The card thickness can be adjusted using the wheel inside the input Hopper. Cards with thicknesses ranging between 0.25 mm and 1.25 mm (10 - 50 mil) can be processed by the printer. Proceed as follows to adjust the card thickness: 1) Open the printing module compartment cover. -
Page 13: Connecting The Power Supply And Powering On The Printer
Connecting the Power Supply and Powering ON the Printer Connect the power cord to the power outlet, to the power supply and then connect the power supply to the printer as shown below. Press the ON/OFF button to power on the printer. User Guide... -
Page 14: Installing The Software And Configuring The Printer
Installing the Software and Configuring the Printer The CD-ROM that comes with the printer contains the following: Windows Vista, Seven, Win 8.1, Win 10 (supported 32 and 64 bit) printer driver for USB, Ethernet LAN and Wireless connections (if supported by the purchased model) ... -
Page 15: Usb Connection
3) Click Next and then “I accept the agreement” to accept the licence agremeent. Then, click Next. The display shows: 4) Click Next. The installation program will ask you to indicate the folder in which to save the files (the disk space necessary for installation is indicated at the bottom of the screen page). -
Page 16: Ethernet (Lan) Connection Via Dhcp
Ethernet (LAN) connection via DHCP The Add Printer Wizard program permits selection of printer connection mode. The options are: Ethernet/LAN or Wireless (WiFi). Note: To run the Add Printer Wizard program manually, activate this from the Start > Programs > Matica menu. - Page 17 Check that the printer is ON and connected with the USB cable. Do not connect the network cable to the printer, then click Next. The configuration software displays the following screen page: Select DHCP Network installation network mode and click Next Note: for further information about the specific company network, contact the network administrator.
- Page 18 Click Start to search for the network printer and wait until this has been identified. If the printer is not found, click Start to repeat the search for the network printer and wait until this has been identified. Once it has been found, the printer is shown in the list of available printers accompanied by the related information (IP address name of the printer, Mac address).
-
Page 19: Ethernet (Lan) Connection With Fixed Ip
Ethernet (LAN) connection with fixed IP The Add Printer Wizard program permits selection of printer connection mode. The options are: Ethernet/LAN or Wireless (WiFi). Note: To run the Add Printer Wizard program manually, activate this from the Start > Programs > Matica menu. - Page 20 Check that the printer is ON and connected with the USB cable. Do not connect the network cable to the printer, then click Next. The configuration software displays the following screen page: Select Fixed IP Network installation network mode and Click Next Note: for further information about the specific company network, contact the network administrator.
-
Page 21: Uninstall Program Tabs
Click Next and wait until the configuration software displays the message indicating that installation has been completed successfully. Terminate clicking Finish and follow the instructions shown on the display. Uninstall Program Tabs To uninstall the software: 1) in Windows 7, Windows 8.1/10, select Programs and Features > Matica Espresso Driver/manager v.1.34.xxx.. -
Page 22: Matica Printer Manager
Matica Printer Manager Upon successful installation, the following programs are installed on the computer: Add Printer Wizard Espresso Printer Manager software to manage the printer Setting Up Your Printe in PDF formatr User Manual in PDF format. Using the Printer Manager Instrument Bar The Windows toolbar includes the Matica application logo that, when clicked, displays a popup window from where the Printer Status can be launched. -
Page 23: Printer Manager
Printer Manager Open the Print Manager by double-clicking in the Application bar icon 1) Information regarding the printer installed, or on its configuration, is displayed in this area. These contents are associated to the icon button displayed on the left hand-side of the window. The following Printer Manager function icon buttons are provided: ... -
Page 24: Preferences
Printer Status Area The printer status and error or warning messages are displayed in this area. The possible conditions are: Ready, Busy, Offline, Error. Ribbon Status Area Ribbon-related information is displayed in this area. 1) Type of ribbon installed. 2) Remaining ribbon capacity indicator: this indicator shows a percentage of how much ribbon can still be used. -
Page 25: Maintenance
Maintenance Open the Maintenance by clicking on the icon . From this area you can test the print quality using the test card layouts and launch the printer cleaning routine. In this environment you can run: 1) Test Card, for printing a test card – 2) Cleaning, for standard or advanced card cleaning. Click on Back to return to the Status screen. -
Page 26: Settings
Settings Open the Settings by clicking on the icon . Duplex activation, Energy Savings, Firmware Updates and Options can be configured in this area. 1) Energy saving parameters. 2) Firmware Update. 3) Duplex activation settings. 4) Options installed on the printer. Click Back to return to the Printer Status screen. -
Page 27: Updating The Printer Firmware
Updating the Printer Firmware The Version Installed field shows the current version of the printer firmware. Click Firmware Update to launch the Update Firmware wizard. Duplex activation Two-sided printing can be enabled in this environment (for more information refer to the documentation provided with the option). -
Page 28: Printing
Printing Card Printing Cards are usually printed and encoded by a Printer Application chosen by the User. However, if required, a compatible non-proprietary Application is available as an option for designing and printing cards. Cards can be customized (logo, image and name) by creating graphic images and defining page formats. The Printer Application recognizes the printer, allowing the User to create fully customized card jobs. -
Page 29: Management Of The Overlay Panel
10) Click the Media tab to configure specific settings such as: Ribbon Identification Color Panel Adjustment (brightness, contrast, sharpness) Overlay Panel Adjustment K Panel /Monochrome Adjustment (greyscale, black text, etc..) Management of the Overlay panel This function, available in the print driver, is used to print a card using one of the following overlay functions available: ... -
Page 30: Double-Side Printing
Double-side Printing 1) Select Properties from print properties to personalise printing options: 2) Check the box selection Dual side printing for front and back printing. 3) Click OK to store the settings made and print the card. Note: Two-sided printing is optional (installation of the Duplex Kit is required). If Dual-sided printing was selected, by clicking the Media tab of Printer Preferences the following parameters for the two sides of the card can be selected independently: ... -
Page 31: Color Settings
Color Settings To customize color printing, click Printer Driver Properties and then click the Printer Driver Preferences tab. You can modify the saturation of each colour being printed by moving its related cursor. When the cursors are moved, the image with the coloured pencils illustrates how the settings change. However, to be sure that the actual result obtained meets your expectations, it is necessary to run a few print tests. -
Page 32: Printer Maintenance
Printer Maintenance Printer Routine Cleaning Four different cleaning processes are implemented in the printers. Standard Cleaning Suggested frequency: Color printing: Each time the ribbon is changed Every 1,200 cards printed. Standard cleaning is performed using the specific cleaning card as explained below. The product has an internal counter that keeps track of the number of cards printed and warns the user when the mandatory cleaning procedure must be performed. - Page 33 5) Insert the cleaning card (A) in the rear slot of insert the extended card (B) in the rear slot of the printer. the printer as represented in Figure. The adhesive surface should remain at the The adhesive surface is on both sides. top.
-
Page 34: Card Path Advanced Cleaning
Card Path Advanced Cleaning The card path advanced cleaning procedure is required after performing five Standard cleaning procedures: The special (alcohol impregnated) T-card must be used. The procedure involves cleaning the card path, removing the dust on the rollers and cleaning the magnetic head. - Page 35 5) Open the Printer Manager and click the Maintenance button. The Maintenance window is displayed. 6) The counter indicates the number of cards that have been printed starting from the last cleaning operation performed. Click the Advanced Cleaning button to start the cleaning procedure. Once the cleaning procedure is completed, the card is ejected from the rear slot and the counter is reset.
-
Page 36: Cleaning Roller Advanced Cleaning
Cleaning Roller Advanced Cleaning It is suggested to perform an advanced cleaning of the cleaning roller when the standard cleaning procedure does not efficiently remove all the dust from the cleaning roller. Roller Cleaning Procedure 1) Unplug the printer from the power supply. 2) Open the printing module compartment covers. - Page 37 7) Reinsert the roller, pushing it into its seat, pressing downwards and parallel to the surface of the printing module. 8) Re-insert the support and close the print module compartment. The cleaning procedure has been completed. User Guide...
-
Page 38: Printhead Cleaning
Printhead Cleaning It is advisable to clean the printhead when light-coloured or white streaks appear on the printed card in the direction of printing: The edge of the printhead must be cleaned using the special impregnated swab or the cleaning pen. ... -
Page 39: Printing Test Cards
Printing Test Cards Test Cards are used to check that the printer is operating correctly and to obtain some important printing parameters. Open the Printer Manager and click the Maintenance button. The following screen is displayed. Printing a Text Test Card In the Test Card area, click the Text button to launch the Monocromatic Test Card print quality test. -
Page 40: Print Head Replacement Procedure
Print head replacement procedure As the print head is the most important component of the printer, it is advisable to carry out the recommended cleaning procedures in order to guarantee maximum quality at all times and longest possible service life. However, the print head may become worn and must be replaced after a certain period of time. - Page 41 6) Close the printing compartment module cover. 7) Connect the printer to the power supply, switch on and connect it to a computer with the USB cable. On the computer on which the Matica Print Manager program has been installed, select the Maintenance environment and press the “Print Head Replacement”...
-
Page 42: Encoding Options
Encoding Options Chip Encoding The Chip Encoder is an optional module for the Espresso products that allows the encoding of chip cards (smart cards). Available chip encoding modules and related functionalities: CHIP ENCODING STATION COMBO PCTWIN + OMNIKEY Allows you to run chip encoding on contact cards (via Chip PCTwin) and on cards with out contacts (via Chip Omnikey) Code PR000015 ... -
Page 43: Test
Test Open Printer Manager and click the Encoding button. The following screen is displayed from where it is possible obtain the Smart Card ATR number. Reading the Chip Encoding This area provides the ATR number of the contact card. This operation is performed to ensure that the contact encoder is working correctly. -
Page 44: External Encoding
External Encoding The machine configured with an external encoder is equipped with a specific 12-pin connector, configured in the following way: Name Description CLOCK 7 12 RESET VCC=5V CDD_NO CARD DETECT NO Binder female socket 12 ways CDD_NC CARD DETECT NC black connector 720 series ... -
Page 45: Configuration
Configuration To print using the Magnetic Encoder, enable these modules on the printer so that the printer driver can use them correctly. 1) Set the Coercitivity values from High, Low. 2) Set the "Standard" encoding preferences. With this drop down menu is possible to set which standard to use for encoding the cards. -
Page 46: Test And Encoding
Test and Encoding The magnetic card is read and written in the magnetic encoding area. 1) The Track Area contains the fields (ISO Standard or JIS-II Standard) where the magnetic tracks can be read or written. Printer Driver Track Track Window Result Box Track Status Label... -
Page 47: Trobleshooting
Trobleshooting Printer does not power on USER Disconnect and reconnect again the power cables making sure Printer does not power on that an electricity supply is actually present Printer has printing problems USER Make sure that a Moca/Espresso printer appears in Printer does not start “Devices and Printers”... -
Page 48: Printer Has Problem With Ribbon
USER Printer takes up the card The card thickness setting does not correspond with that but remains blocked of the card being used: set the correct value, remove the card, then switch the printer off and on again. If you are using non-original ribbon, check that the type of ribbon set for the driver corresponds with the one actually being used ... -
Page 49: Ribbons
Ribbons The following Matica ribbons can be used: Ribbon Type Code to order Monochrome BLACK: 2000 prints PR000034 YMCKO : 200 prints PR000032 YMCKO : 200 prints standard PR000234 NOT available for MOCA YMCKO : 250 prints - PR000031 NOT available for MOCA YMCKO : 250 prints standard - PR000233 Color 1/2 YMCKO : 400 prints... -
Page 50: Technical Characteristics
Technical Characteristics Single-side or dual-side (*) printing module Edge-to-edge printing Color dye sublimation and monochrome thermal transfer 300 dpi printhead (11,81 dots/mm) Up to 128MB of RAM Drop-in ribbon carrier The user-friendly Printer Driver and Printer Manager application facilitate access to and use of all printer functions. -
Page 51: Dimensions And Weight
Software Printer driver Printer Manager Automatic Installer Compatible with Windows: W7 32/64 bit, W8.x 32/64 bit, Win10 32/64 bit Security Slot for Kensington lock ® Power Supply Auto-switching external power supply unit with interchangeable power cords ... - Page 53 CM00000154en revision F Matica Technologies - www.maticatech.com – All rights reserved...
Need help?
Do you have a question about the Espresso II and is the answer not in the manual?
Questions and answers