
Related Manuals for Montgomery Ward MW8000


Summary of Contents for Montgomery Ward MW8000
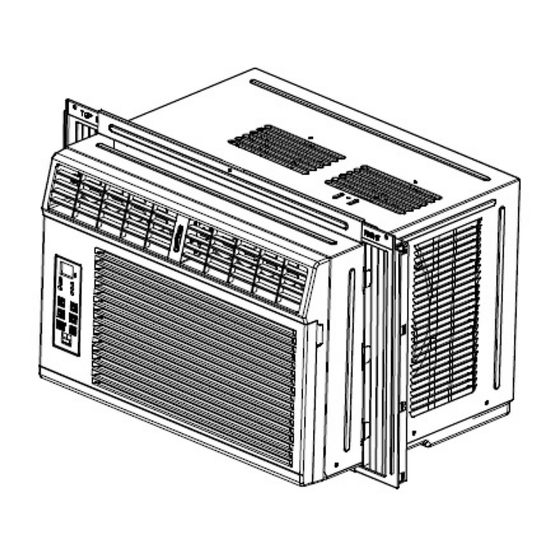
- Page 1 Window AC 8000BTU Instruction Manual MODEL: MW8000 115V~, 60Hz, 705W Montgomery Ward Customer Service 3650 Milwaukee Street, Madison, WI 53714 8:00 am to Midnight, Monday through Friday Wards.com 1 3848 • • • Wards.com 1 3848 • • •...
-
Page 2: Table Of Contents
PLEASE SAVE THESE INSTRUCTIONS 19. Use care when removing the filter. Do not touch metal parts of unit when removing THIS APPLIANCE IS FOR HOUSEHOLD USE ONLY filter. © 2015 Montgomery Ward, Inc. All rights reserved. Wards.com 3848 • •... -
Page 3: Important Safeguards
Installation Important Safeguards (cont’d) (cont’d) 20. Before cleaning, turn power OFF and unplug from electrical outlet. 21. Do not insert body parts or tools into the inlet or outlet grills during operation. 22. Do not ingest water drained from air conditioner. 23. -
Page 4: Installation
Installation Installation (cont’d) (cont’d) Remove air conditioning unit and accessories from box. Save box to use for storage of unit during the winter or when not in use for long periods of time. 1. Guide Panel Assembly: Install the curtain (Item H) into the curtain sash (Item G) with the middle clip on the inside of the curtain sash. - Page 5 Installation Installation (cont’d) (cont’d) CAUTION: Hold unit firmly until window sash is lowered to top channel behind the 3. Guide Panels: upper guide. Personal injury or property damage may result if the air conditioner falls from the window. Extend the curtains in the guide panels and slide them down into the T-shaped groove on the left and right sides of the unit.
-
Page 6: Ac Removal
AC Removal Installation (cont’d) To remove air conditioner, turn power OFF and disconnect power cord. Remove the 7. Secure Guide Panels: 5 screws installed in the top and bottom of the guide panels. Close guides and with a firm grip on the unit tilt outward to allow any condensation to drain out. Fasten the top of the guide panels to the sash with 3 screws (Item B). - Page 7 Operating Instructions Operating Instructions (cont’d) Control Panel Functions: Remote Control: Power - Use to turn AC ON and OFF. To use the remote control, you must be within 20 feet of the unit with a clear line of sight. Remove batteries when control is not in use for long periods of time. CAUTION: After powering off the AC or switching from cooling to fan, wait a mini- mum of 3 minutes before turning cooling back on.
-
Page 8: Cleaning And Care
Cleaning and Care Operating Instructions (cont’d) Remote Control (cont’d) WARNING: Turn AC OFF and remove plug from outlet prior to cleaning. Air Filter Cleaning: Increase Temperature Timer Increase – See instructions Only works in Cool Mode. Pressing under Control Panel Functions. and holding will increase temp 1˚... -
Page 9: Troubleshooting
Cleaning and Care Troubleshooting (cont’d) WARNING: Turn AC OFF and remove plug from outlet prior to cleaning. Before calling for service, try these troubleshooting tips. Front Grill Removal: Problem Possible Cause Remedy Wall plug is loose or Confirm that plug is firmly 1. - Page 10 Troubleshooting (cont’d) Problem Possible Cause Remedy Clean filter. Refer to Clean- Air filter may be dirty. ing and Care section. Temperature on unit is Increase temperature. AC is cooling but room is too warm. still warm. Air flow is restricted. Remove any obstacles (drapes, furniture, etc.) from in front of unit.
- Page 11 (excluding shipping and handling charges). for one year from provable date of purchase. Please send returns to: Within this warranty period, Montgomery Ward will repair or Montgomery Ward, Inc. replace, at its option, defective parts of this...
Need help?
Do you have a question about the MW8000 and is the answer not in the manual?
Questions and answers