Table of Contents
Advertisement
Advertisement
Table of Contents
Troubleshooting

Subscribe to Our Youtube Channel
Related Manuals for Ssl DDML65B

Summary of Contents for Ssl DDML65B
-
Page 2: Table Of Contents
Content Accessories ………………………………………………………………………………………………………………………………………... Unit Installation ……………………………………………………………………………………………………………………………….. Wire Connection ……………………………………………………………………………………………………………………………… Parking Brake Connection ……………………………………………………………………………………………………… Speaker connection ………………………………………………………………………………………………………………………. Button Description …………………………………………………………………………………………………………………………. Remote Control ……………………………………………………………………………………………………………………………….. Main Menu …………………………………………………………………………………………………………………………………………... Radio Operation ………………………………………………………………………………………………………………………………. USB /SD Operation ……………………………………………………………………………………………………………………….. Settings Operation ……………………………………………………………………………………………………………………….. Bluetooth Operation …………………………………………………………………………………………………………………….. Aux-In Operation ……………………………………………………………………………………………………………………………... -
Page 3: Accessories
Accessories Package contains the following accessories for installation and operation of the unit. (1) Washer, Spring (5) Rubber (2) Washer, Cushion M5 Nut (3) Screw (6) Screw Left (7)installation (4) Bolt bracket Right (5) Mounting Strap Remote Control User Manual Power Cable Trim Ring... -
Page 4: Unit Installation
Unit Installation Bracket Screw 1. Put the 2 brackets to the left and right side of the unit; 2. Use screws to fix the brackets to the unit. Wire Connection The Description of the Input/output Interface of the Rear Chassis. -
Page 5: Parking Brake Connection
Parking Brake Connection In order to view videos, the parking brake wire must be connected, and the vehicle stopped. Connecting the reversing line to taillight on the car... -
Page 6: Speaker Connection
Speaker Connection After connecting, when you start up the reverse gear, the unit will receive the picture from car rear view camera. Connect the speakers according the following diagram, incorrect connections will damage the unit or your loudspeakers. Correct connection Left front - Right front | Left rear - Right rear Incorrect connections... -
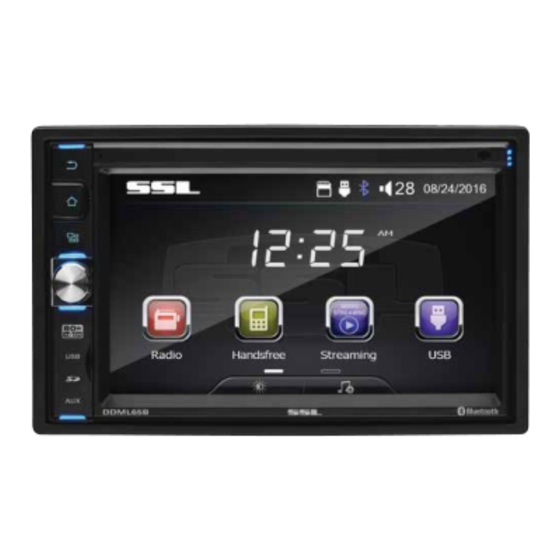
Page 7: Button Description
Button Description 1. MIC 2. RETURN Button Press it back to main previous menu. 3. HOME BUTTON Press home button to return back to main menu. 4. SOURCE BUTTON Press source button to change mode. 5. POWER / MUTE Button /VOL Press it to turn on the unit. -
Page 8: Remote Control
Remote Control ○ 1: POWER 2: MODE ○ ○ 3: LEFT 4: PREVIOUS/Accept ○ 5: VOLUMN DOWN 6: MUTE/BLUETOOTH ○ ○ 7: UP 8: OK ○ 9: DOWN ○ ○ 10: MENU 11: SERARCH ○ 12: RIGHT ○ 13: NEXT/REJECT ○... - Page 9 Remote Control 10. MENU Press it to show main menu. 11. SEARCH button Press it to search the radio station automatically. 12. RIGHT button Press it to move cursor right. 13. NEXT/REJECT button In USB, SD mode, press button to skip to the next track, press and hold button for two seconds to activate fast forward (FF) search in a track.
-
Page 10: Main Menu
Main Menu The best way to discover the program is to explore each screen in detail, and to find out how to move from one to another. Read this chapter for a guided tour. Unit starts by displaying the main menu. This is the root of the screen hierarchy, and you can simply access all features by tapping on the touch screen buttons. -
Page 11: Usb/Sd Operation
USB/SD Operation When a file of USB or SD card is played (music, video, photo), the screen will show following interface: Press it to repeat REP 1 => REP DIR => REP ALL Press it to skip to the previous track. Play/pause button. - Page 12 Settings Operation Tap calendar setting button to calendar Tap SWC item to program SWC There are 3 wires for SWC function, connect to SWC1 (white), SWC2 (Brown), GND (Black) 1) First check whether the car has steering wheel button. 2) The steering wheel and the unit must be connected on the line. 3) While holding down the button on the steering wheel and the corresponding button on the SWC interface it will display complete setting.
-
Page 13: Bluetooth Operation
When the unit have connect with phone, the BT icon will turn on and the mobile phone name (if available) will be display on the panel. According to mobile pairing device manual, after searching new device (BT friendly name: SSL DDML65B) select it, input password "0000" and confirm ok, device paring is finished. -
Page 14: Aux-In Operation
Bluetooth Operation music button enter to listen music for bluetooth in Streaming mode. the button to played and paused ‘music’ in bluetooth main menu. You can select the function with the key for previous and next. A2DP (Advanced Audio Distribution Profile) Music Player A2DP is a function which can receive the audio frequency signal from the mobile phone, amplified by the car audio and played out by the car speakers. -
Page 15: Troubleshooting
Troubleshooting Symptom Cause Remedy Replace with fuse of the same amperage. If Power does not turn Fuse is blown the fuse blows again, consult your store of purchase (No sound is produced) In correct wiring Consult your local retailer 1. Turn off the unit 2. -
Page 16: Troubleshooting
Troubleshooting symptom Cause Solution If the power supply is properly connected The car ignition is not on to the car accessory switch the ignition key to “ACC” No power The fuse is blown Replace the fuse Volume is in minimum Adjust volume to a desired level No sound Wiring is not properly... -
Page 17: General Specification
General Specification General Power supply 11~16V DC Current consumption Max. 10 A Maximum power output 80W x 4 channels (max) Compatible formats MP3,WMA,JPEG,AVI Dimensions (W x D x H) / weight 6.5” x 7.0” x 3.9” /4.15 lbs Working temperature range -4°F -- +140°F TFT display Screen size...
Need help?
Do you have a question about the DDML65B and is the answer not in the manual?
Questions and answers