
Related Manuals for Audiovox Aca200w

Summary of Contents for Audiovox Aca200w
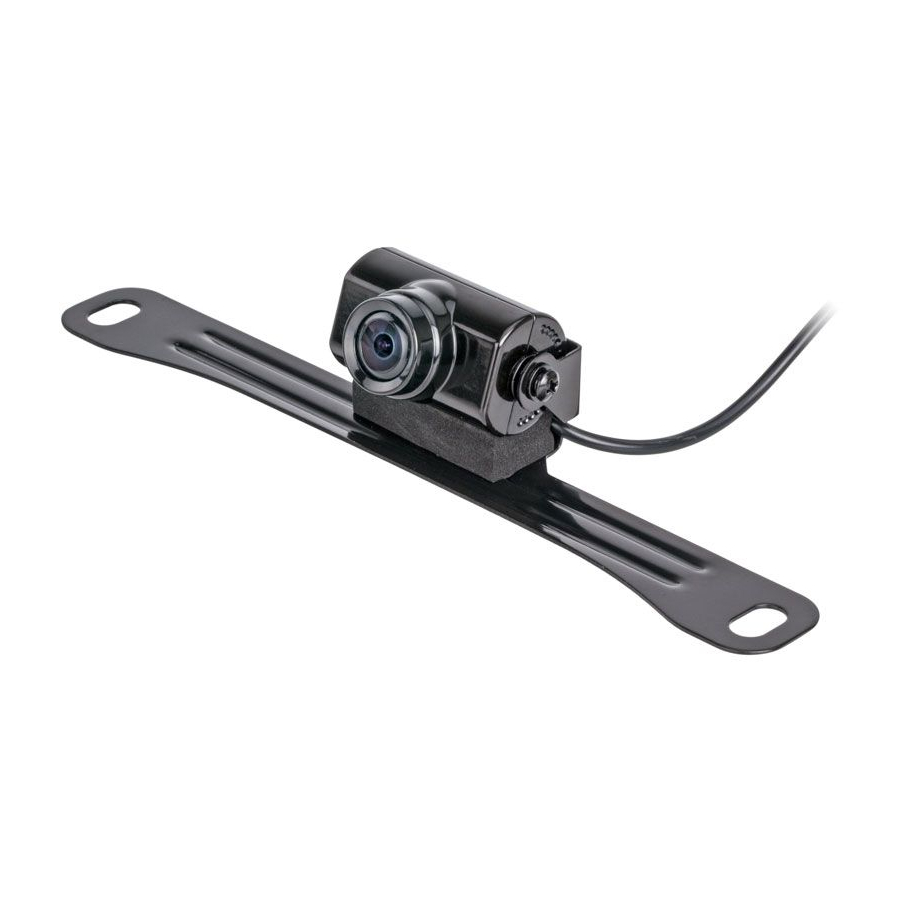
- Page 1 Model: ACA200W Wired License Plate / Rear Mounted Camera Cámara de Montaje Posterior / Patente Cableada Installation Manual / Manual de Instalación...
- Page 2 Features • High Resolution, ¼ inch CMOS Color Camera • Compact Zinc Alloy Die Cast Body • Waterproof Housing • 130 Degree Wide View Angle • Selectable Image: Normal/Reverse • Camera Mounts Behind License Plate – Does Not Obstruct Plate •...
-
Page 3: Table Of Contents
Table of Contents Warnings ...4 Product Description ...5 Packing List ...5 Camera Installation ...6 Camera Wiring Diagram...9 Specifications ...10 Troubleshooting ...10 Warranty ...18 Tabla de contenidos Cuidados ...11 Descripción del Producto ... 12 Lista de lo Empaquetado... 12 Instalación de la Cámara ...13 Diagrama de Cableado de la Cámara ...16 Especificaciones ...17 Solución de Problemas...17... -
Page 4: Warnings
2. You are responsible for ensuring that the installation of this product does not void or affect the vehicle manufacturer’s warranty. Audiovox Electronics Corporation or its subsidiaries are not liable in full or in part for improper installation resulting in loss or damage to your property, or for voiding all or part of the vehicle manufacturer’s... -
Page 5: Product Description
Product Description This revolutionary camera design integrates a backup camera with your vehicle’s rear license plate without covering the license plate. The camera is easy to mount on your car, truck, or van with the bracket being hidden by your license plate. We have also included a surface mount bracket to help with other installation methods. -
Page 6: Camera Installation
Camera Installation License Plate Mounting Instructions 1. Remove the rear license plate. 2. Examine the vehicle to determine the best way to run the power wires to the reverse lights and the extension cable through the car. 3. The Camera can be mounted above or below the plate. (For surface mounting with the included bracket, see the next section.) Determine the mounting location that best suits your needs. - Page 7 Surface Mounting Instructions 1. Find a suitable location on the vehicle where the bracket will not interfere with any equipment or doors, or block the line of sight. Verify that the planned mounting location is accessible from behind and that you have access to route the wiring inside the vehicle. Be sure that the mounting screws will not hit any wires or equipment inside the vehicle.
- Page 8 Wiring the Camera to the Vehicle’s Reverse Lamp 1. Locate the reverse lamp in the tail light assembly. 2. Using the tap connector supplied, perform the following steps: Place the un-stripped positive lead from the tail lamp in the run channel, which runs completely through the connector.
-
Page 9: Camera Wiring Diagram
Connecting the Video Signal 1. Connect the included video extension cable to the Yellow RCA jack on the camera harness. 2. Run the extension cable to the monitor and connect to the Video input. Reverse/Normal Image Adjustment The camera comes standard with a reversed image, designed for mounting at the rear of the vehicle. -
Page 10: Specifications
Specifications 1. Voltage: DC12V 2. Current: 50 mA 3. Signal System: NTSC 4. Image Sensor: ¼” CMOS Sensor 5. Horizontal Resolution: 480 lines 6. Viewing Angle: 130 degrees 7. Minimum Illumination: 0.3Lux 8. Image Display: Selectable Normal/Reverse Image 9. Wireless Transmission Operating Frequency: 2.4GHz 10. -
Page 11: Cuidados
2. Usted es responsable de asegurar que la instalación de este producto no invalida o afecta la garantía del fabricante del vehículo. Audiovox Electronics Corporation o sus subsidiarias no son total ni parcialmente responsables de instalaciones inadecuadas que provoquen pérdida o daño a su propiedad, o de invalidar toda o parte... -
Page 12: Descripción Del Producto
Descripción del Producto Este revolucionario diseño integra una cámara posterior con la patente posterior de su vehículo sin cubrirla. La cámara es fácil de montar en su automóvil, camión o van con el soporte escondido por la patente. Hemos incluido también un soporte de montaje superficial para facilitar otros métodos de instalación. -
Page 13: Instalación De La Cámara
Instalación de la Cámara Instrucciones de Montaje de la Patente 1. Quite la patente posterior. 2. Examine el vehículo para determinar la mejor forma de colocar los cables de energía hasta las luces de reversa y el cable de extensión por el automóvil. - Page 14 Instrucciones de Montaje Superficial 1. Encuentre una ubicación en el vehículo donde el soporte no interfiera con ningún equipo o puerta, o bloquee la visión. Verifique que la ubicación de montaje elegida sea accesible desde atrás y que tenga acceso para pasar el cable hacia adentro del vehículo. Asegúrese que los tornillos de montaje no golpeen ningún cable o equipo adentro del vehículo.
- Page 15 4. Quite la cámara del soporte de patente y adhiérala al soporte superficial del vehículo. Cableando la Cámara a la Lámpara de Reversa 1. Localice la lámpara de reversa en el ensamblaje de luces de cola. 2. Usando un conector de llave provisto, realice los siguientes pasos: Coloque la punta positiva pelada de la cola de la lámpara en el canal del cableo, que corra completamente hasta el conector.
-
Page 16: Diagrama De Cableado De La Cámara
Conectando la Señal de Video 1. Conecte el cable de extensión de video incluido, a la toma RCA amarilla en el arnés de la cámara. 2. Coloque el cable de extensión al monitor y conéctelo a la entrada de Video. Ajuste de Imagen Reverso/Normal La cámara viene estándar con una imagen invertida, diseñada para montarla en la parte posterior del vehículo. -
Page 17: Especificaciones
Especificaciones 1. Voltaje: DC12V 2. Corriente: 50 mA 3. Sistema de Señal: NTSC 4. Sensor de Imagen: Sensor CMOS de ¼” 5. Resolución Horizontal: 480 líneas 6. Ángulo de Visión: 130 grados 7. Iluminación Mínima: 0.3Lux 8. Imagen en Pantalla: Seleccionable Normal o Reversa 9. - Page 20 © 2008 Audiovox Electronics Corp., 150 Marcus Blvd., Hauppauge, N.Y. 11788...
Need help?
Do you have a question about the Aca200w and is the answer not in the manual?
Questions and answers