Table of Contents
Advertisement
Quick Links
Advertisement
Table of Contents

Related Manuals for Technika TK10PDVD112


Summary of Contents for Technika TK10PDVD112
- Page 1 TK10PDVD112 Owner’s Handbook MODE 10.1 ” Digital Screen Portable DVD Player...
- Page 2 IMPORTANT SAFETY INFORMATION Refer all servicing to qualified service personnel. Servic- IMPORTANT ing is required when the apparatus has been damaged Use this appliance only with the supplied AC convertor. Us- ing non-approved power supplies will void the warranty. in any way, such as the power-supply cord or plug is damaged, liquid has been spilled or objects have fallen This equipment generates, uses and can radiate radio into the apparatus, the apparatus has been exposed to...
-
Page 3: Table Of Contents
CONTENTS INTRODUCTION Read this manual before using your player. SAFETY INFORMATION .............. Inside Front Cover The Player is set to play Region 2 discs. INTRODUCTION ....................1 The player will accept the following formats (among others): DVD, DVD+R, PLAYER FEATURES ....................2 DVD+RW, CD-DA, CD, CD-R, CD-RW, Picture CD, CONTROLS AND FUNCTIONS ................ -
Page 4: Player Features
PLAYER FEATURES The regions are: to a rest before removing it. Stopping a disc manually Region 1: Canada, USA could damage both the disc and the player DVD, CD, CD-R, CD-RW DVD+R, DVD+RW capable Region 2: Europe, Japan, Mid. East, South Africa Never press down on the disc compartment lid TV format: PAL Region 3:... -
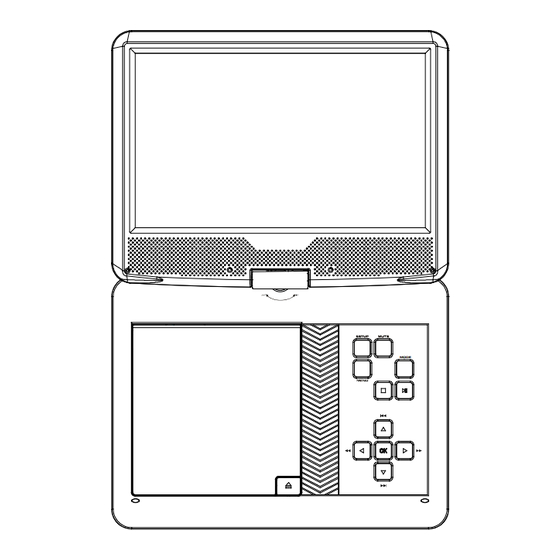
Page 5: Controls And Functions
CONTROLS AND FUNCTIONS 1.SETUP button button 2.MUTE button 12. DC IN 9-12V 13. Power ON/OFF switch 3.MODE button 4.MENU button 14. AV OUT MODE 5.PLAY/PAUSE button 15. Volume knob 6.STOP button 16. Earphone jack button 17. SD Card slot button 18. -
Page 6: Audio Connection
EXTERNAL AUDIO/VIDEO CONNECTIONS TV (AUDIO/VISUAL) CONNECTION You will need to purchase an interconnect with a three pole jack on one end and three RCA phono plugs on the other. This interconnect is often WHITE (left) used for connecting Camcorders and games consoles. AV OUT OFF/ON Connect the jack plug to the Player AV OUT socket Connect the YELLOW... - Page 7 REMOTE HANDSET KEY OPERATIONS 1. Number button 2. TITLE(To display title information) NAVIGATION KEYS 3. AUDIO(To select audio language) MENU MODE 4. SETUP(To go to or exit setup menu) “ Previous/Next button(To go Move Up a Menu/Menu Choice to previous/next chapter or scene ”...
-
Page 8: Swivelling And Tilting The Screen
SWIVELLING AND TILTING THE SCREEN Place the player on a firm level surface where it is unlikely to be knocked over or fall. Do NOT operate the player on your knee or on the rear seat of a travelling vehicle as erratic movement will cause the player to skip tracks and may damage the disc and the player. -
Page 9: Portable Operation
HANDSET PREPARATION PORTABLE OPERATION If you want to use the player without mains power you Remove the safety strip from the battery compart- will need to charge the battery. The battery should be ment. The handset is now ready for use be charged only when the player is switched off. -
Page 10: Getting Started
GETTING STARTED BASIC OPERATION 1) To play a DVD disc from the beginning • Open the player and orient the screen as required. Press PLAY/PAUSE on the handset or the player • Connect the supplied power adapter to the player. Plug the mains plug into the mains outlet and switch on the power. - Page 11 6) Zoom: ADVANCED OPERATION Press ZOOM repeatedly ON SCREEN DISPLAY The picture size changes 2X 1/2X 1/3X 1/4X ’ ’ ’ ’ ’ ’ An On Screen Display (OSD) disc status indicator will be displayed at the top of the When Zoom is greater than 1: use the keys to shift the zoom point.
- Page 12 Press the OSD key continuously to cycle the Display Modes: Direct Selection During Play: • Enter a number. Current Title Current Chapter Title Elapsed Total Chapters TT 05/33 CH 05/09 The player will go to the start of the chapter. Total Titles 0:13:12 Play begins immediately from the start of the selection.
-
Page 13: Customising Player Settings
CHANGING THE AUDIO SETTINGS OF A DVD CUSTOMISING PLAYER SETTINGS The player allows you to select a preferred language, TV and audio format from Always access the SETUP menu when the player is stopped those included on the DVD video disc. Press SETUP to enter Setup. - Page 14 TV DISPLAY ON SCREEN DISPLAY LANGUAGE The settings are: Normal/PS (4:3 Pan Scan) Normal/LB (4:3 Letter Box) Wide Choose the Language for displaying On Screen Menus. Default-English (16:9). The default setting is Wide which will suit most modern TVs. General Setup HANDSET KEYS General Setup “...
- Page 15 TV TYPE SETTING THE SCREEN QUALITY Choose the TV Standard for your area. In the UK this is PAL (Default Setting) Setup etup HANDSET KEYS Brightness • Select BRIGHTNESS “ ”to select an item Type Quality NTSC Saturation • Press ENTER ’to go to the item choice Panel Quality “...
-
Page 16: Parental Settings
AUDIO PARENTAL CONTROL SETTINGS NOTE: Adult level is the factory default. The language you want the Preference Setup film to be in. Default is English Preference Setup Audio English 1 KID SAFE Subtitle Czech Audio • Highlight Parental: Disc Menu Subtitle Hungarian 3 PG... - Page 17 SD/MMC/USB main menu Browser mode 0000 03 43 001/008 \Ctyy\ ..TRACK01 TRACK02 TRACK03 TRACK04 TRACK05 After entering the SD/MMC or USB,the system will show Main In the Browser Mode,the system will show the list of file and folder. Menu which includes 4 Function ICONS.You can select them “...
- Page 18 2. Press OSD button when viewing pictures,you can select In the Music Mode,the system will show the list of music file,like different refresh mode as follows: Mp3 and so on. 1. from top to bottom Press “ ” “ ” “ENTER” ,select and play.
-
Page 19: Playing An Audio Cd
PLAYING AN AUDIO CD ADVANCED PLAY Load an Audio CD into the player. The player reads the disc. Most CDs will start A) Repeat automatically - a very few won’t. The player will display • Press REPEAT once to repeat the track. Press REPEAT again to repeat all tracks. Current Track Total Tracks Track 01/23... -
Page 20: Playing Jpg Discs
To display the menu: PLAYING A JPG CD • Select MENU Press ENTER Play Status Load a JPG disc into the player. The main screen will appear The MENU screen displays all the actions you can perform in JPG mode 00:00 00:00 Item number... - Page 21 ZOOM AND PAN PLAYING FOLDERS 00:00 00:00 001 / 015 During Play: Load a JPG disc into the player. • Press ZOOM repeatedly. The picture zooms: The main screen will appear 100% 125% 150% 200% 100% ’ ’ ’ ’ ’...
- Page 22 REPEAT MODE DIRECT SELECTION OF FOLDERS AND TRACKS From the main screen or when the slide show is stopped: In any screen the item at the top of the screen is always No.1 • Press the REPEAT key to: 00:00 00:00 To highlight the folder “ZOO”...
-
Page 23: Troubleshooting
TROUBLESHOOTING AFTER USING YOUR PLAYER • Remove the disc from the tray If your DVD player is not working properly use this guide before contacting • Close the player lid securely Tesco. Before investigating a problem, always switch off the player and any •... -
Page 24: Warranty
WARRANTY Compatible disc types: DVD/ CD Your Technika appliance is covered by a warranty for 12 months from the date of Signal system: PAL/NTSC purchase. If a fault develops during this period, please contact the TESCO electrical Panel size: 10.1”... - Page 25 Tesco Stores Ltd, Delamare Road, Cheshunt, Herts, EN8 9SL Technika Helpline: 0845 456 6767 ( Calls cost up to 4p per minute from a BT landline, other providers may vary)
Need help?
Do you have a question about the TK10PDVD112 and is the answer not in the manual?
Questions and answers