Table of Contents
Advertisement
Advertisement
Table of Contents

Related Manuals for Bear POLAR

Summary of Contents for Bear POLAR
- Page 1 ™ VISIBLE BEAM ROTARY LASER LEVEL AUTOMATIC HORIZONTAL & VERTICAL...
- Page 3 Thank you for purchasing the model POLAR LASER For trouble-free use of this scientific instrument, please read this instruction manual carefully and keep it for future reference. Place of Purchase : ........Date of Purchase : ...../..../ .... www.bearscientificproducts.com — 1 —...
-
Page 4: Table Of Contents
Contents Instrument accessories ..........Page Chapter 1. Cautions ............... Page Chapter 2. Introduction ..............Page Chapter 3. Instrument operation ............. Page Chapter 4. Battery ................Page 12 Chapter 5. Remote control .............. Page 14 Chapter 6. Accuracy checking & adjustment ........Page 15 Chapter 7. -
Page 5: Instrument Accessories
Instrument accessories Standard Accessories: 1. Instrument 2. Carry Case 3. Instruction Manual 4. Red Laser Target 5. Remote Control 6. Internal Ni-MH Battery Pack 7. Battery Charger Optional Accessories: (see page 27) 1. Genno Rod B-Genno 2. Wallmount B-WM 3. Outdoor Receiver & Clamp —... -
Page 6: Cautions
2. Avoid direct eye exposure to the laser beam. 3. When moving the instrument please turn off the power. 4. Push the buttons on the front of the Polar or the remote control with the base of your finger not sharp fingernails. -
Page 7: Chapter 2. Introduction
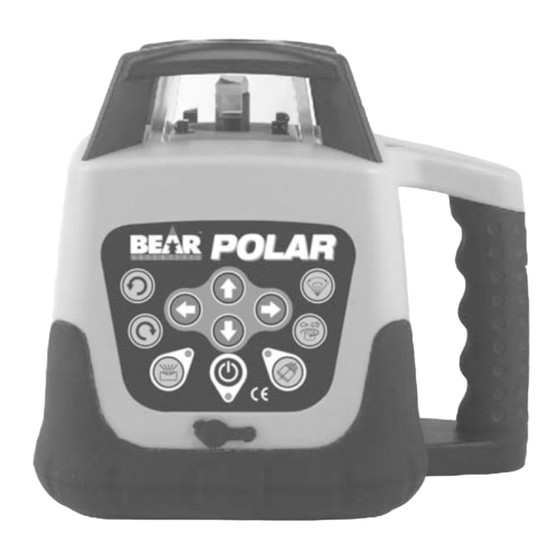
2. Introduction 2.1. Housing Nomenclature Laser head Laser window Rubberized Control panel Handle Charging port — 5 —... - Page 8 2.2. Control Panel Nomenclature Manual grades X & Y Laser head position anti-clockwise Scanning mode Laser head position clockwise Rotation speed Auto/manual Anti-drift mode Power (ON/OFF) — 6 —...
- Page 9 2.3 Control Panel Operation 1. Beam Position: Rotates the beam clockwise or anti-clockwise when the laser head is set to a stationary dot or is in scan mode. 2. Auto/Manual: Toggles the laser between auto leveling mode and manual mode (for set-up of manual slopes). 3.
-
Page 10: Chapter 3. Instrument Operation
3. Instrument Operation 3.1 Horizontal Leveling: • Place the Polar on the floor, countertop or mount it to a tripod or wallmount - suggest a flat head tripod is used. • Press the power button and allow up to 60 seconds for the unit to level. - Page 11 3.3 Rotation Speed Adjustment: Once the laser is set-up in either horizontal or vertical leveling mode, pressing the rotation speed button will cycle through the preset rotation speeds (0, 60, 120, 300, 600, 0 rpm). Slowing the rotation speed increas- es the visibility of the beam for interior applications.
- Page 12 3.5 Beam Position: Once the laser is set-up in either horizontal or vertical leveling mode, if the rotation speed of the laser is slowed to 0 rpm or the laser is placed in scan mode, the positioning of the beam can be adjusted clockwise or anti-clockwise by using the relevant beam position buttons.
- Page 13 • Press and hold the ¢ button to drive the beam down to your desired grade in the X1 direction. • Press and hold the button to drive the beam up to your desired grade in the Y1 direction. • Press and hold the £ button to drive the beam down to your desired grade in the Y1 direction.
-
Page 14: Chapter 4. Battery
4. Battery The Bear Polar comes equipped with a charger and inbuilt rechargeable battery but should you ever need to remove the battery pack for any reason (ie. if the unit is not going to be in use for more than two months) please use the following procedure: •... - Page 15 When battery power is low, the power LED will flash indicating that the batteries must be charged. To charge the batteries: • Plug the mains plug of the charger into a 100-240VAC (50/60Hz) power supply. • The red LED on the charger will flash. •...
-
Page 16: Chapter 5. Remote Control
5. Remote Control The Bear Polar comes standard with an infrared remote control. The remote can control all functions of the laser except power on/off and anti-drift mode on/off. The buttons on the remote control coincide exactly with the buttons on the control panel of the laser (refer to 2.3) and all functions are operated in... -
Page 17: Chapter 6. Accuracy Checking & Adjustment
6. Accuracy Checking & Adjustment: The Bear model Polar is a sealed unit and is calibrated to precise accura- cies at the factory. However, it is recommended that you perform a calibration check before the initial use of the laser and then from time to time to ensure that you are doing the highest quality work possible. - Page 18 sweeping beam line and move slightly up or down until you see that you are centered on the beam, make your mark. If conditions make the beam difficult to see, you can slow the rotation, scan the beam on the target surface or use a receiver to find the beam.
- Page 19 7.1.2 X-axis: 1. Follow steps 1 to 4 of procedure 7.1.1 above, substituting the X-axis for the Y-axis. 2. If the calibration error is within the stated specifications of ±2.0mm @ 30m then no calibration is required. If the calibration is outside of this specification do not move the laser and proceed with the calibration procedure for the X-axis outlined in 7.2.2 7.2 Horizontal Calibration Adjustment:...
- Page 20 7.2.2 X-axis: 1. Press and hold the £ and buttons on the laser control panel for about 3 seconds. The auto/manual LED will start flashing to indicate that the laser is in X-axis calibration mode. 2. Use the ¡ or ¢ buttons to adjust the height of the beam on the target until it is at true level or within the calibration specifications of the laser.
- Page 21 7.3 Vertical Calibration Check: 1. Set the laser up in vertical leveling mode as per procedure 3.2 2. Set up a plumb line in front of a wall approximately 10m from the laser. 3. Physically move the laser to aim the rotating beam at the plumb line. 4.
- Page 22 1. Setup the Bear Polar in horizontal mode and rotate the unit in such a way to align the X and Y axes with the direction of the desired slopes.
- Page 23 (Note: it is best to use the remote control for the next 2 steps but you can gently press the buttons on the laser control panel) 7. Press the auto/manual button to enter manual mode. 8. Use the manual grade arrow buttons to tilt the plane of light (as per chapter 3.7) until the “slope”...
- Page 24 — 22 —...
- Page 25 Example 2: You desire a negative 1.5% slope and your level reading is 1.459m on a staff that is 20m from your laser. Eg: -1.5% Slope with Point A 20 metres from the laser. (Note: -1.5% = -1.5/100) Height Differential = (slope %) x (distance) = (-1.5%) x (20m) = (-1.5/100) x (20m)
-
Page 26: Chapter 7. Outdoor Receiver
7. Optional Outdoor Receivers • Display: 3 channel LCD front • Display: 5 channel LCD front, 3 channel • Accuracy: 0.75mm LED rear • Audio settings: mute, low, high • Reception height: 50mm • Auto switch off: 30 mins without •... -
Page 27: Chapter 8. Care & Maintenance
If the instrument has been dropped please return it to your dealer for calibration (charges may apply). 3. If you are not going to use the Polar for a period greater than two months please remove the batteries from the unit. -
Page 28: Chapter 9. Specifications
9. Specifications Model POLAR Light source Red beam - high power laser diode, 635nm Laser class Class 2M/2a Leveling Accuracy 2.0mm @ 30m Self leveling range ±5° Measuring range 250m radius with receiver Spinning speed 0, 60, 120, 300, 600 r.p.m. -
Page 29: Chapter 10. Optional Accessories
10. Optional Accessories Genno Rod 2. Wall Mount Model B-GENNO model B-WM Two rods in one. • Heavy-duty aluminium Extended height 3.7m. construction Cut & fill on front, • Mounts any brand laser conventional rod on back, on the wall or suspended all in mm. - Page 30 — 28 —...
- Page 32 ™ AUTHORISED DEALER:...
Need help?
Do you have a question about the POLAR and is the answer not in the manual?
Questions and answers
Our level is mot leveling a and levl indicator is flashing