Renaissance Learning NEO 2 Quick Manual
For classrooms
Hide thumbs
Also See for NEO 2:
- User manual (275 pages) ,
- Quick manual (47 pages) ,
- Quick start manual (2 pages)
Table of Contents
Advertisement
Quick Links
Download this manual
See also:
Quick Manual
Advertisement
Table of Contents

Related Manuals for Renaissance Learning NEO 2


Summary of Contents for Renaissance Learning NEO 2
- Page 1 Quick Guide...
- Page 2 This publication is protected by US and international copyright laws. It is unlawful to duplicate or reproduce any copyrighted material without authorization from the copyright holder. This document may be reproduced only by staff members in schools that have purchased the NEO 2. For more information, contact Renaissance Learning, Inc., at the address above.
- Page 3 • your NEO 2 laptop • three AA batteries • a standard USB cable for connecting the NEO 2 to your computer or printer • the NEO Manager installation CD • the NEO 1 and NEO 2 Documentation CD, which includes your manuals •...
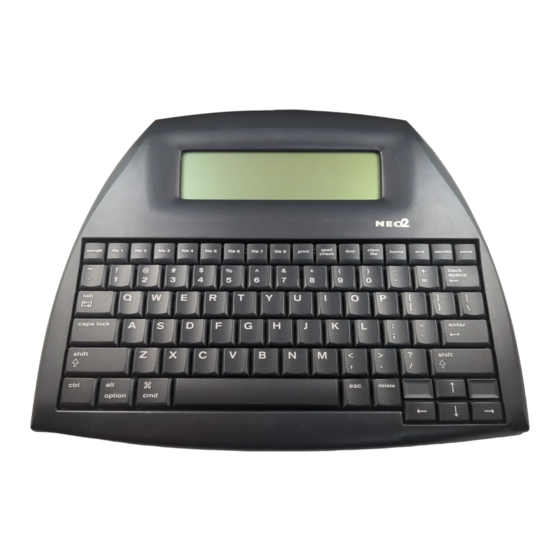
- Page 4 B O U T T H E NEO 2 BOUT THE The drawings below will help you identify the parts of your NEO 2: The NEO 2 screen. The battery compartment cover. The keyboard. The top row includes keys that...
- Page 5 Follow these steps to install the AA batteries: If you purchased the rechargeable battery 1. On the back of the NEO 2, put your thumbs in the circles and slide the pack, insert it instead compartment cover toward the left to remove it from the NEO 2.
- Page 6 NEO 2. For more information, see the NEO User Manual on the Documentation CD or at www.renlearn.com/neo/downloads. NEO 2 shuts down automatically to save battery power if you don’t use it for a certain amount of time. The default time is 4 minutes, but you can change it by pressing option--T or using the Idle Time System setting in NEO...
- Page 7 9. The installer will ask if you want to add the program to the dock. Click Yes or No. The installation will finish. Your computer may restart. After installation, the folders where NEO Manager and the Renaissance Wireless Server Utility were installed will open. NEO 2 Quick Guide...
- Page 8 C o n n e c t i n g a S i n g l e N E O 2 t o Y o u r C o m p u t e r 1. If this is the first time you have connected the NEO 2 to your computer, check the following: •...
- Page 9 ETTING ENAISSANCE ECEIVER If you received or purchased a Renaissance Receiver, you can use NEO 2’s wireless capabilities to print to your computer’s default printer. You can also use NEO 2s with the 2Know! Toolbar program, NEO Share, AccelTest software, Accelerated Reader RP, MathFacts in a Flash RP, Accelerated Math RP, and Google Docs.
- Page 10 It’s important to set a unique name for the computer/Receiver combination so that students know they’re connecting to the right Receiver when they use The Renaissance NEO 2 for quizzes or assignments. This is especially important if your school Wireless Server has more than one Renaissance Receiver. Follow these steps:...
- Page 11 W h a t A r e S m a r t A p p l e t s ? SmartApplets are programs that are installed on your NEO 2. These programs allow you to write on the NEO 2, use it with AccelTest software, Accelerated Math RP, or the 2Know! Toolbar, take Accelerated Reader...
- Page 12 If you want to delete all of the text from one of the files, press clear file. Then, press Y for yes when the NEO 2 asks if you’re sure you want to clear the file.
- Page 13 Manual on the Documentation CD or at www.renlearn.com/neo/downloads. This manual also explains how to send AlphaWord Plus files to services like Google Docs or retrieve files from Google Docs onto your NEO 2 (you must have a Renaissance Receiver, an Internet connection, and a Google Docs account).
- Page 14 Students can use NEO 2 to complete in-class assignments, but not homework; also, the Notes feature cannot be used with NEO 2. You cannot assign an owner to NEO 2 laptops as you do to Renaissance Responders in AccelTest.
-
Page 15: Using Neo 2 With Accel Erated Math Rp
When the assignment is complete, your score may be shown; if so, press any key when you’re ready to leave that screen. The NEO 2 will go back to the SmartApplets list. Using NEO 2 with Accel erated Math RP... - Page 16 3. Enter the form number that is on the top of the printed assignment. 4. If NEO 2 tells you to wait until your assignment is retrieved, press enter. 5. When NEO 2 shows your name and form number, press Y for yes if the information is correct.
- Page 17 5. In the 2Know! Toolbar program, click Close to go back to the toolbar. 6. NEO 2 will list your options. Press A to ask a question, B to show a graph, or C to minimize the Toolbar on your computer or maximize it again; then, press enter.
- Page 18 To mark or enter the correct answer, press D and enter; then, enter or select the answer. 7. When you’ve finished, you can unassign the NEO 2 so it is no longer meant for use by the teacher. Follow these steps: a.
- Page 19 1. The teacher’s computer must be on, with the Receiver connected. (You can use the teacher’s computer for other things while students are quizzing; it doesn’t need to be dedicated to quizzing.) 2. Turn the NEO 2 on and press applets. 3. Press until the cursor is next to Accelerated Reader.
- Page 20 12. The quiz title will be shown. If the monitor password is not required, press Y for yes to confirm that you You cannot substitute the NEO 2 want to take the quiz; then, press enter. master password for If the screen asks for the monitor password, the teacher or quiz monitor the monitor password.
- Page 21 N S T A L L E D O N T H E About the Accelerated Reader SmartApplet 13. NEO 2 will show you one question in the quiz. To answer each question, press the letter for the answer you want to choose; then, press enter to To stop a quiz, press go to the next question.
- Page 22 Students can use the MathFacts in a Flash SmartApplet to complete their school practices and tests on NEO 2 instead of at a computer. Note: You can also use NEO 2 laptops with Accelerated Reader (see page 16) and Accelerated Math (see page 13).
- Page 23 The way you answer the question depends on what you see on the screen: • If you see arrows below the answers, press , or and press enter. The circles below the answer choices will show you what keys to press to choose each answer. NEO 2 Quick Guide...
- Page 24 • To stop a practice or test, press ctrl-A or cmd-A. If the NEO 2 asks for a monitor password, your teacher must enter the MathFacts in a Flash monitor password.
-
Page 25: St Arting The Keywords Smartapplet
You must add each student who will be using KeyWords on the NEO 2. You can add up to eight students on each NEO. To avoid confusion on reports, don’t add the same student to more than one NEO 1 or NEO 2 laptop. Follow these steps to add students: 1. -
Page 26: Start Here
This helps you improve your accuracy and increase your speed while typing the keys. There are six practice passages in the accuracy and speed builders for each lesson. To choose the passage you want to work on, move the cursor NEO 2 Quick Guide... - Page 27 AlphaWord Plus file in one of the eight file spaces on the NEO 2. Then, type the number of the file you want to send the report to. If a password is required for the file, enter the password (or the master password).
- Page 28 AlphaWord Plus file in one of the eight file spaces on the NEO 2. Then, type the number of the file you want to send the report to. If a password is required for the file, enter the password (or the master password).
- Page 29 The Beamer SmartApplet uses infrared (IR) technology to send data from one NEO to another (NEO 1 or NEO 2) without using a cable. (You can also send data between a NEO 2 and an AlphaSmart 3000 running System 3 software, a Palm OS device, or a Dana.)
-
Page 30: About The Control Panel
See the NEO User Manual to find out how to send password-protected files and how to change Beamer settings. About the Control Panel The Control Panel lets you define settings for your NEO 2. To use the Control You can also change Panel, follow these steps: settings using NEO 1. - Page 31 Lower numbers lighten the background and text; higher numbers darken the background. Keyboard Command Lets you view a list of keyboard shortcuts you can use to perform functions on the NEO 2. Reference List View Keyboard Shows you the layout of keys on the keyboard with the currently selected layout. Press...
- Page 32 About NEO 2 Lets you view information about NEO 2. Wireless Security Lets you enter the encryption key if it is required for NEO 2 to communicate with Renaissance Receivers. For more information, contact Renaissance Learning. Update Text2Speech Lets you send updates to your Text2Speech device if you have one within range of the device NEO 2 IR port.
- Page 33 HARE TO XCHANGE ILES WITH NEO Share is a quick and easy way to send text or files to NEO 2 users and receive files back from them as you work with your group or classroom. Using NEO Share, you can: •...
-
Page 34: On Macintosh Computers
39.) Whether it is minimized or open, NEO Share will become transparent whenever you are using another program so that it does not cover other items on your screen. NEO 2 Quick Guide... -
Page 35: Sending Text To Neo 2S Using The Pi Ckup Zone
NEO 2, but the user can open the linked file by pressing ctrl-L. For more information about linked files, see the NEO User Manual. -
Page 36: Choosing The Files For Pickup
In the Files for Pickup area, you can select text files that you want to send to your NEO 2 users. On Windows computers, files must be in text (.txt) format. On Macintosh computers, you can also select .doc and .rtf (rich text format) files. -
Page 37: Monit Oring The Files Received
(or the type of file you have chosen). Monit oring the Files Received The Files Received area lists the files that have been sent back from NEO 2 When NEO Share is users. Depending on what you choose in the preferences (see page 39), this... -
Page 38: Deleting Files Received
7), and make sure your NEO 2 users know the Receiver name. Then, ask your NEO 2 users to follow these steps to pick up the text from your Pickup Zone or one of the files you’ve selected to be picked up: 1. - Page 39 How NEO 2 Users Pick Up Text or Files 2. Press cmd-O. 3. NEO 2 will ask if you want to keep the current file. If you want to keep it, press Y for yes, enter a name for the file, and press enter. If not, press N for no and press enter.
- Page 40 NEO 2.) 1. Open the file that you want to send back to NEO Share. 2. Press cmd-send. 3. If you have shut the NEO 2 off since you last connected to the Receiver, one of the following will happen: •...
- Page 41 The Preferences window will open. 2. Check the first box if you want NEO 2 users to enter a file name for the files they send back. If the box is not checked, the files will be named File 1, File 2, etc.
- Page 42 You’ll find newer versions of the NEO Manager software, which may include updates to your NEO system software or SmartApplets. You’ll also find other software and utilities that can help you make the most of your NEO laptops. NEO 2 Quick Guide...
- Page 43 2911 Peach Street, Wisconsin Rapids, WI 54494 (800) 338-4204 Email: answers@renlearn.com Web: www.renlearn.com NEO2QG.0310...
Need help?
Do you have a question about the NEO 2 and is the answer not in the manual?
Questions and answers