Table of Contents
Advertisement
Quick Links
Download this manual
See also:
User Manual
Advertisement
Table of Contents

Related Manuals for Enttec dmx 512


Summary of Contents for Enttec dmx 512
- Page 1 DMXStreamer User Manual www.enttec.com Firmware V1.3 28-May-2003 DMXStreamer User Manual...
-
Page 2: This
This page Blank DMXStreamer User Manual... -
Page 3: Table Of Contents
Table of Contents This page Blank.................2 Contents....................5 Contacting ENTTEC................5 Warranty....................6 Introduction..................7 Features....................8 Basic Concepts..................8 The DMXStreamer.................8 Connector Pin out................9 DMX OUT :................9 DMX IN:................9 RS232:...................9 The Menus..................10 Menu Structure..................11 Getting Started...................12 Setting the time................12 Memory usage...................13 1-Select Show..................15 2-Show....................15 2-1 Play..................15 2-2 Record..................15... - Page 4 4-1 Erase All.................18 4-2 Set Time.................19 4-3 Set Date..................19 4-4 Local time................19 4-5 Latitude...................19 4-6 Longitude................19 4-7 Start Frame................19 4-8 Start Delay................20 4-9 Backup Show................20 5-Backup ..................21 6-Test DMX..................22 7-Stop....................22 Solar Clock..................23 Internal Battery..................24 Boot Software..................25 1-Self test..................25 2-Firmware...................26 3-Checksum..................27 Appendix 1....................
-
Page 5: Contents
Contacting ENTTEC To contact us, please send an email to: contact@enttec.com Tel: +61 3 9819 2433 GMT+10 Tel: +61 3 9819 2733 To write us: ENTTEC Pty / Ltd PO BOX 282 KEW, VIC, 3101 AUSTRALIA DMXStreamer User Manual... -
Page 6: Warranty
ENTTEC warrants that the product that is manufactures and sells will be free from defects in materials and workmanship for a period of 1 year from the date of shipment from an authorized ENTTEC wholesaler. If the device proves defective within the respective period, ENTTEC will repair or replace at it's sole discretion, the defective hardware. -
Page 7: Introduction
Introduction Thank you for buying the DMXStreamer. At ENTTEC we are proud of our products and we hope you will enjoy them as much as we enjoy making them. Firstly, un-pack the unit from the box, the DMXStreamer is a 1U 9.5 inch rack, you can mount 2 together to form a standard 19 inch rack. -
Page 8: Features
Features The DMXStreamer provides the following features: Full 512 channel streaming recorder • Up to 26 shows • Up to 23 hours of recording • Show scheduling: Time of day, power up and switch closure • Internal battery backed real time clock •... -
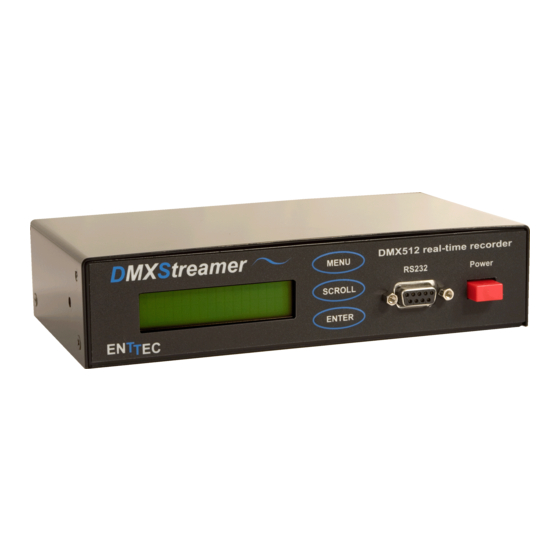
Page 9: Connector Pin Out
Connector Pin out DMX OUT : Pin 1: Ground Pin 2: Data - Pin 3: Data + Pin 4: NC Pin 5: NC DMX IN: Pin 1: Ground Pin 2: Data - Pin 3: Data + Pin 4: Switch To activate the switch input, you must make an electrical contact between PIN4 (switch) and PIN1 (ground) of the DMX input. -
Page 10: The Menus
The Menus To access the menus the DMXStreamer offers 3 buttons on the front panel: MENU, SCROLL, ENTER MENU is used to cancel the current action or go up one level in the menus SCROLL is used to scroll through the menus or scroll through values ENTER is used to validate the current setting, or enter the selected menu. -
Page 11: Menu Structure
Menu Structure 1-Select Show 2-Show 2-1 Play 2-2 Record 2-3 Erase 2-4 Name 2-5 Frame Rate 2-6 Number of Channels 3-Playlist 3-1 Edit 3-2 Goto Line 3-3 Conflict Check 3-4 Enter Show 3-5 Timiing 4-Setup 3-1 Erase All 3-2 Set Time 3-3 Set Date 3-4 Start Frame 5-Auto Backup... -
Page 12: Getting Started
Getting Started Start by connecting the power pack to the DMXStreamer, switch it on. The LCD screen will light up and the product name and version number will appear. The DMXStreamer will probably display NO TIME SET, meaning you have to set the time for the first time. Setting the time To set the time: 1-Press SCROLL until you select the Setup menu... -
Page 13: Memory Usage
Memory usage The DMXStreamer is equipped with 8 Mbytes of FLASH memory. The actual recording time can vary a lot depending on the number of channels that are recorded and the frame rate. This table will give you an indication of the minimum recording time you will achieve. - Page 14 Frame Rate Channels 23:18:06 15:32:04 11:39:03 09:19:14 07:46:02 06:39:27 05:49:32 11:39:03 07:46:02 05:49:32 04:39:37 03:53:01 03:19:44 02:54:46 07:46:02 05:10:41 03:53:01 03:06:25 02:35:21 02:13:09 01:56:31 05:49:32 03:53:01 02:54:46 02:19:49 01:56:31 01:39:52 01:27:23 04:39:37 03:06:25 02:19:49 01:51:51 01:33:12 01:19:53 01:09:54 03:53:01 02:35:21 01:56:31 01:33:12 01:17:40...
-
Page 15: 1-Select Show
1-Select Show This menu will let you select the show you want to act upon. To select the show simply press ENTER, and use SCROLL to select the desired show. Press ENTER to validate or MENU to cancel. 2-Show The Show menu will let you record, playback and setup various parameters. -
Page 16: Frame Rate
2-5 Frame Rate This menu will let you select the recording frame rate for this show. The frame rate can vary between 10 and 40 frames/sec. A higher frame rate will use more memory but fades will be smoother. You will have to find the setting that best suits your needs. The default frame rate is 25 frames per second. -
Page 17: Goto Line
3-2 Goto Line This menu can be used to quickly access a specific line in the playlist, you can also scroll through the lines using the Edit menu. 3-3 Conflict check The DMXStreamer has an inbuilt conflict checker for the playlist. It will check that no shows times overlap. -
Page 18: 4-Setup
Step Value Description MONDAY Start day (MON->SUN or ANYDAY) NORMAL Time type (NORMAL, BEFORE SUNRISE, AFTER SUNRISE,BEFORE SUNSET, AFTER SUNSET) Normal indicates that the show will start at 14:00:00 Before sunrise indicates that the show will start 14 Hours before sunrise After sunrise indicates that the show will start 14 Hours after sunrise 20:00:00... -
Page 19: Set Time
4-2 Set Time This menu can be used to set the system time 4-3 Set Date This menu can be used to set the system date 4-4 Local time This menu can be used to set your current time zone, this is necessary for sunrise/sunset scheduling. -
Page 20: Start Delay
4-8 Start Delay The start frame can be activated for a set time. After that time lapses, the DMXStreamer will continue normal operation and run the playlist as programmed. During the start delay no shows will start. 4-9 Backup Show To enable the show backup, you must program which show you want to start when the DMX fails. -
Page 21: 5-Backup
5-Backup The backup mode will enable you to play a show automatically in case of a DMX failure. The DMXStreamer will monitor the DMX input, if the DMX drops out for more than 2 seconds, the selected show will automatically start. -
Page 22: 6-Test Dmx
6-Test DMX Using this menu, the DXMStreamer can be used a simple tester to check your lamps. Connect you DMX network to the DMX output of the DMXStreamer. Press SCROLL key to select the channel Press ENTER Press SCROLL to modify the value Press ENTER to select the channel again. -
Page 23: Solar Clock
Solar Clock The DMXStreamer is equipped with solar clock calculations. The Solar clock will enable scheduling of shows based around sunrise & sunset times. For this to be accurate you must enter your current geographical location and time zone in the setup menu. To find out the location and time zone of your location please go to appendix 2 To program your show according to sunrise &... -
Page 24: Internal Battery
Internal Battery The internal real time clock runs on a standard lithium coin type battery CR2032. If the clock loses it's time when the DMXStreamer is switched off the battery is probably flat. To replace the battery simply open the unit and replace with a new battery. -
Page 25: Boot Software
Boot Software The DMXStreamer offers a special operating mode which allows you to upgrade the firmware or perform a self test, this is the boot software. To enter this special operating mode, press the MENU and SCROLL keys simultaneously when turning on the DMXStreamer. -
Page 26: 2-Firmware
2-Firmware Upgrading the firmware is very easy, you will need a PC running some sort of terminal program, we recommend Tera Term available http://hp.vector.co.jp/authors/VA002416/teraterm.html You will need to configure the terminal program for: Speed: 57600 baud Data: 8 bit Parity: none Stop bit: 1 Flow control: none 1. -
Page 27: 3-Checksum
3-Checksum This menu will display the checksum on the boot and application software. The reference numbers for each versions are displayed on our website. DMXStreamer User Manual... -
Page 28: Appendix 1
Appendix 1 RS232 Commands supported by the DMXStreamer Description Command Letter Read Ram Command Write Ram Command Version Command Show Command DMX Read Command Set Speed Command DMXStreamer User Manual... -
Page 29: Appendix 2
/ location table. Appendix 3 Federal Communications Commission (FCC) Declaration of Conformity Responsible Party: ENTTEC Pty/Ltd 110 Auburn Rd Hawthorn,Vic,3122 Australia declares that the products: Product Name: DMXStreamer complies with Part 15 of the FCC Rules. - Page 30 harmful interference residential installation. This equipment generates, uses and can radiate radio frequency energy and, installed used accordance with the instructions, may cause harmful interference radio communications. However, there guarantee that interference will not occur particular installation. this equipment does cause harmful interference to radio or television reception, which can be determined by turning the equipment off and on, the user is encouraged to try to...
-
Page 31: Appendix 4
Appendix 4 ENTTEC Pty Ltd 110 Auburn Rd, Hawthorn, Vic, 3122 Australia declare under our sole responsibility that out product: DMXStreamer conforms to the requirements of Council Directives 89/336/EEC and 73/23/EEC and therefore complies with the requirements of Council Directive 73/23/EEC, (The Low Voltage Directive) on the...
Need help?
Do you have a question about the dmx 512 and is the answer not in the manual?
Questions and answers