Table of Contents
Advertisement
Instruction Manual
Film and Photo Scanner
For Slides, Negatives and Photos
with 5.1 Megapixels, 1800 dpi scan quality
t 5.
egap e s, 800 dp sca qua ty
AFTER SALES SUPPORT
ER SALES SUPPORT
• 1 Slide lm holder
1 Slid l h ld
• 1 Negative lm holder
00 800 - 78 77 23 68
• 3 Photo trays
• USB cable
YEARS
• USB type power adaptor
WARRANTY
MODEL: MS 7100
PRODUCT CODE: 91841
11/2014
• Picture editing software
Advertisement
Table of Contents

Summary of Contents for MAGINON MS-7100
- Page 1 Instruction Manual Film and Photo Scanner For Slides, Negatives and Photos with 5.1 Megapixels, 1800 dpi scan quality t 5. egap e s, 800 dp sca qua ty AFTER SALES SUPPORT ER SALES SUPPORT • 1 Slide lm holder 1 Slid l h ld •...
-
Page 3: Introduction
Dear customer, Congratulations on purchasing a high quality Maginon product. You have acquired a modern Multi Scanner with excellent technical features and respective accessories, which is particularly easy to operate. Please study this information in detail, observing safety instructions, in particular. -
Page 4: Table Of Contents
Contents INTRODUCTION MAIN FEATURES CONTENTS OF BOX CONTENTS SAFETY INSTRUCTIONS OVERVIEW OF DEVICE INSERTING SLIDES INSERTING NEGATIVES INSERTING PHOTOS GENERAL OPERATION 6.1. Quick start 6.2. Main menu 6.3. Capture 6.3.1. Flipping an image 6.3.2. Adjusting image brightness and colors 6.3.3. Scanning and editing 6.3.4. - Page 5 6.9. Language setting 6.10. USB mode 7. BLAZEPHOTO (image processing software) 7.1. Installation 7.2. Editing functions 7.2.1. Import photos (Get Photo) 7.2.2. Preview 7.2.3. Edit 7.2.4. Create 7.2.5. Share 8. Disposal 9. Warranty and Service 10. Conformity 11. Technical Specification 12.
-
Page 6: Safety Instructions
1. Safety Instructions HAZARD for children • Children do not recognize the hazards that can result from the incorrect use of electrical equipment. The scanner should consequently be kept away from children. • Keep children away from packaging material. Danger of suffocation ! ELECTRICAL hazard •... - Page 7 WARNING against injuries • Install USB connection cable so that it does not become a trip hazard. CAUTION – material damage • Place Multi Scanner on a sturdy, level surface. • Protect the device against moisture, dust, high temperatures and direct sunlight as these may cause malfunctioning and can damage the electronics or housing.
-
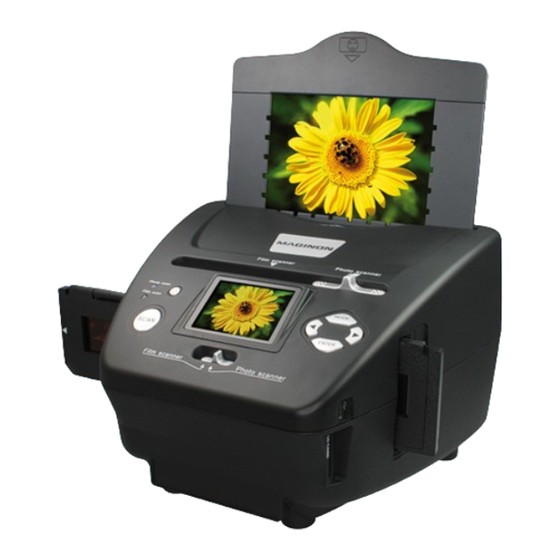
Page 8: Overview Of Device
2. Overview of device 1. ON/OFF switch 12. Insertion slot for photo holder 2. Control LED photo scan mode 13. Slider for selecting scan template 3. Control LED film scan mode 14. 6.1 cm TFT-LCD colour monitor 4. SCAN button 15. -
Page 9: Inserting Slides
3. Inserting slides Open the slide holder at the point marked “Open“ and place the open holder in front of you as shown below. The slides can now be placed the right way up (not turned and not reversed) in the recesses provided in the holder. -
Page 10: Inserting Negatives
4. Inserting negatives Open the negative holder at the point marked “Open“ and place the open holder in front of you as shown below. The negatives can now be placed the right way up (not turned and not reversed) in the recess provided in the holder. -
Page 11: Inserting Photos
5. Inserting photos Insert a photo into the photo holder for the respective picture size. The holders are available in sizes 9 x 13 cm (3 ½“ x 5“), 10 x 15 cm (4“x 6“) and 13 x 18 cm (5“ x 7“). Note: •... -
Page 12: General Operation
6. General operation 6.1. Quick start • To scan slides or negatives, slide the switch at the top for the scan mode and for selecting the insertion slot to the left “Film scanner” position. To scan photos, slide both switches to the right, to the position “Photo scanner”. •... -
Page 13: Main Menu
If no memory card is inserted in the device, the following warning appears when the Multi Scanner is switched on. The warning disappears after several seconds. 6.2. Main menu After switching on the scanner, the main menu of the scan mode appears on the display. When in submenus, you can return to this Main menu at any time by pressing the MODE key. -
Page 14: Capture
The next two illustrations show the Main menu of the photo scanner mode with information about the available options. Main Menu - Photo scanner mode Effect (multi-coloured / black & white) Language setting USB mode Image size (9 x 13, 10 x 15, 13 x 18 cm) Recording mode Resolution Playback... -
Page 15: Flipping An Image
6.3.1. Flipping an image During the scan preview (live display) you have the option of flipping the image vertically or horizontally prior to scanning. This function can be used to correct the orientation of incorrectly inserted pictures. Note: • The set flipped alignment shall also remain if the image is changed or another menu is selected after which scanning is continued. -
Page 16: Adjusting Image Brightness And Colors
6.3.2. Adjusting image brightness and colors During the scan preview you have the option of changing the brightness value (EV) and also the color value. First press the ENTER button. Now the monitor will display the settings for the brightness and also for the colors red (R), green (G) and blue (B). -
Page 17: Scanning More Images
Save Use the / keys in the Edit menu to select the option “Save“ and click on the ENTER key. The recorded image is then saved on the memory card. The scanner then returns to the scan preview. Save Cancel Using the ... -
Page 18: Memory Full
6.3.5. Memory full If the SCAN key is pressed in the Recording mode and the following warning appears on the Multi Scanner display, the used memory is full. In this case you will have to first transfer the images to the computer or insert a new memory card before scanning further images. -
Page 19: Automatic Slideshow
6.4.1. Automatic slideshow Symbol for slideshow mode As soon as you have switched on the Playback mode, all images of of the memory card are automatically displayed at 2-second intervals. Only images scanned by the Multi Scanner will be displayed; images from other sources cannot be played back. - Page 20 Below is another illustration of the described menu sequences. ENTER ENTER Slideshow mode Individual image mode Editing mode Use / keys to page through images Rotate images Scanned images can subsequently be rotated. To rotate the selected image by 90 degrees clockwise, select the option “Rotate+90°”...
- Page 21 Save To permanently save an image, first use the / keys to select the option “Save”. After pressing the ENTER key the image is saved and the next image is shown on the screen. ENTER Delete To completely delete the shown image, first select the option “Delete” with / keys in the Edit menu.
-
Page 22: Film Type (Only In Film Scanner Mode)
Home To leave the Edit menu and return to the Main menu use the / keys to select the option “Home” and press the ENTER key. You can also change to the Main menu at any time using the MODE key. -
Page 23: Effects (Only In Photo Scanner Mode)
6.6. Effects (only in photo scanner mode) The photo scanner mode allows you to preset whether colour or black and white photos are to be scanned. Use the / keys in the Main menu to select the option “Effect” and confirm the selection by clicking on ENTER. -
Page 24: Set Resolution
6.8. Setting the resolution The Multi Scanner contains an image sensor with a 5.1 megapixels resolution. You also have the option of selecting an interpolated resolution of approx. 10 megapixels. Slides and negatives are recorded at 5 megapixels (“5M”) with 2,760 x 1,840 pixels. By selecting the “10M”... -
Page 25: Language Setting
6.9. Language setting The language setting in the menus can be changed at all times. Use the / keys in the Main menu to select the option “Language” and confirm the selection by clicking on ENTER. ENTER Use the / keys to select the desired language and confirm the selection by clicking on ENTER. The Multi Scanner then automatically returns to the Main menu. -
Page 26: Blazephoto (Image Processing Software)
7. BlazePhoto (image processing software) The software CD contains the image editing program BlazePhoto. This program offers basic functions for archiving and post processing of photos. The program allows you to improve, change and manage images scanned with the Multi Scanner and burn them to CD/DVD. 7.1. -
Page 27: Preview
When the option Search folder is selected, the drives and folders currently available on the computer are shown in the program section. The folder containing the respective images can then be selected. The images contained therein are then shown in the preview so that you can select individual or all images. -
Page 28: Edit
The clipboard function allows you to pre-select individual images for further processing. Highlight one or several images in the preview by clicking on them with the left mouse button and selecting the option “Hold”. A lock symbol will then be applied to the thumbnails in the template. In order to remove an individual image again from the Clipboard, click on the image with the right mouse button and select “Delete selection”. - Page 29 You can improve the overall appearance of an image by changing the colour or sharpness of the image using the following functions: • Red eye: If a person appears to have red eyes in an image, this can be corrected. Using the mouse, drag a close frame around the eye and then click on “OK”.
-
Page 30: Import Photos (Get Photo)
7.2.4. Create The BlazePhoto program offers you the option to compile image series and save these for archiving or forwarding on CD or DVD. • Create disk: Select option “Create disk” to save images to CD or DVD. This will save all images on the CD or DVD. -
Page 31: Disposal
Please contact our hotline before returning a defective scanner. Service address for UK and Ireland: Address of manufacturer: Sertronics LTD supra Maginon Service Foto-Elektronik-Vertriebs-GmbH 45 Regal Drive, Walsall Enterprise Park Denisstr. 28A Walsall WS2 9HQ 67663 Kaiserslautern... -
Page 32: Conformity
10. Conformity This device was tested according to part 15 of the FCC regulations and it was confirmed that the limits for a digital device of class B have been complied with. These limits should provide accurate protection against unwanted interference when installed in a residential area. If the device is not installed in accordance with the instructions it may interfere with televisions, radios and radio transceivers. -
Page 33: Technical Specification
11. Technical Specification Model MS 7100 Image sensor 5.1 megapixels CMOS sensor Lens F=3.6; f=4.83 6.1 cm (2.4“ ) LTPS LCD display Scanner resolution 1800 dpi and 2400 dpi (interpolated) Exposure control Automatic Colour balance Automatic Data conversion 24 Bit External memory SD/SDHC and MMC cards Scanning method... -
Page 34: Index
12. Index Burning images 28 Main features 1 Main menu 11 Call-up Main menu 15, 20 Memory full 16 Changing exposure value 14 Menu options film scanner mode 11 Color setting 14 Menu options photo scanner mode 12 Conformity 30 Contents of box 1 Negative holder 8 Delete 19... - Page 36 supra Foto-Elektronik-Vertriebs-GmbH 91841 Denisstr. 28A 11/2014 67663 Kaiserslautern 2001 8207 Germany...
Need help?
Do you have a question about the MS-7100 and is the answer not in the manual?
Questions and answers