Table of Contents
Advertisement
Advertisement
Table of Contents

Subscribe to Our Youtube Channel
Related Manuals for Cimsun CimFAX


Summary of Contents for Cimsun CimFAX
- Page 1 CimFAX Fax Server User Manual (OA5 Version A)...
- Page 2 CimFAX Fax Server User Manual (OA5 Version A) This publication is subject to changes without notice. Changes or revisions of the publications will be included in the latest version. Cimsun Technology Co., Ltd. makes no representations or warranties with respect to the contents hereof and specifically disclaims any implied warranties of merchantability or fitness for any particular purpose.
-
Page 3: Safety Precautions
Safety precautions Please read the following information before deploying the products. Beware of the warnings and use the product in accordance with instructions labelled on the hardware. Warnings: ● Do not expose the equipment to liquid, moisture or high humidity. ●... - Page 4 Usage: This manual helps to familiarize appropriate use of CimFAX fax server. Note: All the servers mentioned in this manual are CimFAX fax server, if not specified otherwise. 3 ...
-
Page 5: Table Of Contents
2. Equipment Setup 08 5.6 Program Options 49 2.1 Setting up Environment 09 5.7 Scan Settings 50 2.2 Setting up CimFAX Fax Servers 5.8 Fax Format Conversion 51 5.9 Send Faxes 2.2.1 Standard Edition 09 5.9.1 Send fax from printing 2.2.2 Professional Edition (one-... -
Page 6: Package Contents
Package Contents Please open the package carefully and take out the contents. If any of the followings is missing, please contact the seller immediately. 1 ... -
Page 7: Product Description
Product Description This chapter describes features, functions and technical specifications of CimFAX fax server. 2 ... -
Page 8: Product Introduction
1.1 Product Introduction CimFAX is a new generation fax server of e-documents, which helps cut down based on embedded technology and large amount of costs on paper. Besides, designed to meet the fax requirement desktop faxing improve of small- and medium-sized companies productivity to a great extent. -
Page 9: Functions
● Fax broadcasting The server can send faxes to multiple ● Network sharing contacts simultaneously. A CimFAX fax server installed on local ● Auto IP dialing network supports multiple users to send The server can auto dial IP for distance and receive faxes simultaneously. -
Page 10: Technical Specification
1.3 Technical Specification Spec/Models Standard Edition A5 Standard Edition B5 Storage ◇ 256MB Users Line Port 1 port 1 port Fax Speed ▲ 14.4kbps 14.4kbps Resolution 98/196DPI 98/196DPI Caller ID Format DTMF, FSK DTMF, FSK Power Adapter Specification 12V AC/DC 12V AC/DC Maximum Power Consumption Network Port... - Page 11 Specs/Models Standard Edition C5 Professional Edition H5 Storage ◇ Users Line Port 1 port 1 port Fax Speed ▲ 14.4kbps 33.6kbps Resolution 98/196DPI 98/196DPI Caller ID Format DTMF, FSK DTMF, FSK Power Adapter Specification 12V AC/DC 12V AC/DC Maximum Power Consumption Network Port Ethernet RJ45x1...
- Page 12 Specs/Models Professional Two-line Ultimate Two-line Edition T5 Edition W5 Storage ◇ 16GB Users Line Port 2 port 2 port Fax Speed ▲ 33.6kbps 33.6kbps Resolution 98/196DPI 98/196DPI Caller ID Format DTMF, FSK DTMF, FSK Power Adapter Specification 12V AC/DC 12V AC/DC Maximum Power Consumption Network Port...
-
Page 13: Equipment Setup
Equipment Setup This chapter describes how to set up the server and connect it to network. 8 ... -
Page 14: Setting Up Environment
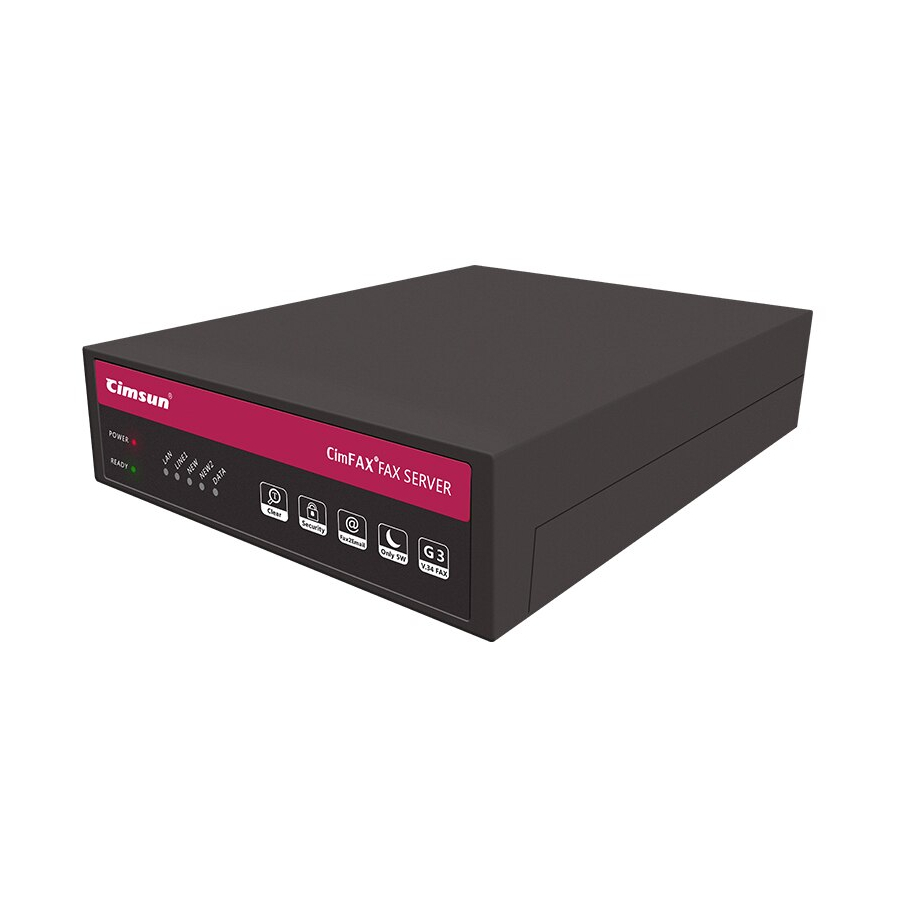
● We suggest you put the server under protection in case of unexpected power off and system restoration. 2.2 Setting up CimFAX Fax Servers of All Models 2.2.1 Standard Edition A5/B5/C5 Fig 2.1 Standard Edition front panel 9 ... -
Page 15: Line
Item Status Description Power on. Power state Power failure. The port is connected to a telephone line. Flash The port is connected to a telephone line. Telephone LINE Line status The port is not connected to a telephone line, or in off-hook status. The port is connected to network. - Page 16 Four steps to start Fig 2.2 4-step cable connection Port Item Description Power in Connects to a power adapter. Restores settings to factory default. Details refer to Reset button “4.8 Restore Factory Settings”. External function Reserved. Ethernet (RJ-45) Connects to an Ethernet 10/100M based network. UPLINK Ethernet (RJ-45) Connects to another network device.
- Page 17 Setting up steps Step 1: Connecting telephone line Step 3: Connecting a telephone or Plug telephone line for fax use in fax machine (optional) server’s LINE port to connect the don’t have to use extra server to PSTN network. Plug the line telephone, fax machine or manual in a telephone and dial to test line answer (see 6.2 Manual Answer), you...
- Page 18 2.2.2 Professional Edition H5 Fig 2.4 Front panel of Professional Edition H5 Item Status Description Power on. Power state Power failure. The port is connected to a telephone line. Telephone line Flash The port is connected to a telephone line. LINE status The port is not connected to a telephone line, or in off-hook status.
-
Page 19: Edition(Two-Line)
Item Status Description Server is receiving or sending fax. Fax status Server is not in fax mode. Server is playing voice. VOICE Voice Status Server is not in voice mode. Note: * LINE2 LED doesn’t work on one-line Server. Other signals: LED flashing in sequence from READY to VOICE means server is updating system. - Page 20 Item Status Description Power on. Power state Power failure. The port is connected to a telephone line. Telephone Flash The port is connected to a telephone line. LINE 1 line 1 The port is not connected to a telephone line, or status in off-hook status.
- Page 21 Fig. 2.6 Deployment of Professional Two-line Edition and Ultimate Two-line Edition Port Item Description Power in Connects to a power adapter. Restores settings to factory default. Details refer Reset button to “4.8 RestoreFactory Settings”. External function Reserved. Connects to a local Ethernet 10/100M based LAN-IN Ethernet (RJ-45) network.
- Page 22 Setting up steps telephones or fax machines by using a deconcentrator. Plug one end of the Step 1: Connecting telephone line RJ11 telephone cable in the PHONE Plug telephone line for fax use in port and the other end in a telephone server’s LINE-1 or LINE-2 port to or fax machine (RJ11 of telephones connect the server to PSTN network.
-
Page 23: Software Installation
Software Installation This chapter steps you through CimFAX client installation 18 ... -
Page 24: Disc Contents
●CimFAX introduction video (you need to have Flash Player in place). 3.2 System Requirements ●To install and use CimFAX client, you need to make sure that you’re your computer meet the following requirements: ●Windows 2000/2003/XP/Vista/7/8/8.1/10 operating system ●400MHz or more X86 compatible CPU ●128MB or more memory available... - Page 25 3. Click “Install CimFAX Client” on the welcome screen. 4. At the setup wizard screen, click “Next”. 5. Click “Next” or “Browse” to choose file location. 20 ...
- Page 26 6. Click “Install”. 21 ...
- Page 27 7. Wait for file copy complete. 8. Wait for the installation of CimFAX virtual printer. 9. Click “Finish”. 22 ...
- Page 28 10. You may have to reboot your computer under certain circumstances. 11. CimFAX client will auto start once installation completed. 23 ...
-
Page 29: Configuration Guide
Configuration Guide This chapter introduces how to configure operating parameter of the Server. 24 ... -
Page 30: Administrator Login
4.1 Administrator Login CimFAX client normally will auto start when installation is finished or computer operating system is initiated. If not, please click “CimFAX” icon on desktop or click “Start” button > “All Programs” > “CimFAX” to open the client. first time CimFAX client, click “Local”... - Page 31 “Server” in the top menu bar and click following two circumstances: “Network Settings” to change the IP 1. CimFAX fax server has not been address into that in the same network connected to your local network. Please segment with your computer (See 4.2 check network connection of the fax Network Settings), like 192.168.1.3.
-
Page 32: Server Network Settings
4.2 Server Network Settings Click “Server” menu bar of the client > “Network Settings”. Network settings window will appear. “Server” menu can be seen only when you login as the administrator. addresses address”. Other users will login the “Manually Specify” by default. Server with the assigned IP. - Page 33 address 2” and “IP address 3” in ● Assign an IP address for the event of login in different network Internet gateway (generally it is the IP segments. address of the router) in the field of Note: please make sure the “Default gateway”.
-
Page 34: Server Datetime Settings
corner and display “The IP address of connect to the Server at the new IP server been changed. address. Reconnecting…” and then “Connect to server success”, otherwise you will have to reconfigure network settings. If there’s another user logging on the server at this point, he/she will receive the said messages and their PC will re- 4.3 Server Datetime Settings... -
Page 35: Fax Options
be lost. After all information filled in, click “Apply” button. prompt window ● “Allow the server to synchronize with FSK time”: server date and time synchronize with FSK timecode. If your fax line does not support FSK caller identification or your FSK timecode incorrect, uncheck the option. -
Page 36: Fax Options
Fig 4.1 Fax options for one-line server In the Fax options window: ● Choose “send speed” and “recv speed” ● Fill in the name of your company in to limit the highest send and receive field “Company” within speed. We suggest you keep the factory characters. -
Page 37: Smtp Settings
“FROM: ●Check the option of “Disable warning Cimsun Tech 02085566893-607 Helen beep of this line” to enable the server TO: 02085566891 Mike” beep every seconds when The upper right header: “2013-06-12 telephone line is disconnected. -
Page 38: Smtp Settings
and SMTP settings window appears. “Server” menu can be seen only when you login as the administrator. ● “SMTP Server”: the SMTP server address like: smtp.MailServer.com. If your email requires encrypt link, you'll have to assign the port such as "465" and encrypt type like "#SSL". -
Page 39: User Accounts Management
4.6 User Accounts Management Click “Server” menu bar > “User Accounts”. User Accounts window displays. “Server” menu can be seen only when you login as the administrator. ● “User name”: permission by default. user name you used to login the fax “Fax forward to email”: the right to server. -
Page 40: System Upgrade
Inappropriate upgrade could cause server malfunction. Click “Browse” button to select the upgrade file which is named “*.img” released website (www.cimfax.com) or provided to you by our technical support. Click “Start Upgrade”. When file is uploaded, the following dialogue window will appear. -
Page 41: Temporary Factory Reset
4.8 Temporary Factory Reset Temporarily factory reset the server only when the administrator forgets admin password by cut power. Steps: ●Admin password will be restored to: ●Unplug the power adapter and then “admin”. plug in. the server will beep for 2 secs. ●Login the server with factory IP ●Use a toothpick or stick like this to address (192.168.1.2), user name... - Page 42 Type in the IP address of the other server in the field “Server IP” and click “Add”. A window will show “Servers binding success”. Click “OK” to close the window. 37 ...
- Page 43 Meanwhile, Servers binding window, “Address” column displays the other server’s IP address, “Server ID” column displays serial number “Connecting State” will marked success. Login the other server and follow the above-mentioned steps to mutually bind with the previous server. To unbind the servers, you just need...
-
Page 44: Fax Queue
If unbinding is success, a window will show “Servers successfully unbounded”. Click “OK”. Then the IP and serial number of the other server are removed from the Server binding window. Login the other server and follow the above- mentioned operations to unbind. 4.10 Fax Queue Click “Server”... -
Page 45: Fax History
4.11 Fax History Click “Server” menu bar > “Fax History”. Fax history window will appear. “Server” menu “Server” menu can be seen only when you login as the administrator. In Fax history window, you search fax The administrator can select a task and sending and receiving history by enter click “View content”... -
Page 46: Instructions
Instructions This chapter guides you through CimFAX client functions and usage in details. 41 ... -
Page 47: User Login
CimFAX client normally will auto start when installation is finished or computer operating system is initiated. If not, please click “CimFAX” icon on desktop or click “Start” button > “All Programs” > “CimFAX” to open the client. Enter the required information (note the case difference) on the login screen and then click “Login”. -
Page 48: Change Password
5.2 Changing Password To change your password, click “Option” menu bar > “Change Password”. Changing password window will appear. In the Change Password window, enter the required information and then click “OK”. If password is successfully changed, a window will show “Password has been changed. -
Page 49: Contacts
5.3 Contacts Click “Options” menu bar > “Contacts”. Contacts window will show. In the Contacts window: ● “Import”: add contacts from excel file (*.csv/*.xls/*.xlsx) and from name card file (*.vcf). ● “Export”: export contacts in excel file (*.csv) or name card file (*.vcf). ●... -
Page 50: Signature Library
5.4 Signature Library Click “Options” menu bar> “Signature Library”. Signature library window will appear. The first time you use signature library, you’ll be asked the following question. Click “Yes” to continue. Enter password for the signature library and then click “OK”. Note: Keep your password in mind, otherwise you’ll not be able to access signature library. - Page 51 Check whether the scanner is connected to your computer first and then sign your name or stamp on a white clean paper and put it in your scanner. Click “Scan”. Choose the model of your scanner shown list click...
- Page 52 A scanning screen will display the paper content. Drag the box signature click “Crop”. Check the signature and click “OK” if there’s no problem. 47 ...
- Page 53 signature will displayed in the left blank box of your signature library window. 48 ...
-
Page 54: Fax To Email
5.5 Fax to Email Click “Options” menu bar > “Fax to Email Setup”. Fax to email setup window will appear. In the drop-down box of “Forward to email”, you can choose: ● Never ● When user offline ● Always Enter you email address in the field of “Email to receive”. -
Page 55: Program Options
5.6 Program Options Click “Options” menu bar > “Program Options”. Program options window will appear. For “Startup and Close”, you can For Software Live Update, you can choose either “Startup with the system” choose “Disable automatic update from or “Login automatically (Remember official website (Internet)”. -
Page 56: Scan Settings
If you check “Disconnected/Connected”, you’ll see a pop-up window when server is disconnected or connected with your computer. For “Voice Prompt”, you can check the option “Play the following voice when there’s a new fax coming” and the option “Play the following voice when there’s unread fax”. -
Page 57: Fax Format Conversion
5.8 Fax Format Conversion Click “Options” menu bar > “Format Converting”. Format converting window will appear. For “Virtual Print Data Source”, you can choose: ● BW: gray document and image ● RGB: color document and image As to “Converting color/gray image to B/W fax format”, you can choose: ●... -
Page 58: Send Fax From Printing Documents
Select“CimFAX Printer” in drop-down menu of printer. Note: doc has many pages, please note to type in the number of pages that you want to send as fax. Printing too many pages may cause overload on you system. -
Page 59: Send Fax From Selecting Document
Click “OK” and you’ll see the following message in the lower right corner. After printed, the doc content will be displayed in “Fax viewer”. 5.9.2 Send fax from selecting document To send a fax, you can also click the “File” button or right clicking the document choosing option... -
Page 60: Send Fax From Scanning
5.9.3 Send fax from scanning Click “Scan” button. Select your scanner in the shown list and then click “Select”. Scanner begins working and the following progress window appears. Progress screen might differ due to scanners’ model difference. Some scanner may need warming time to work. -
Page 61: Choose Or Enter Recipients
5.9.4 Choose or enter recipients In the Fax viewer window, enter fax number in the field of “To”. You can also click “To” button and select multiple recipients in Select Recipients window. 56 ... - Page 62 If you want to send a fax to multiple recipients, you can add multiple recipients’ fax number in the field of “To” separate by colon. Or add recipients’ name and number in the following format: recipient 1<fax number 1>; recipient 2<fax number 2>; for example: Jack <02083598617>;...
-
Page 63: Signature And Stamps
5.9.5 Signature and stamps Click “Sign” button. You will be asked enter protection password signature library. Enter password and click “OK”. Follow the steps in “5.4 Signature Library” the first time you use the signature library. Click the signature you want in the list on the left of signature library window or select the signature and click... -
Page 64: Add A
5.9.6 Add a page Click “File” menu bar > “New Page”. You can choose to add a page from a scanner or a file. When page is added, you can see the pages of the fax on the left list. 5.9.7 Rotate Page Click “Options”... -
Page 65: Fax Options
5.9.8 Fax options Click “Options” in the upper right corner of the Fax Viewer. Fax options window will appear. Options include: “Priority”: when several tasks are delivered to the server, the server will process the task marked priority first. “Quality”: fax of fine quality takes more time to send while normal quality ones take less time. -
Page 66: Outbox And Sending Status
When there’s a new incoming fax, the server will route it to extension number it’s been directed to (see 6. Fax Mode). Open CimFAX client and you can see the following pop-up notification in the lower right corner of your computer (if you checked the option in 5.6 Program Options). -
Page 67: Reply And Forward
Click the message. Inbox screen will show up. Click the unread fax and the fax content will be displayed preview window below main screen. Click view next pages. You can also double click the fax to view it in the FaxViewer. Rotate counterclockwise/ rotate clockwise the page. -
Page 68: Add A Contact
5.10.5 Add a contact To add a contact, just right click the fax number in the column of “Caller ID” and choose “Save to Contacts”. Edit contact’s information in Contacts Details window and click “Save”. The contact is saved. You can check it later in Contacts. ... -
Page 69: Add Remarks
The remarks will be displayed in the column “Remarks”. 5.10.7 Send fax by email You can send the received fax by email to others. Right click the fax and choose “Forward thru Email”. CimFAX client only supports forwarding email Microsoft Office Outlook. -
Page 70: Ocr Options
When you need to extract text from fax, click “OCR” button preview window or right click the choose “OCR Recognition”. CimFAX client will call OCR Library in Microsoft Office Document Imaging identify texts in the fax. need have Microsoft Office Document... - Page 71 “Automatic Recognition” Start OCR when fax is received and add the texts in the column of “Remarks”: CimFAX client will automatically recognize texts in faxes as soon as they are received and use a part of the text as fax remarks.
-
Page 72: Public Faxes Distributing
5.11 Public Faxes Distributing If your account has the permission of “Distributor”, the server will route the un- specified incoming fax to your public inbox (See 6. Fax Mode). You can view the content and check whether it should be forwarded or deleted. Right click the fax task and choose “Distribute”... -
Page 73: Faxes Auto Export
5.12 Faxes Auto Export Click “Options” menu bar > “Automatic Export”. Automatic Export window will appear. The window contains: “Auto Print” and “specify the printer”: when a fax is received, it will be auto printed by the printer you specified. “Save as general file format”... -
Page 74: Language Configuration
5.13 Language Configuration Click “Options” menu bar > “Language”. Language configuration window will display. You can select the language you want for the client. Only “English” and “Chinese (simplified)” are supported to date. 69 ... -
Page 75: Fax Mode
Fax Mode 70 ... -
Page 76: Auto Answer
office, please note that 6.1 Auto Answer extension number on CimFAX server is not the telephone extension number of CimFAX server supports auto yours. However, the administrator can answer mode. If the administrator set set the telephone extension number as the server to answer incoming call after the respective user’s fax number in case... -
Page 77: Faq
This chapter introduces how to deal with server or client malfunctions. If your problem is not covered here or cannot be solved in the provided ways, please contact the distributor or CimFAX technical support (4008886480) for help. 72 ... - Page 78 IP, you can Q: What if server memory run out? login to the server in your office A: CimFAX fax server can meet the wherever you are. If you don’t static demand of most customers. 512 MB...
- Page 79 (stamp)? A: First sign your name or stamp on a white clean paper. Then put it in the scanner and CimFAX scanning signature function will help add your signature or stamp in encrypted library. See 5.4 Signature Library. 74 ...
Need help?
Do you have a question about the CimFAX and is the answer not in the manual?
Questions and answers