
Related Manuals for CPS g-290

Summary of Contents for CPS g-290
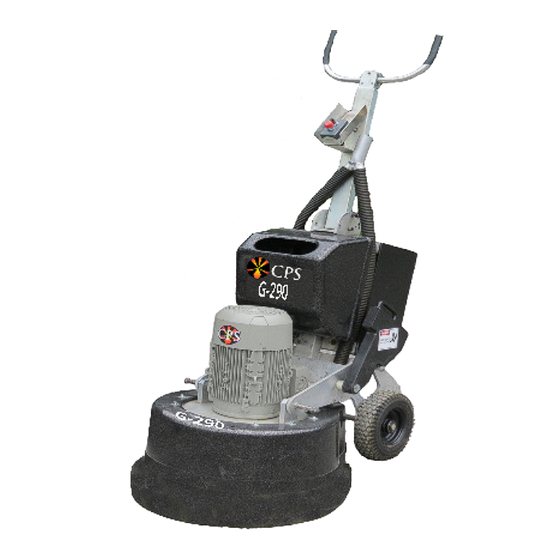
- Page 1 G-290 Grinder OPERATOR’S MANUAL Concrete Polishing Solutions PO Box 520 * Norris, TN 37828 Phone: (865) 494-8200 * Fax: (865) 494-8300 Toll Free: (877) 472-8200 * www.go2cps.com...
-
Page 2: Special Thanks
We truly look forward to each and every partnership that we have the privilege to form with our customers. Thank you again for purchasing a CPS G-290 Planetary Grinder. Best Regards, David Padgett President and CEO... -
Page 3: Table Of Contents
Concrete Polishing Solutions- G-290 Operator’s Manual GENERAL INFORMATION Table Of Contents Special Thanks .................2 Warranty/ Liability Policies ............4-5 Forward/ Special Symbols ............6 Delivery/ Specifications ..............7 Safety Messages ................8-9 All About Your G-290/290PRO ............10 Understanding Your Controls .............10 Preparing The Machine ..............12 How To Operate The Machine ............13... -
Page 4: Warranty/ Liability Policies
Warranty Concrete Polishing Solutions warrants to the purchaser that under normal use and service, the G-290 purchased hereunder shall be free from defects in material and workmanship for a period of 1 year or 300 hours. Expendable or consumable items or parts are not covered under this warranty. This warranty does not cover equipment or parts which have been misused, altered, neglected, handled carelessly, or used for any purposes other than those for which they have been manufactured. - Page 5 Concrete Polishing Technologies, Inc. CPS will not be liable for delays in shipping due to circumstances beyond the control of CPS. Warranties will not apply if after market alterations, changes, or modifications have been made to the equipment.
-
Page 6: Forward/ Special Symbols
Concrete Polishing Solutions- G-290 Operator’s Manual FORWARD Special Symbols Throughout your manual you will see several symbols that will enable you to recognize important information at a quick glance. WARNING! Avoid Death! This symbol and text highlight definite hazards or death to the operator or bystanders that will occur if the hazards or procedures are ignored. -
Page 7: Delivery/ Specifications
Concrete Polishing Solutions- G-290 Operator’s Manual DELIVERY & SPECIFICATIONS Your G-290 was carefully inspected and protectively packaged to prevent damage in shipment. We suggest that upon removing the unit from its carton, you carefully inspect it for any possible damage in transit. If damage is discovered, immediately notify the transportation company who delivered your machine. -
Page 8: Safety Messages
Concrete Polishing Solutions- G-290 Operator’s Manual SAFETY MESSAGES The G-290 machines are designed to be used by a professional. The user is expected to have a good knowledge and understanding of the user and safety instructions before operating, inspecting, or adjusting the machine. -
Page 9: Safety Messages
Concrete Polishing Solutions- G-290 Operator’s Manual SAFETY MESSAGES Always wear personal protective gear when operating the machine without a vacuum system. Wear a properly fitting particle mask, appropriate for this application, as specified by OSHA regulations. Obey all safety signs and instructions when operating or maintaining equipment. -
Page 10: All About Your G-290/290Pro
8 gallons of water. The water is gravity fed and released by using the water valve (B:3) located at the bottom of the frame. The G-290 is unique in that the weights © are attached to the frame, which prevents loss while maintaining an orderly job site. They provide 72lbs of additional weight and are located on both sides of the machine. -
Page 11: Understanding Your Controls
Concrete Polishing Solutions- G-290 Operator’s Manual UNDERSTANDING YOUR CONTROLS The control box is mounted on top of the G-290 on top of the control plate. Please note that some of the controls are strictly for programming the machine and are not part of the every-day function of the machine. Please contact the CPS Customer Service Department if you have any questions regarding the programming of your grinder/polisher. -
Page 12: Preparing The Machine
Then hook hose up to join vacuum and dust interceptor. Run the machine hose to dust interceptor. 4. The power cord should be included with delivery of your G-290. Locate power cord and plug into receptacle located next to the handle pin on top of the inverter box. -
Page 13: How To Operate The Machine
Concrete Polishing Solutions- G-290 Operator’s Manual HOW TO OPERATE THE MACHINE The G-290 is intended for use by a professional. As such, this section is intended to guide the operator through the operation of the G-290. It is not intended as instruction on grinding or polishing of floors. -
Page 14: Best Practices
12. Unplug electrical cord from outlet first, then unplug from G-290 and store as appropriate. When grinding with the G-290, one should do a forward pass followed by a back pass. No weights are to be used in the following steps: 1. -
Page 15: Maintenance & Rebuilding
MAINTENANCE & REBUILDING Maintenance The G-290 has been designed to be low maintenance for the operator. As such, there are only a few things you need to do to ensure optimum function. •By following the schedule above, you can expect the G-290 to operate as designed and perform consistently in the field. -
Page 16: Replacing Spring Sets
Concrete Polishing Solutions- G-290 Operator’s Manual REPLACING SPRING SETS The inverter will tell you your faults and what is occurring with your G-290. Remote keypad reading “LCR” (amps) is important. 24/7 Technical Support- Toll Free 1-877-472-8200... -
Page 17: Troubleshooting
Concrete Polishing Solutions- G-290 Operator’s Manual TROUBLESHOOTING The G-290 is designed for long, trouble-free performance and should not require extensive troubleshooting in the field. If difficulty is encountered, check the following: 24/7 Technical Support- Toll Free 1-877-472-8200... - Page 18 TROUBLESHOOTING CON’T If you still have questions after checking these items, please feel free to contact the CPS Customer Service Department and ask for Technical Support 24 hours a day at 1-877-472-8200. We are more than happy to help you with any questions or concerns you may have.
-
Page 19: Transporting & Storage
Concrete Polishing Solutions- G-290 Operator’s Manual TRANSPORTING & STORAGE Transporting the Machine Place the handle in the upright position. Lock the handle pin. Tip the machine back and transport on the wheels. CAUTION! Always place hands in center of handlebars (see... -
Page 20: Accessories & Related Products
Concrete Polishing Solutions- G-290 Operator’s Manual ACCESSORIES & RELATED PRODUCTS ACCESSORIES & RELATED PRODUCTS Item # Description GPPT0279 230 v PNS Machine Cord, 50 feet GPPT0138 480 v PNS Machine Cord, 100 feet GPPT0285 G-250 Dust Skirt GPPT0601 G-320/290 Series Magnetic Plate... -
Page 21: Regreasing The Ring Gear
Concrete Polishing Solutions- G-290 Operator’s Manual GREASING THE RING GEAR Instructions for Greasing Ring Gear Models G-290 24/7 Technical Support- Toll Free 1-877-472-8200... -
Page 22: Flex Head Assembly Instructions
Concrete Polishing Solutions- G-290 Operator’s Manual FLEX HEAD ASSEMBLY INSTRUCTIONS Flex Head Assembly Instructions- Using ¼ “ Diaphragm material Note: Procedure is shown with 1/4” nylon lock nuts and 5/16” I.D. flat washers; ¼” nylon flanged lock nuts may substitute. - Page 23 Concrete Polishing Solutions- G-290 Operator’s Manual FLEX HEAD ASSEMBLY INSTRUCTIONS Step 1 Place inner Polycord holder on the Polycord and push through the 8 flat head screws. The screws heads should be flush with the surface of the inner Polycord holder.
- Page 24 Concrete Polishing Solutions- G-290 Operator’s Manual FLEX HEAD ASSEMBLY INSTRUCTIONS Improperly aligned retainer and inner polycord holder. Note: The 3 holes of the inner polycord holder do not align with holes of the retainer. Flex heads could not be mounted...
- Page 25 Concrete Polishing Solutions- G-290 Operator’s Manual FLEX HEAD ASSEMBLY INSTRUCTIONS Components: Second Assembly * Outer Polycord holder * Completed first assembly * Main Mounting Plate * Spring (Red) * Drive shaft * 8 – ¼” nylon lock nuts * 8 – 5/16” flat washers Note: 8 1/4:”...
- Page 26 Concrete Polishing Solutions- G-290 Operator’s Manual FLEX HEAD ASSEMBLY INSTRUCTIONS Step 4 With the main Mounting Plate studs pointing up, place the grinding shaft in the center slots. Then place the spring in the center hole of the grinding shaft.
- Page 27 Concrete Polishing Solutions- G-290 Operator’s Manual FLEX HEAD ASSEMBLY INSTRUCTIONS Recommended type of manual press. Step 6 Continue to apply downward press pressure to the assembly, use your hands to push the Polycord holder down on the main Mounting Plate studs. Do this until the outer Polycord holder can be placed on the studs far enough to place a flat washer and a loosely fit nut.
- Page 28 Concrete Polishing Solutions- G-290 Operator’s Manual FLEX HEAD ASSEMBLY INSTRUCTIONS The assembly with flat washers and locking nuts in place prior to relieving ram pressure. Note: For illustration only. Nuts have been properly torqued in this photo. Using a criss-cross method torque all nuts to 6 foot pounds.
-
Page 29: Motor Manual
Concrete Polishing Solutions- G-290 Operator’s Manual MOTOR MANUAL 24/7 Technical Support- Toll Free 1-877-472-8200... - Page 30 Concrete Polishing Solutions- G-290 Operator’s Manual MOTOR MANUAL 24/7 Technical Support- Toll Free 1-877-472-8200...
- Page 31 Concrete Polishing Solutions- G-290 Operator’s Manual MOTOR MANUAL 24/7 Technical Support- Toll Free 1-877-472-8200...
- Page 32 Concrete Polishing Solutions- G-290 Operator’s Manual MOTOR MANUAL 24/7 Technical Support- Toll Free 1-877-472-8200...
- Page 33 Concrete Polishing Solutions- G-290 Operator’s Manual MOTOR MANUAL 24/7 Technical Support- Toll Free 1-877-472-8200...
- Page 34 Concrete Polishing Solutions- G-290 Operator’s Manual MOTOR MANUAL 24/7 Technical Support- Toll Free 1-877-472-8200...
- Page 35 Concrete Polishing Solutions- G-290 Operator’s Manual MOTOR MANUAL 24/7 Technical Support- Toll Free 1-877-472-8200...
-
Page 36: Slip Clutch W/O Pinion- Two Flange
Concrete Polishing Solutions- G-290 Operator’s Manual G-290 DRAWING & SCHEMATICS Slip Clutch Without Pinion 24/7 Technical Support- Toll Free 1-877-472-8200... - Page 37 Concrete Polishing Solutions-G-290 Operator’s Manual G-290 DRAWING & SCHEMATICS Slip Clutch Without Pinion G-290 24/7 Technical Support- Toll Free 1-877-472-8200...
-
Page 38: Slip Clutch W/Pinion- One Flange
Concrete Polishing Solutions- G-290 Operator’s Manual G-290 DRAWING & SCHEMATICS Slip Clutch With Pinion 24/7 Technical Support- Toll Free 1-877-472-8200... - Page 39 Concrete Polishing Solutions- G-290 Operator’s Manual G-290 DRAWING & SCHEMATICS Slip Clutch With Pinion G-290 24/7 Technical Support- Toll Free 1-877-472-8200...
- Page 40 Professional Surface Solutions Resin Bond Tooling Metal Bond Tooling Grinders Extractors CPS Mission Statement Take advantage of 10% off our To build and maintain lifelong relationships with our clients standard metal bond diamonds through our commitment and dedication to provide...
Need help?
Do you have a question about the g-290 and is the answer not in the manual?
Questions and answers