Table of Contents
Advertisement
Advertisement
Table of Contents

Related Manuals for Atomic AMPLIFIRE


Summary of Contents for Atomic AMPLIFIRE
- Page 1 USER MANUAL V 4.0...
-
Page 3: Table Of Contents
T A b L E o f c o N T E N T S INTRODUCTION . . . . . . . . . . . . . . . . . . . . . . . . . . 4-5 CONNECTORS . -
Page 4: Introduction
. This meant it had to sound/feel authentic and amazing while being easy-to-use, portable and road-rugged . AMPLIFIRE is equally capable of being a complete rig replacement or part of a larger pedal board and/or outboard processing rig . - Page 5 AMPLIfIRE12 AddITIoNAL fEATURES: • 12 fully programmable footswitches for ultimate control • 2 dedicated expression control inputs • 1/4” professional headphone jack • Large easy to read LCD display • Ultra rugged extruded aluminum case • Power Switch Enjoy!
-
Page 6: Connectors
coNNEcToRS dATA ENTRY ENcodER – used MIdS KNob – adjusts the mids to select and edit user presets . equalization control of the tone Turn to select a preset or change stack in the virtual guitar amplifier a parameter value. Push (click) to model . - Page 7 (for playing along with backing tracks, etc.). In EXPRESSION mode (AMPLIFIRE only) these inputs can be used with a special Y-cable to provide an expression pedal input for real-time effect control (wah, volume, etc).
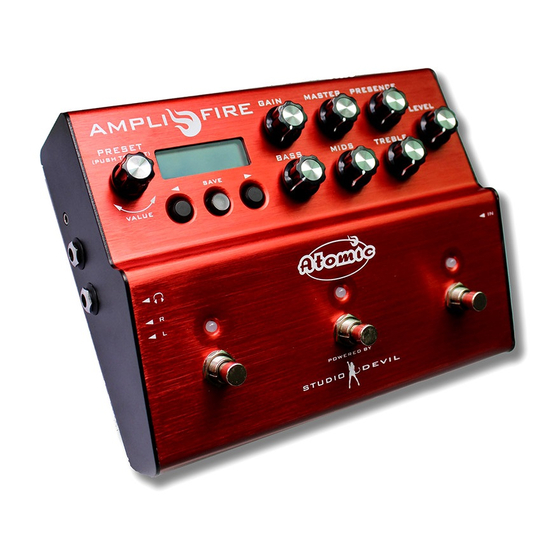
- Page 8 9V (1A) coNNEcToRS – AMPLIfIRE ampli fire GAIN MASTER PRESENCE PRESET LEVEL (PUSH TO EDIT) BASS MIDS TREBLE SAVE VALUE EFFECTS LOOP / AUX INPUT MIDI AUX OUTPUT LEFT RIGHT RETURN / AUX IN SEND RIGHT LEFT (MONO) 9V (1A)
-
Page 9: Connectors
– AMPLIfIRE 12... -
Page 10: Connection Diagram
– AMPLIfIRE fRoM oTHER To oTHER MIdI coNTRoLLERS MIdI EffEcTS PRocESSoRS fULL RANgE LoUdSPEAKER MP3/MEdIA PLAYER SYSTEM / P.A. EffEcTS PEdAL cHAIN MIdI fooT coNTRoLLER EffEcTS PRocESSoR MIXINg coNSoLE HEAdPHoNES AUX oUTPUTS MIdI EffEcTS LooP ampli fire GAIN... -
Page 11: Connection Diagram
– AMPLIfIRE 12 fRoM oTHER To oTHER MIdI coNTRoLLERS MIdI EffEcTS PRocESSoRS fULL RANgE LoUdSPEAKER EXPRESSIoN PEdALS SYSTEM / P.A. MP3/MEdIA PLAYER EffEcTS PEdAL cHAIN MIdI fooT coNTRoLLER EffEcTS PRocESSoR MIXINg coNSoLE MAIN oUTS MIdI ampli fire GAIN... -
Page 12: Effects & Signal Chain
EffEcTS ANd SIgNAL cHAIN AMPLIFIRE offers studio-quality effects developed by Studio Devil . They are arranged into the following signal chain categories (Editor designation is noted in parentheses): NoISE gATE (gTE) PARAMETRIc EQ / EcHo / MULTI-TAP PRogRAMMAbLE dELAY (Eco) -
Page 13: Cabinet Modeling
. Each of the amp models in AMPLIFIRE contain a “matched” built-in IR cabinet, but you are free to mix and match to create YOUR tone . -
Page 14: Quick Edit - Tweak Knobs
CONTINUED . . . MATcHEd cAbINETS Each amp model in AMPLIFIRE has its own ideal IR . meaning that they represent the type of cabinet that is typically used with that particular type of amp model . Without any programming or cabinet selection, you get the “right”... -
Page 15: Deep Edit - Preset Parameters
EdIT – PRESET PARAMETERS AMPLIFIRE has many effects modules, and each effects module has several parameters . Deep editing allows you to customize each of these parameters to create your own tone and effects setup. Here’s how it works: •... -
Page 16: Amps
800: Based on the early 80s British 100w head that helped defined metal . Hot brit: An AMPLIFIRE original model, this amp is inspired by the great British rock amps but has a tighter low end and more gain on tap . -
Page 17: Fx-Loop
EffEcTS LooP (fX-LooP) The EFFECTS LOOP allows you to place an external effect or processor or pedal into the AMPLIFIRE signal routing chain . The EFFECTS LOOP may be positioned in any of the following locations: • At Input: The EFFECTS LOOP is the first block in the signal chain immediately following the GATE effect . - Page 18 (unaffected) with your main outputs. In this mode, the EFFECTS LOOP position setting has no effect . If you have the AUX INPUT mode selected, then AMPLIFIRE will disable the EFFECTS LOOP, routing the output of the AMP MODEL effects block directly to the POST- EFFECTS section.
-
Page 19: Saving Presets
. • To SAVE YoUR cHANgES To THE SAME PRESET, without making any changes to the name, simply press the SAVE button twice, and wait for AMPLIFIRE to finish saving your preset. • To SAVE YoUR cHANgES To A dIffERENT PRESET LocATIoN with the same... -
Page 20: Default Preset On Power-Up
CANCEL return to the edited preset for either more editing or to save . waRning: amplifiRe will not warn you if you try to make a program change via a footswitch or midi program change. if you are in a performance, and use either a footswitch or external midi device to instruct amplifiRe to change presets, it will discard any edits and immediately switch to the selected preset. -
Page 21: Parameter Settings
PARAMETER SETTINgS ModEL: Selects the amplifier model from the list of available amp models . Choose NONE to bypass the amp model . ENAbLE: Enables or disables the amp modeling effect . Choose ACTIVE to enable the amp modeling or BYPASSED to disable the amp modeling . gAIN: Sets the gain control knob of the amplifier from 0.0 (minimum) to 10.0 (maximum). - Page 22 PARAMETER SETTINgS CONTINUED . . . cAbINET ModEL: Selects the cabinet model and/or cabinet emulation mode . Select NONE to disable everything: no cabinet model, no ROLLOFF, PEAK Q, BOTTOM, and AIR adjustment filters (for use with real guitar cabinets). Select FILTER ONLY to disable the cabinet model only and run the cabinet ROLLOFF, PEAK Q, BOTTOM, and AIR adjustment filters ONLY.
- Page 23 PARAMETER SETTINgS CONTINUED . . . booST booST: Turns the BOOST effect on or off . Select ACTIVE to turn it on . Select BYPASSED to turn it off . ModE: Select from the following BOOST modes: oVERdRIVE: Models a classic overdrive pedal similar to the Boss SD-1 ScREAMER: Models a classic overdrive pedal similar to the Ibanez TS-808 dISToRTIoN: Models a typical distortion pedal similar to a Boss DS-1 fUZZ: Models a fuzz-type distortion pedal similar to a Fuzz-Face...
- Page 24 PARAMETER SETTINgS EcHo EcHo: Turns the ECHO effect on or off . Select ACTIVE to turn it on . Select BYPASSED to turn it off . INSERT: Positions the ECHO effect . Choose PRE to position the effect in the PRE- EFFECTS section (mono, before the amp model).
- Page 25 PARAMETER SETTINgS CONTINUED . . . LEVEL (db): Controls the level in dB of the ECHO effect only. Adjust to blend the right amount of effect signal with your dry (unaffected) signal. WIdTH (0-100%): Controls the stereo width of the delay. Works in conjunction with the PING-PONG mode and only used when the ECHO effect is set in the POST (stereo) position.
- Page 26 PARAMETER SETTINgS CONTINUED . . . dIffUSIoN (0-100%): Controls the amount of cross-coupling in the feedback paths of the delays . Adding diffusion can make the ECHO sound more like a reverb . dRIVE (0-100%): Adds a distortion or overdrive character to the signal in the feedback loop .
- Page 27 PARAMETER SETTINgS CONTINUED . . . SPILLoVER (oN/off): Controls if the echo effect continues to decay after changing presets (spilling over into the next preset). This parameter is per preset and controls if the delay spills over when ENTERING (switching to) that preset. Setting this parameter to ENABLED means that any remaining echo from the previous preset will continue to spillover when you switch to THIS preset .
- Page 28 PARAMETER SETTINgS CONTINUED . . . REVERb ENAbLE: Turns the REVERB effect on or off . Select ACTIVE to turn it on . Select BYPASSED to turn it off . TYPE: Select from the following REVERB modes / styles: SMALL: simulates the reverb of a small room .
- Page 29 PARAMETER SETTINgS CONTINUED . . . dRY LEVEL (db): Allows you to change the dry (unaffected) signal level when the REVERB effect is enabled. Usually, the dry signal is mixed equally (0dB) with the REVERB effect . In cases where you want the dry signal much lower than the REVERB effect (to accentuate the reverb), or want to increase the output level, you can adjust it here .
- Page 30 PARAMETER SETTINgS CONTINUED . . . cHoRUS ENAbLE: Turns the CHORUS effect on or off . Select ACTIVE to turn it on . Select BYPASSED to turn it off . INSERT: Positions the CHORUS effect . Choose PRE to position the effect in the PRE- EFFECTS section (mono, before the amp model).
- Page 31 PARAMETER SETTINgS CONTINUED . . . The cHoRUS provides full programmability of the following parameters for up to 4 voices: MIX 1-4 (db): Adjust the level of the individual chorus voices before they are summed together to form the wet output signal . When all voices are set to 0dB they are of equal amplitude .
- Page 32 PARAMETER SETTINgS - EffEcTS CONTINUED . . . SPEEd (Hz): Controls the rate at which the LFO (Low-Frequency Oscillator) oscillates . The output of the LFO controls the delay time of the wet signal . A faster LFO rate means the delay times will change more quickly and the resulting comb filter will move around more quickly .
- Page 33 PARAMETER SETTINgS - EffEcTS CONTINUED . . . PHASER ENAbLE: Turns the PHASER effect on or off . Select ACTIVE to turn it on . Select BYPASSED to turn it off . INSERT: Positions the PHASER effect . Choose PRE to position the effect in the PRE- EFFECTS section (mono, before the amp model).
- Page 34 PARAMETER SETTINgS CONTINUED . . . bASE fREQ (Hz): Selects the starting frequency for the lowest notch filter when it is at the bottom most location of its sweep . TYPE (Log/LINEAR): Adjusts between logarithmic or linear sweeping of the notch filters .
- Page 35 PARAMETER SETTINgS CONTINUED . . . TAPER (0-100%): Controls how the LFO output is used to control the TREMOLO gain . TAPER controls the mid-point of the overall travel range of the TREMOLO gain . So at 50%, the TAPER is exactly linear. Below 50%, it is an audio TAPER and above 50% it is a reverse audio TAPER .
- Page 36 PARAMETER SETTINgS CONTINUED . . . coMPRESSoR ENAbLE: Turns the COMPRESSOR effect on or off . Select ACTIVE to turn it on . Select BYPASSED to turn it off . INSERT: Positions the COMPRESSOR effect . Choose PRE to position the effect in the PRE-EFFECTS section .
- Page 37 (for controlling effect parameters with pedals in real- time). For expression pedals to work with the loop jacks, the LOOP must be put into EXPRESSION mode. PLEASE NOTE: This mode is only available on the AMPLIFIRE since the AMPLIFIRE12 has dedicated expression pedal inputs.
- Page 38 PARAMETER SETTINgS CONTINUED . . . PARAM A: Selects the parameter for expression pedal “A” to control. You may choose from any non-global, non-menu type parameters (normal continuous parameters) within your preset . MIN A: Sets the minimum value of the selected PARAM A . This represents the value of the parameter when EXPRESSION PEDAL A is in the heel (minimum) position.
- Page 39 PARAMETER SETTINgS CONTINUED . . . fREQUENcY MIN (kHz): Sets the minimum frequency of the WAH-WAH filter effect sweep . This is the resonant frequency of the filter when the PEDAL parameter is in the minimum 0% (heel) position. fREQUENcY MAX (kHz): Sets the maximum frequency of the WAH-WAH filter effect sweep .
- Page 40 PARAMETER SETTINgS CONTINUED . . . T-WAH SENSE (db): Adjusts the sensitivity of the TOUCH WAH. It does so by means of an input gain control adjustment. Setting this to positive values will make the TOUCH WAH more sensitive and lower signal amplitudes will more easily move the WAH to the toe-down position .
- Page 41 PARAMETER SETTINgS CONTINUED . . . ModE (NoRMAL/ENVELoPE): In normal mode the VOLUME pedal position is determined by the value of the PEDAL parameter (see below). In envelope mode the VOLUME pedal position is determined by an input gain envelope detector and automatically tracks with your playing like an auto-swell volume pedal .
- Page 42 PARAMETER SETTINgS CONTINUED . . . INSERT: positions the GRAPHIC EQ effect . Choose PRE to position the effect in the PRE-EFFECTS section (mono, before the amp model). Choose POST to position the effect in the POST-EFFECTS section (stereo, after the amp model). LEVEL: Adjusts the output level of the GRAPHIC EQ effect in dB to match the bypassed level or to just provide additional overall boost or cut to the effect.
- Page 43 PARAMETER SETTINgS CONTINUED . . . LoWPASS 2: Applies a second-order low pass filter which passes bass (lows) and rolls off treble (highs). This filter begins to roll off (cut) high frequencies above the value set in the FREQUENCY parameter . It passes all low frequencies below the FREQUENCY parameter at the level set with the LEVEL parameter .
- Page 44 PARAMETER SETTINgS CONTINUED . . . PEAKINg: Applies a peaking filter which boosts or cuts the level of frequencies within a narrow band and leaves all other frequencies outside this band unaffected The level of the peak is set by the LEVEL parameter The center frequency of the peak is determined by the FREQUENCY parameter The width of the peak (amount of frequencies near the center frequency) is determined by the Q control Increase the Q control for a NARROWER peak, decrease the Q control for a WIDER peak...
- Page 45 PARAMETER SETTINgS CONTINUED . . . LoW-cUT: Adjusts the roll off frequency of a special low-cut filter, designed to allow customizing your tone by feeding less lows into the front end input of the guitar amp model This parameter can be used to “mod” the amp models for a tighter and punchier tone .
-
Page 46: Footswitches
AMPLIFIRE features three (3) fully programmable footswitches. AMPLIFIRE12 features twelve (12) fully programmable footswitches. PRogRAMMINg fooTSWITcHES Footswitch modes are selected on the FOOTSWITCH menu . The FOOTSWITCH menu appears third to last in the edit menu list, just before the CC settings page. To CHANGE THE FOOTSWITCH MODES, press the ENCODER knob to enter edit mode . - Page 47 TREMoLo: Toggles the TREMOLO effect between ACTIVE and BYPASSED . bANK +10: Increment the currently selected bank by 10 . After a press, AMPLIFIRE will flash the currently selected BANK and wait for the user to press one of the switches assigned to an OFFSET (see below).
- Page 48 fooTSWITcHES CONTINUED . . . PRESET “A”: Select one of the 128 presets for use as preset “A” in A<->B or A/B<- >BYPASS modes (allows you to toggle between two presets). PRESET “b”: Select one of the 128 presets for use as preset “B” in A<->B or A/B<- >BYPASS modes (allows you to toggle between two presets).
-
Page 49: Global Settings
SETTINgS Some of AMPLIFIRE’s parameters are GLOBAL, meaning that they have only one value and do not change with each preset . These GLOBAL parameters are either system options or effect parameters that are best set once from one location and that apply to all presets universally . - Page 50 MIdI cLocK (off/INPUT/oUPUT): Allows the AMPLIFIRE to transmit or receive a MIDI CLOCK signal . When set to INPUT the AMPLIFIRE will listen and respond to MIDI CLOCK messages on MIDI IN and set the BPM accordingly . When set to OUTPUT the AMPLIFIRE will transmit the current BPM via the MIDI OUT port .
-
Page 51: Tuner
If your signal clips one of the three (3) sets of outputs (MAIN, AUX, or HEADPHONES), AMPLIFIRE will display a CLIP WARNING in the display windows for 2 seconds . The CLIP WARNING will also indicate which output pairs clipped. For example, if you see Main+Aux+HP in the CLIP WARNING message, then you are experiencing digital clips on all three sets of outputs . -
Page 52: Expression Pedals
To enable expression pedals you will need a special adapter cable to connect your expression pedals to AMPLIFIRE. This adapter is available through Atomic Amps, or you can build your own with standard 1/4” adapters. Alternatively, you might want to assemble your own. - Page 53 EXPRESSION mode, or CABIBRATE your pedals . To cALIbRATE your expression pedals: 1. Press the SAVE button while AMPLIFIRE is displaying the PEDAL A (or PEDAL B) parameter. Pressing SAVE while TESTING your expression pedal will start the CALIBRATE process .
- Page 54 EXPRESSIoN PEdALS CONTINUED . . . ASSIgNINg EXPRESSIoN PEdALS Once the expression pedals are connected, calibrated, and working smoothly, you can assign them to parameters for continuous control . When an expression pedal is assigned to a parameter, it does not corrupt the value of the parameter in the preset (this is to preserve your settings when you choose to use your presets without expression pedals in the future).
-
Page 55: Midi
MIDI IN jack to the MIDI OUT jack. This is useful for MIDI setups where AMPLIFIRE is part of a chain of MIDI equipment in which only some of the messages are intended for AMPLIFIRE, and others are intended for other equipment on the same chain. - Page 56 MIDI CC settings are selected from the MIDI CC menu . The MIDI CC menu appears second to last in the edit menu list, just before the global settings. From this menu you can customize what actions the AMPLIFIRE will take in response to different MIDI control number (CC) messages.
- Page 57 MIdI CONTINUED . . . MIDI CC# FUNCTION PARAMETRIC #1 enable PARAMETRIC #2 enable PARAMETRIC #3 enable AMP enable FS1 press FS2 press FS3 press FS4 press (AMPLIFIRE12 only) FS5 press (AMPLIFIRE12 only) FS6 press (AMPLIFIRE12 only) FS7 press (AMPLIFIRE12 only) FS8 press (AMPLIFIRE12 only) FS9 press (AMPLIFIRE12 only) FS0 press (AMPLIFIRE12 only)
- Page 59 USER MANUAL V 4.0...
Need help?
Do you have a question about the AMPLIFIRE and is the answer not in the manual?
Questions and answers