
Subscribe to Our Youtube Channel
Related Manuals for MBM FGMD107


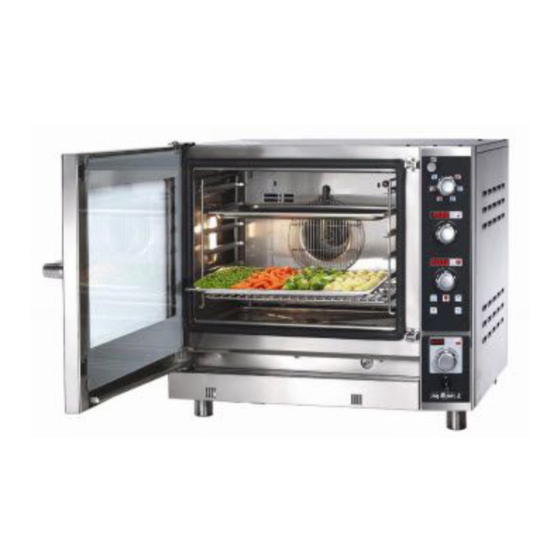
Summary of Contents for MBM FGMD107
- Page 1 INSTALLATION, OPERATION AND MAINTENANCE INSTRUCTIONS DIRECT ”COMBINED” ANALOGUE ELECTRONIC GAS OVEN TO STANDARDS EN 437 and EN 203 Part I EN 60335 - I and EN 60335 - II - 42 FGMD67 FGMD67SC FGMD107 FGMD107SC FGMD207SC FGMD207 - 1 -...
-
Page 2: Table Of Contents
Installation diagrams ......................... Direct ”Combined” gas oven FGMD67/FGMD67SC ............... Direct ”Combined” gas oven FGMD67/FGMD67SC with stand SF3 ..........Direct ”Combined” gas oven FGMD107/FGMD107SC with cabinet SFA - SFRU ......Direct ”Combined” gas oven FGMD207/FGMD207SC with stand SF2 .......... Installation instructions ........................10 Preparing for installation ........................ -
Page 3: Warnings
1. WARNINGS GENERAL WARNINGS - Installation, start-up and maintenance of the oven are to be carried out only by skilled personnel authorized by our firm or by licensed installers. - Read the instructions contained in this manual carefully as they provide important information on the correct installation, operation and maintenance procedures. -
Page 4: Technical Data
2. TECHNICAL DATA GAS APPLIANCES FGMD67 FGMD107 FGMD207 MODEL FGMD67SC FGMD107SC FGMD207SC EN 437 and EN 203 part 1 Standards EN 60335 - I and EN 60335 - II - 42 Electric Outside dimensions Width 1340 Depth Height min.mm 1045 Height max.mm... -
Page 5: Installation Diagrams
3. INSTALLATION DIAGRAMS DIRECT ”COMBINED” GAS OVEN FGMD67/FGMD67SC A) Gas connection G 3/4” B) Softened water inlet G 3/4” D) Water outlet Ø 40 mm E) Chamber flue Ø 100 mm F) Vent pipe Ø 50 mm G) Power supply cable input - 5 -... - Page 6 DIRECT “COMBINED” GAS OVEN FGMD107/FGMD107SC A) Gas connection G 3/4” B) Softened water inlet G 3/4” D) Water outlet Ø 40 mm E) Chamber flue Ø 130 mm F) Vent pipe Ø 50 mm G) Power supply cable input - 6 -...
-
Page 7: Direct "Combined" Gas Oven Fgmd67/Fgmd67Sc With Stand Sf3
DIRECT ”COMBINED” GAS OVEN FGMD67/FGMD67SC WITH STAND SF3 - 7 -... -
Page 8: Direct "Combined" Gas Oven Fgmd107/Fgmd107Sc With Cabinet Sfa - Sfru
F) Vent pipe Ø 50 mm D) Water outlet Ø 40 mm G) Power supply cable entry DIRECT “COMBINED” GAS OVEN FGMD107/FGMD107SC WITH STAND SFCV A) Gas connection G 3/4” E) Chamber flue Ø 130 mm B) Softened water inlet G 3/4”... -
Page 9: Direct "Combined" Gas Oven Fgmd207/Fgmd207Sc With Stand Sf2
DIRECT ”COMBINED” GAS OVEN FGMD207/FGMD207SC WITH STAND SF2 B) Adjustable top condensate outlet Ø 50 mm C) Chamber flue Ø 160 mm D) Humidifier water and steam reduction inlet G 3/4” E) Water outlet Ø 40 mm G) Power supply cable input H) Gas connection G 3/4”... -
Page 10: Installation Instructions
4. INSTALLATION INSTRUCTIONS Installation and adjustment operations are to be carried out by qualified personnel according to the norms in force. (See technical specification tables on page 4). WARNINGS: - If the oven is installed against a wall, the wall needs to withstand temperatures of 80°C and must be incombustible. - Inlets (water and electricity) and outlets (waste water, steam etc.) are signalled by dedicated tags. -
Page 11: Positioning
FGMD67 0.4 bar FGMD107 0.75 bar FGMD207 1 bar If the pressure does not correspond to the figure given here, release the control knob by pulling it, turn it onto the desired pressure and then press it to lock it. -
Page 12: Electrical Connection
Check that the phase (L1) and neutral (N5) polarities have not been swapped over, otherwise operation would be irregular and faulty in controlling the flame. PE (Earth) yellow-green N (NP) blue AC 220...240 V 50 Hz brown FGMD67 FGMD107 FGMD207 MODEL FGMD107SC FGMD207SC FGMD67SC I max. No. cables I max. -
Page 13: Table I Gas, Pressure And Classes In Different Countries
4.6.0 TABLE I: Gas, pressure and classes in different countries. As per EN 437 - EN 203-1 CAT. PRESSURE mbar COUNTRY AND CATEGORY OF THE EQUIPMENT Injector Nom. Min. Max. ERMANY UXEM ELGIUM USTRIA ENMARK TALY PAIN ORTUGAL ETHERLANDS RANCE ORWAY acronym WITZERLAND... -
Page 14: Hook-Up With The Gas System
The nozzles supplied for different types of gas are marked and contained in a plastic bag. The size of the orifice is given in hundredths of a millimetre. 4.6.1.1 REPLACING BURNER NOZZLE (FGMD67, FGMD67SC, FGMD107 and FGMD107SC) - Remove the right panel. -
Page 15: Replacing Burner Nozzle (Fgmd207 And Fgmd207Sc)
TAB. 11 4.6.1.3 ADJUSTING THE GAS PRESSURE AT THE BURNER FGMD207/FGMD207SC In the case of FGMD67and FGMD107 the valve is found by removing the right panel. In the case of FGMD207 the gas valve is located inside the left panel. To adjust the pressure at the burner, after removing the panel as shown in the figure, proceed as directed below. - Page 16 TAB.10 Foreword: The SIT 820 NOVA valves are multi-functional controls designed to optimize the performance of modern gas appliances: safety, quiet operation, durability. SIT is certified, from product development to production and quality control, to ISO 9001. Main features of the valves: - Passing from natural gas to L.P.G.
- Page 17 VALVE SIT 826 The main feature of this valve is being able to have two power units in the oven, therefore more even cooking, more accurate temperatures and a longer service life for the oven. The adjustments are made according to the data of Tab.4.6.1.5.1. The inlet and outlet pressures should be checked with a pressure meter (in mbar) at the test points on the valve.
-
Page 18: 4.1A Table Ii: Gas Burner Injectors For Direct Ovens
4.6.1.4.1a TABLE II: Gas burner injectors for direct ovens Model: FGMD67/FGMD67SC to EN 437 and EN 203 part 1 Convection part P.T. = 11.4 kW Pressure Pressure regulator Class Type of gas rated Injector upstream Press. Press. Burner at the Nozzle 1°Step Ø... -
Page 19: 4.1B Table Iii: Gas Burner Injectors For Direct Ovens
4.6.1.4.1b TABLE III: Gas burner injectors for direct ovens Model: FGMD107/FGMD107SC to EN 437 and EN 203 part 1 Convection part P.T. = 15.5 kW Pressure Pressure regulator Class Type of gas rated Injector Press. Press. upstream Burner at the Nozzle 1°Step... -
Page 20: 4.1C Table Iv: Gas Burner Injectors For Direct Ovens
4.6.1.4.1c TABLE IV: Gas burner injectors for direct ovens Model: FGMD207/207SC to EN 437 and EN 203 part 1 Convection part P.T. = 28.0 kW Pressure Class Type of gas Pressure regulator rated Injector Press. Press. upstream Burner at the Nozzle 1°Step Ø... -
Page 21: Checking Heat Capacity By Means Of Pressure
4.6.1.5 CHECKING HEAT CAPACITY BY MEANS OF THE PRESSURE Check whether the indication given on the adhesive plate near the gas connection G 3/4” corresponds to the available gas. Using a pressure gauge, check whether the inlet pressure is within the limits as per Table II on page 19 and 4.6.1.6.1. The inlet pressure can be checked either on the ramp or on the valve (inlet pressure test point). - Page 22 - 22 -...
-
Page 23: Other Outlets
4.6.1.9 OTHER OUTLETS For no reason may the food vapour vent or waste water outlet of the appliance be closed, blocked or channelled together with other pipes. 4.7 ROOM VENTILATION It is necessary to have plenty of air coming into the rooms to take the place of the volume of air expelled through the flues, and to supply the burners, approximately 3 m /h. - Page 24 COMBINED GAS OVEN INSTRUCTIONS - CONTROL PANEL - 19 MANOPOLA SELETTORE - - 1 VALVOLA SFIATO - - 2 CONVEZIONE - - 7 RAFFREDDAMENTO CAMERA - - 6 RIGENERAZIONE - - 3 VAPORE - - 4 VAPORE TERMOSTATO - - 5 MISTO - - 8 DISPLAY TEMP.
-
Page 25: Using The Electronic Oven
6. USING THE ELECTRONIC OVEN COOKING SELECTION The selection is made by turning the selector onto one of the six positions corresponding to the different cooking modes: the respective LEDs (2,3,4,5,6,7) flash and, after a few seconds, the function is accepted. In this way the control panel is switched CONVECTION COOKING From 20°C to 270°C this is the fastest cooking method. -
Page 26: Humidifier
HUMIDIFIER (12) It is possible to adjust the percentage of moisture in the cooking chamber. It is essential to obtain products with a low moisture content, such as bread, biscuits and cakes, soft items. The humidifier is also used to prevent roasts from burning or losing a lot of their liquid. Pressing this button once (left LED on) introduces water for a set time. -
Page 27: Core Probe
CORE PROBE (Only for models -SC) For many foods (for instance roast-beef, pâté, fatty roasted meat, etc.) the temperature inside the product is very important. With the inner probe, it is possible to switch off the oven at the right time, that is when the desired temperature (previously set on display 17) has been reached. -
Page 28: Messages And Alarms
6.11 MESSAGES AND ALARMS Service messages door : door open Cont : continuous operation Hold flashing: waiting to hold Hold steady: holding in process End : cooking has ended. Alarm messages P1 no : Chamber temperature sensor broken or disconnected. P2 no : Core probe broken or disconnected (it is still possible to continue using the oven without the core probe). -
Page 29: Troubleshooting
7.1.2 TROUBLESHOOTING THE OVEN DOES NOT COOK EVENLY * The products to cook have been pressed too close to each other. You should always check there is good air circulation between the products. YOUR PRODUCT IS DRY AND IS UNFIT FOR CONSUMPTION * Check whether the humidifier is working and whether the temperature is the right one for your product. -
Page 30: F) Oven Lamp
F) Oven lamp Tab.3 - Remove both screws (1). - Remove the frame (2) with glass (3). N.B. Check that the silicone rubber gasket is not damaged. - Replace the oven lamp (4). - Fit it all back together in reverse order to the above. G) Oven door gasket Tab. -
Page 31: Yearly Maintenance
7.2.2 YEARLY MAINTENANCE This is only to be done by an authorized, skilled technician! 1) Check burner ignition. 2) Check all the settings of the gas multi-functional valve. 3) Check the pipe bundle if necessary. 4) Check the seal of the door gasket. 5) Check the seal of the gaskets of the door double-glazing.
Need help?
Do you have a question about the FGMD107 and is the answer not in the manual?
Questions and answers