Table of Contents
Advertisement
Quick Links
Download this manual
See also:
Installation Manual
Advertisement
Table of Contents

Related Manuals for Audiovox Mobile Video VOD100


Summary of Contents for Audiovox Mobile Video VOD100
-
Page 1: Operation Manual
OPERATION MANUAL 128-8338... -
Page 2: Important Notice
If you have any questions regarding wire routing in a vehicle, please contact Audiovox Technical Support at 1-800-225-6074. -
Page 3: Safety Precaution
Congratulations on your purchase of the Audiovox VOD100 DVD Player with Drop-Down Video / Monitor. The VOD100 has been designed to give you and your family many years of video entertainment in the mobile environment. Please read the directions that follow to familiarize yourself with the product to ensure that you obtain the best results from your equipment. -
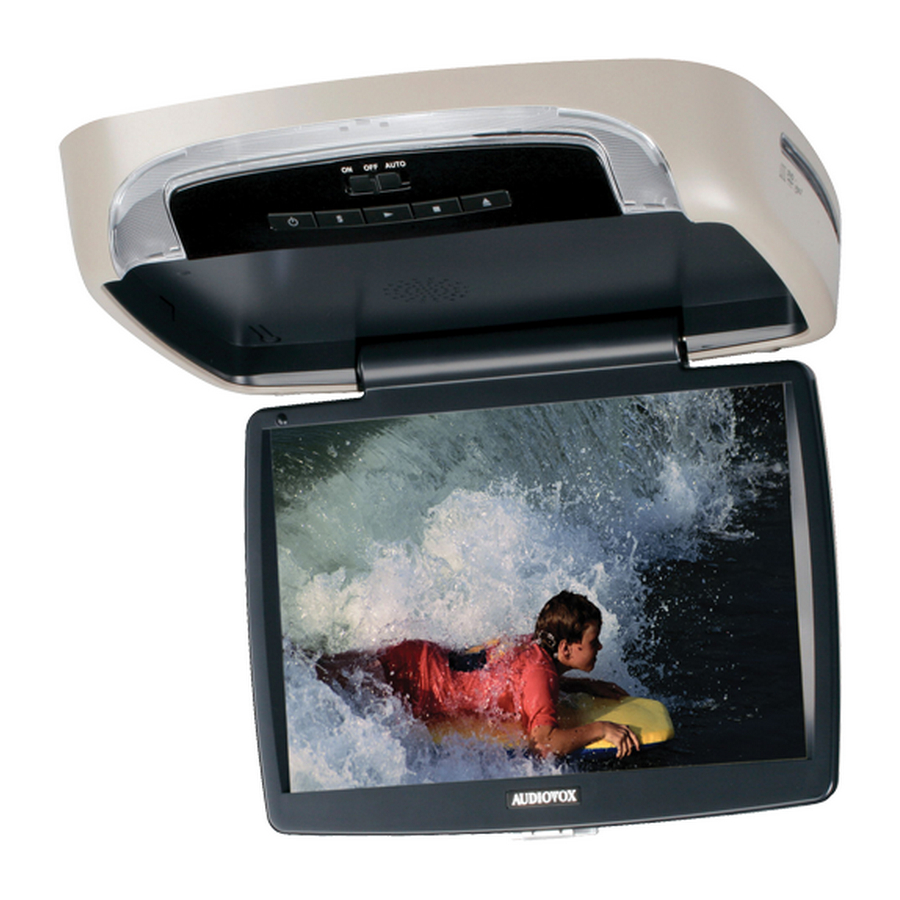
Page 4: Controls And Indicators Diagram
CONTROLS AND INDICATORS DIAGRAM (FRONT VIEW) 1. POWER ( ) Button Used to turn the system on/off. 2. Source Select Use to select one of the four sources: 3. PLAY ( ) Button This button is used to start playback of a disc. 4. -
Page 5: Remote Control Operation
CONTROL FUNCTION DESCRIPTION (SIDE VIEW & BACK VIEW) Side View Side View 1. DVD Disc insertion Slot For loading and removing discs. Unit must be in a powered on state to load disc when disc is inserted. Insert disc with label side facing up. -
Page 6: Main Function Description
MAIN FUNCTION DESCRIPTION POWER MONITOR SELECT EJECT SOURCE AUTO MEMORY SKIP/ SEARCH ERASE/ WRITE VOLUME CHANNEL DAY/ ON/OFF SELECT NIGHT RETURN DISPLAY ON/OFF MENU SETUP REPEAT AUDIO ZOOM SUBTITLE * Function control is available on the unit and the remote control. ** Function not available in this model. - Page 7 SKIP / SEARCH Button** This button selects between SKIP and SEARCH mode. In "SKIP mode" the TV tuner will tune and stop on channels that are programmed into memory when the CHANNEL UP / DOWN buttons are used. When the SKIP mode is disable, the TV will stop on all active channels. ERASE / WRITE Button** While tuned to a channel, pressing this button will alternately store or erase the channel from memory.
- Page 8 15. MENU Button Allows the user to access the DVD menu(DVD MODE). 16. REPEAT Button Allows the user to repeat a selected title, chapter, or track. 17. AUDIO Button Press to display and select the available AUDIO languages in DVD mode. Each time you press the button, the language changes. Note: The languages for audio vary from disc to disc.
- Page 9 25. NEXT ( ) Button Press to skip to the next chapter or track. 26. A-B Button Allow user to repeat the playback from point A to point B. Press A-B button On-Screen Display Once Repeat A- Twice Repeat AB 3 times AB Off 27.
- Page 10 31. DAY / NIGHT Mode Button** This control toggles the unit between "Day" and "Night" LCD illumination modes. In the "Day" mode, the LCD backlit intensity is at Maximum. In "Night" mode, the LCD backlit is dimmed to a preset level that is more suitable for low light operation. 32.
-
Page 11: Settings And Adjustments
SETTINGS AND ADJUSTMENTS PICTURE ADJUSTMENTS When watching a program, the picture quality can be adjusted to suit your taste. PIX (P) Button 1) Each time this button is pressed, the on screen picture adjustment displays the "adjustment bar" for BRIGHTNESS, CONTRAST, COLOR, TINT or RESET. -
Page 12: Menu Adjustment
MENU ADJUSTMENT SYSTEM (MAIN) MENU and On Screen Display (OSD) 1) In TV mode, Press the MENU button on the remote, the main page of the system menu will appear on screen. 2) Use the cursor buttons to select the desired item in the main page and press the OK button to select. 3) The sub menu will appear on screen. -
Page 13: Osd Language
OSD LANGUAGE This allows the user to select the language for the on-screen display. The user can either select English, Spanish, French or German for the OSD language. SOURCE DEFAULT DVD This allows the user to select from: DVD default on- When ever the unit is turned on it will return to DVD mode. DVD default off- When ever the unit is turned on it will return to the last source selected. -
Page 14: Using The Setup Menu
SETTINGS AND ADJUSTMENTS The Setup Menu contains features and options that let you customize your DVD player. For example, you can set a language for the on-screen display or prevent DVD playback for children. Using the Setup Menu 1. Press the SETUP button on the remote. The Setup Menu appears on the screen as shown per diagram. Language Setup Language Video Setup... - Page 15 LANGUAGE SETUP Language for On-Screen Display OSD MENU: The OSD MENU setup allows you to select the language for the on-screen display. The user can either select English, French, Spanish, German or Italian for the OSD language. SUBTITLE SETUP select "SUBTITLE" using button, then press desire using button, then press "OK"...
-
Page 16: Rating Setup
TV Type The TV TYPE setup allows you to select the system to fit to the color system of the TV to be connected. NTSC - Select this type for NTSC TV PAL - Select this type for PAL TV Multi - Select this type for multi-system TV RATING SETUP Rating... -
Page 17: Misc Setup
Misc SETUP select "MISC" using button, then press using button, then press "OK" to confirm the setting. Press button to return. Load Factory Load Factory allows you to reset all options to factory settings. * This function will not affect the Rating control settings. Screen Saver ON -Screen saver will appear OFF -Screen saver will not appear... -
Page 18: Playing Mp3 Discs
Playing MP3 Discs MP3 is a format for storing digital audio. An audio CD-quality song can be compressed into the MP3 format with very little loss of quality, while taking up much less space. CD-R discs that have been encoded in MP3 format can be played on your DVD player. The DVD player plays the songs in the order they were burned on to the disc. - Page 19 Flat Mode: play the entire disc This mode is aways on (default). During the Flat Mode all the data folder with MP3, JPEG & movies will be played in sequence. If the Flat Mode function is off, it will only play the selected folder; other folders are disabled. Repeat: play repetitively Repeat function has 4 options : Off, Single, Folder, All.
- Page 20 Edit Mode Program View Add to Program Notice: Edit Mode/Program view/Add to program functions are all related and can not be implemented during play mode or any other program function. Method: Make sure disc playback is off. Move cursor to Edit Mode function and press OK. After Edit Mode is selected, open the folder and select the songs which will be compiled.
- Page 21 DVD Basics To get the optimum use out of the DVD section, make sure you read this section completely. Regional Coding Both the DVD player and DVDs are coded by region. These regional codes must match in order for the disc to play. If the codes don t match, the disc won t play.
-
Page 22: Turning The Unit On Or Off
TURNING THE UNIT ON OR OFF 1. Pushing in the Screen Release button will unlock the LCD screen and it will drop down slightly. Pivot the screen downward until a Comfortable viewing angle is reached. The hinge friction will hold the screen in position while the system is in use. 2. -
Page 23: Wireless Headphones
ACCESSORIES WIRELESS HEADPHONES VOD100 includes a built-in infrared transmitter for use with the supplied wireless headphones. The headphone volume is adjusted using the controls on each headset. Any number of wireless headphones may be used but they must be used within a line of sight from the transmitter, as infrared transmissions, like visible light travel only in a straight line. -
Page 24: Troubleshooting
TROUBLESHOOTING PROBLEM IR remote inoperative Disc won't play Play starts, but then stops immediately No sound or distorted sound Can't advance through a movie SOLUTION Verify that the batteries in the remote are fresh. Verify that the remote sensor eye is not obstructed. If monitor is set to M1, press M1 button on remote;... - Page 25 PROBLEM Not allowed at the moment Picture is distorted No forward or reverse scan SOLUTION The feature or action cannot be completed at this time because: 1. The disc's software restricts it. 2. The disc's software doesn't support the feature (e.g., angles) 3.
-
Page 26: Replacement Parts
REPLACEMENT PARTS Remote Control SPECIFICATIONS 136-4196 LCD Backlighting Resolution Pixels Operation Temperature Storage Temperature Backlit life Video Display System Video Output Power Source Dimension Specifications subject to change without notice. Edge Light Tube 2400 x 480 1,152,000 32 ~131 F (0 ~ 55 C) -4 ~ 158 F (-20 ~ 70 C) 30,000 Hours NTSC / PAL... -
Page 27: 12 Month Limited Warranty
Applies to Audiovox Mobile Video Products AUDIOVOX ELECTRONICS CORP. (the Company) warrants to the original retail purchaser of this product that should this product or any part thereof, under normal use and conditions, be proven defective in material or workmanship within 12 months from the date of original purchase, such defect(s) will be repaired or replaced with reconditioned product (at the Company's option) without charge for parts and repair labor. - Page 28 © 2008 Audiovox Electronics Corp., Hauppauge, NY 11788 128-8338...
Need help?
Do you have a question about the Mobile Video VOD100 and is the answer not in the manual?
Questions and answers