
Related Manuals for Custom Engineering TK300II

Summary of Contents for Custom Engineering TK300II
- Page 1 USER’S GUIDE GUIDA OPERATIVA GUIDE D’UTILISATION BEDIENUNGSANLEITUNG GUIA OPERATIVA Commands reference: DOMC-0005E...
- Page 3 The CE mark affi xed to the product certify that the product satisfi es the basic safety requirements. Il marchio CE applicato al prodotto certifi ca che il prodotto stesso soddisfa i requisi- ti base di sicurezza. Le label CE appliqué sur le produit certifi e que le produit même satisfait les qualités requises de securité...
-
Page 5: Installation
TK300II TK300II Table of contents Indice Table des matières Inhaltsverzeichnics Indice PRINTER SETUP PRINTER TYPE ......KPM 300 PRINTING HEAD TYPE ....KPA80 SETUP SETUP INTERFACE ........RS232 PROGRAM MEMORY TEST..OK DYNAMIC RAM TEST....OK EEPROM TEST......OK CUTTER CUTTER TEST TEST.......OK PRINTER PRINTER HEAD R HEAD Rav .. - Page 6 TK300II TK300II BLANK PAGE <2>...
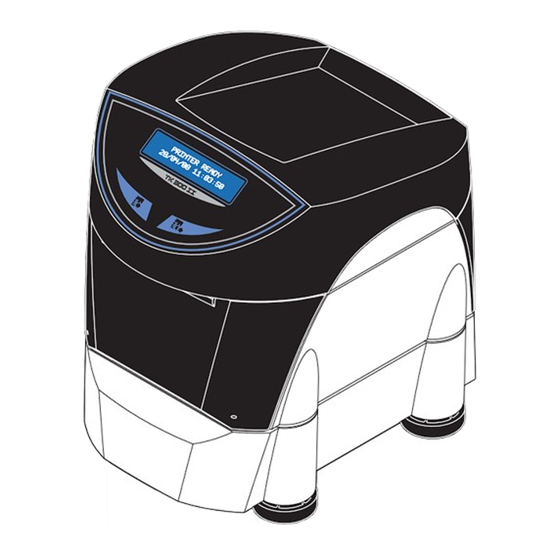
- Page 7 TK300II TK300II PRINTER READY 28/04/08 11:03:50 UNPACKING THE PRINTER Installation instructions FanFold module Power supply cable Laterals foam packing shell Printer USB cable Bottom foam packing shell DISIMBALLO DELLA STAMPANTE Fogli avvertenze Modulo FanFold Cavo di alimentazione Imballi sagomati di protezione laterale...
- Page 8 TK300II TK300II • Switch printer ON/OFF • Accendere/Spegnere la stampante • Brancher/Éteindre l’imprimante • Den Drucker einwieden/ausschlaten • Encender/Apagar la impresora PRINTER READY 28/04/08 11:03:50 • Switch printer On pressing key On/Off • The display turn on; the standby message “PRINTER READY” and the date/time values will be displayed on the printer •...
- Page 9 TK300II TK300II • Calendar clock regulation • Regolazione dell’orologio calendario • Reglage du montre-calendrier • Uhrzeit und kalender einstellung • Ajuste del reloj calendario Press the LF LINE FEED key to enter in the clock confi guration. The highlighted digit indicates the digit Premere il tasto LF LINE FEED per en- to be modifi...
-
Page 10: Status Led
TK300II TK300II STATUS LED DESCRIPTION GREEN PRINTER ON : NO ERROR COMMUNICATION STATUS DATA RECEIVE RECEPTION ERRORS (parity, frame error, overrun error) GREEN MISINTERPRET COMMAND COMMAND RECEPTION TIME OUT RECOVERING ERROR HEADING OVER TEMPERATURE PAPER END YELLOW PAPER JAM POWER SUPPLY VOLTAGE INCORRECT... -
Page 11: Message Displayed
TK300II TK300II MESSAGE DESCRIPTION DISPLAYED PRINTER READY Printer ON: no error 28/04/08 11:03:50 RECEIVING DATA Data receive SPOOLING..Reception errors (parity, RS232 RX ERROR CHECK RS232 SETTINGS frame error, overrun error) COMAND ERROR Misinterpret command COMMAND NOT FOUND Command reception... - Page 12 TK300II TK300II PRINTER READY 28/04/08 11:03:50 POWER ON STAND BY (push for a few seconds) Enter SETUP Advance the paper LF LINE FEED and print SETUP report Advance the paper by a pre-set Perform the font test FF FORM FEED...
- Page 13 TK300II TK300II • Insert ethernet connector • Insert USB connector • Inserire il connettore ethernet • Inserire il connettore USB • Introduire le connecteur d’ethernet • Introduire le connecteur USB • Den ethernet verbinder einsetzen • Den USB Verbinder in die Buchse stecken •...
- Page 14 TK300II TK300II • Connector. • Connettore. • Connecteur. • Schnittstellen. • Conectador. J16 - RJ45 Ethernet Connector J5 - USB Connector J9 - RS232 Serial Connector only for models with Ethernet interface 2 2 2 2 2 1 1 1 1 “Sx”...
- Page 15 TK300II TK300II • Paper specifi cation • Caratteristiche della carta • Caractéristiques du papier • Papier spezifi kation • Caracteristicas del papel TICKET WITH BARCODE (only for models with barcode reader) • Place the barcode on the heat sensitive side of the ticket, 25mm far from the margin;;...
- Page 16 TK300II TK300II • Paper specifi cation • Caratteristiche della carta • Caractéristiques du papier • Papier spezifi kation • Caracteristicas del papel TICKET WITH NOTCH • “Notch Position” parameter sets the positions for the notch as follow: • notch can be places on heat sensitive side or non sensitive side: 33.75mm...
- Page 17 TK300II TK300II • Paper roll insertion • Inserimento del rotolo carta • Introduire le rouleau de papier • Einsetzen der Papierrolle • Introducir el rollo de papel N O T E: Inspect inside the printer every paper change, and verify that there aren’t paper off-cuts on the cutter compartment;...
- Page 18 TK300II TK300II <14>...
- Page 19 TK300II TK300II • Paper jam • Inceppamento carta • Bourrage de papier • Papierstau • Atasco de papel DISPLAY PAPER JAM CLEAR PAPER PATH B E W A R E: In case of paper jam do not operate over the printer with any kind of instruments, like scissors, screwdriver, cutter, etc.
- Page 20 TK300II TK300II B E W A R E: In case of cutter jam: open the printer cover; open the front cover and the cutter cover; remove the damaged paper and replace it with a new one; remove scraps of paper in the printer;...
- Page 21 TK300II TK300II <17>...
- Page 22 TK300II TK300II <18>...
- Page 23 TK300II TK300II STATUS COLOUR FLASHING Customer Service Department Customer Service Department e-mail: support@custom.it Contact Customer Service if the LED with the printer on, still blinking on red light. Contattare l’Assistenza tecnica se il led (a stampante accesa) lampeggia prolun- gatamente sul colore rosso.
- Page 24 TK300II TK300II BLANK PAGE <20>...
-
Page 25: Printer Setup
TK300II TK300II Printer Printer setup setup NOTE: 1 Go into SETUP mode by pressing the LINE FEED key See chapter 1 for FEED key functions. during printing power up. 2 The printer should print all list of the parameters: •... - Page 26 TK300II TK300II Printer Printer setup setup 1 Entrare nel SETUP tenendo premuto il tasto LINE FEED NOTA: durante la fase di accensione della stampante Vedere capitolo 1 per le funzioni del tasto FEED. 2 La stampante stamperà la lista di tutti I parametri: •...
-
Page 27: Ethernet Setup
TK300II TK300II Ethernet Ethernet setup setup (only for models with Ethernet interface) 1 Go into ETHERNET SETUP mode by pressing the FORM FEED key after printing the Setup report. 2 The printer should print all list of the ethernet pa-... - Page 28 TK300II TK300II BLANK PAGE <24>...
- Page 29 TK300II TK300II 1 Download the SW from the web site: www.custom.biz 2 Use the following procedure to install the printer SW: • From the START menu, press Enter and key-in the path where the SW was saved on your PC, then click OK.
- Page 30 TK300II TK300II BLANK PAGE <26>...
-
Page 31: Technical Specifications
TK300II TK300II Appendix Appendix A.1 TECHNICAL SPECIFICATIONS A.1.1 Technical specifi cations for the printer MODEL 200 dpi 300 dpi USB (communication speed: 12 Mbit/sec) AVAILABLE INTERFACES RS232 (communication speed: from 1200 to 115200 bps) ETHERNET (communication speed: 10 Mbit/sec) Ticket presence, head temperature, cover open, black mark detector in 6 positions... - Page 32 TK300II TK300II Appendix Appendix MODEL 200 dpi 300 dpi ELECTRIC SPECIFICATIONS Power supply 220 Vac ± 10% 35 W 51 W Medium consumption (Referred to a standard CUSTOM receipt (L=10cm, Density = 12,5% dots on) Standby consumption ENVIROMENTAL SPECIFICATIONS Operating temperature 0-50°C...
-
Page 33: Advanced Functions
Appendix A.2 ADVANCED FUNCTIONS A.2.1 EMBEDDED WEB SERVER (only for models with Ethernet interface) TK300II is equipped with an Embedded Web Server that I modelli di KPM300H con interfaccia Ethernet, sono do- allows to execute some operations on printers, through... - Page 34 TK300II TK300II Appendix Appendix Embedded Web Server access Accesso al Web Server interno To enter the Embedded Web Server, type the IP address Per accedere al Web Server interno, digitare l’indirizzo IP assigned to the printer into Web browser. For example, if assegnato alla stampante nel browser Web.
-
Page 35: Printer Support
TK300II TK300II Appendix Appendix Embedded Web Server sections Le sezioni del Web Server interno Device info Device info KPM300-H - Windows Internet Explorer http://192.168.10.37/index.htm In the “Device Info” section, it is possible Nella sezione “Device Info” è pos- File Edit... - Page 36 • Printer friendly name. “Locator” è un software esterno disponibile per i modelli di TK300II dotati di interfaccia Ethernet. Il software serve ad eseguire una operazione di ricerca delle stampanti connesse alla rete, anche senza conoscerne gli indirizzi IP delle singole stam- panti.
- Page 37 TK300II TK300II Appendix Appendix A.2.3 DRIVERS DOWNLOAD Drivers download from USB Mass Storage To install printing drivers from USB Mass Storage, pro- ceed as follows: • Connect the printer to a computer by an USB cable. • Open printer’s Flash Disk and enter the internal folders.
- Page 38 TK300II TK300II Appendix Appendix Drivers download from FTP Server Download dei drivers da FTP Server (for models with Ethernet interface) (solo per modelli con interfaccia Ethernet) To install printing drivers, proceed as follows: Per installare i driver di stampa, procedere come segue: •...
-
Page 39: Logos Management
TK300II TK300II Appendix Appendix A.2.4 LOGOS MANAGEMENT Logos management from USB Mass Storage To add a new logo to the printer from USB Mass Storage, proceed as follows: • Connect the printer to a computer by an USB cable •... - Page 40 TK300II TK300II Appendix Appendix Logos management from FTP Server (for models with Ethernet interface) To add a new logo to the printer from FTP Server, proceed as follows: • Connect to the network the printer and the computer. “ftp://” followed by the •...
- Page 41 TK300II TK300II Appendix Appendix Logos management from Embedded Web Server (for models with Ethernet interface) To manage logos from the Embedded Web Server, pro- ceed as follows: • Connect to the network the printer and the computer. • Enter into the Embedded Web Server.
-
Page 42: Fonts Management
TK300II TK300II Appendix Appendix A.2.5 FONTS MANAGEMENT Fonts management from USB Mass Storage To add a new font to the printer from USB Mass Storage, proceed as follows: • Connect the printer to a computer by an USB cable •... - Page 43 TK300II TK300II Appendix Appendix Fonts management from FTP Server (for models with Ethernet interface) To add a font logo to the printer from FTP Server, proceed as follows: • Connect to the network the printer and the computer. “ftp://” followed by the •...
- Page 44 TK300II TK300II Appendix Appendix Fonts management from Embedded Web Server (for models with Ethernet interface) To manage fonts from the Embedded Web Server, proceed as follows: • Connect to the network the printer and the com- puter. • Enter into the Embedded Web Server.
- Page 45 TK300II TK300II Appendix Appendix A.2.6 FONTS MANAGEMENT KPM300H permits the confi guration of default parame- La KPM300H consente di confi gurare i parametri di de- ters for printer and network setup by editing the “Setup. fault della stampante e della rete tramite la modifi ca del ini”...
- Page 46 TK300II TK300II Appendix Appendix Setup mode from USB Mass Storage Modalità Setup da USB Mass Storage To confi gure printer and network parameters from Per confi gurare i parametri della stampante e di rete da USB Mass Storage, proceed as follows: USB Mass Storage, procedere come segue: •...
-
Page 47: Accessories And Spare Parts
TK300II TK300II Appendix Appendix B.1 ACCESSORIES AND SPARE PARTS B.1.1 ACCESSORIES COMPONENT CODE Kit for “BURSTER” confi guration PCXSP-TK300II-BUSTER B.1.2 SPARE PARTS COMPONENT CODE Thermal paper roll 80 mm, RCT80X180-25MM-165GR Øext.=180, Øcore=25mm, 165gr. FANFOLD module 155x65 neutral 255gr. RCTFF-B-155-65-255GR-N <43>... -
Page 48: Outside Cleaning
TK300II TK300II Appendix Appendix B.2 CLEANING B.2.1 OUTSIDE CLEANING To clean the machine, use a pneumatics air or soft cloth. First remove the mains plug from the wall socket. Do not use alcohol, solvents, or hard brushes. Do not let water or other liquids get inside the machine. - Page 49 TK300II TK300II Appendix Appendix B.2.2 CLEANING THE PRINTING HEAD (VOID) Clean the printing head heating line using a ATTENTION! non-abrasive cloth moistened with isopropyl Do not touch the head heating line with bare hands alcohol. or metal objects. Do not perform any operation in- side the printer immediately after printing because the head and motor tend to become very hot.
- Page 50 TK300II TK300II Appendix Appendix B.2.3 CLEANING THE BARCODE READING (only for models with barcode readers) To clean the machine, use a pneumatics air or soft cloth. First remove the mains plug from the wall socket. Do not use alcohol, solvents, or hard brushes.
-
Page 51: Cleaning The Roller
TK300II TK300II Appendix Appendix B.2.4 CLEANING THE ROLLER To clean the roller, use a a medium-stiff brush to avoid them being scratched. First remove the mains plug from the wall socket. Do not use alcohol or solvents. Do not let water or other liquids get inside the machine. - Page 52 CUSTOM ENGINEERING SPA World Headquarters Via Berettine, 2 - 43100 Fontevivo Tel. +39 0521 680111 - Fax +39 0521 610701 info@custom.biz - www.custom.biz All rigths reserved www.custom.biz...
Need help?
Do you have a question about the TK300II and is the answer not in the manual?
Questions and answers