Table of Contents
Advertisement
Advertisement
Table of Contents

Related Manuals for Medion E89030

Summary of Contents for Medion E89030
- Page 1 Design W-LAN USB Remote Hub MEDION ® E89030 (MD 86097) Instruction manual...
-
Page 2: Table Of Contents
Contents Contents ............... 1 Overview ............... 3 About this device ..........5 Scope of supply .............. 5 Use in accordance with regulations ......... 6 Safety information ..........6 Safety in operation ............7 ... - Page 3 System Setting .............. 36 Wi-Fi Protected Setup (WPS) ......41 Reset the unit ............43 Customer service ..........44 First aid in the case of malfunctions ....... 44 Technical Data ............ 46 Cleaning ............. 48 ...
-
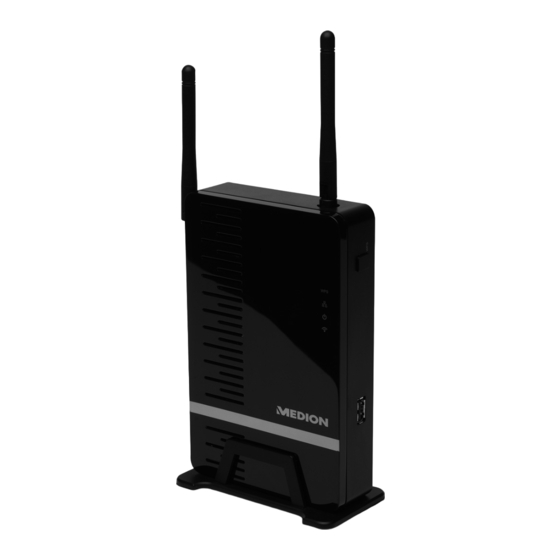
Page 4: Overview
Overview 1. WLAN aerial 2. LINE OUT (A): For the connection of a device for remote audio reproduction (e. g. an amplifier or an active loudspeaker) - 3 -... - Page 5 3. ETHERNET: LAN connection 4. RESET: Reset switch 5. USB 1,2,3: USB connections 6. DC POWER: Connection for a mains adapter 7. Stand 8. WLAN aerial 9. WPS LED: Lights up during the WPS function 10. LAN LED: Lights up during a LAN connection, flashes during data transmission 11.
-
Page 6: About This Device
About this device Scope of supply Please check the completeness of the delivery and inform us within 14 days after purchase, if the delivery is not complete. You will have received the following with the package purchased by you: Wireless USB hub ... -
Page 7: Use In Accordance With Regulations
Use in accordance with regulations The wireless USB hub serves to connect USB devices (USB- mass storage devices like external harddrives, USB sticks as the connection of USB-printers and -scanners) and will transfer the USB signals to computers connected to the USB hub by means of WLAN or LAN across a WLAN connection. -
Page 8: Safety In Operation
Safety in operation The device is not intended to be used by individuals with restricted physical sensory or intellectual abilities or a lack of experience and/or knowledge (including children), unless they are supervised by an individual responsible for their safety or have received instructions from such an individual about how the device is to be used. - Page 9 The device is intended to be connected to computers with protected connection (Limited power source in the sense of EN60950). Only use the Ktec KSA1200150W1UK type mains adapter supplied. The socket must be close to the device and easily accessible.
-
Page 10: Installing The Usb Hub Software
Installing the USB hub software The software must be installed on all computers intended to use the USB hub, before you will be able to receive USB signals through the network. 1. Launch the setup application. The Windows User Account Control will prompt for permission to install. - Page 11 3. The Welcome screen appears. Click Next. 4. You can accept the default installation path and click Next to proceed. Instead, you can change the destination folder for the utility by clicking Change..- 10 -...
- Page 12 5. Choose the folder where you want to install the software into and click OK. 6. You are now ready to install the software. Click Install. - 11 -...
- Page 13 7. Wait for the installation to complete. Click Finish. After installation, an icon will appear on your desktop, and a tray icon will appear: 8. Now you can double click on the desktop icon or the tray icon to launch the Control Utility. - 12 -...
-
Page 14: Bringing The Device Into Operation
Bringing the device into operation Mains connection 1. Connect the hollow jack of the mains adapter to the DC POWER socket on the device. 2. Plug the mains adapter into an easily accessible AC 230 v 50/60 Hz socket. The device is now ready for operation and the green POWER LED will... -
Page 15: Wlan-Connection (Access Point Mode)
WLAN-Connection (Access Point Mode) A simple WLAN connection is sensible if your PC is connected to a router by a cable (e.g. for access to the Internet) and your PC has an unused wireless network adapter apart from this. 1. Switch the USB hub on by connecting the mains adapter as described on Page 13. - Page 16 5. As no encryption is set by default, Windows will notify that this connection is insecure. Click Connect. About how to enable an encryption mode see page 32. - 15 -...
- Page 17 6. Wait until the connection is established. Now you will see your PC is connected to the Hub over Wi-Fi. 7. To configure the USB-Connections, start the USB Control Utility (See page 21). - 16 -...
-
Page 18: Integrating The Usb-Hub Into An Existing Network (Station Mode)
Integrating the USB-Hub into an existing network (Station Mode) The integration of the device into an existing network is only sensible if your PC is already receiving access to an Internet router by means of a wireless network connection (WLAN) and it is additionally intended to connect the USB hub by means of WLAN. - Page 19 Setting up the Station mode If you are connected to a network router that uses Dynamic Host Configuration Protocol (DHCP), which most networks do, you do not need to set up your router. Please follow up the setting as below 1.
- Page 20 6. Enter username and password and click OK to enter the configuration page. The default username and password are both admin. 7. Check the LAN LED will be illuminated if the Ethernet connection is working. 8. In the Setup Menu of the USB-Hub choose Wireless -> Wireless Operation Mode and set Station.
- Page 21 Scan for available wireless networks 11. After the device rebooted, start the Setup-Menu of the USB-Hub and choose the menu item Wireless -> Basic. Click on Scan Wireless Network to display all the Access Point or Router signals found within your area. Rescan: Scan for more AP/Router signals within your area.
-
Page 22: Using The Control Utility
Using the Control Utility Once the setup is completed, you can launch the Control Utility through the Start menu, the desktop icon or the tray icon. From the Control Utility you can connect/disconnect a USB device, view its status and request to use a device if it’s already in use by other computers. -
Page 23: The Menu Bar
The Menu Bar From the Control Utility you can scan for other Hubs by clicking Hub > Scan. Instead, you can click the Scan icon on the toolbar. - 22 -... - Page 24 Advanced You can set advanced options by clicking Advanced > Option. The Option window appears and allows you to set if the Utility should start when Windows starts, or if you want to be notified when using remote USB audio. - 23 -...
- Page 25 Help You can check what device status icons represent by clicking Help > Status instruction. The Status Instruction window appears. There are 4 statuses for the devices connected to the Hub: A white icon means the device is not in use and is ready to use.
-
Page 26: Connecting And Removing Devices
Connecting and Removing Devices To connect a device attached to the Hub, simply click the checkbox in front of each of the devices displayed in the Utility. In addition, you can click the checkbox in front of the Hub to connect all the displayed devices. - Page 27 The Device Properties window appears with information on the selected device. To disconnect a device, uncheck the check box in front of it. - 26 -...
-
Page 28: Using The Remote Usb Audio
Using the Remote USB Audio The Hub can be used as a remote USB audio device as well. Simply check the box in front of the Remote Audio device in the Utility, and you can listen to music through any speaker or headphone attached to the Hub. -
Page 29: Requesting A Device And Disconnecting It For Others To Use
Requesting a Device and Disconnecting it for Others to Use If you want to use a device that is in use by another person, you can send a request to that person to disconnect the device so you can use it. To do so, first select a device in use, and click the Request icon on the... - Page 30 The person who is using the device will see a popup asking to disconnect the device. If the other person clicks Yes, the device will be disconnected from his/her Hub, and you will be able to connect it for use. - 29 -...
-
Page 31: Setting Up The Usb-Hub
Setting up the USB-Hub Accessing the configuration page 14. Open your preferred Internet browser and enter the IP address of the Hub in the address bar. Press Enter. NOTE: the IP address of the Hub is displayed in the Control Utility (See page 21). 15. -
Page 32: Wireless Setting
Wireless setting The wireless setting is divided into 4 sections. Operation Mode The first section is the Operation Mode setting. You can change the wireless operation mode here. Select Access Point (standard setting), to make a connection to the respective computer, if the USB hub is intended to represent an independent wireless network. -
Page 33: Basic Setting
Basic Setting The second section is the Basic setting. You can change the SSID (Network Name), the wireless channel (1-13) and the encryption type here. Change the settings to your needs and click Apply. - 32 -... - Page 34 If you set the encryption to WEP or WPA-PSK encryption, you will also need to set a security key or a passphrase. - 33 -...
- Page 35 The Hub also supports the latest WPS encryption. The support is disabled by default (How to use the WPS- function: See page 41). You can enable the feature in the WPS setting by selecting the Enabled radio button and click Apply. You can also change the PIN number by clicking Generate New PIN.
- Page 36 Advanced In the Advanced setting, you can enable or disable WLAN and SSID broadcasting, and change other advanced settings. - 35 -...
-
Page 37: System Setting
System Setting The system setting is divided into 4 sections as well. The first section is LAN setting. You can change how the Hub acquires an IP address. By default this is set to Static IP and no further configuration is needed. You can also enable or disable the built-in DHCP server and configure the IP address range which will be used by DHCP. - Page 38 The Firmware section allows you to upgrade the firmware of the Hub, to restore all Hub settings and to reboot the Hub. Have a look on the MEDION website www.medion.com for updates or ask the Medion service. - 37 -...
- Page 39 1. If you need to upgrade the firmware, first click Browse… to locate the firmware file. Once the correct file is located, click Upgrade to start upgrading. 2. The upgrade will begin. Please wait for the process to finish. IMPORTANT: Do not power off the Hub during firmware upgrade.
- Page 40 3. Once the upgrade is complete, the Hub will automatically be rebooted with the new firmware. - 39 -...
- Page 41 Languages In the Language section you can change the display language for the configuration page. Select the desired language and click Apply. - 40 -...
-
Page 42: Wi-Fi Protected Setup (Wps)
Wi-Fi Protected Setup (WPS) Wi-Fi Protected Setup (WPS) is an industry standard of LAN connecting defined by Wi-Fi Alliance. It allows devices with an WPS-function to connect automatically without entering a PIN manually. The WPS function must have been activated in the Set- up Menu of the USB hub or of the other WPS-capable device (see Page 33), before you will be able to use the WPS function. - Page 43 Personal Identification Number (PIN) There are two ways to demonstrate how the PIN method works: 1. One of enter the PIN code into your computer requested. You can find the W-LAN USB Remote Hub PIN code on the firmware under WPS setting page. 2.
-
Page 44: Reset The Unit
3. Two devices will be found and connected whenever enter the right PIN code. To use WPS for your device, your operating system should be Windows Vista or Windows 7. To use WPS for your device, your wireless LAN card, station, router or Access Point should support WPS function Reset the unit... -
Page 45: Customer Service
Customer service First aid in the case of malfunctions I have connected a USB device to the USB hub; however, it is not visible on the PC. The Control Utility software has not been installed. Install the software and start it. ... - Page 46 Set the identification of the SSID to visible, in the router of the network into which it is intended to integrate the USB hub. The USB hub is not recognized by the PC The USB Hub is not being supplied with electricity. ...
-
Page 47: Technical Data
Technical Data Model Name MD 86097 Audio Output 3.5 mm Stereo Line out 10/100 Ethernet One 10/100 RJ45 Ethernet port 4 Type A USB 1.1/2.0 ports Wireless Standard IEEE 802.11 n/g/b Operation Modes Infrastructure Range Outdoor: 100m (may vary according to the environment) RF Power 11g/n:13 dBm ( +1.0 / -1.0 dBm) - Page 48 Find out locally about the respectively applicable legal regulations for the use of the device in other countries. MEDION AG herewith declares that these devices are in accordance with the basic requirements and the other relevant terms of the 1999/5/EG Guideline. Complete Declarations of Conformity are obtainable at www.medion.com/conformity.
-
Page 49: Cleaning
Cleaning Attention! This device does not contain any parts to be maintained or cleaned. Pay attention to the fact that the USB hub is not soiled. Do not use any solvents, corrosive or gas-forming cleaning agaents. Clean the casing with a moistened cloth, if necessary. -
Page 50: Licence Disclaimer
Licence disclaimer This product includes certain copyrighted third-party software components licensed under the terms of the GNU General Public License, PSF LICENSE AGREEMENT FOR PYTHON 2.3, and other similar license agreements offering free distribution of these software components, offered by organizations such as Free Software Foundation, Python Software Foundation and the X.Org Foundation, etc. -
Page 51: Downloading Source Code
Please pay attention to the copyright notice, warranty disclaimer and the copy of the license agreement accompanying these source codes. http://www.medion.com - 50 -... - Page 52 Medion Electronics Ltd. 120 Faraday Park, Faraday Road, Dorcan Swindon SN3 5JF, Wiltshire United Kingdom Hotline: 0871 37 61 020 (calls are charged at 7p per min from a standard landline, calls from mobiles could be higher) Fax: 01793 71 57 16...
Need help?
Do you have a question about the E89030 and is the answer not in the manual?
Questions and answers