
Related Manuals for RDS loadmaster 9000i


Summary of Contents for RDS loadmaster 9000i
- Page 1 Loadmaster 9000i DMM Approved Weighing System Operation RDS Part No.: S/DC/500-10-589 Document Issue: 1.1: 3/9/08 PS 306-050 rev. 20 Software Issue:...
-
Page 2: Service And Technical Support
If unknown then fax +44 (0) 1453 733311 for further information. Our policy is one of continuous improvement and the information in this document is subject to change without notice. Check that the software reference matches that displayed by the instrument. © Copyright RDS Technology LTD 2008 \UK589110.DOC... -
Page 3: Table Of Contents
CONTENTS OVERVIEW __________________________________________________________ 5 Introduction................................5 What is the difference between these two Approvals? ................... 5 System Technical Details ............................5 Calibration................................. 6 Weighing Units................................6 The Head Unit................................6 Approved Weighing Mode Certification........................7 Loading Attachments..............................8 Menu keys................................. 8 Data Entry.................................. - Page 4 CONTENTS STORE FUNCTIONS _________________________________________________ 18 Stores Setup................................18 4.1.1 Hardware Setup - Data Module......................... 19 4.1.2 Hardware Setup - ICP 300 Printer......................19 4.1.3 Software Setup for Printers (in Approved Mode) ..................19 4.1.4 Data Card Compatibility and Formatting....................21 4.1.5 Data Card files required to enable the Store Functions................
-
Page 5: Overview
EEC countries with this Standard is possible, providing Approval has been acquired from the Trading Standards Body in the relevant EEC country. Contact your local RDS Distributor for the relevant details. This "Automatic" mode allows both Dynamic or Static operation, together with Automatic entry of the displayed weight. -
Page 6: Calibration
'CALIBRATION' menu. If weighing volumetrically, you must set the density. On a Loadmaster 8000i, the units are normally displayed on screen and on printouts. If a Loadmaster 9000i Class IIII approved weighing system is used in non-approved weighing mode (i.e. as a Loadmaster 8000i), then units are not displayed on screen or included on a printout in compliance with the requirements for Weights and Measures Approval. -
Page 7: Approved Weighing Mode Certification
1 to 25 tonnes. For ease of setup, the instrument is configured for certification in the range 1 to 15 tonnes via a menu of 18 presets (see below). It is also possible to configure the Loadmaster 9000i for any maximum weight from 16 to 25 tonnes, but not via presets. -
Page 8: Loading Attachments
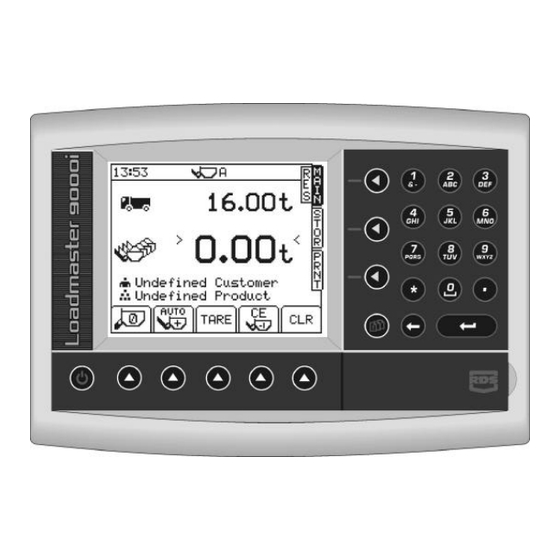
1 - OVERVIEW Loading Attachments The system can be calibrated for up to 8 different attachments. Menu keys Nine menu keys adjacent to the LCD display access all instrument functions. The four menu keys to the right of the screen access the primary screen pages (those viewed during normal operation). -
Page 9: Startup
2 - STARTUP Startup Before you start to load you need to check a few things, ?? Select Approved or Non-approved mode ?? Work the hydraulics to get up to normal operating temperature, otherwise the screen displays the message "Oil too Cold" and weighing is inhibited. -
Page 10: Zero
2 - STARTUP Zero 2.4.1 Dynamic Zero (Dynamic Mode) Pressing the key displays the "Dynamic Zero" screen when dynamic weighing is selected in AWI mode (fig. 7). Lift the empty bucket at medium lift speed. The weight will display very briefly and then the instrument zeros automatically before returning to the MAIN screen. -
Page 11: Error Messages
2 - STARTUP 2.4.3 Error Messages Angle of Slope This indicates that the angle of slope is too great in a particular direction - move to a more level area. (ii) Low Oil Temperature / Sensor Faults The instrument also warns you of low oil temperature or a sensor fault and inhibits the zero routine. -
Page 12: Re-Weigh Function (Tare -1)
2 - STARTUP 2.6.2 Re-weigh function (Tare –1) The loader operator may wish to tip a partial amount off the last bucket load to “top-off” the truck load. The “re-weigh” function enables the weight of this surplus material to be subtracted from the truck total, ensuring the recorded total matches the actual weight loaded into the truck. -
Page 13: Weighing In Approved Mode
3 - WEIGHING Weighing in Approved Mode In approved mode (NAWI or AWI), weighing will be inhibited unless the machine is up to normal operating temperature and the bucket is crowded right back. These restrictions do not apply in non-approved mode. -
Page 14: Static Weighing
3 - WEIGHING Static Weighing This uses the loader's auto-kickout system to automatically stop the lift arms in the reference position before sampling the weight. The weighing screen (fig. 19) will appear the same as for AWI Mode, other than that AUTO ENTER is not selectable. Fill the bucket as normal and crowd it right back. -
Page 15: Selecting Stores Index
3 - WEIGHING Selecting Stores Index Until a data card containing the reference files is inserted into the Data Module, the instrument will alternately display a black screen and the message "Data Card Module Needed". Select the STOR screen, then select the index required for store 1, using the key or the search function (fig. -
Page 16: Set Target Weight
3 - WEIGHING 3.4.2 Set Target Weight The target weight is set automatically to the value programmed in field 2 of the selected 'Truck' index (a blank field sets a zero target weight). After completing the store selection and returning to the MAIN screen, you can manually enter a different target weight if required. -
Page 17: Zero Error (More Than ±10%)
3 - WEIGHING Zero Error (more than ±10%) When the system is initially switched on, or if the unit has not been used for 15 minutes, the figure resulting from the Zero procedure is compared to the initial Zero's logged during the systems initial verification. -
Page 18: Store Functions
4 - STORE FUNCTIONS Store Functions There are 6 separate Reference stores which to which you can programme whatever information you require e.g. Customers, Products, etc. All data is stored on the internal SD Card - Data Management Module (DMM), as .CSV (Comma Separated Variable) text files. -
Page 19: Hardware Setup - Data Module
4.1.2 Hardware Setup - ICP 300 Printer The top port is factory set for connecting an RDS ICP printer, without further configuration being necessary. If another printer is used (or you want to select an option other than a printer), you can configure the settings from the ‘SETUP’... - Page 20 4 - STORE FUNCTIONS Data Bits: 7 / 8 Stop Bits: 1 / 2 Parity: None / Odd / Even Handshake: RTS / XON NOTE: Print Inhibit: (LM 9000 y(b) (AWI) mode only). In AWI mode, printing is inhibited when the weight total is less than 10e, and cannot be added to the totals.
-
Page 21: Data Card Compatibility And Formatting
2Gb. Cards supplied by RDS are pre-formatted with the correct files ready for use. If you are using a card not supplied by RDS, then format it in Windows Explorer i.e. if it is Drive D:, Right-click on "Removable Disk (D:) and select "Format". -
Page 22: Programming Stores Data (Files Refdat01 - Refdat06) Via A Pc
4 - STORE FUNCTIONS Programming Stores Data (Files REFDAT01 - REFDAT06) via a PC All store names and extended information are contained in the index files REFDAT01 - REFDAT06. There is 1 file for each e.g. for 'Product', 'Customer' etc. New store information can be added in MS Excel, or via the instrument keypad. -
Page 23: Programming Stores Data (Files Refdat01 - Refdat06) Via The Head Unit
4 - STORE FUNCTIONS Programming Stores Data (Files REFDAT01 - REFDAT06) via the Head Unit Only new store information can be added via the instrument keypad. Existing store information can only be edited in MS Excel. Press the STOR key to select the first Reference store screen (Product) - fig. -
Page 24: How To Read The Load Data File (Lm9Ktotl.csv)
PC, replacing it with an empty LM9KTOTL.CSV file. Figure 31: Load Data File Example CN THIS FILE LOGGED VIA AN RDS PCMCIA ADAPTOR v502-027 6 28/10/04 16:26 A 0 19.2 4.8 4.8 4.8 4.8 5 28/10/04 17:10 A 0 19.2 4.8 4.8 4.8 4.8... -
Page 25: How To Read The Print Log File Lm9Kplog.csv
How to read the Print Log file LM9KPLOG.CSV LM9KPLOG.CSV is a record of all paper printouts that have been made from the instrument. Figure 32: Print Log File Example CN THIS FILE LOGGED VIA AN RDS PCMCIA ADAPTOR v502-027 1 1 2 3 0 0 0 16/02/06 14:44 16/02/06 14:44:39 A 0 1 0 10.9 5.45 5.45... -
Page 26: Search / Print Load Records
4 - STORE FUNCTIONS Search / Print Load Records 4.6.1 Select Printer Output Mode By default, the print mode is OFF. Select the PRNT screen and set the print mode using the key (fig. 39a). A Job Record is printed out (fig. 38a) when you press CLR to reset for the next load. -
Page 27: View / Print Multiple Load Records
4 - STORE FUNCTIONS 4.6.3 View / Print Multiple Load Records The instrument has the facility to search the database and print all load records matching a given Date /Time and Store references specification. NOTE: If there are more than 200 index entries for each store reference, the search procedure becomes slower. Press the "PRNT RANGE"... -
Page 28: View / Print / Clear The Grand Total
4 - STORE FUNCTIONS Example Search: All product data in conjunction with the following criteria: ?? Reference 1: Customer 0 (0) ?? Reference 2: Undefined Site (0) ?? Reference 3: Haulier 1 (1) ?? Reference 4: Truck ABC123 (2) ?? Reference 5: Destination XYZ789 (3) ?? Between the dates 16:11 28/04/04 and 15:11 29/04/04 Figure 41 : Summary Printout 4.6.4 View / Print / Clear the Grand Total... -
Page 29: Overload Logging Facility
4 - STORE FUNCTIONS 4.6.5 Overload logging facility The instrument can log any weight entered over and above the target weight. This facility is enabled/disabled from the "System Settings" » "Weighing Units" menu. The accumulated overload weight ( ) is displayed on the GRAND TOTAL page (fig. -
Page 30: System Settings Menu
5 - SYSTEM SETTINGS System Settings Menu A number of settings can be programmed by the operator from the SETUP menu. These settings are accessible without a PIN number. NOTE: Certain menus including the ‘Calibration’, 'Printer Setup' and 'Weighing Units' menus are not normally accessible to the operator. -
Page 31: Set Instrument Id
5 - SYSTEM SETTINGS Set Instrument ID From the SETUP screen, press; 3. System Settings *. More 1. Instrument ID This is the heading that appears at the top of the display e.g. "IN APPROVED MODE" any time a button is pressed. -
Page 32: Set Language
5 - SYSTEM SETTINGS Set Language From the SETUP screen, press; 3. System Settings *. More 3. Language Select the preferred language from the list displayed. Note that English has three settings:- "UK", "AU" for Australia and "US", to cater for differences in some wording and Time+Date format. -
Page 33: Loadmaster Configuration File (Lmsetup.csv)
?? (LINE 7) A "Start Logo". This is the bitmap in Decimal format shown on the Start up screen. ?? (LINE 8) A "Print Logo". This is the bitmap in Decimal format shown at the top of each print. A typical file is shown below: OE,LM9000,RDS Loadmaster 9000 ID,Company Name,ID 2,Road,Town,Region,Post Code,Tel,Fax Icon1,8,8,24,24,0,102,102,0,219,219... -
Page 34: Document History
Document History Issue 1.0: 28/1/08 Original Issue based on UK506-3.DOC Issue 1.1 3/9/08 Minor corrections (ref. WB)
Need help?
Do you have a question about the loadmaster 9000i and is the answer not in the manual?
Questions and answers