Advertisement
Advertisement
Table of Contents

Related Manuals for Airwheel R5


Summary of Contents for Airwheel R5
- Page 1 USER MANUAL...
- Page 2 FREE INTELLIGENT LIFE 01-14 15-28 29-42 43-56 57-70 71-84 85-98...
- Page 3 USER MANUAL - 01 -...
-
Page 4: Check Packing Contents
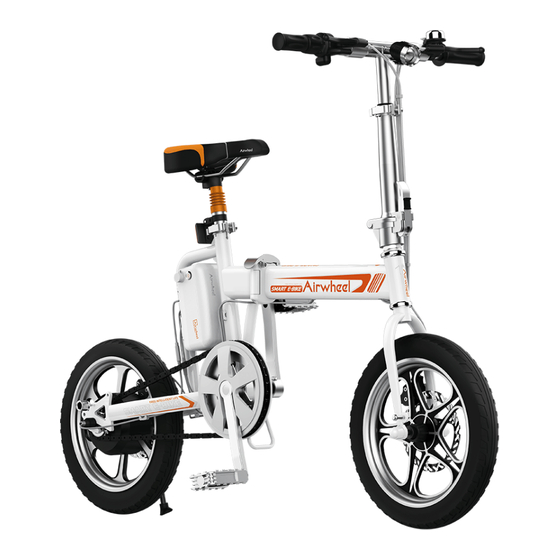
Check Packing Contents Saddle Bike body components Front and real water-brush (Optional) Instruction Accessories Storage rack installation tool (Optional) (Optional) Front and rear Charger fenders (Optional) Packing list Bike body 1 pcs Other accessories(Optional) 1 unit Charger 1 pcs Accessories installation tool (Optional) 1 unit Instruction 1 pcs... - Page 5 Diagram Front brake Handle Headlight Bell Handle lock catch Rear brake Lifting rod lock catch Foldable armrest Saddle Frame foldable armrest Reflector Screw Front wheel USB charging interface Disc-brake Storage rack (Optional) Battery holder Front fender Rear fender (Optional) (Optional) Front water-brush Motor (Optional)
-
Page 6: Specifications
Specifications Main Technical Parameters 1320mm×550mm×1180mm Item weight ~18.5kg Size Folding size 710mm×380mm×700mm Max. load 100kg Tire size 16 inch Max. speed ≤20km/h Charging voltage AC220V 50-60Hz Max. Permissible Gradient ~15° Charging time About 180min Applicable temperature -10℃ ~40℃ USB output voltage 5V Range ≥25km Main Technical Parameters Of Storage Battery... - Page 7 Figure 2 Figure 3 Take R5 out of the package bag, unfold pedals and kickstand. Push the head in vertical direction (see Figure 2 - ① arrow), the folding handle along with the bike head is to be down-and-backward to the slot and then button up (see Figure 2 - ②...
- Page 8 Frame folding handle Frame folding ⑨ handle ⑧ ⑥ Screw ⑦ Figure 8 Figure 6 Figure 7 Rotate the screw in the frame folding handle counterclockwise (see Figure 6- ⑥ arrow), loosen the frame folding handle and unfold the frame (see Figure 7- ⑦ arrow) to let it automatically lock. Rotate the screw clockwise to fasten the frame folding handle.
-
Page 9: Get Started
Get Started R5 provides riders with three different riding modes. 1.Electricity-assisted mode Set right the head, fold kickstand and fasten frame. Adjust bike head and saddle position to ensure a comfortable riding experience. Find the power switch in the one side of the battery, start it and hold the handle. -
Page 10: Important Note
You need lots of practice to grasp the skill before you ride R5 safely. If you are not skilled, or fail to follow the user guide of this product, it may cause rider or others injury or property loss. Our company only takes the responsibility for product defects or damage, and we are NOT responsible for physical injury or property loss related with using products. -
Page 11: Adjustment And Maintenance
AC220V power source for 2~4 hours until the charger is full. The normal charge of the battery: the operation of R5 is also the discharge process of the battery. The battery should be charged immediately after the use of the power-assisted vehicle. - Page 12 R5 is not suitable for long-distance travel. Develop good habits to charge in time. Before ride, please ensure R5 has enough electricity. It is very important to form the habit of charging in time every day so that the battery can serve you a longer period of time.
- Page 13 Foldable Handle lock Figure 11 Frame folding handle Screw Figure 13 Figure 12 Adjust the heights of the bike head and saddle to the lowest. Pull the handle lock (see figure 11- arrow), fold down the handle (see figure 11- arrow).
-
Page 14: Download App
*Support Android 4.3 or higher, iOS 7.0 or higher. APP Instructions 1. Turn on R5 power button, and start App as well as Bluetooth. 2. Click the search button and do as the follows to connect (verify password is 11111111). - Page 15 Other Functional Instructions USB charging interface Chargeable (compatible with mobile phones and digital equipment). Power indicator Green light-high power When the power indicator is red, it Yellow light-middle power is suggested not to ride. Red light-low power Battery box can be disassembled Separate the battery box wire Motor connecting line and frame line before removing...
- Page 16 Fender (optional, if any) Front fender A l i g n t h e f r o n t f e n d e r a n d Rear fender Front wheel rear fender to the circular rod Rear wheel holes in front and rear wheels.
Need help?
Do you have a question about the R5 and is the answer not in the manual?
Questions and answers