
Related Manuals for NCE NCECD100W

Summary of Contents for NCE NCECD100W
- Page 1 NCECD100W Instruction Manual CLASS 1 LASER PRODUCT Made In PRC Rev. 1.0 www.nce.com.au Bluetooth...
-
Page 2: Table Of Contents
NOTES Installation............02-03 Additional information......... General operations..........05-08 Radio operations..........Aux Audio Inputs..........CD/SD/MMC/USB Operations ....... 12-14 BLUETOOTH............Mp3 WMA overview..........Remote control layout........... 17-18 Specification............Before playing discs..........Trouble shooting............. Notes.............. -
Page 3: Installation
If installation angle exceeds 30 from horizontal, the unit mi ght not give its Clean the CD or try to play optimu m performa nce. The CD is extremely dirty or a new one defected Temperature inside the car is... -
Page 4: Installation
INSTALLATION BEFORE PLAYING DISCS Removing the unit Cleaning the CD Before playing a CD, wipe it off with a clean, dust-free cleaning cloth. Wipe the disc in the direction of the arrow. Always insert the CD with the label side facing upwards. Fig.3 Fig.2 If the CD is inserted with the printed side facing downwards, the device... -
Page 5: Additional Information
SPECIFICATIONS ADDITIONAL INFORMATION General Power Supply Requirements: DC 14.4V“ ”, Negative Ground Load Impedance: 4 ohms Maximum Output Power: 25W x 4(CH) Chassis Dimensions: 178 x 163x 50mm (W x D x H) Current Drain: REAR Rch LINE OUT REAR Lch LINE OUT REAR Rch AUX LINE IN Tone Controls REAR Lch AUX LINE IN... -
Page 6: General Operations
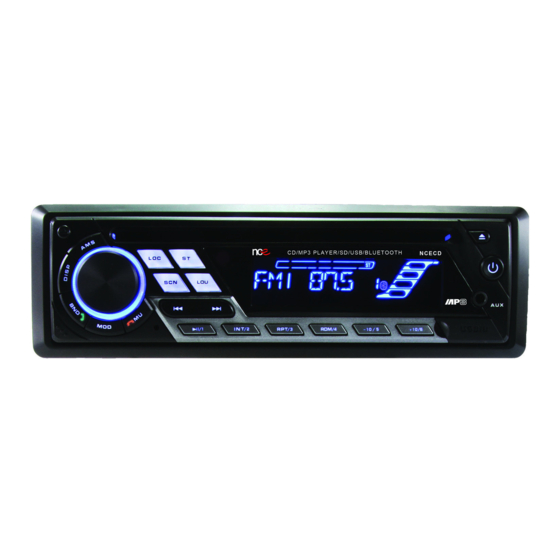
GENERAL OPERATIONS REMOTE CONTROL LAYOUT FRONT PANEL LAYOUT LOUD 1. Power Button 15. Intro & Preset Button 2 2. Release Button 16. Repeat & Preset Button 3 3. Volume/ Sel Button 17. Random & Preset Button 4 4. Mute/ Button 18. - Page 7 REMOTE CONTROL LAYOUT GENERAL OPERATIONS GENERAL OPERATIONS 6. How to delete stored phone number? The unit can store ten numbers of missed ,rejected and ANS separately, Power ON/OFF and the first number will automatically be deleted when the 11th number calls. Press any button to turn the unit on.
- Page 8 GENERAL OPERATIONS BLUETOOT H 1.Pairing connection. Turn on this unit and place your mobile near the unit, activate your mobile bluetooth Press MUTE button (4) to mute the sound. Press the mute button again to unmute the sound function. Soon the phone will find the new bluetooth device "CAR AUDIO" . and return to the previous volume level.
-
Page 9: Bluetooth
MP3/WMA Over view GENERAL OPERATIONS 。 MP3 is short for MPEG Audio Layer 3 and refers to an audio compression technology standard. SELECT MODE 。 This product allows playback of MP3 files on CD-ROM, CD-R or CD-RW discs. 。 The unit can read MP3 files written in the format compliant with ISO 9660. Press the MODE button (5) to select different modes: However it does not support the MP3 data written by the method of packet write. - Page 10 CD/SD/MMC/USB OPERATIONS RADIO OPERATIONS Selection of MP3/WMA files BAND SELECTION At tuner mode, press BAND button (10) to select the desired band. The 1.Searching Time: •Press AMS one time, then searching time is activated. reception band will change in the following order: •Turn VOL knob to right or left, select the time you want.
- Page 11 CD/SD/MMC/USB OPERATIONS RADIO OPERATIONS Note: USB format supports 2.0. Capacity: up to 4 GB. SD cards brands: Cannon, Fuji film, Palm, Motorola, Microsoft, IBM, HP, Compaq, Sharp, Samsung, etc. Capacity: up to 4 GB. MMC cards brands: Ericsson, Nokia, Motorola, HP, Palm, Sanyo, Microsystems, etc.
- Page 12 AUX AUDIO INPUT CD/SD/MMC/USB OPERATIONS Discs for playback: Operational Notes: This unit can play disc types: CD/CD -R/-RW. This unit has 2 Aux inputs that use the single Aux mode feature Compatible with formats: CDDA/MP3/WMA. (button 5) on the head unit. Please note that the front Aux audio input automatically overrides the rear Aux audio input when Loading and ejecting a disc connected.
Need help?
Do you have a question about the NCECD100W and is the answer not in the manual?
Questions and answers