
Related Manuals for NCE NCE1DBT

Summary of Contents for NCE NCE1DBT
-
Page 1: Instruction Manual
NCE1DBT Instruction Manual DVD / MULTIMEDIA PLAYER HIGH POWER RECEIVER & BLUETOOTH Bluetooth... -
Page 2: Table Of Contents
Safety Precautions Precautions Safety Precautions .........1 Note: Panel Controls ..........2 • Use only in a 12-volt DC negative-ground • Playing a defective or dusty disc can cause Remote Controls......... 3-4 electrical system. dropouts in sound. Behind the Panel ..........4 • When replacing the fuse, be sure to use one • Hold discs as illustrated. General Operation ........4-5 with an identical amperage rating. Using • Do not touch the unlabeled side. Radio Mode ............6 a fuse with a higher amperage rating may • Do not attach any seal, label or data protec- USB/SD/MMC/MP3 Mode ......7 cause serious damage to the unit. -
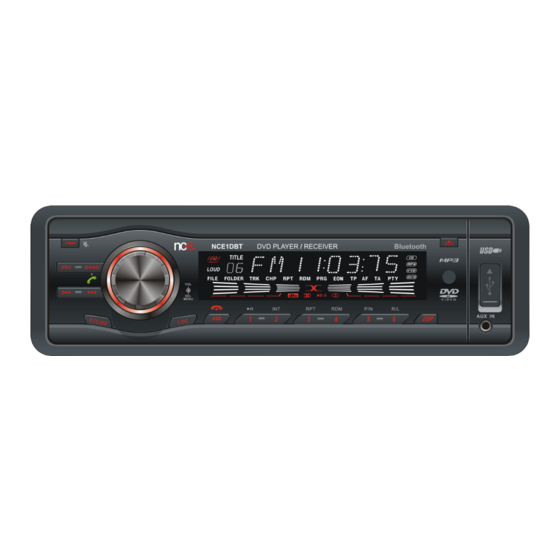
Page 3: Panel Controls
Panel Controls Power on/off: Press PWR to turn on/off the unit. 1. - Power on/off (press more than 2 seconds) - Short press to select audio menu, and 14. Button 6: - DVD audio/VCD audio L/R/ST - Folder up (MP3) - Mute rotate the knob to adjust level. 2. Source switch: Radio,Disc,USB, SD/MMC - Long press to enter into setting menu, 15. utton 1~6 Radio Preset: Card, Aux-in then each press changes the mode. Press to listen to a preset station, and hold for more than 2 seconds to store station. 3. - Band switch: FM-FM2-FM3-MW1-MW2 7. Radio local/distant (Radio mode) (Radio mode) 8. - Radio station auto preset 16. - Short press to switch to clock display, - Dial pick up/Transfer the call (Bluetooth - Hang up the call (press more than 2 press again to exit. mode) seconds, in Bluetooth mode) - Long press to enter clock setting. 4. - To fast search within a track/skip to next 9. Button 1: Play/Pause 17. Remote sensor or previous track... -
Page 4: Remote Controls
Remote Controls Power on/off: Press to turn on/ 1. Zoom (DVD/VCD only) 23. - Short press to switch to clock display, 2. Title (DVD only) press again to exit. off the unit. 3. Power on/off - Long press to enter clock setting. 4. Setup - Return to previous menu (Setting menu) 5. Menu cursor 24. - Angle (DVD only) 6. Enter - Terminate call (in BT mode) 7. Program 25. - V ideo system NTSC/PAL 60/PAL/AUTO 8. Digit area - Radio band (in Radio mode) 9. - Short press to select audio menu, and rotate - Dial/Receive call (in BT mode) the knob to adjust level. - Long press to enter into setting menu, then Replacing the lithium battery of each press changes the mode. 10. Volume remote control unit. -
Page 5: Behind The Panel
Remote Controls Behind the Panel General Operation Press the button to open the panel. Switching on and off Remote control operating range 1. Press PWR to turn on the unit. The remote control can operate within a distance of 3~5m. 2. Press SRC once or more to select your desired function: DISC, USB, CARD, Aux ( Aux-in), Tuner (Radio). 3. Pres PWR more than 2 seconds to power off. -
Page 6: General Operation
General Operation Audio Setting Menu Setting - 12 /24 HOURS Press the VOL knob to select audio menu: Press the VOL knob more than 2 seconds 12 HOURS MODE: VOL/BAS/TRE/BAL/FAD, and rotate the knob to enter into menu mode, then each press The clock displays in the type of 12 hours such to adjust. -
Page 7: Radio Mode
Radio Mode Selecting a Band Preset Mode Press BAND once or more to select FM1- FM2 Six numbered preset buttons store and recall stations for each band. The stored stations - FM3 - AM1 - AM2. Display shows wave band, frequency, and (1-6) for the current band can be viewed on preset station number if already stored. the screen. Storing Stations Selecting a Station Press the... -
Page 8: Usb/Sd/Mmc/Mp3 Mode
USB/SD/MMC/MP3 Mode Disc Mode Accessing Disc Mode 1. Load SD/MMC Card 4. Take out USB Device Open the panel and insert the SD/MMC card Press the SRC button to non-USB mode and If a disc is already in the disc slot but is not into the slot. Close the panel, the unit will read take out the USB device from the USB jack. playing, press the SRC button on the front the file of the card automatically. -
Page 9: Disc Mode
Disc Mode Insert a Disc disc operation. Disc and File NOT Supported 3. For VCD/CD, VCD or CD icon will appear *.AAC, *.DLF, *.M3U, *.PLS, MP3 PRO files Press to flip down the panel. Insert the disc on the display. and files with DRM. into the slot, and the unit will change to disc 4. W hile MP3/WMA files playback, MP3/WMA Open session discs. mode automatically. - Page 10 Disc Mode Entering File and Folder Names which MP3/WMA files are to be played by Note: assigning file names beginning with play Names using the code list characters are the MP3 and WMA (Windows Media Audio) music sequence numbers such as "01" to "99". For only file names and folder names that can files are digital audio files that are compressed example, a medium with the following folder/ be entered and displayed. Using any other...
- Page 11 Disc Mode 2. Press RDM again to select normal playback. Select Desired Track Display shows A B CANCEL. - Press or to skip to the next track. - Use 1-9 and 0, 10+ buttons on the remote control to select desired track number. Fast Forward/Backward During Repeat Pause Playback During playback, press RPT once or more. - D u r i n g p l a y b a c k , p r e s s t o p a u s e - RPT icon will appear on the display.
- Page 12 Disc Mode DVD Subtitle Select GOTO PROGRAM Goto desired track/chapter or time point Press SUB.T to select the subtitle language directly. to show if the DVD has multiple language Press GOTO button on the remote control, subtitles. track or DVD Title/Chapter and time display on top of the screen. Current item is highlighted. Use / to select desired item. Use digit DVD Title Select button to select number. Press ENTER to confirm.
-
Page 13: Bluetooth Mode
Bluetooth Mode Voice Transfer Exit Pairing Note: A f t e r p a i r s u c c e s s f u l l y , i f y o u w a n t t o During talking, press button to transfer audio For your safety, avoid talking on the phone as disconnect, press and hold SRC button until... -
Page 14: Auto Connect
Bluetooth Mode Auto Connect Music Mode such as PHILIPS, when it playbacks A2DP, you must find the unit “SUN-BMA19” in the Press the MENU button to enter main menu, A2DP phone’s menu and reconnect (check your and select [AUTO ON] or [AUTO OFF] in the A2DP is short for Advanced Audio Distribution mobile phone whether has the A2DP & menu. -
Page 15: Dvd Setup
DVD Setup Press SETUP to display setup menu on the - PASSWORD - DEFAULT: RESTORE screen. 1. Press number button " 0000 " on the remote If this item is selected, the unit will return to Use to select setup items: control, then press the ENTER button to original setting. SYSTEM - LANGUAGE - VIDEO confirm. - Page 16 DVD Setup English - CONTRAST German French Set the contrast of the video output with Select one dialogue language that you are Spanish from 0 to 12. familiar with when playing back DVD discs. Portuguese - HUE German Note: Set the hue of the video output with from -6 Select one language that you are familiar with If the DVD disc has the audio file in the to +6.
-
Page 17: Electrical Connections
Electrical Connections Wiring Diagram Video out 1 (Yellow) Antenna Video out (Yellow) (Black) Subwoofer out (Green) External Mic Bluetooth MIC in R (Red) (Black) Aux in Bluetooth Antenna L (White) (Grey) Fuse 15A Connector R(Red) Front Line-out (Brown) Amplifier L(White) ISO Connector R(Red) Rear Line-out (Gray) -
Page 18: Anti-Theft System
Anti-Theft System This unit is equipped with a flip-down detachable Installing the Panel panel. 1. Hold the panel and ensure the panel faces Panel can be detached and taken with you, toward you, and set the panel in the panel helping to deter theft. bracket. 2. Press the right side of the panel until it locks. Removing the Panel 1. Switch off the power of the unit. 2. Press button to flip down the panel. 3. At an angle hold the panel to pull it out. 4. Place the panel into the case and take it with you when you leave the car. -
Page 19: Installation Guide
Installation Guide Installation Procedures Important: Remove these two screws before installation. Otherwise, the player will not work. First complete the electrical connections, and then check for correctness. Reset Press button to flip down the panel. Then press the RESET button with a pointed object lock lever to reset the unit to the original status. Note: Press the RESET button will erase the clock and stored stations. 1. Inset mounting collar into the dashboard, and bend the mounting tabs out with a screw- driver. -
Page 20: Troubleshooting
Troubleshooting Sound skips due to vibration. If you suspect something is wrong, immediately switch power off. Immediately stop using it and Mounting angle is over 30 call the store where you purchased it. Adjust mounting angle to less than 30 Never try to repair the unit yourself because it Unstable mounting. is dangerous to do so. Mount the unit securely with the mounting parts. General Radio No power or no sound. Noise in broadcasts. Car's engine switch is not on. Turn your car's key to ACC or ON. Station is too far, or signals are too weak. -
Page 21: Specifications
General AM(MW) Radio Components Power supply 12V DC (11V-16V) Frequency range 522-1620KHz Mounting collar (Europe) Test voltage 14.4V, Machine screws M5x6 mm Usable sensitivity 30dBμ negative ground Mounting bolt (50 mm) Maximum power output 50Wx4 channels (S/N=20dB) Wire connector Continuous power 20Wx4 channels (4 Removable face plate case output... - Page 24 CLASS 1 LASER PRODUCT Made In PRC Rev. 1.0 www.nce.com.au...
Need help?
Do you have a question about the NCE1DBT and is the answer not in the manual?
Questions and answers