Subaru Navigation 2009 Forester Manual
Hide thumbs
Also See for Navigation 2009 Forester:
- Owner's manual (384 pages) ,
- Service bulletin (1 page) ,
- Owner's manual (384 pages)
Table of Contents
Advertisement
Contents
Safety Warnings ............................................................................. 6
System Components and Controls ............................................... 7
Loading the map disc ..................................................................... 9
Before Use..................................................................................... 12
Starting Up the Navigation System ............................................ 16
Volume .......................................................................................... 18
Markers and Controls Displayed on Maps ................................. 19
Screens During Route Setting.................................................................. 19
Screens During Route Guidance ............................................................. 21
Menu Screen Keys and Functions ............................................... 22
Map Operations............................................................................ 24
Selecting Map Orientation ........................................................................ 24
Changing Map Scale.................................................................................... 25
Setting Route ................................................................................ 27
Setting Destination ...................................................................................... 27
■ Setting destination/waypoints by scrolling the map.................................................... 27
■ Setting the destination from the navigation menu ....................................................... 29
Route Guidance ............................................................................ 43
Route Guidance Screen .............................................................................. 43
Zoom-in Map at Intersection.................................................................... 44
Dual Map Display.......................................................................................... 45
Freeway Information................................................................................... 46
Replaying Voice Guidance ........................................................................ 47
Compass Mode ............................................................................................. 48
Route Options .............................................................................. 49
Setting Route Options ................................................................................ 49
■ Search condition................................................................................................................................... 50
■ Detour.......................................................................................................................................................... 51
■ Route preferences................................................................................................................................ 52
■ Destination and waypoints ............................................................................................................ 52
■ Display route............................................................................................................................................ 56
■ Route preview......................................................................................................................................... 57
Navigation Setup ......................................................................... 60
Setting Your Navigation System............................................................. 60
■ User settings ............................................................................................................................................ 61
■ Quick POI selection.............................................................................................................................. 63
■ Language Selection ............................................................................................................................ 64
■ Calibration................................................................................................................................................. 64
■ Set clock...................................................................................................................................................... 66
■ Vehicle signal........................................................................................................................................... 67
■ Restore system defaults.................................................................................................................... 67
Stored Locations .......................................................................... 69
■ Memory points....................................................................................................................................... 70
■ Avoid area.................................................................................................................................................. 75
■ Previous destination (deleting stored locations) .............................................................. 77
Other Functions............................................................................ 79
■ Displaying POIs on a map ............................................................................................................... 79
■ Displaying POI data ............................................................................................................................. 81
■ Deleting POI markers.......................................................................................................................... 82
■ Editing Quick POI categories......................................................................................................... 82
■ SUBARU dealership search.............................................................................................................. 84
1
Advertisement
Chapters
Table of Contents

Related Manuals for Subaru Navigation 2009 Forester


Summary of Contents for Subaru Navigation 2009 Forester
-
Page 1: Table Of Contents
■ Displaying POI data ..........................81 Route Guidance ................43 ■ Deleting POI markers.......................... 82 Route Guidance Screen ................43 ■ Editing Quick POI categories......................82 Zoom-in Map at Intersection..............44 ■ SUBARU dealership search......................84 Dual Map Display..................45... - Page 2 Version and Initialization ............87 Selecting a station..................116 ■ Selecting a station that is preset ....................116 Version......................87 ■ Setting the frequency ........................116 Initialization of the navigation settings..........88 ■ Searching a station automatically................... 117 General Information ..............90 ■...
- Page 3 Looking at the DVD ..............140 Initializing the DVD..................168 ■ Setting the screen ..........................169 What must be known................141 ■ Setting the dynamic range......................170 ■ Operations while in the playback of the disc ..............141 ■ Setting the language........................171 ■...
- Page 4 ■ Making a phone call from the Speed Dial ................. 192 Editing the Speed Dial setting............... 218 ■ Making a phone call to the phone number of the Memory Point..... 193 ■ Adding the phone number to the Speed Dial memory ........... 218 ■...
- Page 5 Introduction...
-
Page 6: Introduction
Safety Warnings You will find a number of WARNINGs, CAUTIONs and NOTEs in this supplement. These safety warnings alert you to potential hazards that could result in injury to you or others. Please read these safety warnings as well as all other portions of this supplement carefully in order to gain a better understanding of how to safely use the systems it describes. -
Page 7: System Components And Controls
System Components and Controls (10) (11) (12) This button is used to display the destination entry screen of This button is used to operate the audio system. the navigation system. This button is used to operate the audio system. This button is used to display the menu screen of the naviga- tion system. - Page 8 System Components and Controls (10) MODE/TUNE This button is used to operate the audio system. (11) This button is used to operate the audio system. (12) This button is used to take out a disc and/or adjust the tilt of the monitor.
-
Page 9: Loading The Map Disc
Loading the map disc When changing the map disc with a disc appropriate to the Insert a map disc that contains the area showing the cur- present location, or when updating the map disc while in the rent position. version upgrade of a map disc, it is necessary to change it The monitor automatically gets back to the normal condition to with another map disc by following the procedure as start the playback of the disc. -
Page 10: Navigation
Loading the map disc Introduction... -
Page 11: Navigation
Navigation... -
Page 12: Before Use
Before Use • You must stop the vehicle in a safe place before operating WARNING the navigation system. For safety's sake, some of the naviga- tion system's controls and functions cannot be used unless READ THIS MANUAL FIRST the vehicle is stationary. Read this supplement carefully before using your navigation •... - Page 13 SUBARU dealer. Continuing to use the system could lead to a fire, an electric shock, or some other type of accident. contact the nearest SUBARU dealer.
- Page 14 If normal operation is still not restored after ROM disc in the system's main unit and turn the ignition switch to several hours, we recommend that you contact the nearest SUBARU the ON or ACC position. The system will automatically reload the pro- dealer.
- Page 15 Before Use ■ Handling precautions for DVD-ROM discs • Handle DVD-ROM discs carefully. Any DVD-ROM disc with excessive warping or scratches on its surface can cause reading errors. • Store DVD-ROM discs away from direct sunlight, which can cause warping and render them unusable. •...
-
Page 16: Starting Up The Navigation System
Starting Up the Navigation System Use the following procedure to start up the navigation system Carefully read the instructions on the CAUTION screen and display the current map screen. (cited below), then select Start the engine. The CAUTION screen will appear, followed by the opening screen. CAUTION Make selections only when vehicle is stopped. - Page 17 Starting Up the Navigation System NOTE • To make a selection, touch the desired key displayed on the screen. • The CAUTION screen remains on the display unless you select • When you use the navigation system for the first time, Eastern Standard Time (EST) will be displayed.
-
Page 18: Volume
Volume Use this function if you want to change the voice guidance volume setting from the default setting. Press the button. Select to adjust the sound volume. Each time is selected, the sound volume turns down. • Each time is selected, the sound volume turns up. If you want to turn off the sound of the navigation sys- •... -
Page 19: Markers And Controls Displayed On Maps
Markers and Controls Displayed on Maps Screens During Route Setting Touch a point on the map. A crosshair (scroll mark) will appear (1) Time Indicates the current time. on the screen. Then touch a desired point on the map. The map will scroll with the selected point at the center. - Page 20 Markers and Controls Displayed on Maps (8) "Store memory point" key Stores markers on the map. This key appears just for a few seconds after a map screen is selected. (9) Point of interest (POI) key Allows you to display the POI selection screen (See Page 79). On the screen, you can program POIs to appear on a map as markers.
-
Page 21: Screens During Route Guidance
Markers and Controls Displayed on Maps Screens During Route Guidance (1) Distance and time to destination Indicates the time (either approximate time required or time of arrival) and the distance to the destination or a waypoint. (2) Route A thick blue line indicates the route you should follow. (3) Turn guidance arrow Indicates the direction of your turn at the next intersection/ intersection as well as the distance to the intersection/inter-... -
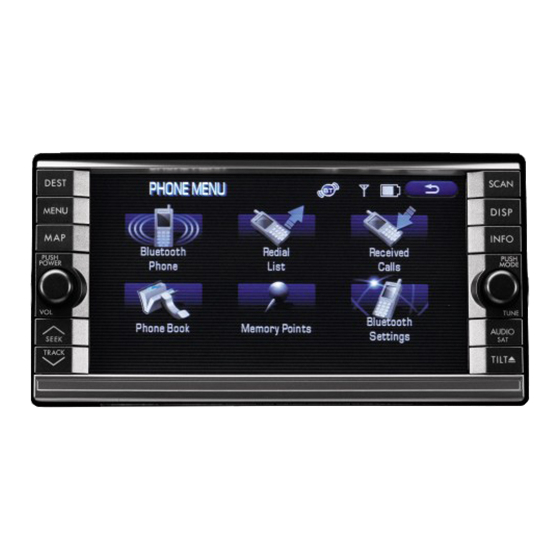
Page 22: Menu Screen Keys And Functions
Menu Screen Keys and Functions The table below shows the keys displayed on the MENU screen, <Current map screen> the functions accessible by selecting these keys, and the pages of this manual that describe the instructions you should follow when using these functions. -
Page 23: Menu Screen Key
Menu Screen Keys and Functions Menu screen key Function Reference page Phone Bluetooth Phone page Redial List page Received Calls page Phone Book page Memory Points page Bluetooth Settings page Version Version page Volume page Navigation 23... -
Page 24: Map Operations
Map Operations Selecting Map Orientation You can select either "heading up" or "north up" display on the current map screen by using the following procedure. Select <"North up" display> <"Heading up" display> If you select ("north up" display), the system rotates the If you select ("heading up"... -
Page 25: Changing Map Scale
Map Operations Changing Map Scale You can increase or decrease the scale of the map using the Selecting changes the scale as shown following procedure: below. Select to change the map scale. Navigation 25... - Page 26 Map Operations NOTE • Selecting allows you to change the map scale. • You can keep selecting allows you to change the map scale. • Selecting either of the following on the scale bar displayed by selecting allows you to change to the specified map scale. Scale to be changed Current scale <Scale Bar>...
-
Page 27: Setting Route
Setting Route Setting Destination Setting destination/waypoints by scrolling the Select the (destination or waypoint) key. The key will separate into the destination key and the waypoint key. Even if you do not know the exact address of your destination or a way- point on your route to the destination, you can set it by scrolling the map as follows: Touch the screen and scroll the map until the crosshair... - Page 28 Setting Route ■ Select (start). Selecting route Route guidance will begin along the displayed route. Upon setting the destination, the system prepares to calculate three types of routes to the destination (Quick, Alt., and Short). You can select from any of the three options as follows: Select (3 routes).
-
Page 29: Setting The Destination From The Navigation Menu
Setting Route Select (information). Setting the destination from the navigation menu The screen will display details (required time, total distance, roads used, etc.) regarding each option. You can set your destination using a variety of methods if you start set- ting from the DESTINATION ENTRY screen. - Page 30 Setting Route • Depending on the method used or the status of the map displayed, the located point may differ from where the facility you want to visit actually (Address)* See Page 31. exists. (Point of Interests)* See Page 34. (Select from Map) See Page 35.
- Page 31 Setting Route ■ "Address" method : Use this key to delete the last character entered. Select it repeatedly if you want to delete all the characters entered. Press the button and select (address). You can switch between keypad screens showing different characters by selecting (others), (symbols) or...
- Page 32 Setting Route Select the correct city from the list. Select (start). (input name): Use this key to input the city name from the Route guidance begins along the displayed route. keypad. NOTE • If the system cannot find your desired route, select (change route).
- Page 33 Setting Route ■ "Memory Point" method : Use this key to display the next suggestion. If you have saved some locations in the system's memory, you can : Use this key to display up to five of the next suggestions. make use of an appropriate one to set the destination.
- Page 34 Setting Route The map including your home location or the selected location Enter the name of the desired point of interest and will be displayed. select Select (destination) or (waypoint). Select the desired point of interest from the list. NOTE Icon (home) and keys (Category 1) through...
- Page 35 Setting Route NOTE : Use this key to display the next suggestion. • If two or more points of interest share the same name, they will both be listed : Use this key to display up to five of the next suggestions. on the screen.
- Page 36 Setting Route Select (destination) or (waypoint). : Use this key to display up to five previous suggestions. : Use this key to display the previous suggestion. ■ "Freeway Entrance/Exit" method : Use this key to display the next suggestion. You can use the name of a Freeway entrance or exit selected from the "Freeway Ent./Exit"...
- Page 37 Setting Route : You must select this key before you can enter the street Select the desired institution from the list. name. : Use this key to search through the list by distance. : Use this key to search through the list by name (alphabeti- cal search) Select (destination) or...
- Page 38 Setting Route ■ "Coordinates" method Enter the longitude of the location. You can set destinations or waypoints using their latitudes and longi- tudes as follows: Press the button, select , and then select (coordinates). Enter the latitude of the desired location. Use the numeric keys together with the [°] (degrees), ['] (minutes), : Use this key to switch over to the north latitude.
- Page 39 Setting Route Select (destination) or (waypoint). Select the street from the "Intersection" list. ■ "Intersection" method You can use a intersection defined by two street names as a location for setting your destination or a waypoint. Press the button, select , and then select (Intersection).
- Page 40 Setting Route ■ When there are two or more candidates, a list of intersec- "Phone number" method tions will be displayed. Select an intersection of your des- This function allows buildings and the like to be located using their tination. phone numbers.
- Page 41 Setting Route Select your destination. The DESTINATION ENTRY menu screen will appear. NOTE Select (destination) or (waypoint). • The SEARCH AREA screen shown above is a sample image. It may be slightly different from the actual screen image. NOTE • Three map discs are contained in this system.
- Page 42 Setting Route ■ ■ Area (West) Area (East) Arizona, California, Colorado, Idaho, Kansas, Montana, Nebraska, Alabama, Connecticut, Delaware, Florida, Georgia, Kentucky, Maine, Nevada, New Mexico, North Dakota, Oklahoma, Oregon, South Dakota, Massachusetts, Maryland, New Hampshire, New Jersey, New York, North Texas, Utah, Washington, Wyoming, Canada Carolina, Ohio, Pennsylvania, Rhode Island, South Carolina, Tennessee, Vermont, Virginia, Washington D.C., West Virginia, Canada...
-
Page 43: Route Guidance
Route Guidance Route Guidance Screen During route guidance, the system can indicate on a second Select (screen configuration). screen the directions in which you must make turns at the Select for turn arrow indication or for turn list next and following intersection in either of two ways: "turn arrow"... -
Page 44: Zoom-In Map At Intersection
Route Guidance Zoom-in Map at Intersection Before you arrive at an intersection, the system will automati- NOTE Use the following procedure to recall the most recently displayed zoom-in map cally show a zoom-in map of the intersection on a second of an intersection or a freeway fork. -
Page 45: Dual Map Display
Route Guidance Dual Map Display You can configure the screen for a dual map display. Select (dual map). If you wish to return to the single map display, select (sin- <Single map display> gle map). If you need not make any further selection, select . -
Page 46: Freeway Information
Route Guidance Freeway Information A list of buildings and facilities along a freeway can be dis- Select to display the map in the neighborhood together with the icons of hotels and banks. played on the screen. Select (screen configuration). Select (freeway information). -
Page 47: Replaying Voice Guidance
Route Guidance Replaying Voice Guidance If you want to listen to the last voice guidance again during route guidance, use the following procedure: Select You can hear the voice guidance again. Navigation 47... -
Page 48: Compass Mode
Route Guidance Compass Mode Longitude and latitude of present location can be displayed Longitude and latitude of present location are displayed on the screen. at upper right of the screen. Select (screen configuration). Select (compass). Navigation... -
Page 49: Route Options
Route Options Setting Route Options Using the functions available from the Route Options screen, (search condition): This function allows you to specify the way in which the system you can change the route options, stop the route guidance or calculates the route to the destination. (See Page 50.) check the route. -
Page 50: Search Condition
Route Options (cancel guidance): Search condition Selecting this key prompts the system to stop route guidance. Note that this erases the destination and waypoints. To prompt You can specify the way in which the system calculates your route. the system to start guidance again, select (calculate). -
Page 51: Detour
Route Options Select (calculate) Detour Select (start). You can specify a detour distance from your current position. The sys- tem will calculate an alternative route according to the distance specifi- cation, enabling you to take a detour. Press the button, then select (route options), and then select (detour). -
Page 52: Route Preferences
Route Options Route preferences Destination and waypoints Use this function to specify preferred route search conditions. The sys- You can change the destination or waypoints for the route calculation tem will start recalculating the route according to your specified condi- by using this function. - Page 53 Route Options Set a waypoint using any method available from the NOTE • When a new destination is set using (destination), it will replace the screen. current destination and the route calculation will be carried out again. • Step 4 must be performed for the second and any subsequent waypoints. •...
- Page 54 Route Options Select the key corresponding to the location that is to be Select the waypoint keys according to the order of your modified. visit. The map for the area around your current location will be dis- If you wish to cancel the visiting order number indication, select played.
- Page 55 Route Options ■ Deleting destination or waypoints Confirmation message will be displayed. Select (yes). Use this procedure when you wish to delete the previously set destina- tion or waypoint. Select (no) to cancel the deletion. Press the button, then select (route options), and then select (destination and way-...
-
Page 56: Display Route
Route Options ■ Deleting destination and all waypoints Display route You can delete the destination and all previously set waypoints in a sin- gle process. Use this function to display the entire route. You can also specify an area you wish to avoid and prompt the system to recalculate the route Press the button, then select (route... -
Page 57: Route Preview
Route Options Route preview The system can show you an automated simulation of the calculated route. Press the button, then select (route options), and then select (route preview). Start the simulation drive according to the calculated route using the keys on the screen as follows: (avoid): Select this key if you wish to specify any areas to avoid from the list of street names. - Page 58 Route Options ■ : Move to the destination. Setting conditions for simulation drive You can change the simulation drive conditions using this procedure. : The EDIT ROUTE PREVIEW screen will be displayed. (See Page 58.) Press the button, then select (route options), and then select (route preview).
- Page 59 Route Options POI keys: When you select one of the six POI category keys, the system will retrieve the selected POI from the Quick POI storage and display it on the map. When you select the (others) key, you can find POIs of other categories. For more details, See Page If, for example, the (to next POI) category key is selected and a simulation drive is started, your simulation...
-
Page 60: Navigation Setup
Navigation Setup Setting Your Navigation System Using the functions available from the Navigation Setup Select any of the displayed functions as necessary. This screen consists of two pages. Change the page by using screen, you can change the map display conditions and alter keys. -
Page 61: User Settings
Navigation Setup User settings (user settings): This function allows you to change the screen display and sound settings. (See Page 61.) You can change the screen display and sound settings using this procedure. (quick POI selection): Press the button, then select (navigation This function allows you to set the point of interest categories that setup), and then select... - Page 62 Navigation Setup Distance: (daytime): Units of distance can be selected from (km) The brightness of the display is fixed at the daytime setting (mile). regardless of whether the headlights are on or off. (nighttime): Road Restriction Warnings: The brightness of the display is fixed at the nighttime setting You can select or deselect display of traffic restriction warnings regardless of whether the headlights are on or off.
-
Page 63: Quick Poi Selection
Navigation Setup Quick POI selection Select a category. Once you have selected a category key, subcategories will be dis- played. Using this function, you can set the point of interest categories that are displayed when you select the Point of Interest menu key on the cur- rent map screen. -
Page 64: Language Selection
Navigation Setup Language Selection Calibration Use the following procedure to select your preferred language for the This function allows you to correct any display errors in the position and menu screens and the voice guidance. direction of your vehicle on the map display. ■... - Page 65 Navigation Setup ■ Move the crosshair to the correct position, and then Distance select When selected, this function automatically corrects an error in the cur- rent position display that might occur after tire replacement. Press the button, then select (navigation setup), and then select (calibration).
-
Page 66: Set Clock
Navigation Setup Set clock Select the daylight saving time mode by pressing Since the adjustments for minutes and seconds are made automatically NOTE using the time data provided by GPS satellites, you can set your clock by Select to advance the time by one hour. simply performing a time-zone and daylight saving time adjustment using this function. -
Page 67: Vehicle Signal
Navigation Setup Vehicle signal Restore system defaults This function allows certain vehicle data and GPS satellite data to be dis- Use this function if you want to change all of the system's current set- played. tings back to the default settings. Press the button, then select (navigation... -
Page 68: Route Options Search Condition
Navigation Setup [Default List] Item Initial condition Item Initial condition Navigation Setup Menu Distance mile Map display Road Restriction Warnings Search Area Disc A (WEST): CA Reverse Mute Disc B (MID): IL Keyboard Layout Disc C (EAST): DC Arrival Time Required remaining time Display Guidance Language US English, female... -
Page 69: Stored Locations
Stored Locations You can store, edit, or delete any destinations, waypoints, and (Memory Points): Use this function to place markers on the map. (See Page 70.) other marked points using the procedures described in this section. (Avoid Area): Use this function to store into the system's memory any areas you Press the button. -
Page 70: Memory Points
Stored Locations Editing keys displayed for each function are as follows: Memory points ■ Storing new memory points Memory Points (100) Memory points can be stored into any of the six categories (including Home) of storage locations. Press the button, then select (stored loca- tions), and then select (memory points). - Page 71 Stored Locations ■ Set the memory point using the preferred method avail- Reviewing and modifying memory points able on the displayed screen. Using this function, you can review the stored memory points in the form of a list on the screen and modify names, icons, telephone num- bers, and other memory point data.
- Page 72 Stored Locations Select the memory point to be modified. Select the category key corresponding to the memory point to be modified. You can change the sequence in which memory points are listed by selecting (Attribute), (icon), me), or (date). (icon): Selecting this key allows you to choose a dis- play icon.
- Page 73 Stored Locations NOTE (position): Select this key to review the memory points and modify a memory point on the map screen. After The "With direction" ( ) keys in the "With Sound" page are checking or modifying it, select (OK). used to activate response sounds only when you come near the mem- ory point from the specified direction.
- Page 74 Stored Locations ■ Deleting memory points Confirmation message will be displayed. Select (yes). You can delete stored memory points by using this function. Select (no) to cancel the deletion. Press the button, then select (stored loca- tions), and then select (memory points).
-
Page 75: Avoid Area
Stored Locations Confirmation message will be displayed. Select Avoid area (yes). Select (no) to cancel the deletion. ■ Storing avoid areas If you use this function to store into the system's memory the areas you want to avoid, the system will avoid the areas when calculating routes. Press the button, then select (stored loca-... - Page 76 Stored Locations Select (reduce) or (enlarge). Select the avoid area to be modified (reduce): Reduces the size of the avoid area. Select the key corresponding to the item to be modified. (enlarge): Increases the size of the avoid area. For details regarding the function of each key, refer to "Reviewing and modifying memory points"...
-
Page 77: Previous Destination (Deleting Stored Locations)
Stored Locations Previous destination (deleting stored locations) Select the destination to be deleted. Use this function to delete previously set destinations. Press the button, then select (stored loca- tions), and then select (previous destinations). Select (delete). (all delete) is selected, all previously set : Use this key to display up to five previous destinations. - Page 78 Stored Locations Confirmation message will be displayed. Select (yes). Select (no) to cancel the deletion. Navigation...
-
Page 79: Other Functions
Other Functions Displaying POIs on a map (all local POIs): Use this key to search for all local points of interest (see below). Using this function, you can display POIs on the current map screen. Touch the current map screen. Select (points of interest). - Page 80 Other Functions ■ Local search Select the POI you want to find from the list of catego- ries. Touch the current map screen. Select (points of interest). : Use this key to display up to five previous POIs. : Use this key to display the previous POI. : Use this key to display the next POI.
-
Page 81: Displaying Poi Data
Other Functions Displaying POI data Select (information). The information on the POI will be displayed. You can display the information on a POI, such as the name, address and telephone number. Display the desired POI markers on the current map screen. -
Page 82: Deleting Poi Markers
Other Functions Deleting POI markers Editing Quick POI categories Use this function when you want to delete any POI markers on the map. Use this function when you want to edit the Quick POI categories on this unit. Touch the current map screen. Select (menu). - Page 83 Other Functions Select (quick POI selection). Select (automotive). Select (SUBARU dealership). Select the item that you want to edit. (Following procedure show how to change the category from ATM to SUBARU dealership on Quick POI for example.) Navigation 83...
-
Page 84: Subaru Dealership Search
Other Functions ATM bookmarked as to Quick POI. SUBARU dealership search ■ SUBARU dealership search from POI Press the button and select (point of inter- est). Press the (category). Selecting [Default] returns the Q-POI SELECTION items to their default settings. - Page 85 Other Functions ■ Select (SUBARU dealer- Displaying SUBARU dealership on map ship) from the list. Touch the current map screen. Select (points of interest). NOTE • Displayed information about a specific facility might not include recent changes. It is recommended that you check the location or business days/ hours of a desired point of interest before departure.
- Page 86 Other Functions Select (automotive). Select the SUBARU dealership marker by moving the cross hair over it. Select (SUBARU dealer- ship) and press (show). Select (info). The POI marker of SUBARU dealership will appear. The information of SUBARU dealership will be displayed.
-
Page 87: Version And Initialization
Version and Initialization Version Use this function to check the version of the DVD-ROM disc you are presently using. Press the button. Select (version). The version of the DVD-ROM disc will be displayed on the screen. Navigation 87... -
Page 88: Initialization Of The Navigation Settings
Version and Initialization Initialization of the navigation settings The settings of the navigation system can be initialized. When Select initialized, data such as memory points, travel history and telephone numbers are all deleted. Data once deleted cannot be restored. Press the button. - Page 89 Version and Initialization Select The navigation system is restarted automatically. All of the settings are initialized. Navigation 89...
-
Page 90: General Information
General Information ■ Accuracy of vehicle position tion. The correct position will eventually appear on the screen through the correction function. If the screen does not show the cor- Area in which GPS signals cannot be received rect position for an excessively long time, correct the current position Because the radiowave signals from the GPS satellites travel primarily or make an automatic correction. - Page 91 General Information (10) The vehicle's mark could deviate from its actual position after shape of the roads on the map in order to correct the vehicle's the tires have been replaced. position mark to the most appropriate road. • If the vehicle is driven on a road whose actual shape differs from ■...
- Page 92 General Information (10) The system might guide the driver to make a U-turn. (11) The system might guide the driver to a road that cannot actu- ally be travelled (such as a road to which entry is prohibited). (12) The system might not output guidance even if the vehicle is driven in reverse on the guided route.
-
Page 93: When A Problem Occurs
Confirm whether the problem is due to a minor operational error or a malfunction in the system by referring to the table below before you contact your SUBARU dealer for any repair service. The map does not scroll even when the vehicle is moving. - Page 94 General Information Navigation...
-
Page 95: Audio And Visual
Audio and Visual... -
Page 96: Before Using The Audio And Visual
Before using the Audio and Visual Precautions when using the system WARNING LOOK AT THE AUDIO AND VISUAL SCREEN ONLY WHEN NECES- SARY READ THIS MANUAL FIRST When you need to look at the audio and visual screen, do so Read this supplement carefully before using your audio and visual for the shortest time possible. - Page 97 Do not spray the cleaning fluid SUBARU dealer. Continuing to use the system could lead to a directly onto the audio and visual screen. Spraying cleaning fluid fire, an electric shock, or some other type of accident.
- Page 98 Before using the Audio and Visual • In hot weather, cool the passenger compartment down before using the audio and visual system. The liquid crystal display operates cor- rectly at temperatures between 0°C and 60°C (32°F and 140°F). When the temperature exceeds 60°C (140°F), the audio and visual system circuit protection function is activated, causing the display to dim.
-
Page 99: Discs That Can Be Used
Before using the Audio and Visual Discs that can be used For the in-vehicle equipment, it is possible to look and listen CAUTION to discs attached with the marks shown below. • Handle the disc with care so that it does not get smeared Music CD DVD Video with fingerprints and stain, or does not get scratched. - Page 100 Before using the Audio and Visual • Avoid the use of discs of which the recording section is trans- parent or translucent. These discs may not be inserted or ejected, or played back normally. • Using lens cleaner may cause malfunction to the pick-up sec- tion of the player.
-
Page 101: Player
Even when conducting the operation according to the mes- sage displayed on the screen and the function is stopped, a malfunction may result. Get a checkup of the player at Subaru Dealer. In the following cases other than malfunction, the player may not oper- ate normally. -
Page 102: Character Information Displayed
Before using the Audio and Visual Character information displayed The number of characters that can be displayed as informa- tion on various screens and the audio display is limited, and it sometimes occurs that all of the characters cannot be dis- played. -
Page 103: Basic Operation Of The Audio And Visual
Basic operation of the Audio and Visual Name of each part The following are the name of each part that is used when 0.5 seconds allows you to fast-forward or fast-rewind a tune, and/or search a radio station automatically. using the audio and visual function. ■... - Page 104 Basic operation of the Audio and Visual ■ Audio control buttons (if equipped) buttons These buttons are located on the spokes of the steering wheel. They allow the driver to control audio functions without taking his/her hands off the steering wheel. MODE button These are used for various operations within each source of the audio and visual.
- Page 105 Basic operation of the Audio and Visual Volume control buttons Press the “+” button to increase the volume. Press the “-” button to reduce the volume. A number indicating the volume will be shown on the audio display. MUTE button Press this button if you wish to immediately cut the volume to zero.
-
Page 106: Turning On The Power
Basic operation of the Audio and Visual Turning on the power Turn on the power for the audio and visual. Conduct either of the following operations. • Press the [POWER/VOL] button. • Press the [MODE/TUNE] button. • Press the [MODE] switch of the steering switch. •... -
Page 107: Selecting The Source
Basic operation of the Audio and Visual Selecting the source It is possible to make a switch among AM radio, FM radio, SAT, When the operations above are conducted on the audio screen, each source screen is displayed as following example. VIDEO, CD, DVD, MP3/WMA and other externally connected equipment for looking and listening. - Page 108 Basic operation of the Audio and Visual CD screen VIDEO screen (The display varies with the externally connected equipment.) DVD screen NOTE • When the disc is not set or when no externally connected equipment is pro- vided, the source is not displayed. •...
-
Page 109: Making A Selection By Touching
Basic operation of the Audio and Visual Making a selection by touching Touching the source display allows you to select a source. Press the button. When the source display is shown, proceed to step 3. Press again the button. Select a source. Each of the source screens is displayed. -
Page 110: Setting And Adjusting The Sound
Basic operation of the Audio and Visual Setting and adjusting the sound Adjusting the sound volume Turning off the sound It is possible to adjust the sound volume while looking and listening to It is possible to mute temporarily. the source. Press the (mute) switch of the steering switch. -
Page 111: Handling The Disc
Basic operation of the Audio and Visual Handling the disc Setting the disc CAUTION When inserting a CD, do not insert 2 or more CD's in piles. This Set a CD, DVD, or MP3/WMA disc. may cause a malfunction to the player, resulting in the take-off For details of the discs that can be used, refer to "Discs that can be used"... -
Page 112: Taking Out The Disc
Basic operation of the Audio and Visual Taking out the disc Take out a CD, DVD or MP3/WMA disc from the in-vehicle equipment. Press the button. Select (DVD/CD). The monitor section is tilted and the disc is ejected. Take out the disc. Press the button. -
Page 113: Listening To The Radio
Listening to the radio Listening to the radio It is possible to tune in to a radio station to listen to the AM or (1) Clock The current time is displayed. FM radio. (2) FM display Change the source over to the FM radio or AM radio. The difference between the FM1 and FM2 frequency bands is (See Page 107.) displayed. -
Page 114: Am Radio Screen Displayed
Listening to the radio (SETTING) AM radio screen displayed Select this to display the screen set for the audio. (See Page 158.) When the AM radio screen is not displayed while listening to the AM (10) (BAND) radio, press the button to display the AM radio screen. - Page 115 Listening to the radio (5) VOL The volume level is displayed. (See Page 110.) (6) SCAN Displayed when scanning a station to which you can tune in. (See Page 117.) (7) Preset keys 1 to 6 It is possible to preset a station and invoke it later. (See Page 119.) (SETTING) Select this to display the screen set for the audio.
-
Page 116: Selecting A Station
Listening to the radio Selecting a station Selecting a station that is preset Setting the frequency Presetting a station in advance in the in-vehicle equipment allows you It is possible to set the frequency manually to listen to the radio. to invoke that station. -
Page 117: Searching A Station Automatically
Listening to the radio Searching a station automatically Searching a FM station from a category of interest It is possible to search a station that can be tuned in to automatically to It is possible to select a category of interest and make search of a station listen to a radio. - Page 118 Listening to the radio • ROCK • SOFT • TOP40 • COUNTRY • OLDIES • JAZZ • CLASSIC • R&B • RELIGIOUS • MISC • ALL • Selecting scrolls the display to display a category 5 posi- tions ahead. • Selecting scrolls the display to display a category 5 posi- tions behind.
-
Page 119: Presetting A Station
Listening to the radio Presetting a station It is possible to store in the memory a station frequently lis- Presetting a station that can receive radio waves tened to and invoke it later. automatically Presetting a station that is now being tuned in to It is possible to search and preset a station that can receive radio waves automatically. -
Page 120: Listening To The Cd
Listening to the CD Listening to a tune in the CD It is possible to set the CD in the in-vehicle equipment to lis- ten to a tune in the CD. Change the source over to the disc. (See Page 107.) The track of the CD is played back from the start. -
Page 121: Cd Screen Displayed
Listening to the CD CD screen displayed When the CD screen is not displayed while looking and listen- (4) FUNCTION The playback status such as repeat and random is displayed. ing to the CD, press the button to display the CD RPT: A tune is being played back repeatedly. - Page 122 Listening to the CD (10) (SETTING) Selecting this displays the screen set for the audio. (See Page 158.) (11) (RDM) The playback method of tunes is changed over in random order. (See Page 127.) (12) (RPT) The playback method of tunes is changed over to the repeated playback.
-
Page 123: Selecting A Tune
Listening to the CD Selecting a tune Selecting the preceding tune Selecting the succeeding tune It is possible to play back a tune preceding the one that is now being It is possible to play back a tune succeeding to the one that is now played back. -
Page 124: Selecting A Tune From The List
Listening to the CD Selecting a tune from the list Select a tune you want to listen to. It is possible to display in the list tunes contained in the CD, and select a tune from the list to play it back. Press the button. -
Page 125: Searching A Tune While Listening
Listening to the CD Searching a tune while listening Fast-rewinding or fast-forwarding a tune It is possible to search a tune you want to hear while listening to each It is possible to fast-rewind or fast-forward a tune that is now being tune in the CD for 10 seconds. -
Page 126: Listening To A Tune Repeatedly
Listening to the CD Listening to a tune repeatedly It is possible to play back a tune repeatedly. Select (RPT) while playing back a tune. "RPT" is displayed for FUNCTION on the CD screen to play back a tune repeatedly. Selecting again (RPT) releases the repeated playback. -
Page 127: Listening To Tunes In Random Order
Listening to the CD Listening to tunes in random order It is possible to play back the tunes in the CD in random order. Select (RDM) while playing back a tune. With "RDM" displayed for FUNCTION on the CD screen, tunes are played back in random order. -
Page 128: Listening To Mp3/Wma Disc
Listening to MP3/WMA disc MP3/WMA ■ MP3/WMA can be played back by this in-vehicle equipment. WMA formats that can be played back However, media and formats are limited in which MP3/WMA WMA files that can be played back with the in-vehicle equipment are as files that can be used are recorded. - Page 129 Listening to MP3/WMA disc ■ For details of the characters that can be used, refer to the instruction Input of a file name and a folder name manual of the writing software and "Input of file name and folder When inputting a file name and a folder name, input them in half size name.
- Page 130 Listening to MP3/WMA disc ■ ■ Files that are written into media Example of Media hierarchy When media that contains MP3/WMA files is inserted, first of all, all the files in the disc are checked. So, when a lot of folders and files other than MP3/WMA are written into the media to be played back, a lot of time is required before starting the playback of the media.
-
Page 131: Listening To Tunes (File) In The Mp3/Wma Disc
Listening to MP3/WMA disc Listening to tunes (file) in the MP3/WMA disc It is possible to set the MP3/WMA disc in the in-vehicle equip- ment to listen to tunes (files) in the disc. Change the source over to the disc. (See Page 107.) The first tune in the lead folder in the MP3/WMA disc is played back from the start. -
Page 132: Mp3/Wma Disc Screen Displayed
Listening to MP3/WMA disc MP3/WMA disc screen displayed When no MP3/WMA disc screen is displayed while looking RPT: A tune is being played back repeatedly. RDM: Tunes in the MP3/WMA disc are being played back in and listening to the MP3/WMA disc, press the button random order. - Page 133 Listening to MP3/WMA disc (10) ARTIST The name of an artist is displayed. (11) (SETTING) Selecting this displays the screen set for the audio. (See Page 158.) (12) Used to play back the first tune in the succeeding/preceding folder. (See Page 134.) (13) (RDM) Used to change over the playback method of tunes in ran-...
-
Page 134: Selecting A Tune
Listening to MP3/WMA disc Selecting a tune Selecting a folder that you want to hear Select (UP). Select a folder in the MP3/WMA disc. ■ To select a folder Select Selecting plays back the first tune in the succeeding folder. Selecting plays back the first tune in the preceding folder. -
Page 135: Selecting A Tune (File) You Want To Hear
Listening to MP3/WMA disc • When the tunes are displayed in the list, selecting [UP] displays Selecting a tune (file) you want to hear the folder list. • Selecting (CONTROL) gets back to the MP3/WMA disc Select a tune (file) in the MP3/WMA disc. in which the tune information is displayed. - Page 136 Listening to MP3/WMA disc ■ To select a tune from the list • When the tunes are displayed in the list, selecting up displays the folder list. • Selecting (CONTROL) gets back to the MP3/WMA disc Select (LIST). in which the tune information is displayed. The tunes in the folder are displayed in the list.
-
Page 137: Fast-Rewinding Or Fast-Forwarding A Tune
Listening to MP3/WMA disc ■ To search a tune while listening to tunes in the folder Fast-rewinding or fast-forwarding a tune It is possible to search a tune you want to hear while listening to each of the tunes in the folder for 10 seconds. After all the tunes in the folder It is possible to rewind or forward quickly a tune that is now being are played back, the player gets back to the normal playback mode. -
Page 138: Listening To A Tune Repeatedly
Listening to MP3/WMA disc ■ Listening to a tune repeatedly To listen to the tunes in the folder repeatedly It is possible to play back the tunes in the folder repeatedly. It is possible to listen to the same tune or the tunes in the folder repeat- Select (RPT) twice while playing back a tune. -
Page 139: Listening The Tunes In Random Order
Listening to MP3/WMA disc Listening the tunes in random order It is possible to play back the tunes in the folder in random order. After all the tunes in the folder are played back, the tunes in the next folder are played back in random order. -
Page 140: Looking At The Dvd
Looking at the DVD WARNING • Never try watching videos or using other entertainment pro- grams with your Audio and Visual System by keeping the vehicle engine running in a garage or other enclosed area. Exhaust gases accumulated in such an area or entering the vehicle are dangerous, or even lethal. -
Page 141: What Must Be Known
Looking at the DVD What must be known Manufactured under license from Dolby Laboratories. DVD video and DVD audio "Dolby, " "Pro Logic, " and the double-D symbol are trademarks of Dolby Laboratories. They are compliant with the NTSC color television format. Non disclosed confidential writings: Copyright: Dolby Laboratories, 1992 to 1997 ■... -
Page 142: Playing Back The Dvd
Looking at the DVD Playing back the DVD It is possible to set a DVD on the in-vehicle equipment to look at and listen to it. Change the source over to the disc. (See Page 107.) When a DVD is not yet set on the in-vehicle equipment, set a DVD. (See Page 111.) The DVD is played back. -
Page 143: Dvd Control Screen Displayed
Looking at the DVD DVD control screen displayed When the DVD screen is not displayed while in the playback (3) CHAPTER The chapter number of the DVD that is being played back is of a DVD, press the button to display the DVD screen. displayed. - Page 144 Looking at the DVD (10) (STOP) The playback of the DVD image is stopped. (11) (MENU CONTROL) The screen is changed over in which the menu is operated. See Page 149. (12) (T.SEARCH) The DVD image can be played back with the title specified. See Page 145.
-
Page 145: Selecting The Title And The Chapter
Looking at the DVD Selecting the title and the chapter Selecting the chapter Searching a title with the title number specified ■ It is possible to search a title with the title number specified and then To play back the preceding chapter play it back. - Page 146 Looking at the DVD Select to enter a title number and then select (ENTER). A title selected is played back. NOTE When selecting (ENTER) with a title number entered that is not in the DVD, the screen displayed is not changed. Audio and Visual...
-
Page 147: Controlling The Playback Of The Dvd
Looking at the DVD Controlling the playback of the DVD ■ It is possible to pause, stop, rewind quickly or forward quickly To rewind the DVD image quickly the DVD for control. Keep pressing the button while in the DVD play- ■... - Page 148 Looking at the DVD ■ To forward the DVD image in single frame step Select the screen while in the DVD playback. Select The DVD is stopped temporarily. Conduct either of the following operations while in the DVD playback. • Press the button.
-
Page 149: Operating The Menu Screen
Looking at the DVD Operating the menu screen Selecting the menu Selecting to select a menu item, and then select (ENTER). It is possible to operate the menu screen of the DVD. Select the screen while in the DVD playback. •... -
Page 150: Changing Over The Position Of The Menu Operation Key
Looking at the DVD Changing over the position of the menu opera- Select (CHANGE). tion key The menu operation key is used to operate the menu of the DVD. It is possible to relocate the position of the menu operation key so that it does not interfere with the DVD image. -
Page 151: Changing The Language And The Angle
Looking at the DVD Changing the language and the angle Changing the superimposed language Select (SUB). It is possible to change over the superimposed language while in the playback of a DVD. Select the screen while in the DVD playback. Each time selecting (SUB), the superimposed lan- guage is changed over. -
Page 152: Changing The Voice Language
Looking at the DVD Changing the voice language Select (AUDIO). It is possible to change the voice language while in the DVD playback. Select the screen while in the DVD playback. Each time (AUDIO) is selected, the voice is changed over. -
Page 153: Changing Over The Angle
Looking at the DVD Changing over the angle Select (CONTROL). It is possible to change over the angle to look at the DVD image in the multi-angle scene while in the playback of the DVD compliant with multi-angle. In the scene compliant with multi-angle, select the screen while in the DVD playback. -
Page 154: Setting The Screen
Looking at the DVD Setting the screen Adjusting the image quality • Selecting allows you to adjust the brightness. Each time is selected, the brightness is increased and each time is selected, the brightness is decreased. The image quality can be adjusted while looking and listening to the •... -
Page 155: Setting The Screen Mode
Looking at the DVD Setting the SCREEN MODE (NORMAL): Displayed in the horizontal to vertical ratio of 3:4 screen (normal size of TV screen) with both ends black. The screen mode can be set while looking and listening to the DVD. (FULL): Displayed in the horizontal to vertical ratio of 3:4 screen (normal size Press [DISP]. -
Page 156: Looking At The Video
Looking at the DVD Looking at the VIDEO It is possible to look at the VIDEO with the VIDEO equipment externally connected. Change the source over to VIDEO. (See Page 107.) NOTE • The VTR equipment is required to be connected externally. •... -
Page 157: Satellite Radio Operation (If Equipped)
Use of satellite radio (Sirius) requires a tuner, antenna and a service con- tract. For details, please contact your SUBARU dealer or visit Sirius Satel- lite Radio at www.sirius.com or call 1-888-539-SIRIUS (7474) for more information. Sirius, the Sirius dog logo, channel names and logos are trademarks of SIRIUS Satellite Radio Inc. -
Page 158: Setting The Audio
Setting the audio Setting the equalizer It is possible to set the audio to the sound quality of your pref- Select (EQUALIZER) in the SETTING screen. erence. Setting the equalizer with ease It is possible to select a sound category to set the equalizer with ease. Press the button. -
Page 159: Setting The Equalizer In Detail
Setting the audio Setting the equalizer in detail Select (EQUALIZER) in the SETTING screen. Setting the numeric value of the equalizer in detail allows you to enjoy a sound quality more suited to your taste. Presetting the equalizer allows you to invoke it later. Press the button. -
Page 160: Invoking The Equalizer Setting That Has Been Preset
Setting the audio Invoking the equalizer setting that has been 0.25/0.5/1/2 Used to set the degree of preset acumination. GAIN: -9/-7/-5/-3/-2/-1/0/1/2/3/5/7/9 Used to set the value of gain. It is possible to invoke the equalizer preset to make use of it. The larger the value of Q factor (degree of acumination) is, the Press the button. - Page 161 Setting the audio Select (EQUALIZER) in the SETTING screen. Select either of of USER PRESET. Audio and Visual 161...
-
Page 162: Setting The Balance Of The Audio Volume
Setting the audio Setting the balance of the audio volume Set the balance of the audio volume and the sound volume of Select (BALANCE/FADER) in the SETTING screen. the sub woofer in the vehicle. Press the button. Select (SETTING). Select given in the in-vehicle illustration to set the balance of the sound volume. - Page 163 Setting the audio NOTE • Selecting (DEFAULT) gets "+" back to the center position. • The setting of the sub woofer level is available only when the sub woofer is connected. (See Page 166.) • The larger the numeric value of the sub woofer level, the bigger the sub woofer volume.
-
Page 164: Setting The Surround
Setting the audio Setting the surround The setting of the surround is made for each source. Set the Select (SURROUND) in the SETTING screen. surround for the source currently selected. Press the [MODE/TUNE] button to select the source for which the surround is to be set. Press the button. - Page 165 Setting the audio • "Panorama": This enhances greatly the stereo effect in front including the surround speaker. With the entire vehicle used, you can enjoy the feeling like "being wrapped in sound. " It is recommended that you use this mode when playing back the stereo signals of an audio CD.
-
Page 166: Setting The Speaker
Make a setting for the connection of the center speaker and Select (SET UP). the sub woofer. The center speaker and the sub woofer are sold separately. When using them, contact the Subaru dealer. Press the button. Select (SETTING). Select (SPEAKER). - Page 167 Setting the audio Make a setting to decide whether or not the SUB WOOFER and the center speaker are connected. • Select [ON] of the SUB WOOFER when connecting the sub woofer. And select (OFF) when not connecting it. • Select [ON] of the CENTER when connecting the center speaker. And select (OFF) when not connecting it.
-
Page 168: Initializing The Dvd
Setting the audio Initializing the DVD The DVD player is initialized. The selection of the superim- Select (SET UP). posed language and the sound can be set while in the look- ing and listening of the DVD. However, it is convenient if you initialize in advance the settings frequently used. -
Page 169: Setting The Screen
Setting the audio When "After changing settings, system may not play Setting the screen back" is displayed, select (Yes). NOTE It is possible to make a setting to decide whether or not the angle mark The following can be conducted in this screen. is displayed. -
Page 170: Setting The Dynamic Range
Setting the audio • : With a black frame attached to the top and bottom Setting the dynamic range of the image in the ratio of 16:9, the width and height is displayed in the ratio of 4:3. The dynamic range is set. The setting of the dynamic range is effective •... -
Page 171: Setting The Language
Setting the audio Setting the language Select the voice you want to set. When there is no lan- guage found you want to set, select (OTH- ERS). It is possible to initialize the voice language, the superimposed lan- guage and the language to be displayed on the menu. For detailed method for changing the language while in the looking and listening of the DVD, refer to "Changing the voice language"... -
Page 172: Setting The Password Of The Parental Level
Setting the audio Setting the password of the parental level Select the numeric key to enter a 4-digit password, and then select (OK). The parental level is used to restrict the looking and listening of the DVD according to the level set. To set the parental level, it is necessary to register a password in advance. -
Page 173: Setting The Parental Level
Setting the audio Setting the parental level Select the numeric keys to enter a 4-digit password and then select (OK). Set the parental level to restrict the looking and listening of the DVD according to the level set. In order to set the parental level, a password is used. - Page 174 Setting the audio Audio and Visual...
-
Page 175: Handsfree
Handsfree... -
Page 176: Before Using The Handsfree
Before using the Handsfree What can be made with the handsfree It is possible to connect the Bluetooth Phone of which the What cannot be done with the handsfree operation has been confirmed to the in-vehicle equipment through the Bluetooth format (wireless) to make a phone call In the following cases, the functions of the handsfree cannot be used. -
Page 177: Precautions To Be Taken When Using The Bluetooth Equipment
Before using the Handsfree Precautions to be taken when using the Bluetooth equipment Please take note of the following when using the Bluetooth equipment. CAUTION • Do not leave the Bluetooth Phone in the vehicle. WARNING (The temperature in a sun-heated car may go up extremely high.) •... -
Page 178: Name Of Each Part
Before using the Handsfree Name of each part ■ The name of each part used by the functions of the handsfree Steering switches is as shown below. Pressing the switch short allows you to answer an incoming phone call. Pressing the switch long allows you to hang up the phone. -
Page 179: Phone Voice
Before using the Handsfree Phone voice After making a phone call or having a phone call, you can talk over the phone through mike and speaker. • An incoming call notice and a voice output while in the phone call are output from the speaker on the driver's seat side and passenger’s seat. -
Page 180: Various Types Of Displays
Before using the Handsfree Various types of displays Selecting (Phone) with the button pressed dis- • When "Out of the range" is being displayed, you are now out of the service area, or in the location to which no radio waves get through. plays the PHONE MENU screen, in which you can set and On occasions like this, you cannot use the Bluetooth Phone. -
Page 181: Bluetooth Connection Status Display
Before using the Handsfree Bluetooth connection status display Roaming display This displays the Bluetooth connection status of the Bluetooth Phone. Roaming is a service that provides a continuous use of the system by using the facilities of a company with which the telephone company The Bluetooth Phone is correctly connected to the in-vehicle equip- ties up when you are out of the stipulated service area. -
Page 182: When Parting With Your Car
Before using the Handsfree When parting with your car When using the handsfree, a lot of personal information is registered. When parting with your car, delete your personal information and data referring to the following. And data once deleted cannot be restored to their original state. -
Page 183: Making Preparations Of The Handsfree
Making preparations of the handsfree Registering the Bluetooth Phone To use the Bluetooth Phone in interlock with the in-vehicle Select (Bluetooth Settings). equipment, it is necessary to register the Bluetooth Phone with the in-vehicle equipment in advance. NOTE It is possible to register up to five Bluetooth Phones with the in-vehicle equip- ment. - Page 184 Making preparations of the handsfree The device name of the Bluetooth Phone is displayed on the DEVICE LIST. The Bluetooth Phone most recently registered is selected as a Bluetooth Phone to be used with the in-vehicle equipment. NOTE • For detailed method for the transmission of the PASS-KEY from the Bluetooth Phone, refer to the instruction manual of the Bluetooth Phone.
-
Page 185: Connecting The Bluetooth Phone
Making preparations of the handsfree Connecting the Bluetooth Phone To use the Bluetooth Phone in interlock with the in-vehicle Select (Bluetooth Settings). equipment, the Bluetooth Phone registered with the in-vehi- cle equipment is required to be connected to the in-vehicle equipment. - Page 186 Making preparations of the handsfree Select (Connect). NOTE • With (Autoconnect) set to "ON" on the DEVICE LIST screen in advance, the in-vehicle equipment automatically accept the connection of the Bluetooth Phone. Selecting (Autoconnect) makes a changeover between ON and OFF. •...
-
Page 187: Speaking Over The Handsfree
Speaking over the handsfree Making a phone call Entering a phone number to make a phone call Select (Bluetooth Phone). It is possible to select the in-vehicle equipment to enter a phone num- ber and make a phone call. Press the button. -
Page 188: Making A Phone Call From The Outgoing Or Incoming Call History
Speaking over the handsfree NOTE Making a phone call from the outgoing or • Selecting briefly allows you to enter "*. " And then selecting incoming call history more than two seconds allows you to enter "+. " • Selecting allows you to delete a digit entered. - Page 189 Speaking over the handsfree Select the phone number and then select You have a phone call. Speak over the phone. When the phone call is over, hang up the phone. (See Page 198.) NOTE The following can be conducted from this screen. •...
-
Page 190: Making A Phone Call From The Phone Book
Speaking over the handsfree Making a phone call from the phone book Select (Phone Book). It is possible to select a phone number from the phone book registered with the in-vehicle equipment to make a phone call. NOTE It is possible to copy the data in the phone book from the phone book of the Bluetooth Phone into that of the in-vehicle equipment. - Page 191 Speaking over the handsfree • Selecting scrolls the display to display a phone book data 5 Select (Yes). position behind. You have a phone call. Speak over the phone. NOTE The following can be conducted from this screen. • It is possible to register the phone book data. (See Page 203.) •...
-
Page 192: Making A Phone Call From The Speed Dial
Speaking over the handsfree Making a phone call from the Speed Dial Select the name or phone number of a person to whom you want to make a phone call. It is possible to select a phone number from the Speed Dial registered You have a phone call. -
Page 193: Making A Phone Call To The Phone Number Of The Memory Point
Speaking over the handsfree Making a phone call to the phone number of the Select the Memory Point. Memory Point It is possible to make a phone call to the phone number registered as a memory point. Press the button. Select (Phone). -
Page 194: Making A Phone Call From The Bluetooth Phone
Speaking over the handsfree Select Making a phone call from the Bluetooth Phone It is possible to directly operate the Bluetooth Phone connected to the in-vehicle equipment to make a phone call. Even while speaking over the Bluetooth Phone, operating either of the following, when connected to the in-vehicle equipment, displays the handsfree screen in the in-vehicle equipment. -
Page 195: Taking A Phone Call And Declining A Incoming Call
Speaking over the handsfree Taking a phone call and declining a incoming call When you have a phone call, the information of a caller is dis- Putting an incoming phone call on hold played together with an incoming call sign. When the name of a caller is registered with the phone book, the name of the It is possible to put an incoming phone call on hold to take it later. -
Page 196: Hanging Up An Incoming Call Before Answering It (Denial Of An Incoming Call)
Speaking over the handsfree Hanging up an incoming call before answering it (Denial of an incoming call) It is possible to hang up an incoming call before answering it. And it is also possible, while putting a phone call on hold, to conduct the follow- ing operations to hang up the phone call. -
Page 197: Speaking Over The Phone
Speaking over the handsfree Speaking over the phone Adjusting the tonal volume Muting the voice on this side It is possible to adjust the tonal volume. It is possible to make your voice unheard to the other party (Mute). However, you can hear the voice of the other party. While speaking over the phone, select either of the fig- Select (Mute) while speaking over the phone. -
Page 198: Transmitting The Phone Call
Speaking over the handsfree Transmitting the phone call Hanging up the phone It is possible to transmit the phone call of the in-vehicle equipment to Hang up the phone while speaking over the phone or after the phone the Bluetooth Phone. And also, the phone call of the Bluetooth Phone call is over. -
Page 199: Using The Outgoing Or Incoming Call History
Using the outgoing or incoming call history Checking the outgoing or incoming call history It is possible to check the outgoing or incoming call history. Check the outgoing or incoming call history. Press the button. Select (Phone). • The maximum number of calls in the history items that can be checked is five for each of the outgoing calls and the incoming calls. -
Page 200: Deleting All The Outgoing And Incoming Call History
Using the outgoing or incoming call history Deleting all the outgoing and incoming call history Delete all the outgoing and incoming call history. History Select once deleted cannot be restored to its original state. Press the button. Select (Phone). NOTE The following can be conducted from this screen. -
Page 201: Using The Phone Book
Using the phone book Registering the phone book data Up to 1000 phone book data can be registered with the Transmitting the phone book of the Bluetooth phone book of the in-vehicle equipment. Phone Contents that can be registered as phone book data are as shown below. -
Page 202: Select (Phone)
Using the phone book Press the button. Select (Download). Select (Phone). Select (Add). Select (Phone Book). NOTE When there is a phone book data already in the phone book, select (Overwrite) or (Add). Selecting (Overwrite) overwrites the existing phone book. And select- (Add) adds a phone book data to the existing phone book data as a new data. -
Page 203: Registering A New Data With The Phone Book
Using the phone book Transmit the phone number data from the Bluetooth Phone. Registering a new data with the phone book Register a new phone book data with the phone book. It is possible to register a name and up to 2 phone numbers as phone book data. Press the button to edit the phone book data reg- istered. - Page 204 Using the phone book Select (New). Enter the name of the phone book data and select (OK). Select (Name). • Selecting deletes 1 character. • Selecting (Others) displays other characters. Then selecting displays the preceding or succeeding screen. • Selecting (Sym.) displays figures and symbols.
- Page 205 Using the phone book Enter the phone number and select (OK). A phone book data is added. • Selecting briefly allows you to enter "*" and selecting for more than 2 seconds allows you to enter "+. " • Selecting deletes 1 character.
-
Page 206: Registering Data With The Phone Book From The Outgoing Or Incoming Call History
Using the phone book Registering data with the phone book from the Select the phone number and then select outgoing or incoming call history It is possible to register a phone number of the outgoing or incoming call history with the phone book. Press the button. - Page 207 Using the phone book Enter the name of a phone book data and select Select (OK). (OK). The phone number is registered with the phone book data. • Selecting deletes 1 character. • Selecting (Others) displays other characters. Then selecting displays the preceding or succeeding screen.
-
Page 208: Editing Or Deleting A Phone Book Data
Using the phone book Editing or deleting a phone book data Editing a phone book data Select (Phone Book). It is possible to edit the name of a phone book data and a phone num- ber. Press the button. Select (Phone). -
Page 209: Selecting Scrolls The Display To Display A Phone Book Data
Using the phone book • Selecting scrolls the display to display a phone book data 1 Select an item you want to edit. position behind. • Selecting scrolls the display to display a phone book data 5 positions behind. NOTE The following can be conducted from this screen. -
Page 210: Selecting A Phone Book Data To Delete It
Using the phone book Select (OK). Selecting a phone book data to delete it Select a phone book data registered and delete it. NOTE A phone book data once deleted cannot be restored to its original state. Press the button. Select (Phone). - Page 211 Using the phone book Select a phone book data you want to edit. Select (Delete). • Selecting alphabets, figures or (Others) given in the NOTE upper section displays a phone book data to which the acro- The following can be conducted from this screen. nym has relevance.
-
Page 212: Deleting All The Phone Book Data
Using the phone book The phone book data selected is deleted. Deleting all the phone book data It is possible to delete all the phone book data. NOTE Phone book data once deleted cannot be restored to their original state. Press the button. - Page 213 Using the phone book Select Select (Yes). All the phone book data are deleted. Handsfree 213...
-
Page 214: Other Bluetooth Settings
Other Bluetooth settings Deleting the registered Bluetooth Phone from the in-vehicle equipment Delete the Bluetooth Phone registered with the in-vehicle Select (Bluetooth Settings). equipment. NOTE When deleting the Bluetooth Phone with the Bluetooth Phone connected to the in-vehicle equipment, no automatic connection is made. Press the button. - Page 215 Other Bluetooth settings Select Select (Yes). The Bluetooth Phone registered is deleted. NOTE • When you want to use again the deleted Bluetooth Phone in interlock with the in-vehicle equipment, register and connect it again. • Even when the Bluetooth Phone is deleted from the in-vehicle equipment, the phone book data transmitted from the Bluetooth Phone and the outgo- ing and incoming call history remain as they are.
-
Page 216: Changing The Device Name Of The In-Vehicle Equipment Displayed In The Bluetooth Phone
Other Bluetooth settings Changing the Device Name of the in-vehicle equipment displayed in the Bluetooth Phone It is possible to change the Device Name of the in-vehicle Select (My Info). equipment displayed in the Bluetooth setting of the Blue- tooth Phone. Press the button. - Page 217 Other Bluetooth settings Enter a new Device Name and select (OK). • Selecting deletes 1 character. • The number of characters that can be entered is up to 20 char- acters. • Selecting (Others) displays other characters. Then selecting displays the preceding or succeeding screen.
-
Page 218: Editing The Speed Dial Setting
Other Bluetooth settings Editing the Speed Dial setting Adding the phone number to the Speed Dial Select (Speed Dial Settings). memory It is possible to add the phone number from the Phone Book to Speed Dial memory. NOTE To add the phone number to the Speed Dial memory, the phone num- ber needs to be registered onto Phone Book beforehand. - Page 219 Other Bluetooth settings Select a name on a Phone Book whom you want to add Select a registering position where you want to add to to the Speed Dial memory. the Speed Dial memory. Select a phone number which you want to add to the If you are going to overwrite the Speed Dial memory, Speed Dial memory.
-
Page 220: Deleting The Phone Number From The Speed Dial Memory
Other Bluetooth settings Deleting the phone number from the Speed Dial Select (Delete). memory It is possible to delete the phone number from the Speed Dial memory. Press the button. Select (Phone). Select a Speed Dial memory which you want to delete. Select (Speed Dial Settings). - Page 221 Other Bluetooth settings Select (Yes). Select (Yes). If you need to delete all memories from Speed Dial, select (Delete all) on step 4. Handsfree 221...
-
Page 222: Changing The Pass-Key Used When Certificating The Bluetooth Phone
Other Bluetooth settings Changing the Pass-Key used when certificating the Bluetooth Phone When connecting the Bluetooth Phone to the in-vehicle Select (My Info). equipment, the Pass-key is used for certification. It is possible to change the Pass-Key used for certification. Press the button. - Page 223 Other Bluetooth settings Enter a new Pass-key and then select (OK). NOTE • Selecting deletes 1 character. • What can be entered as a Pass-key are limited only to numeric characters "0 to 9" in 4 to 8 digits. Handsfree 223...
- Page 224 Other Bluetooth settings Handsfree...
-
Page 225: Vehicle Information
Vehicle Information... -
Page 226: Before Use
Before Use Precautions when using the system WARNING LOOK AT THE VEHICLE INFORMATION SCREEN ONLY WHEN NECESSARY READ THIS MANUAL FIRST When you need to look at the vehicle information screen, do Read this supplement carefully before using your vehicle informa- so for the shortest time possible. - Page 227 SUBARU dealer. Continuing to use the system could lead to a fire, an electric shock, or some other type of accident.
- Page 228 Before Use ■ About the vehicle information screen • In hot weather, cool the passenger compartment down before using the vehicle information system. The liquid crystal display operates • Subjecting the control buttons or liquid crystal display to excessive correctly at temperatures between 0°C and 60°C (32°F and 140°F). shock could result in vehicle information screen deformation or other When the temperature exceeds 60°C (140°F), the vehicle information damage.
-
Page 229: Displaying Vehicle Information Screen
Displaying Vehicle Information Screen The vehicle information screen provides a variety of informa- You can program your maintenance schedule and other mainte- tion on your vehicle and driving. It also gives ways to program nance-related items from this screen. See Pages through 239. -
Page 230: Displaying Vehicle Information And Programming Vehicle System Functions
Displaying Vehicle Information and Programming Vehicle System Functions Displaying fuel consumption information and • Displayed current and average fuel consumption rates are based on estimates during running, not on accurate measurements. programming for the automatic alarm display • The average fuel consumption rate is associated with the driving after the last resetting of each trip meter. - Page 231 Displaying Vehicle Information and Programming Vehicle System Functions Select (off) for the desired alarm display item • The current fuel consumption rate alarm will be displayed only when the nav- igation screen is being used. (“FUEL“). The selected (off ) should change to (on).
-
Page 232: Displaying, Retaining, And Erasing Driving Record Data
Displaying Vehicle Information and Programming Vehicle System Functions Displaying, retaining, and erasing driving • When the vehicle battery is removed for repair or other purposes, the time is reset, but the distance is not reset. To reset the distance, press the trip meter record data knob. - Page 233 Displaying Vehicle Information and Programming Vehicle System Functions Select to specify the number of the history NOTE • A maximum of three different driving record data sets can be retained for frame (data storage location) where the driving record each of the trip meters (TRIP A and TRIP B). data are to be retained.
- Page 234 Displaying Vehicle Information and Programming Vehicle System Functions Select to specify the number of the history NOTE There is no way to restore erased driving record data. Please use this procedure frame (data storage location) where the driving record with caution so as not to accidentally erase any important data. data to be erased are retained.
- Page 235 Displaying Vehicle Information and Programming Vehicle System Functions Select (table) for the trip meter (TRIP A or TRIP B) about which you wish to retain the driving record data. This completes the procedure. NOTE Select (store). Selecting on a driving record data list screen will cause the monitor sys- tem to go back to the driving record screen.
- Page 236 Displaying Vehicle Information and Programming Vehicle System Functions ■ Select the history frame (data storage location) in which Erasing driving record data while viewing a retained the data are to be retained. driving record data list Use the following procedure if you want to erase retained driving record data while viewing a driving record data list.
-
Page 237: Displaying Three Meters
Displaying Vehicle Information and Programming Vehicle System Functions Select the history frame (data storage location) where Displaying three meters the data to be erased are retained. Use the following procedure to display the three meters showing the average fuel consumption rate, current fuel consumption rate and throttle opening percentage. -
Page 238: Maintenance Schedule
Displaying Vehicle Information and Programming Vehicle System Functions Maintenance schedule Select to enter the maintenance schedule date. ■ Programming maintenance schedule You can program your maintenance schedule into the monitor system for any of the following items, in terms of period and distance intervals. Maintenance Fluids check Tire pressure... -
Page 239: Programming Vehicle System Functions
Displaying Vehicle Information and Programming Vehicle System Functions Select (set). Programming vehicle system functions (yes) will appear on the screen. Select it if the ■ selection is correct. Programming other vehicle system functions You can program the vehicle system functions described below by Select using the following procedure: This completes the procedure. - Page 240 Displaying Vehicle Information and Programming Vehicle System Functions DEFOGGER NOTE • All selections and settings become effective as soon as they are made. You can program the rear window defogger for two operation • The monitor system returns to the vehicle information screen when you modes: continuous and 15-minute.
- Page 241 Displaying Vehicle Information and Programming Vehicle System Functions ■ Keyless entry system programming NOTE • Each setting becomes effective as soon as you make it. You can program certain items related to the keyless entry system using • The monitor system returns to the vehicle information screen when you the following procedure: select •...
-
Page 242: The Calculator Functions
If the sensitivity adjustment has not been performed correctly, the buzzer (beeping sound) will sound four times. If the buzzer continues to sound fre- quently, please have the system inspected by a SUBARU dealer. To perform a unit conversion, enter a number, then select the key for the unit you wish to convert from, then the key for the unit you wish to convert to. - Page 243 Displaying Vehicle Information and Programming Vehicle System Functions Description Action Description Action Addition operator Perform addition Kilograms Convert the entered number from pounds to kilograms* – Subtraction operator Perform subtraction Miles Convert the entered number from kilome- ÷ Division operator Perform division ters to miles* ×...
-
Page 244: The Calendar Functions
Displaying Vehicle Information and Programming Vehicle System Functions The calendar functions A calendar feature is available. ■ Displaying calendar Press the button. Select (calender). NOTE The calendar will appear. Use the arrow buttons ( ) to display the previous and following A mark will appear on today's date. -
Page 245: Adjusting Brightness/Contrast
Adjusting Brightness/Contrast Adjusting brightness/contrast NOTE • All adjustments take effect as soon as you make them and can be visually con- firmed. Use the following procedure to adjust the brightness/contrast of the • The system saves the adjustments for individual screens (vehicle information screen and navigation screen) as well as for a situation with and without illu- image on each screen: mination from headlights or parking lights. - Page 246 Notes...
- Page 247 Notes...
- Page 248 Notes...
Need help?
Do you have a question about the Navigation 2009 Forester and is the answer not in the manual?
Questions and answers