Table of Contents
Advertisement
Quick Links
An FKI Industries Company
700 West Bridge Street
Owatonna, MN 55060
www.truth.com
techserv@truth.com
Form 90066 R2
Thank you for purchasing this product. Your remote is state-of-the-art and you'll
find it easy to setup and use. Please take the time to read through this manual
carefully. It contains important operation and safety information.
French and Spanish versions available at www.truth.com/technicalsupport
Sentry II
Sentry II
Sentry II
Sentry II
Hand Held Remote
Operating Instructions
TM
Advertisement
Table of Contents

Related Manuals for Truth Sentry II

Summary of Contents for Truth Sentry II
- Page 1 Thank you for purchasing this product. Your remote is state-of-the-art and you’ll find it easy to setup and use. Please take the time to read through this manual carefully. It contains important operation and safety information. French and Spanish versions available at www.truth.com/technicalsupport...
- Page 2 • Do not allow children to operate the wall push buttons or remote control transmitter(s). Additional Safety Guidelines • The Sentry II system must not be used on windows that are intended to meet egress codes. • The Sentry II system is intended for indoor use only, with screens in place.
-
Page 3: Table Of Contents
Regulatory compliance ....17 Important information This remote is compatible with all Sentry II window or skylight motorization systems. Setting up the remote first requires window system installation. -
Page 4: Parts List
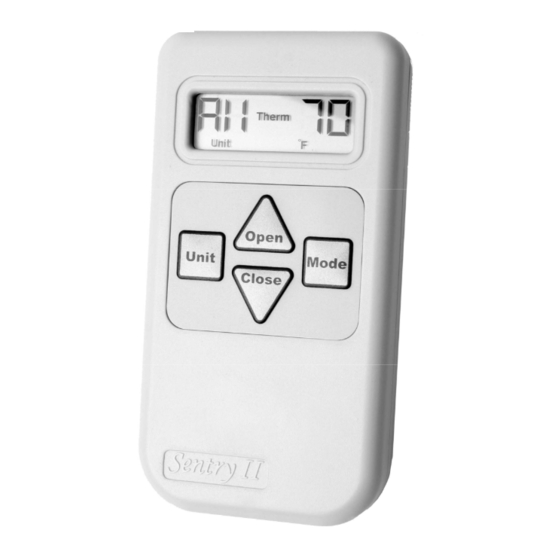
Note: The buttons on the remote need to be held down for ½ second for the command to be accepted. The Sentry II system is designed to operate both windows and skylights. This manual refers to windows and skylights as “windows” and all skylight and window... -
Page 5: Planning
If you have only one window you can skip ahead to the next step, “Remote Setup.” The Sentry II remote control has the ability to operate multiple power windows with a single command sequence. This is accomplished by assigning wall or skylight mounted controllers a unit number with the remote. -
Page 6: Remote Set Up
Remote Control Set Up After installing window motors, blinds, and control systems set up the remote using the following steps: 1. Place three “AAA” batteries into the remote. 2. The display on the remote will be blank except for the word “SET.” Remote must be in “SET”... - Page 7 The RF Remote Status LED in the control box will light a steady red and the Motor Status LED (on control board for HS model and wall plate for WLS model) will begin to flash Green. This indicates that the controller is in “Learn”...
- Page 8 Note: Any number of windows can be put onto a single “Unit” code. 6. Press the “Open” button on the remote once again. The RF Remote status LED should flash then go out and the Motor Status LED will go out. Remote control set up is now complete. 7.
-
Page 9: Options For Multiple Units
4. All windows programmed to the remote control will respond when the “Unit” code is set to “All”. 5. Sentry II system allows up to two remotes to be used to control a single window or group of windows. The set up process teaches wall mounted controllers to recognize the unique identity of individual remotes. -
Page 10: Normal Operation
Normal Operation OPEN A SELECTED WINDOW Choose Unit Choose Stops Window Number or All “Motor”Function In Place Close Optional Mode Unit Open CLOSE A SELECTED WINDOW Choose Unit Choose Stops Window Number or All “Motor”Function In Place Close Unit Mode Optional Open... -
Page 11: Thermostat Operation
Thermostat Operation There is an internal thermostat built into the hand held remote control. The temperature is always displayed on the right hand side of the remote display. Since the thermostat is built into the remote, the remote will display the temperature for the area the remote is located in. -
Page 12: Troubleshooting
“Motor” or “Blind.” The set point will be retained for future use. Window does not open fully • The Sentry II system is intentionally programmed to stop windows and skylights from reaching full open to keep wear and tear on the hardware to a minimum. -
Page 13: Switching Between Fahrenheit & Celsius
Sentry II system allows up to two remotes to be used to control a single window or group of windows. The set up process teaches wall mounted controllers to recognize the unique identity of individual remotes. Repeat set up steps 2 through 7 for each remote. -
Page 14: Forced Re-Initialization
FORCED RE-INITIALIZATION Press and hold both buttons to reset Unit Mode When an error is noted in the operation of the motor unit (indicated by a Flashing RED light on the wall plate or status indicator), the unit can be “Reset” by forcing a re-initialization via the remote control. -
Page 15: Blind Set Up & Control
After the Sentry II remote has been successfully set up to control a window motor and the blinds have been properly installed and wired to the control unit there is no further set up required for blinds. -
Page 16: Battery Replacement
CLOSE A SELECTED BLIND Choose Unit Choose Stops Blind Number or All “Blind”Function In Place Close Unit Mode Optional Open REPLACING THE BATTERIES • Replace the batteries using 3 “AAA” size batteries. • Insert with the proper polarities (+ and -) aligned correctly. The use of alkaline batteries is recommended for best service life. -
Page 17: Regulatory Compliance
Consult the dealer or an experienced radio/TV technician for help. Warning: Changes or modifications not expressly approved by Truth Hardware could void the FCC compliance and negate your authority to operate the product. FCC Declaration of Conformity According to 47 CFR, Parts 15.107 and 15.109 Class B...
Need help?
Do you have a question about the Sentry II and is the answer not in the manual?
Questions and answers