
Subscribe to Our Youtube Channel
Related Manuals for Bewator Codoor CD3500

Summary of Contents for Bewator Codoor CD3500
- Page 1 Codoor CD3500 Installation and Users Guide Codoor is only for internal fitting and operation...
-
Page 3: Table Of Contents
Table of Contents Codoor - General ............4 Setting the programming code........5 Installation kit..............6 Fitting to door ..............7 Install reinforcing spring..........8 Setting codes ..............9 Deactivation function ..........10 Buzzer................11 Using Codoor ............... 12 Testing ..............13 Backup power supply .......... -
Page 4: Codoor - General
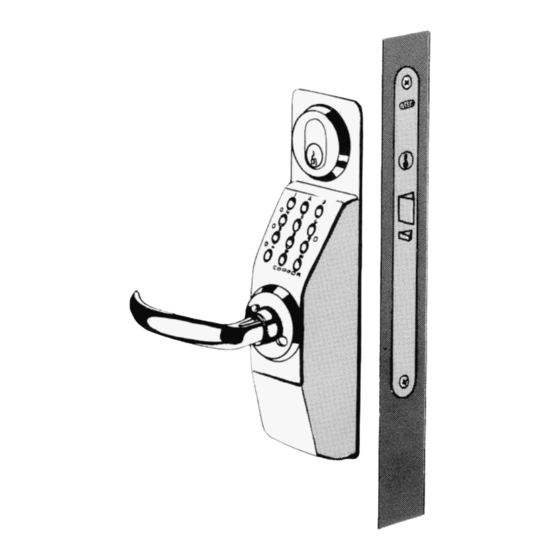
Codoor - General Codoor 3500, a complete code lock suitable for fitting to a single door, incorporates an electronic code lock, a mechanical locking device and a power unit in the same housing. Codoor may be fitted on most doors with handle operated ASSA type mortice locks. -
Page 5: Setting The Programming Code
Setting the programming code When Codoor is delivered, the memory is completely empty. The first thing you have to do is to set a programming code, before you fit Codoor to a door. To set the programming code for the first time, connect the batteries and proceed as follows: Press the reset button on the rear of Codoor and hold it down as you press the # button for at least 2... -
Page 6: Installation Kit
Having set the programming code, Codoor can be fitted to the door in accordance with the accompanying installation instructions. Do not forget to make a note of the programming code. NOTE:- The first 4 digits in the programming code must never be used Programming code for any of the 9 access codes... -
Page 7: Fitting To Door
Fitting to door Remove the cylinder ring and the door handle from the door by loosening the four screws. The lever handle spindle should project no more than 20 mm on the outside of the door. If the spindle is too long, push it through into the handle on the inside. -
Page 8: Install Reinforcing Spring
Install reinforcing spring For Codoor’s mechanical release to work properly, the follower spring in the lock case in the door must be capable of holding the inside handle in a horizontal position. If the handle on the inside sags (could be the result of the handle being screwed too tightly), or if the follower spring in the lock case in the door appears weak, the reinforcing spring supplied should be fitted. -
Page 9: Setting Codes
Setting codes With Codoor 3500 you can program up to 9 different codes (codes 01-09). Follow these steps: 1. Press then enter the 6-digit programming code. Finish by pressing 2. The red LED will flash slowly, accompanied by simultaneous sounding of the buzzer. 3. -
Page 10: Deactivation Function
Deactivation function The ninth code may be used as a “deactivation” code, by which Codoor may be set manually in the unlocked position. Follow these steps: 1. Press then enter code 9 (4 digits). Finish by pressing 2. The red LED will flash slowly, accompanied by simultaneous sounding of the buzzer. -
Page 11: Buzzer
Continued from previous page. Press , and then enter the 6-digit programming code. Finish by pressing The red LED will flash slowly, accompanied by simultaneous sounding of the buzzer. Enter . The red LED will flash faster.. Enter . The green LED will come on. Exit programming mode by entering The buzzer sounds a rising tone to confirm. -
Page 12: Using Codoor
Using Codoor Access 1. Enter any of the programmed codes (without pressing ) and without touching the door handle. At each key press, an audible signal is sounded (if the buzzer is enabled) and the red LED on the keypad flashes once. 2. -
Page 13: Testing
Testing • It must always be possible to open the door from the inside. • The handle on the outside should not be disengaged, and should not open the door until the correct code is entered. • When the correct code is entered, the handle on the outside should activate the lock, but only once. -
Page 14: Backup Power Supply
Button 5 Puts the unit into sleep mode to enable the current consumption of the unit tobe measured. The unit will come out of this function when any key is pressed. Button 6 Only shows the status of the position sensor. Red LED – unit locked (solenoid un-engaged), green LED - unit unlocked (solenoid engaged). -
Page 15: Changing The Batteries
Changing the batteries When the unit’s batteries run out, Codoor will stop working. The lock has a backup power supply that will allow the door to be opened a limited number of times, but the batteries should be replaced as soon as they fail. Follow these steps: 1. -
Page 16: Troubleshooting
Troubleshooting Symptom Remedy Lock does not open Check that the right code has been when code us entered. entered. Make sure the handle is not pressed down as the code is entered. Check that the handle is not sagging. Check that the time limit for automatic reset has elapsed. -
Page 17: Where Can Codoor Be Fitted
Where can Codoor be fitted? Codoor is suitable for most doors with handle-operated mortice locks. Check suitability by simply measuring your own lock: the distance between the center of the handle follower and the center of the cylinder follower should be between 105 and 116 Codoor may be used with any of the following types of lock: ASSA 760 Requires locking of upper latch bolt into lock case (daytime) -
Page 18: Technical Specifications
Technical specifications Number of codes: Handle: Spindle, 8 mm square. Environment: Indoors, dry. Ambient temperature: 0 to +50°C. Power: Two batteries, 9V type 6LR61 (Not included). Operating life: Up to 150,000 openings (lithium batteries) or 50 000 openings (alkaline batteries) - or one year, which ever comes first Dimensions: 64 x 245 x 47 mm, excluding handle...
Need help?
Do you have a question about the Codoor CD3500 and is the answer not in the manual?
Questions and answers