Table of Contents
Advertisement
Quick Links
Advertisement
Table of Contents

Related Manuals for Robe LiteWare HO2

Summary of Contents for Robe LiteWare HO2
- Page 1 Ver. 1.5...
-
Page 2: Table Of Contents
3.3 Flight case charger system ............................ 6 3.4 Battery care ................................6 3.5 Wireless DMX operation ............................7 4. LiteWare HO2 - DMX protocol (ver. 1.1) ........................8 5. Control menu map ..............................10 6. Fixture menu ................................13 6.1 Fixture Address ..............................13 6.2 Fixture information ............................. -
Page 3: Safety Instructions
Do not modify the unit or install other than genuine Robe parts. Do not stick filters, masks or other materials directly onto LEDs. Do not operate the unit if the ambient temperature exceeds 40 °C. - Page 4 Do not short battery positive terminal to case as this will cause irreparable damage of the unit. Only connect the unit to the „Robe” charging system! Before transportation of the LiteWare units in the charging case or keeping them for a longer time in the charging case which is not connected to mains , switch the LiteWare units off.
-
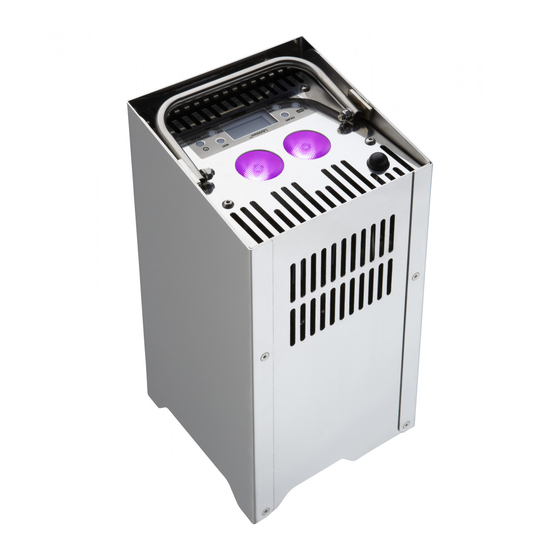
Page 5: Fixture Exterior View
If DMX address flashes , the LiteWare does not receive DMX signal. The LiteWare HO2 is equipped with 2-row LCD display which allows to set the fixture´s behaviour according to your needs, obtain information on its operation, test its various parts and lastly program it, if it has to be used in a stand-alone mode. -
Page 6: Low Battery
• The LiteWare HO2 should always be fully re-charged as soon as possible. Once fully charged LiteWare HO2 can be stored. • If the LiteWare HO2 is to be unused for long periods, we recommend the LiteWare HO2 is charged every two months to keep the batteries topped up. -
Page 7: Wireless Dmx Operation
LiteWare HO2 3.5 Wireless DMX operation All fixture channels are controlled by the wireless DMX controller that you use with the the LiteWare HO2. The fixture allows to set 2 DMX modes: Mode 1: 9 control channels Mode 2: 4 control channels To link the fixture with DMX transmitter. -
Page 8: Liteware Ho2 - Dmx Protocol (Ver. 1.1)
LiteWare HO2 4. LiteWare HO2 - DMX protocol ( ver. 1.1 Type of Mode 1 Mode 2 Value Function control Special functions 0-29 Reserved To activate following functions, stop in DMX value for at least 3 sec. and shutter must be closed at least 3 sec. (Shutter channel 8 must be at range of 0-31 DMX). - Page 9 LiteWare HO2 136 - 174 Red=full, Green down, Blue=0, White=0 proportional Red(Red=full, Green=0, Blue=0, White=0) step 176 -214 Red=full, Green=0, Blue up, White=0 proportional Magenta step Red=full, Green=0,Blue=full,White=0) 216-246 Red down, Green=0, Blue=full, White=0 proportional Blue (Red=0, Green=0, Blue=full, White=0)
-
Page 10: Control Menu Map
LiteWare HO2 5. Control menu map Default settings=Bold print Menu Level 1 Menu Level 2 Menu Level 3 Menu Level 4 Menu Level 5 Menu Level 6 Set DMX 001-512 Mode 1, Mode 2 DMX Pres. Wireless Signal Unlink InFo POn. - Page 11 LiteWare HO2 Menu Level 1 Menu Level 2 Menu Level 3 Menu Level 4 Menu Level 5 Menu Level 6 PErS DMX Pres. Mode 1 Mode 2 Alarm Setting ENT. PASW. 1-255 Alarm On/Off On, Off Sensitivity 0…13…15 M. F.Time 0..0.8…25.5...
- Page 12 LiteWare HO2 Menu Level 1 Menu Level 2 Menu Level 3 Menu Level 4 Menu Level 5 Menu Level 6 Test Prog 1 Prog 3 Pr. Play Test Prg Prog 3 Pr. Edit Prog 1 Step.01 Prg. En. 1-40 Spec.
-
Page 13: Fixture Menu
DMX mode. Note: After switching on, the LiteWare HO2 will automatically detect whether DMX 512 data is received or not. If there is no data received at the DMX input, the display will start to flash with actually set address. -
Page 14: Personality
LiteWare HO2 Total - the function shows the total number of the operation hours since the LiteWare HO2 has been fabricated. Reset - the function shows the number of the operation hours that the LiteWare HO2 has been powered on since the counter was last reset. - Page 15 LiteWare HO2 3. Use the PREV/NEXT buttons to select menu item “ Alarm On/Off”, press the ENTER button and select option “On” ( if you want to deactivate the acoustic alarm, select option “Off”) and confirm with the ENTER button.
-
Page 16: Manual Mode
6.5 Test program Use this menu to run demo-test sequences without an external controller, which will show you some possibilities of using the LiteWare HO2. 6.6 Stand-alone setting The fixtures on a data link are not connected to the controller but can execute pre-set programs which can be different for every fixture. -
Page 17: Special Functions
LiteWare HO2 E.g. If “F.tim.“=5 second and “S.tim.“=20 second, effects will go to the desired position during 5 seconds and after that they will stay in this position for 15 seconds before going to the next prog. step 1. 1. Use the PREV/NEXT buttons to find “ Sta Alone“ menu and press the ENTER button. -
Page 18: Software Update
Note: Both software update and case software update should execute a qualified person. If you lack qualification, do not attempt the update yourself and ask for help your ROBE distributor. Before starting both updates, the LiteWare unit has to be charged! Note: programs 1-3 and all items in the menu "PErS"... -
Page 19: Rdm
Turn both the computer and the LiteWare unit on (shutter should be closed). We recommend to cancel all running programs before starting the ROBE RDM Uploader. 2. Run the ROBE RDM Uploader and perform software update of the LiteWare unit. Avoid interrupting the update process. -
Page 20: Information And Error Messages
LiteWare HO2 Parameter ID Discovery command SET command GET command DISC_UNIQUE_BRANCH DISC_MUTE DISC_UN_MUTE DEVICE_INFO SUPPORTED_PARAMETERS SOFTWARE_VERSION_LABEL DMX_START_ADDRESS IDENTIFY_DEVICE DEVICE_MODEL_DESCRIPTION MANUFACTURER_LABEL DEVICE_LABEL SENSOR_DEFINITION SENSOR_VALUE DISPLAY_LEVEL DEVICE_RESET DMX_PERSONALITY DMX_PERSONALITY_DESCRIPTION STATUS_MESSAGES STATUS_ID_DESCRIPTION DEVICE_HOURS 9. Information and error messages CHARGED – the LiteWare is fully charged and ready for operation. -
Page 21: Technical Specifications
LiteWare HO2 10. Technical specifications Power supply • Battery supply • flight case charger system Optic & Effects • Light source: 2 x high power RGBW multichip • Optical system: 22° • RGBW or CMY colour mixing • Virtual colour wheel with preset whites (2700K, 3200K, 4200K, 5600K, 8000K) •... - Page 22 • weight: 45 kg (empty) • dimensions (W x L x H): 500mm x 735mm x775mm • Input voltage: 100V-240V • Max. power c : 320W onsumption Included items • 6 x LiteWare HO2 • 1 x Flight charging case...
- Page 23 LiteWare HO2 Light output...
-
Page 24: Cleaning And Maintenance
LiteWare HO2 11. Cleaning and maintenance Disconnect from the charging flight case before starting any cleaning or maintenance work A soft lint-free wet cloth and a neutral soap is recommended for cleaning, under no circumstances should alcohol or solvents be used! Maintenance and service operations are only to be carried out by a qualified person. - Page 25 LiteWare HO2...
Need help?
Do you have a question about the LiteWare HO2 and is the answer not in the manual?
Questions and answers