Blue I HYDROGUARD HG-702 User Manual
Water quality analyzer
Hide thumbs
Also See for HYDROGUARD HG-702:
- User manual (76 pages) ,
- Operator's manual (20 pages) ,
- User manual (20 pages)

Related Manuals for Blue I HYDROGUARD HG-702


Summary of Contents for Blue I HYDROGUARD HG-702
- Page 1 ® HYDROGUARD HG-702 Water Quality Analyzer User Manual March 2015 Document ID HG702UM1.36...
- Page 2 Blue I Water Technologies Ltd. Disclaimer Blue I Water Technologies Ltd. does not accept any responsibility for any damage caused to its products by unauthorized personnel. Use of non-Blue I Water Technologies’...
-
Page 3: Table Of Contents
Table of Contents General Safety Precautions ....................7 Preface ..........................9 Intended Use ......................9 Safety Precautions..................... 9 Overview ..........................9 The HYDROGUARD Solution ................... 9 Measurements and Features ................... 10 3.2.1 Wireless Management Package* ................ 10 System Components ....................10 Installation ........................ - Page 4 Replacing Reagents ....................31 Cleaning the Filter ....................31 Shut-Down and Winterizing ..................31 Start-up and Preventive Maintenance ..............32 6.5.1 Replacing Reagent Pump Head and Tubes ............32 Troubleshooting ....................... 33 Replacing Components ................... 36 6.7.1 Replacing Flow Switch ..................36 6.7.2 Replacing Reagent Siphons ................
- Page 5 7.4.4.3 Replacing Components ................... 48 7.4.5 Shut-down and Winterizing .................. 49 Conductivity Measurements ..................49 7.5.1 Installation ......................49 7.5.2 First Time Set-up and General Operation ............50 7.5.3 Routine Maintenance ................... 50 7.5.3.1 Conductivity Calibration ................... 50 7.5.3.2 Cleaning the Conductivity Meter ..............50 7.5.3.3 Replacing the Conductivity Meter ..............
- Page 6 Table of Figures Figure 1: HydroGuard 702 Main Components ................ 12 Figure 2: HydroGuard 702 Mounting Panel ................14 Figure 3: Flow Cell and Colorimeter Inlet and Outlet .............. 15 Figure 4: Jumper........................15 Figure 5: 115-120VAC setting ....................16 Figure 6: 200-230VAC setting ....................
-
Page 7: General Safety Precautions
1. General Safety Precautions This section presents important information intended to ensure safe and effective use of this product. Read the following carefully before handling the product. These warnings and cautions must be followed carefully to avoid injury to yourself or damage to equipment. - Page 8 Attention! Avant de relier l’appareil à une Caution: Before connecting to a power source, confirm that both jumpers are located on the quelconque alimentation électrique, vérifiez que correct voltage and that the appropriate fuse is les deux cavaliers sont situés sur les valeurs correctes de tension et que c’est le bon fusible in place.
-
Page 9: Preface
This manual is for qualified and trained service technicians who will install and service the HYDROGUARD HG-702 Water Quality Analyzer. It provides instructions on how to install the HYDROGUARD system, how to integrate it with external chemical dosing systems and how to calibrate, operate and maintain the system. -
Page 10: Measurements And Features
Internet or mobile phone. *The wireless modem is an optional module. Note: Not all cellular companies support this wireless modem. Please contact Blue I Water Technologies or your supplier for details. See the supplemental manual for instructions on installing and using the modem. - Page 11 Control Panel Module – Calculates the measurement results and determines the required chemical dosing to maintain an appropriate chemical balance in closed-loop systems. The Control Panel Module also provides data to external communication devices such as the 4- 20mA outputs or the wireless communication package. Keyboard Panel –...
-
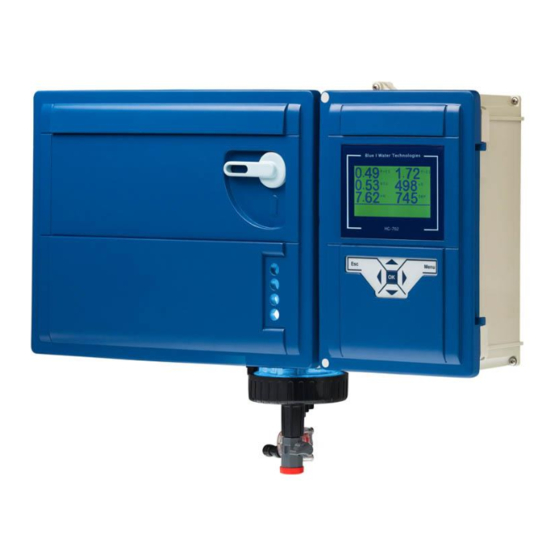
Page 12: Figure 1: Hydroguard 702 Main Components
Figure 1: HYDROGUARD HG-702 Main Components 2218 Ha'melacha St., Rosh Ha'ayin 4809148, Israel * Tel: 972-9-7680004 * Fax 972-9-7652331 www.blueitechnologies.com... -
Page 13: Installation
4. Installation 4.1 Working Environment Pollution Degree: 2 Installation Category: 2 Altitude: 2,000 m Humidity: 1 to 90% non-condensing Electrical Supply: 100-115Vac, 1.0A or 200-230Vac, 0.5A, 50/60Hz Temperature: 5°C to 45°C 4.2 Selecting a Location Take extra time in selecting a location since the installation location will determine the ease of the installation and future operation and maintenance. -
Page 14: Mechanical Installation
4.3.1 Mechanical Installation Illustrates steps 3 to 5 in the following procedure. 1. HYDROGUARD is shipped pre-mounted on a mounting panel, along with a water filter. The mounting panel includes four screw holes, one in each corner. 2. Determine the location of one hole on the HYDROGUARD unit or on the mounting panel. -
Page 15: Electrical Requirements And Installation
Figure 3: Flow Cell and Colorimeter Inlet and Outlet Note The HYDROGUARD colorimeter drains water at zero (0) pressure. The drainage pipe should be as straight as possible and have a constant downward slope and should not have any bends where water flow can be restricted. If the colorimeter drains to a bucket or basin, the end of the drainage pipe should terminate above the bucket or basin rim. -
Page 16: Figure 5: 115-120Vac Setting
To change the configuration use jumpers J21 & J22 on the I/O card. For 115-120VAC see the jumpers setting per Figure 5. For 200-230VAC see jumpers setting per Figure 6. Figure 5: 115-120VAC setting Figure 6: 200-230VAC setting Caution Before making a connection to a power source, confirm that both jumpers are located on the correct voltage and that the appropriate fuse is in place. -
Page 17: Chlorine Shock Mode
3. Connect the neutral wire to the I/O board connector marked Neutral. 4. Connect the earth wire to the I/O Module connector marked Ground. 5. Continue with the other electrical connections. 6. Turn on electrical power only after all electrical connections have been completed. For information on wiring and using the relays as dry contact or for control, see chlorine shock mode. -
Page 18: First Time Operation And Calibration
Flow Meter: Connection for 2 or 3-wire flow meter. The analyzer will not look for the flow meter connection unless the option is turned ON in the technician menu; therefore, no jumper is required if a meter is not installed. Caution Electrical connections depicted in this section are ONLY recommendations. -
Page 19: Figure 8: Reagent Handling
Do not refill the reagent bottles. Do not mix or add reagent from other bottles. Do not use any non-Blue I Water Technologies’ reagents. 8) Prime the reagent pumps: a) Press Menu on the control panel keypad until the Reagent Pump menu appears. -
Page 20: First Time Menu Setup
d) Press OK (OFF will appear on top line) e) Press OK again (OFF will appear on the top and bottom lines) Press UP to turn the reagent pumps ON g) Press OK when the water flowing from the colorimeter has a red tint or reagent drops are being formed at the needle tips. -
Page 21: Hydroguard Control Panel
5.3.1 HYDROGUARD Control Panel The HYDROGUARD control panel is a simple, intuitive interface for monitoring and controlling water quality with the following components: Table 1: Control panel structure Figure 9: HydroGuard Control Panel When an alarm is issued, the bottom row of the LCD displays the alarm. Pressing the up and down arrows together will display the Langelier index for approximately five (5) seconds, and then returns to the previous display mode. -
Page 22: Table 2: Operator Menu Functions And Descriptions
Table 2: Operator Menu Functions and Descriptions Function Name Description Activate Chlorination according to “Cl shock set point” Shock Chlorination Menu Relays Manual activation of Relays Reagent pump Manual activation of Reagent Pumps Controls Cl relay 1 – On/Off or Proportional Cl set point1 Cl shock set point Controls Cl relay according to the set point level for a period of time... -
Page 23: Table 3: Operator's Menu & Variables Limits
Function Name Description This mode must be started manually, by scrolling to the ORP Emergency Mode Menu, entering the password, and switching the mode to ON. If no colorimeter problem is present, the analyzer will not allow this mode to be entered. When in ORP Emergency mode, the ORP set point will be used to control Relay 1 (primary Cl relay). -
Page 24: Configuration Settings In The Operator Menu
Function Name Min Value Max Value Default Units Flow k-factor* 0.01 0.01 Total Alkalinity Total Hardness 5000 T-Cl calibrated to* 0.01 9.99 1.50 sensor value was Total Cl high alarm* 9.99 Comb. Cl high alarm* 9.99 ORP Emergency mode* Language English SYSTEM RESET * Optional features... -
Page 25: Table 4: Technician Menu Functions And Descriptions
Cl is being maintained at low levels. Therefore, this alarm feature may be turned off. For cases when the Cl level is always expected to be above 0.5ppm, Blue I Water Technologies highly recommends that this alarm remain in use except for start-up. -
Page 26: Configuring Settings In The Technician Menu
Table 5: Technician Menu and Variable Limits Function Name Min Value Max Value Default Units Cl P factor Cl pump period 0:30 Cl pump freq. 0 (0=on/off max pulses/min pump) Cl averaging Cl < 0.1 alarm pH p factor pH pump period 0:30 pH pump freq. -
Page 27: Calibration
a) Press Menu until the desired parameter name appears in the LCD display. b) Press OK. “Enter Password 100” appears in the LCD display. 3) Enter the Technician menu password: a) Press the up arrow or down arrow until the password number is reached. b) Press OK. -
Page 28: Calibrating Other Sensors And Meters
8) Press OK again. The display will now show “Calibrate Cl to” on the top line and “Sensor Reading” on the bottom line. The “Sensor Reading” is the current reading of the sensor with no calibration. The “Calibrate Cl to” value is the new value which you want to set. 9) Press the up arrow or down arrow until the value is the same as the value given by the digital photometer. -
Page 29: Monitoring Hydroguard Alarms
Table 7: Maintenance Table Basic Operation: involves setting the desired parameters and monitoring the system for alarms. When operating normally, HYDROGUARD demands very little operator involvement. Calibration: Sensor sensitivity and accuracy can degrade or drift over time. For this reason, HYDROGUARD settings must be periodically recalibrated and compared with measurements from other measuring devices, such as electronic photometers, pH sensors, and thermometers or compared to standard solutions like pH buffers or ORP... -
Page 30: Table 8: Alarm Description And Result
shown on the screen at a time based on importance and the order in which it should be fixed. For example, if the pH is high and the ORP is low, only the pH alarm will be indicated since lowering the pH will likely also correct the low ORP. All of the alarms are presented in Table 8 along with a description and resulting action of the analyzer/controller. -
Page 31: Replacing Reagents
6.2 Replacing Reagents HYDROGUARD issues a LOW REAGENTS message when the float at the end of one of the reagent siphons detects that one or both of the reagents is approaching depletion. After this time, HYDROGUARD will count down (internally) until the reagents are expected to be completely depleted and the Cl analysis will stop and the analyzer will activate an alarm. -
Page 32: Start-Up And Preventive Maintenance
4) Remove the pump tubes from the water containers and turn the pumps ON for an additional 90 seconds to remove any water. 5) With the solenoid valve in the open position, turn off the power to the analyzer. If the solenoid is in the closed position, the unions at the top and bottom of the solenoid should be loosened to allow the colorimeter and solenoid to completely drain. -
Page 33: Troubleshooting
11) Attach the pump tube from the top of the pump head to the needle on the colorimeter cap by holding the needle and gently pressing the tube onto the connector. 6.6 Troubleshooting The following procedures instruct how to locate, evaluate, and fix a problem when HYDROGUARD issues an alarm or indicates suspect chemical levels. - Page 34 Alarm Description Symptom Solution/Suggestion Compare to manual reading and recalibrate if necessary. Check No chlorine dosing as unstable reading due to High ORP ORP above upper limit. safety against over- poor grounding. Increase chlorination. high/low ORP level if operation is normal. Replace probe if needed.
- Page 35 Alarm Description Symptom Solution/Suggestion Temp. high Temperature above upper alarm limit. Conductivity Conductivity below lower limit. Conductivity Conductivity above upper high limit. No problem to allow ORP emergency emergency mode. Use with care. This ORP Emergency Mode. method has Function may be Problem with Colorimeter disadvantages and will enabled, after no...
-
Page 36: Replacing Components
Disconnect all power supplies to the HYDROGUARD analyzer before opening the control unit door. Replacing any parts of HYDROGUARD without the expressed written authorization of Blue I Water Technologies Ltd. or the qualified representative who supplied the product may void the warranty. -
Page 37: Replacing Reagent Pumps
6) Reconnect the 2 red wires to the colorimetric module. 6.7.4 Replacing Reagent Pumps 1) Turn the power off to the analyzer. 2) Disconnect both pipes from the reagent pump. 3) Remove the four (4) mounting screws. 4) Disconnect the Red and Blue wires from the Pumps connector on the colorimetric module. 5) Install the new pump and reconnect (in this order): the pipes, the 4 screws and the wires to the colorimeter module. -
Page 38: Replacing Colorimeter Solenoid Valve
13) Close the HYDROGUARD analyzing module door. 14) Turn on the power and restore flow to the flow cell. 15) Confirm that the colorimeter is operating properly. 6.7.6 Replacing Colorimeter Solenoid Valve 1) Turn the water inlet and outlet to the flow cell and turn off the analyzer power. 2) Release the top union connecting the solenoid valve to the Colorimeter module. -
Page 39: Replacing Colorimetric Module
3) Put in the new card and tighten the 4 mounting screws. 4) Connect the flat cable plug to the card. 6.7.9 Replacing Colorimetric Module Disconnect the power supply to the unit before opening the control unit. If pH, ORP, and/or Temperature is being measured, first remove the pH, Redox and Temperature card. -
Page 40: Free + Total Chlorine Measurements
Redox(ORP) Temperature 7.2 Free + Total Chlorine Measurements 7.2.1 Installation The Free Cl + Total Cl measurements are an optional feature that is supplied from the factory. However, in addition to the standard free chlorine set-up, some additional steps are required. 7.2.2 Installing DPD3 Reagent The DPD-3 reagent bottle is installed the same way as the DPD 1 and Buffer solution bottles. -
Page 41: Routine Maintenance
8) Select the ratio of total chlorine measurements. The frequency of total chlorine testing will be based on the chlorine interval and the chlor ratio. If the Chlor Ratio is 1, the total chlorine will be tested every cycle. If the Chlor Ratio is greater than 1, the Total chlorine will be tested every few cycles. -
Page 42: Routine Maintenance
b. Place the probe into the connector until and the connector is tighten . c. Route the temperature probe wires into the electronics box and connect to the pH, ORP and Temp module following the color codes listed on the module. 5) Install the pH and/or ORP probes: a. -
Page 43: Replacing Sensors
ORP (Redox) Calibration ORP is calibrated using an ORP Standard Solution. A standard closest to the normal operating value should be used for calibration. 1) Shut off the water inlet and outlet from the flow cell. 2) Remove the ORP sensor and (PT-100) temperature probe from the flow cell. 3) Wipe sensor probe with a dry cloth and submerge it and the temperature probe into a cup with the ORP Standard Solution and wait for the reading to stabilize. -
Page 44: Shut-Down And Winterizing
3) Locate the sensor in the flow cell that is to be replaced. The specific sensor may be identified by the label on the wire or by tracing the wire from the control panel back to the sensor. 4) Remove the old sensor from the flow cell: a) Unplug the sensor's wires from the sensor, by grabbing the connector at the top end of the sensor and unscrewing the connector. -
Page 45: Turbidity Measurements
7.4 Turbidity Measurements 7.4.1 Installation If the HYDROGUARD system was ordered with Turbidity pre-installed some of these steps may have been completed in the factory. Supplied Components Turbidity Input Module (electronics card) 250 mm flat cable Turbidity Sensor (wiper optional) ... -
Page 46: Relay Wiring And Use
Figure 12: Turbidity Sensor and Flow Cell The flow rate should be between 0.25 and 1 GPM (15-60 gal/hr or 50-225 L/hr) and the pressure should not exceed 30psi (2 bar). The inlet and outlet connections are ¼” FNPT. Electrical Installation 1) Install the Turbidity Module (electronics card) on the inside bottom of the control panel door using the supplied screws. -
Page 47: First Time Set-Up And General Operation
4) Connect the line (live) wire of the power supply to the connector marked ‘C’ (common) on the NTU terminal block. 5) Connect the line (live) wire of the controlled external turbidity equipment to the normally open (NO) or normally closed (NC) connection on the NTU terminal block. Caution Each relay connection is limited to 4 amps, to prevent overheating. -
Page 48: Routine Maintenance
7.4.4 Routine Maintenance 7.4.4.1 Turbidity Calibration 1) Take a sample of water from the flow cell. 2) Test the sample using an accurate digital turbidly meter. 3) Press Menu until “NTUl Calibrated to” or “NTUh Calibrated to” appears in the LCD display. -
Page 49: Shut-Down And Winterizing
4) Remove the meter from the flow cell by unscrewing the cap and pulling gently. 5) Install the new meter in the flow cell. 6) Route the wires back to the turbidity module and reconnect the 5 wires following the color coding on the module. -
Page 50: First Time Set-Up And General Operation
3) Mount the conductivity flow cell and meter on a solid wall or surface using appropriate hardware (not supplied). Make sure that the distance is less than 15m (45 feet) from the HYDROGUARD analyzer. 4) Connect a water supply of no greater than 2 bar (30 psi) to the inlet fitting using 6mm tubing. -
Page 51: Shut-Down And Winterizing
3) If temperatures will drop below freezing, remove the conductivity sensor and store in a safe location where temperatures will not drop below freezing. 7.6 Flow Meter Blue I Water Technologies does not supply flow meters; only input connections and display. 7.6.1 Installation Required Components ... -
Page 52: Routine Maintenance And Troubleshooting
7) Press Up + Down arrows together and then press Menu until “Flow Rate m3/hr” appears. Select the flow units of m3/hr or GPM. 4-20 Output Flow Meter Any flow meter with a 4-20mA output can be connected to the analyzer’s internal 4-20 input module. - Page 53 5) Enter the new parameter setting: a) Press the up arrow or down arrow until the desired parameter value is reached, according to the options listed in Table 13. b) The second row of the menu display, below the value that is being changed, shows the current value.
-
Page 54: Table 12: Modbus Configuration Options
Table 12: Modbus Configuration Options Bit 3 Bit 4 Bit 0 Bit 2 Bit 1 Parameter’s Floating point 2 stop / Parity / 19200bps / Parity Even / value / Swapped 9600bps 1 stop bit No parity floating point Bit 3 Bit 4 Bit 0 Bit 2... -
Page 55: Table 13: Modbus Communications Options
Table 13: Modbus Communications Options Parameter’s Name Type Address Notes Chlor main pump Coil Chlor Addition. pump Coil Acid/ Base Pump Coil Turbidity cleaner Coil Temperature control Coil Alarm Lamp Coil Parameter’s Name Type Address Notes Low Reagent Discrete Input 10015 Alkali/Acid Discrete Input... - Page 56 Table 13: Modbus Communications Options [continued] Parameter’s Name Type Address Notes Chlorine<0.1 Discrete Input 10035 ORP>XXX Discrete Input 10036 Unclean cell Discrete Input 10037 Replace light Discrete Input 10038 Low chlor. Discrete Input 10039 High chlor. Discrete Input 10040 Low Ph Discrete Input 10041 High Ph...
-
Page 57: Communication Options
7.8 Communication Options 7.8.1 Internal 4 to 20mA Output 7.8.1.1 Installation Required Parts Internal 4-20mA Module (electronics card) 250mm Flat Cable (ribbon cable) To complete the installation a 2-wire cable for each output channel/parameter will also be required. Hardware Installation 1) Attach the 4 to 20 module to the inside of the control panel door below the control panel module using the 4 supplied screws. -
Page 58: Chlorine Shock Mode
Note Optional features appear in the selection as well. Choose only a viable option (e.g. choose NTU only if NTU card was ordered). e) Select “read” or “control” function (for F-CL only) If control was selected, set control to “Normal” or “invert” and press OK. Select “Set value for 4mA”... - Page 59 Two menus control this feature: 3. Shock Chlorination 4. Cl Shock Set-point a. Duration During normal operation, the analyzer controller operates Cl dosing systems based on Cl Set Point 1. When Cl Shock mode is turned ON, the controller will automatically control the Cl dosing system based on the Cl Shock Set Point.
-
Page 60: Appendix A: Relays And Closed-Loop Control
Appendix A: Relays and Closed-Loop Control There are 6 dry-contact relays on the I/O module. Five of the relays may be used for direct control of closed-loop systems. All of the relays may be used as dry-contacts and will operate based on the settings, specifically the set-points, selected in the operator menu. -
Page 61: Proportional Control Overview
Table 14: Relays and their controlled dosing systems Relay # Relay name Control Main Chlorine system. On/Off or Proportional. Proportional controls pulse length or pulse frequency (PL/PF) Secondary Chlorine system (On/Off only – no proportional control) Acid or Base dosing. On/Off or Proportional. Proportional controls pulse length or pulse frequency (PL/PF) Nephelometric Turbidity Units –... -
Page 62: Figure 16: P-Factor Computation Example
Note After each cycle of dosing, please take into account the system cycle time e.g. the time it takes the chlorine to dissolve in the water reservoir, before measuring the chlorine levels. Set point Cl= X Measured Cl= X’ Cl P factor= Y One cycle of Cl adding Cl <... -
Page 63: Step By Step Proportional Settings
Step By Step Proportional Settings 1) Finish the installation of all controllers (electrical, water, feeding systems and electrodes). 2) Calibrate the controller to the water chemical values at the sample point. 3) Set the proportional factor and the pump period of the chlorine and the pH at an initial setting. -
Page 64: Appendix B: Technical Specifications
Appendix B: Technical Specifications MECHANICAL DATA ORP (REDOX) MEASUREMENT* Dimensions (controller) 670 x 330 x 130mm Measurement range 0 to 2000mV Ceramic diaphragm and gel (W x H x D ) (26.4" x 13" x 5.1") Sensor filling Dimensions (mounting board) 800 x 550 x 5 mm TEMPERATURE MEASUREMENT* (31.5"... - Page 65 Patents issued and pending at the time of this printing Disclaimer Blue I Water Technologies Ltd. does not accept any responsibility for any damage caused to its products by unauthorized personnel. Use of non-Blue I Water Technologies’ reagents and/or replacement parts will void all warranties.
Need help?
Do you have a question about the HYDROGUARD HG-702 and is the answer not in the manual?
Questions and answers