Table of Contents
Advertisement
Quick Links
Advertisement
Table of Contents

Related Manuals for ChyTV HD-150

Summary of Contents for ChyTV HD-150
- Page 1 Pub. No 2A02234, 1/28/08...
-
Page 2: Table Of Contents
Connection Diagram..................9 3.2.2 Connector Descriptions................9 ......................11 PERATION 3.3.1 Controls and Indicators................11 3.3.2 Selecting a Video Input................12 CHYTV HD 100 / HD 150 SETUP ..............13 ....................13 NTRODUCTION ................13 ARDWARE ONNECTION 4.2.1 Power Supply Voltage Selector............. 13 4.2.2 Connection Diagram................14 4.2.3... - Page 3 Page Elements..................34 ...............35 TORING AND EFERENCING 6.6.1 Embedding ....................35 6.6.2 File Referencing..................35 6.6.3 Active Data....................36 CHYTV AUTHOR QUICK START TUTORIAL ........37 TV U ....37 PENING AND RANSFERRING A ROJECT TO THE ............38 REATING AND AVING A ........39...
- Page 4 Creating a 4x3 Fixed Aspect Ratio Video Tag........82 HTML ............82 AVING THE RESENTATION AS ......82 LACING EXT AND RAPHICS CREEN IDEO 9.6.1 Keying Defined..................82 9.6.2 Keying in ChyTV..................83 CHYTV ELEMENTS REFERENCE............. 84 10.1 ..............84 OWER OINT ONFIGURATION...
- Page 5 Logos......................103 11.4.6 Flip Books....................103 11.5 ..............103 ROJECT CHEDULE INDOW 11.5.1 Adding ChyTV Pages to the Schedule..........104 11.5.2 Adding a Page Tag to the Schedule............104 11.5.3 Changing the Order of Pages in the Schedule........104 11.5.4 Project Schedule Command Buttons..........104 11.6 ..................107...
- Page 6 ARDWARE PECIFICATIONS 13.5 TV P ..........129 ARDWARE PECIFICATIONS 13.6 TV P GPIO I ..............131 NTERFACE 13.6.1 ChyTV Plus GPIO Pinout Diagram...........131 13.7 TV P RS232 I ..............132 NTERFACE 13.7.1 ChyTV Plus RS232 Pinout Diagram..........133 13.8 TV P ..............134 ROGRAMMERS UIDE 13.8.1...
-
Page 7: Introduction
1 I N T R O D U C T I O N Introduction Welcome to ChyTV™, the next generation in digital signage! This Hardware/Software Setup Guide illustrates the three main phases of ChyTV setup. When setup is complete, ChyTV is ready to display your custom-created pages. ®... -
Page 8: Section 11: Chytv Tools Reference
1 I N T R O D U C T I O N 1.2.6 Section 11: ChyTV Tools Reference This section describes in detail all of the menus, windows and controls available in ChyTV tools. -
Page 9: Chytv Hardware Setup
IMPORTANT!!!! Please note that an RF (antenna), cable or satellite source cannot be connected directly into the ChyTV system! The signal fed to the ChyTV system must be a video source from a cable/satellite box or a VCR/DVD player, or originate from a direct composite source such as... -
Page 10: Hardware Connection
USB Version Connection Diagram 2.2.2 Ethernet Version Connection Diagram When using an RF video source, such as cable or satellite, an external tuner is required. A television's internal tuner cannot be used. This is because the ChyTV unit must be provided with a... -
Page 11: Connector Descriptions
In addition, if the television speakers or other external speakers are used for audio, the stereo audio pair must also pass through the tuner and the ChyTV box to the television. RCA cables are used for the video and audio connections between the tuner and the ChyTV, as well as between the ChyTV and the television. -
Page 12: Operation
Connect the supplied USB cable from the USB port of the ChyTV unit to a USB port on the PC. The USB driver, which is a software component, must be installed on the PC before connecting the USB cable. -
Page 13: Chytv Plus Hardware Setup
ChyTV Plus units. Additional Network Content Management solutions facilitate larger enterprises of up to thousands of ChyTV’s. Easy Integration The ChyTV system is easy to configure in a display system or integrated into an existing video infrastructure. The graphic and text informat ion coupled with programmable audio clips may be displayed on a single TV screen or broadcast throughout the facility. -
Page 14: Hardware Connection
IMPORTANT: RF, cable or satellite sources cannot be cabled directly into a ChyTV system. The signal fed to the ChyTV system must be a tuned to a particular channel via a cable/satellite box or a VCR/DVD player, or originate from a direct composite source such as VCR/DVD playback... -
Page 15: Connection Diagram
Note: Only one of the 3 video inputs (Composite, Component, or S-Video) may be selected as the video input to ChyTV Plus. Typically, the video input is automatically detected on power up. See Section 3.3.2 for more information about manually selecting the video input for ChyTV Plus. - Page 16 Connect the supplied USB cable from the USB port of the ChyTV Plus unit to a USB port on the Important: The USB driver, which is a software component, must be installed on the PC before connecting the USB cable.
-
Page 17: Operation
C H Y T V P L U S H A R D W AR E S E T U P Manager. The USB device is displayed in the list only when the ChyTV Plus is connected to the PC via the USB cable and the unit is turned on. -
Page 18: Selecting A Video Input
3.3.1.5 AUDIO BYPASS When the AUDIO BYPASS s witch is depressed, audio generated by the ChyTV Plus unit is added to the source audio. When the AUDIO BYPASS switch is not depressed, ChyTV Plus audio processing is bypassed, and only external audio is output. -
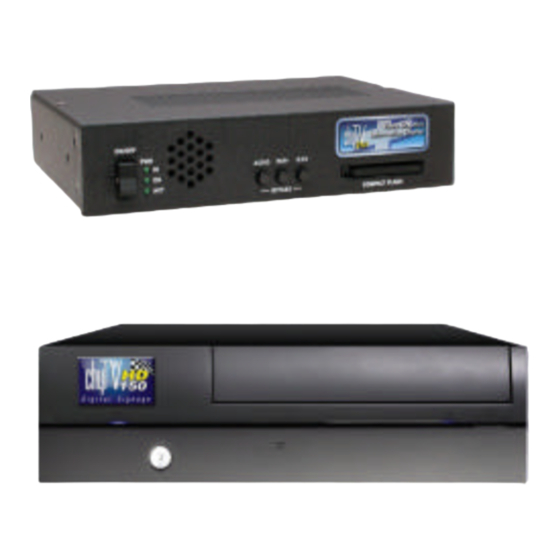
Page 19: Chytv Hd 100 / Hd 150 Setup
The ChyTV HD 150 is based on the HD 100, but also gives you the ability to include a live NTSC or PAL video window in your pages, much like the standard ChyTV products. In addition, the HD 150 includes faster memory and a faster CPU. -
Page 20: Connection Diagram
TV tuner set-top box, a DVD player, or a VCR. Connect an RCA cable from the video output of the external TV tuner set -top box, a DVD player, or a VCR to the VIDEO input (yellow) of the ChyTV unit. 4.2.3.2 COMPOSITE VIDEO OUT Composite video out (CVBS). -
Page 21: Operation
Setting the IP Address Before the HD 100 / HD 150 can be connected to via a network from ChyTV Tools, it must be configured with a valid static IP address. It is also possible to run as a DHCP device, however this makes operation with ChyTV Tools more difficult since the IP address is dynamic. -
Page 22: Phoning Home
By removing the ‘#’ sign in front of ‘help’ and inserting the UBS thumb drive into the HD 100 / HD 150, the device will automatically send an email to ChyTV support containing the device’s contact information. This enables ChyTV support to connect directly to the HD 100 / HD 150 for troubleshooting or software updates. -
Page 23: Authoring Content
In ChyTV Tools, the Options / Settings / Authoring menu’s Conversions setting needs to be set for either 720p or 720p (Portrait), rather than NTSC or PAL. 4.4.2 ChyTV Author In ChyTV Author, the New ChyTV Page dialog box needs to be set to one of the four settings available. -
Page 24: Powerpoint
4 C H Y T V H D 1 0 0 / H D 1 5 0 S E T U P 4.4.3 PowerPoint In PowerPoint, the File / Page Setup menu needs to be configured with a custom Width and Height as follows. -
Page 25: Pc Software Installation
ChyTV Tools – A utility used to import, organize and schedule pages and their page elements for display by the ChyTV unit. It is also used to transfer files between the PC and ChyTV’s CF card, and control the unit remotely while updating pages and Active Data. - Page 26 Next Click . The Setup window closes. USB ChyTV Users: Proceed to Section 4.6 for instructions on how to install the ChyTV USB drivers. Network ChyTV Users: Proceed to Section 5.4 for instructions on how to configure the IP address of your ChyTV unit.
-
Page 27: Configuring The Ip Address Of A Chytv Unit
5.4.2 IP Address Configuration 9. Insert the ChyTV Compact Flash card into the reader/writer and find the appropriate drive letter associated with it. (In this example we use G: ) - Page 28 ChyTV and the ChyTV is booted, it will then have the IP Address, Default Gateway and Subnet Mask as entered above. 13. In ChyTV Tools, you will need to identify the IP address of the unit you just configured. In Options...
- Page 29 P C SO F T W A R E I N S T A L L A T I O N Connections Settings 14. You will be viewing the tab in the window. Edit IP Addresses Network Connectivity 15. Click Modify IP Address In the dialog box, type in the address for the unit as you configured it on the...
-
Page 30: Additional Ip.txt Entries
When this line is included in IP.TXT, a ‘blue’ screen of information regarding IP info, version info, etc. is displayed when ChyTV is first powered on. The 5 means 5 seconds. Note that it may say #DSPETH,5 The ‘#’ mark means the command is ‘commented out’ and not applied. It’s the equivalent of being deleted. -
Page 31: Installing The Usb Driver
The USB driver enables the ChyTV unit and the PC to communicate with each other via the USB connection. To install the USB driver: 1. When the ChyTV is connected t o the PC for the first time, the Found New Hardware message is displayed: Shortly thereafter, the Found New Hardware Wizard dialog box opens. -
Page 32: Usb Installation Tips
2. With USB cable detached from both the ChyTV unit and the PC, power up the ChyTV unit. 3. After color bars display on the display connected to the ChyTV unit, plug in the USB cable to the ChyTV unit only. -
Page 33: Manually Installing Chytv Elements
Stop button to pause the running schedule whenever performing updates. Some users may wish to use Task Manager to stop the ChyTV Tools application if the response time is taking particularly long. This is OK, however it may be necessary to unplug the USB cable for Windows to complete terminating the application. -
Page 34: Installing Chytv Author
PowerPoint Tools Add-Ins… 3. From menu, select 4. If you are updating to a newer version of the Elements add-in, select the existing ChyTV Add- In then click . There should be no instances of the Remove ChyTV Add-In left in the Add-Ins list. - Page 35 When Next selection is complete, click 4. The next step creates a shortcut to ChyTV Author in the specified Start menu folder. Use the Browse folder that is shown, or click to select a different folder. When selection is complete,...
- Page 36 P C SO F T W A R E I N S T A L L A T I O N Install 5. You are now asked to confirm the install information entered. Click to proceed with the installation. 6. A progress page is diplayed as the program files are copied to your PC. A window is Finish displayed after the program is successfully installed.
-
Page 37: Chytv Overview
The ChyTV unit must be connected to a PC by USB or Ethernet in order to add or update pages, data and the schedule stored in the unit’s on-board memory. Program data can also be copied directly to a unit’s CF card using a Compact Flash Reader/Writer. -
Page 38: Pages
ChyTV Tools application. ChyTV Author is designed to create pages by placing page elements on a stage and setting their display parameters using prompts and pull-down menus. The pages are saved as native .ctv page files which are then scheduled using the ChyTV Tools application. -
Page 39: Cf Folder
PowerPoint. These images are embedded in the .CTV pages during conversion, and therefore are not downloaded to ChyTV’s on-board memory. 6.4.4 Thumbnail Folder This folder is used by ChyTV Tools to store and cache page and image thumbnails. It is not downloaded to ChyTV’s on-board memory. -
Page 40: Creating And Displaying Pages On Chytv
Chapter 8 PowerPoint Quick Start Tutorial. Tags are specially formatted text that is interpreted by the ChyTV Image Engine as an instruction. When using PowerPoint to compose pages, Tags are typed into a Text Box and are always enclosed by left and right angle brackets (<... -
Page 41: Storing And Referencing Data
6.5.1.3.2 Tags with text as Active Data ChyTV reserves 1000 “data slots” in memory to hold text that can be referenced by tags. Each slot can hold up to 512 characters of text, including spaces. Active data is useful for setting up generic pages that reference text in specific data slots, then updating the data in those slots to change the text being displayed by the pages. -
Page 42: Active Data
C H Y T V O V E R V I E W A disadvantage of file referencing is that files pointed to by a page must be present in the referenced file location or they will not be displayed. 6.6.3 Active Data Active Data provides a method of both storing and referencing data that is most useful for pages... -
Page 43: Chytv Author Quick Start Tutorial
ChyTV Tools / Projects folder. Opening and Transferring a Project to the ChyTV Unit ChyTV Tools 1. Launch 2. From the Device List pulldown, select the ChyTV unit that will be used during this tutorial. Project Open Project 3. Click... -
Page 44: Creating And Saving A New Page
. This erases all previously stored data on the ChyTV unit. Update All 6. Click to transfer the tutorial data to the ChyTV unit. Restart 7. Click to start the tutorial playlist. Creating and Saving a New Page ChyTV Author 1. -
Page 45: Adding A Background Image To The New Page
Project Reference 4. Click the Magnifying Glass icon to select the project directory where your page will be stored. The directory for the ChyTV Author tutorial is: C:\Program Files \ChyTV \ChyTV Tools \Projects \Author_Tutorial. Click to close the file window, then... - Page 46 2. From the pull-down menu, select , then click the button that appears. 3. Navigate to /Program Files /ChyTV /ChyTV Tools /Projects /Author_Tutorial /Images. Select climbing.jpg Open and click . To view thumbnails of the images while browsing, select the...
-
Page 47: Adding A Crawl To The Page
C H Y T V A U T H O R Q U I C K S T A R T T U T O R I A L Adding a Crawl to the Page GRAPHIC 1. We will start by adding a shaded area where our crawl will be displayed. Click the button on Author’s toolbar. - Page 48 C H Y T V A U T H O R Q U I C K S T A R T T U T O R I A L 4. Click on the box graphic to select it (red borders showing), then drag the red borders to reshape the graphic into a long rectangle.
- Page 49 Feel free to experiment with any of the parameters to see the effect they have on the crawl, keeping in mind that the preview in Author is only a representation of how the page will actually be displayed by ChyTV.
-
Page 50: Adding Video To The Page
VIDEO CLIP 1. Click the button on Author’s toolbar. Note: In this example a video clip file is added to the page. If your ChyTV supports display of VIDEO a live video source, you can click the button instead to add a live video window to... - Page 51 C H Y T V A U T H O R Q U I C K S T A R T T U T O R I A L 4. Now to dress up the page a bit, we are going to add a frame to the video clip. As before, click GRAPHIC Source: Embedded Import: Image...
-
Page 52: Saving And Testing Your Page
ChyTV’s video output. 5. Quit ChyTV Author before moving on to the next section. Adding Active Data to Your Project Active Data provides a method of both storing and referencing data that is most useful for pages that are updated frequently and in real time. - Page 53 Data 1. In ChyTV Tools, click the tab in the toolbar. Page 1 of the Active Data area is displayed. The data that appears on Page 1 is used by the Altrec.ctv page, so we will create Active Data for FirstPage.ctv on page 2.
- Page 54 C H Y T V A U T H O R Q U I C K S T A R T T U T O R I A L 4. Again, your Active Data should now look like the picture below. The cryptic text is Active altrec2 Data representation indicating that is a Flip Book file and will loop forever.
-
Page 55: Using Active Data In Tags
8. Do the same for slots 39 and 40, entering “Winter Gloves” in slot 39 and “$19.95” in slot 40. Your page 2 Active Data should now look like the picture below. Using Active Data in Tags ChyTV Author Open 1. Launch . - Page 56 C H Y T V A U T H O R Q U I C K S T A R T T U T O R I A L 2. In preparation for the next example, place the same shading graphic used for our crawl at the box.png location shown below.
- Page 57 C H Y T V A U T H O R Q U I C K S T A R T T U T O R I A L gloves 5. Select the Logo file that we added to Active Data slot 36. Click , then click Create.
- Page 58 C H Y T V A U T H O R Q U I C K S T A R T T U T O R I A L $19.95 Create 9. Select the String that we added to Active Data slot 40. Click , then click Place the $19.95 as shown and adjust the text size to your liking.
- Page 59 C H Y T V A U T H O R Q U I C K S T A R T T U T O R I A L 12. Place the Winter Gloves String as shown below. The bottom of the text tag box should extend to the bottom of the stage.
-
Page 60: Adding Pages To The Schedule
C H Y T V A U T H O R Q U I C K S T A R T T U T O R I A L 14. Place the spinning logo as shown. The tag parameters can remain unchanged. 15. Click the Save icon on Author’s toolbar to save the page. Return to ChyTV tools and test the results as you did before. -
Page 61: Tips For Using Chytv Tools
3. Click to load the new schedule information into memory and run the playlist. 7.10 Tips for using ChyTV Tools 1. Each page in the playlist is displayed for the duration of the crawl then the next page in the playlist is displayed. -
Page 62: Powerpoint Quick Start Tutorial
ChyTV Tools / Projects folder. Opening and Transferring a Project to the ChyTV Unit 8. Open ChyTV Tools. 9. From the Device List pulldown, select the ChyTV unit that will be used during this tutorial. Project Open Project 10. -
Page 63: Creating And Saving A New Page
P O W E R P O I N T Q U I C K S T A R T T U T O R I A L The full path for Tutorial is C:\Program Files \ ChyTV \ ChyTV Tools \ Projects \ Tutorial. - Page 64 Set Background Select Picture 8. In Elements, click . Then click 9. Navigate to Program Files / ChyTV / ChyTV Tools / Projects / Tutorial / Images. Select AltrecBkg.jpg Open and click . To view thumbnails of the images, select the thumbnail...
- Page 65 P O W E R P O I N T Q U I C K S T A R T T U T O R I A L Video Window Video Window (Squeeze-back) 10. In Elements, click , select , then click Apply Graphics ArcteryxJacket.png...
- Page 66 P O W E R P O I N T Q U I C K S T A R T T U T O R I A L Save As ChyTV FirstPage.htm This will save 13. In Elements, click . Save the file as your PowerPoint html page, convert your it to a ChyTV .ctv page, and add it to your project.
-
Page 67: Adding Active Data To The Page
Double-click FirstPage.ctv in the lower left “ChyTV Pages” window to preview your page on ChyTV’s video output. Adding Active Data to the Page 9. If FirstPage.htm is not already open in PowerPoint, in the Project/Pages window of ChyTV FirstPage.ctv Edit... - Page 68 P O W E R P O I N T Q U I C K S T A R T T U T O R I A L Apply 11. After clicking , the Font Properties dialog box appears. Keep the font defaults and click Alignment >...
- Page 69 Data slot 10 Arcteryx Jacket 15. Select the view tab. Select and enter “ ” (no parenthesis) in the text edit window. Update All 16. Click . Verify that Active Data slot# 10 on the ChyTV unit has been updated.
- Page 70 Pages Double-click FirstPage.ctv to preview your page on 17. Select the view tab. ChyTV’s video output. 18. If FirstPage.htm is not already open in PowerPoint, in the Project/Pages window of ChyTV FirstPage.ctv Edit Tools, click on then click , as in step 1.
- Page 71 P O W E R P O I N T Q U I C K S T A R T T U T O R I A L Save As ChyTV Save 20. In Elements, click . Then click 21. Return to ChyTV Tools. Update All 22. Click Double-click FirstPage.ctv to preview your page on the ChyTV’s video output.
-
Page 72: Adding Crawl Data To
Pages 5. Select the view tab. If FirstPage.htm is n ot already open in PowerPoint, in the FirstPage.ctv Edit Project/Pages window of ChyTV Tools, click on then click Crawl Speed: Medium 6. In Elements, click . In the Crawl dialog box, select . - Page 73 8. From the Font dialog box, select the desired font, font size, and font color. Click Save As ChyTV Save 9. In Elements, click . Then click 10. Return to ChyTV Tools. Update All 11. Click Double-click FirstPage.ctv to preview your page on the ChyTV’s video output.
-
Page 74: Adding Artistic Elements To
13. You can confirm that the text file has been added by clicking the tab and seeing FirstCrawl.txt in both the Project and ChyTV Text windows. Adding Artistic Elements to Pages. 16. If FirstPage.htm is not already open in PowerPoint, in the Project/Pages window of ChyTV FirstPage.ctv Edit Tools, click on then click... - Page 75 P O W E R P O I N T Q U I C K S T A R T T U T O R I A L Graphics ProductBackground.png Open 17. In Elements, click . Select . Click 18. Position and resize the ProductBackground.png graphic over the jacket graphic. Order >...
- Page 76 P O W E R P O I N T Q U I C K S T A R T T U T O R I A L This is what the shirt graphic looks like after sending ProductBackground.png to the back: Graphics CrawlBar.png Open...
- Page 77 This is what the Crawl looks like after sending CrawlBar.png to the back: Save As ChyTV Save 23. In Elements, select . Then click 24. Return to ChyTV Tools. Update All 25. Select Double-click FirstPage.ctv to preview your page on the ChyTV’s video output.
-
Page 78: Adding Pages To The Schedule
Pages window. Drag the thumbnail straight across into the Project / Schedule window and release the mouse button. Update All 4. Select to transfer the new schedule to the ChyTV unit. Restart load 5. Select new schedule information into memory and run. -
Page 79: Manually Creating A Page Using Powerpoint
PowerPoint and its conventions and operation. In fact, although it makes content development easy and efficient, ChyTV Elements does not need be used at all; PowerPoint can be used exclusively to create ChyTV pages. This chapter gives you a basic overview of PowerPoint operation as it pertains to ChyTV. -
Page 80: The Powerpoint User Interface
Menu options allow you to insert page elements as well as open and save slides as presentations. The following is a list of all menu items necessary for creating slides for import into ChyTV Tools. A keyboard or mouse shortcut to the menu item is listed if one exists:... - Page 81 9 M A N U A L L Y C R E A T I N G A P A G E U S I N G P O W E R P O I N T FILE MENU File>Save As Web Page... Saves the current presentation in HTML format for import and conversion by ChyTV Tools. File>Save Saves the current presentation in HTML...
-
Page 82: The Toolbar
After creating your first ChyTV page, it is important to establish a “Safe Zone” on your slides to insure that t ext and graphics are completely displayed on your video monitor. -
Page 83: Setting The Background Image
Images for use a backgrounds should have a 4x3 (width x height) aspect ratio and the resolution of the video monitor that will display the final ChyTV page. This is usually 720 x 480 pixels for NTSC or 720 x 576 pixels for PAL. Aspect ratios other than... -
Page 84: Moving And Resizing An Image
9 M A N U A L L Y C R E A T I N G A P A G E U S I N G P O W E R P O I N T Format Picture… Note: ChyTV does not support picture borders applied using in PowerPoint. -
Page 85: Adding Shadow And Underline Effects To Text
3. From the Format menu, select . The Font page convert ed dialog box appears. ChyTV (.ctv) page format. 4. In the Effects area, check the box next to the text See section 9.2.4.5 for effects desired. more information. 5. Click 9.3.9... -
Page 86: Adding Tags To A Slide
Adding Tags to a Slide As mentioned before, a tag is specially formatted text that instead of being displayed, tells the ChyTV Image Engine to perform a command. For example: Resizing a Text Box <AD 1>{EF 3,M,1}{VC} displays the text stored in active data slot 1. -
Page 87: Rules For Using Tags
Overlapping Text Boxes will obscure each other in the order in which the tags are displayed § A <Video> tag is always the top most layer displayed on a ChyTV page. The output of all other tags and placed objects is obscured by displayed video. -
Page 88: Creating A 4X3 Fixed Aspect Ratio Video Tag
PowerPoint presentations intended for import into ChyTools must be saved in HTML format and stored in the HTML folder of your ChyTV project folder (see section 6.4.2). To save your project: 1. Be sure that there is only one slide listed in the PowerPoint Slide List. Delete any others. -
Page 89: Keying In Chytv
100% black, creating the key color that the video will appear on. In step 3, the <VIDEO FULL> tag is created to tell the Image Engine to display ChyTV’s input video full screen. The {B} (black) Key value parameter tells the Image Engine to only display video where there is 100% black color. -
Page 90: Chytv Elements Reference
9. 10.1 PowerPoint Configuration The ChyTV Elements Add-In must be added to PowerPoint’s list of Add- Ins before it can be displayed and used. Please refer section 10.1 of this manual for information on how to configure PowerPoint to use the ChyTV Elements Add-In. -
Page 91: Set Background
1 0 C H Y T V E L E M E N T S R E F E R E N C E 10.4 Set Background Set Background button is used to automate applying a background color or background image to the PowerPoint slide. Set Background Clicking displays two buttons:... -
Page 92: Crawl Data Source
1 0 C H Y T V E L E M E N T S R E F E R E N C E Speed: 1. Select the crawl speed from the pulldown menu. Soft Mask 2. Check the checkbox for transparent soft edges at the beginning and end of the crawl text. -
Page 93: Text Effect
1 0 C H Y T V E L E M E N T S R E F E R E N C E Loop Count: 3. Check to repeat the audio, then enter the number of repetitions in the prompt. -
Page 94: Active Data
1 0 C H Y T V E L E M E N T S R E F E R E N C E Note: at the time of this manual’s writing, not all clock formats have been added to the ChyTV Elements interface. -
Page 95: Logo File Name
(.ctf) animated to the parameters you FlipBook select. Clicking displays a parameter setup window. Note: ChyTV Dynamo software is required for creating ChyTV Logo and Flipbook files. Note: The FlipBook file used for the <AD> tag must already exist in the FLIPBOOKS directory of the current project. -
Page 96: Active Data
ChyTV Plus button allows ChyTV Plus owners to create tags that command the GPIO and RS-232 ports of the ChyTV Plus unit. GPIO and RS-232 tag syntax can be found in Section 12 of this user guide, connector pinouts and technical information can be found in Section... - Page 97 RS-232 commands. This command list is automatically stored by the Elements plug-in so that user- created commands can be easily added to new ChyTV pages. 10.14.1.1 Editing Commands in the Command List 1.
-
Page 98: Gpio
1 0 C H Y T V E L E M E N T S R E F E R E N C E 10.14.2 GPIO Note: See Section 13.6 for information about the ChyTV Plus GPIO and GPIO Connector Pinout. GPIO... -
Page 99: Save As Chytv
1 0 C H Y T V E L E M E N T S R E F E R E N C E 10.15 Save as ChyTV Save as ChyTV saves the current page as HTML in the HTML directory of the current project. -
Page 100: Chytv Tools Reference
ChyTV Tools is the utility used to import, organize and schedule pages and their page elements for display by the ChyTV unit. It is also used to transfer files between the PC and ChyTV’s CF card, and control the unit remotely while updating pages and Active Data. -
Page 101: View
Pause – Pauses the schedule after executing the current page. Stop – Stops execution of the current page. Note: The ChyTV unit can also be controlled using the ChyTV Remote Control buttons located in the ChyTV Toolbar (see Section 11.7) 11.2.4 Options... - Page 102 Brightness – Adjusts the overall brightness of the ChyTV’s video output. Red Color – Adjusts the red color of ChyTV’s video output in relation to the green and blue colors. Blue color is fixed. Green Color – Adjusts the green color of ChyTV’s video output in relation to the red and blue colors.
- Page 103 Note: Ethernet equipped ChyTV units must be configured with an IP address in order to be recognized on the network and by ChyTV tools. Please refer the ChyTV Hardware/Software Setup Guide for information about setting up ChyTV units on a network.
-
Page 104: Help
Previews – Allows setting the file size limit for auto-previewing Logo and Flip Book image files in ChyTV tools. The larger the file size, the longer auto-preview will take to render the file for display. -
Page 105: Data Selector Buttons
1 1 C H Y T V T O O L S R E F E R E N C E 11.3.2 Data Selector Buttons The six Data Selector buttons are used to select what is displayed in the Project and ChyTV Data Windows. Clicking each button displays the following: 11.3.2.1... -
Page 106: Project Data Window
11.4.1.2 Displays a file dialog for navigating to and adding unconverted HTML or converted ChyTV (.ctv) files the file list. When an HTML page is added, the file is automatically converted to ChyTV (.ctv) format. Important: Page Elements referenced by tags in HTML or ChyTV pages are not imported into the project by the Add command. -
Page 107: Data
11.4.2.3 Change Data Type Displays a dialog box that is used to select whether the Active Data is Text, ChyTV Logo (.ctl) or ChyTV Flipbook (.ctf) format. The Available Data Window displays all files of the selected data type available in the current project. -
Page 108: Text
Active Data is Text, ChyTV Logo (.ctl) or ChyTV Flipbook (.ctf) format. The Available Data Window displays all files of the selected data type available in the current project for selection. -
Page 109: Logos
Activates the currently selected file name for editing. 11.5 Project Schedule Window The Project Schedule Window is used to create a playlist of ChyTV pages for download to and display by the ChyTV unit. The following operations are performed in this window: §... -
Page 110: Adding Chytv Pages To The Schedule
A Page Tag is a text entry in the schedule that acts while selecting multiple pages like a physical ChyTV page. A Page Tag has before applying the command. duration and transition properties, and be scheduled like any other page. - Page 111 1 1 C H Y T V T O O L S R E F E R E N C E 11.5.4.2 Remove Remove Clicking removes the selected ChyTV page or Page Tag from the schedule. The source ChyTV page is not deleted or affected by this operation. 11.5.4.3 Properties The Properties Button is used to set the duration and entry transition effect of the selected Page or Page Tag.
- Page 112 1 1 C H Y T V T O O L S R E F E R E N C E not display at that exact moment; it is somewhat dependent on the contents of the rest of the schedule. Start Date pull down menu and checkbox is used to set the date that the selected page will start being displayed.
-
Page 113: Device Selector
§ All page elements, including Project Pages, Active Data slots, Text files, Audio files, ChyTV Logo files and ChyTV Flip Book files are downloaded to the ChyTV unit. No page elements on the ChyTV unit are deleted. Page elements on the ChyTV unit with the same filename are overwritten. -
Page 114: Drive
The ChyTV Data Window serves the same purpose as the Project Data Window; to display ChyTV (.ctv) pages and their page elements that reside on the ChyTV unit’s CF card. The data that is displayed in this window is selected using the Data Selector Buttons (see section 11.3.2) or menu options in the View Menu (see section 11.2.2). -
Page 115: Text
Next and Previous Page - Clicking the Right or Left arrows displays the next or previous list page. 11.8.2.6 Data Editing Window When the Data button is selected, the ChyTV Schedule Window becomes a Data Editing Window for the selected Active Data. Clicking the displayed data in Data Editing Window activates it for editing. -
Page 116: Logos
11.8.5 Logos Displays the ChyTV Logo (.ctl) files stored in the LOGOS folder of the ChyTV unit’s CF card. When the Logos button is selected, the ChyTV Data Window, Command Buttons and Schedule Window change to facilitate updating or deleting the Logo files. - Page 117 1 1 C H Y T V T O O L S R E F E R E N C E 11.9.1.2 Revert Revert Clicking uploads the Schedule from the unit’s CF card to the Project, overwriting the previous Project Schedule. 11.9.1.3 Back Back...
-
Page 118: Tag Reference
T A G R E F E R E N C E 12 Tag Reference 12.1 Supported Tags The following tags and value parameters are supported for use in ChyTV pages: <TAG> {VALUE PARAMETERS} Display External Video Region No Parameters <VIDEO>... - Page 119 T A G R E F E R E N C E Display Full Screen External Video Video Key Color <VIDEO FULL> {B} or {W} The <Video Full> tag specifies that the {B} - Specifies that the color Black is used as the external video fills the entire television video Key Value.
- Page 120 T A G R E F E R E N C E Crawl Text Repeat Crawl <CRAWL> {Value Parameters}… text {R #} file If present, defines the number of times the Crawl Defines a region where text travels from will repeat after the first time the crawl is displayed. right to left in the area defined by the Text A value of zero repeats the Crawl continuously.
- Page 121 T A G R E F E R E N C E Crawl Text (continued) Soft Mask {SM} If present, specifies that the Crawl will have a 20 pixel soft edge on the left and right edges of the Crawl area. This makes the text appear to fade in at the right edge and fade out at the left edge of the Crawl area.
- Page 122 T A G R E F E R E N C E Crawl Text (continued) Specify Internal Font {F#} If present, uses one of 8 internal fonts to display Crawl text instead of the font style the tag is typed Restrictions: •...
- Page 123 T A G R E F E R E N C E Display Active Data Text Effect <AD ##-##> {Value Parameters} {EF ##, Speed, Order} Displays the text stored in Active Data slot Displays the Active Data text with an animated ## or a range of slots between ##-##.
- Page 124 T A G R E F E R E N C E Display Active Data (continued) Staggered Display Causes the tags on a page to display in sequential order. If no order parameter is specified in the Effects parameter, the tags display in the order they are processed by the Image Engine.
- Page 125 T A G R E F E R E N C E Text Effect Staggered Display <EF ##> {Value Parameters} text Displays text with an animated effect at Causes the tags on a page to display in sequential the speed and display order specified. order.
- Page 126 Clock Display Format <CLOCK> {Value Parameters} {S #} Displays the time and and date stored in Available Formats: ChyTV’s internal clock using the format 0 or Default = HH:MM:SS specified in the tag’s Value Parameters. 1 = HH:MM Example: 2 = HH:MM:SS AM/PM <Clock>...
- Page 127 T A G R E F E R E N C E 63 = YY/MM/DD HH:MM:SS (24-Hour Clock) 64 = DD.MM.YYYY HH:MM:SS (24-Hour Clock) 65 = DD- MM-YYYY HH:MM:SS (24-Hour Clock) 66 = YYYY-MM-DD HH:MM:SS (24-Hour Clock) 67 = MM.DD.YYYY HH,MM,SS (24-Hour Clock) 68 = MM.DD.YYYY HH:MM:SS (24-Hour Clock) 69 = DD/MM-YYYY HH:MM:SS (24-Hour Clock) 70 = DD- Month-YYYY HH:MM:SS 12-October-...
-
Page 128: Appendix
§ Never remove the cover of the ChyTV unit, attempt to rewire or otherwise modify the ChyTV unit, as it creates the risk of injury to the user or damage to the ChyTV unit. All servicing of the ChyTV unit should be performed only by authorized Chyron Corporation personnel. - Page 129 § Chyron Corporation bears liability only for the replacement of a CompactFlash card that has been proven to have been defective or to have been damaged by the ChyTV unit during normal and customary operation. Chyron Corporation bears no liability whatsoever for damage to or loss of content on a CompactFlash card.
-
Page 130: Troubleshooting
1 3 . 2 A P P E N D I X T R O U B L E S H O O T I N G 13.2 Troubleshooting If, after connecting the ChyTV to a television or video monitor, the picture has lost its color or does not otherwise look right, ensure that the Video Standard (NTSC or PAL) is set... -
Page 131: Chytv Plus Rack Mount Installation
Removing Cover Screws Attach one short rack ear to one side of the combined ChyTV Plus units using two supplied screws. Attach the other short rack ear to the opposite side of the combined ChyTV Plus units using two supplied screws. - Page 132 1 3 . 3 A P P E N D I X C H Y T V P L U S R A C K M O U N T I N S T A L L A T I O N Connecting Units Attaching Rack Ears...
-
Page 133: Chytv Hardware Specifications
1 3 . 4 A P P E N D I X C H YT V H A R D W A R E S P E C I F I C A T I O N S 13.4 ChyTV Hardware Specifications... - Page 134 Software § ChyTV Tools (included) – User interface for control and content management § ChyTV Elements (included) – Page Creation and Template Add-in for PowerPoint § ChyTV Dynamo (optional) – Animation and Image conversion tool for ChyTV Flipbooks and Logos...
-
Page 135: Chytv Plus Hardware Specifications
§ Rack mount kit for single or dual channel in 1RU space (Optional) § Processing controls for Composite, Y/C, and YUV video § RS-232 serial control § GPI (General Purpose Interface) remote triggering Software § ChyTV Tools (included) – User interface for control and content management... - Page 136 1 3 . 5 A P P E N D I X C H Y T V P L U S H A R D W A R E S P E C I F I C A T I O N S § ChyTV Elements (included) – Page Creation and Template Add-in for PowerPoint § ChyTV Dynamo (optional) – Animation and Image conversion tool for ChyTV Flipbooks and Logos...
-
Page 137: Chytv Plus Gpio Interface
Of the 8 GPI pins some or all can be set to act as output pins set by GPIO commands that can be inserted in ChyTV pages or in the ChyTV Playlist. The default operation is for all the GPI pins to act as input only, but the user can set the GPI pins to act as all output or 4 input and 4 output. -
Page 138: Chytv Plus Rs232 Interface
ECHOTEST - The ECHOTEST entry should only be used to test the RS232 interface. When this entry is in the Init.txt file all RS232 data is simply received by the ChyTV Plus then sent back out through the RS232 port. This can easily be used to verify that the RS232 connection is correct from the PC to the ChyTV. -
Page 139: Chytv Plus Rs232 Pinout Diagram
1 3 . 5 A P P E N D I X C H Y T V P L U S H A R D W A R E S P E C I F I C A T I O N S The ChyTV Control Field is <RS232> followed by ChyTV RS232 Control Values that will call out the particular RS232 Device command specified by the manufacturer of that device. -
Page 140: Chytv Programmers Guide
PC to the ChyTV system. The command set to the ChyTV is set up as a series of text based string commands that contain a leading backslash, followed by the 2 letter command, followed by a backslash, followed by any data that supports the command and ended by 2 backslashes. - Page 141 22. Issue \GN\\ command to get number of bytes returned. 23. Read 4 byte count from ChyTV. 24. If count greater than 0 read those number of bytes from the ChyTV. 25. A string is returned from ChyTV formatted like : “Ver xx.xx”...
- Page 142 Returns: YES Protocol: 26. Issue \UE\\ command. 27. Read 8 bytes from ChyTV. (UE always returns a fixed number of 8 bytes) 28. The 8 bytes are a packed binary format for : HH MM SS MM DD YY Format:...
- Page 143 Gets the ChyTV Unit ID stored with the \ID\S\ command. Returns: YES Protocol: 29. Issue \ID\G\\ command. 30. Read 16 bytes from ChyTV. (\ID\G\\ always returns a fixed number of 16 bytes) 13.8.2.14 Set Video Standard to NTSC \S5\\ Sets the video standard of the ChyTV system to NTSC.
- Page 144 Protocol: 1. Issue \ DH\F \\ command. 2. Read 4 bytes from ChyTV. (\DH\F \\ always returns a fixed number of 4 bytes) 3. These 4 bytes reflect a 32 bit integer value of Compact Flash Free Space. 13.8.2.18 Write File To ChyTV Compact Flash \DD\file size\[file name and path]\\ Start File Download to ChyTV Compact Flash.
- Page 145 Protocol: 1. Issue \ GF\folder\\ command. 2. Read 4 bytes from ChyTV. (This is the number of bytes for the list of file names.) 3. If greater than 0 then start reading in list from ChyTV. 4. After issuing the \GF\folder\\ command a block of memory in the ChyTV system is loaded with the directory list.
- Page 146 Keeping the block size below 50000 allows for the app to update a progress bar. 5. Use File Length to keep calling ReadUSB until all the data is transferred from the ChyTV t o the host.
- Page 147 Protocol: 1. Issue \ DH\D\[file name and path]\\ command. 2. Read 4 bytes from ChyTV. (This is t he OK>=0 or NG flag(-1 File Not Found) 13.8.2.22 BREAK command Writing a single 0x1b (ESC) character using WriteUSB() to the ChyTV will end a Looping Crawl.
- Page 148 \VI\G\\ - Get Video In Setting. Read a 4 byte integer whose value is 0-3. \TP\\ - Test for ChyTV Plus. Ver 2.25 or later. Returns a 4 byte binary 1 if ChyTV is a ChyTV Plus; otherwise a 0 is returned.
-
Page 149: International Appendix
In the root folder of the ChyTV Compact Flash exists a file called Init.txt. This file contains some initialization information us by the ChyTV when it is first turned on. It this file it is possible to change the text used for the Clock display when the text version of the day of the week or the month is displayed as part of the clock display. - Page 150 Simply change the text that follows the ‘=’ sign to the new text, save the updated Init.txt file in the ChyTV compact Flash root folder and restart the ChyTV device. When the ChyTV is restarted the new values for the Days and Months entered will replace the default ones.
-
Page 151: Warranty
W A R R A N T Y 13.10 Warranty All ChyTV products are covered by a One (1) Year Warranty for Parts and Labor. All Units are to be returned to Chyron Corporation (shipping paid by customer) for repair and / or replacement.
Need help?
Do you have a question about the HD-150 and is the answer not in the manual?
Questions and answers