Jensen AWM975 Owner's Manual
Hide thumbs
Also See for AWM975:
- Owner's manual (39 pages) ,
- Quick reference manual (2 pages) ,
- Quick reference manual (2 pages)
Advertisement
Table of Contents
Owner's Manual
Guide du Propriétaire
PUSH AUDIO/MENU
AM/FM
AM/FM
WB
WB
iPhone, iPod, iPod classic, iPod nano, iPod shuffle, and iPod touch are
trademarks of Apple Inc., registered in the U.S. and other countries.
iPhone, iPod, iPod classic, iPod nano, iPod shuffle, et iPod touch sont les
marques déposées d'Apple Inc., enregistrées aux Etats-Unis et en d'autres pays.
Installation . . . . . . . . . . . . . . . . . . . . . . . . . . . . . . . . . . . . . . . . . . . . . . . . . . . . . . . . . . . . . . 3
Wiring . . . . . . . . . . . . . . . . . . . . . . . . . . . . . . . . . . . . . . . . . . . . . . . . . . . . . . . . . . . . . . . . . . 4
Basic Operation. . . . . . . . . . . . . . . . . . . . . . . . . . . . . . . . . . . . . . . . . . . . . . . . . . . . . . . . . . 5
Tuner Operation . . . . . . . . . . . . . . . . . . . . . . . . . . . . . . . . . . . . . . . . . . . . . . . . . . . . . . . . . 7
Weatherband Operation . . . . . . . . . . . . . . . . . . . . . . . . . . . . . . . . . . . . . . . . . . . . . . . . . . . 8
CD Operation . . . . . . . . . . . . . . . . . . . . . . . . . . . . . . . . . . . . . . . . . . . . . . . . . . . . . . . . . . . . 9
DVD/VCD Operation . . . . . . . . . . . . . . . . . . . . . . . . . . . . . . . . . . . . . . . . . . . . . . . . . . . . . 11
MP3/USB Operation . . . . . . . . . . . . . . . . . . . . . . . . . . . . . . . . . . . . . . . . . . . . . . . . . . . . . 13
iPod Operation . . . . . . . . . . . . . . . . . . . . . . . . . . . . . . . . . . . . . . . . . . . . . . . . . . . . . . . . . 15
Remote Control Operation . . . . . . . . . . . . . . . . . . . . . . . . . . . . . . . . . . . . . . . . . . . . . . . . 16
Setup Menu . . . . . . . . . . . . . . . . . . . . . . . . . . . . . . . . . . . . . . . . . . . . . . . . . . . . . . . . . . . . 17
Specifications . . . . . . . . . . . . . . . . . . . . . . . . . . . . . . . . . . . . . . . . . . . . . . . . . . . . . . . . . . 19
Installation . . . . . . . . . . . . . . . . . . . . . . . . . . . . . . . . . . . . . . . . . . . . . . . . . . . . . . . . . . . . . 22
Câblage . . . . . . . . . . . . . . . . . . . . . . . . . . . . . . . . . . . . . . . . . . . . . . . . . . . . . . . . . . . . . . . 23
Opération de base. . . . . . . . . . . . . . . . . . . . . . . . . . . . . . . . . . . . . . . . . . . . . . . . . . . . . . . 24
Opération tuner AM/FM . . . . . . . . . . . . . . . . . . . . . . . . . . . . . . . . . . . . . . . . . . . . . . . . . . 26
Opération Weatherband . . . . . . . . . . . . . . . . . . . . . . . . . . . . . . . . . . . . . . . . . . . . . . . . . . 27
Opération CD . . . . . . . . . . . . . . . . . . . . . . . . . . . . . . . . . . . . . . . . . . . . . . . . . . . . . . . . . . . 28
Opération DVD/VCD . . . . . . . . . . . . . . . . . . . . . . . . . . . . . . . . . . . . . . . . . . . . . . . . . . . . . 30
Opération MP3/USB . . . . . . . . . . . . . . . . . . . . . . . . . . . . . . . . . . . . . . . . . . . . . . . . . . . . . 32
Operation iPod . . . . . . . . . . . . . . . . . . . . . . . . . . . . . . . . . . . . . . . . . . . . . . . . . . . . . . . . . 34
Opération télécommande . . . . . . . . . . . . . . . . . . . . . . . . . . . . . . . . . . . . . . . . . . . . . . . . . 35
Menu Configuration . . . . . . . . . . . . . . . . . . . . . . . . . . . . . . . . . . . . . . . . . . . . . . . . . . . . . 36
Spécifications . . . . . . . . . . . . . . . . . . . . . . . . . . . . . . . . . . . . . . . . . . . . . . . . . . . . . . . . . . 38
Advertisement
Table of Contents

Related Manuals for Jensen AWM975


Summary of Contents for Jensen AWM975
-
Page 1: Table Of Contents
Weatherband Operation ........... 8 AWM975 CD Operation . - Page 2 Headphone Output • 3 Zone / 6 Speaker Output NOTE: If the AWM975 is to be installed in a vehicle equipped with an on-board drive or • Wireless Remote Control Included navigation computer, do not disconnect the battery cable. If the cable is disconnected, the computer memory may be lost.
-
Page 3: Installation
AWM975 Packing List Installation It’s a good idea to read all of the instructions before beginning the installation. We recommend having your JENSEN AWM975 installed by a reputable installation shop. 4-PIN C SPEAKER Selecting the Mounting Location MATING PIGTAIL Select a mounting location, taking care to avoid the following: •... -
Page 4: Wiring
AWM975 Wiring The wiring diagram depicts all the wiring connections required for proper operation of the unit. AWM975 TOP VIEW AWM975 BACK VIEW... -
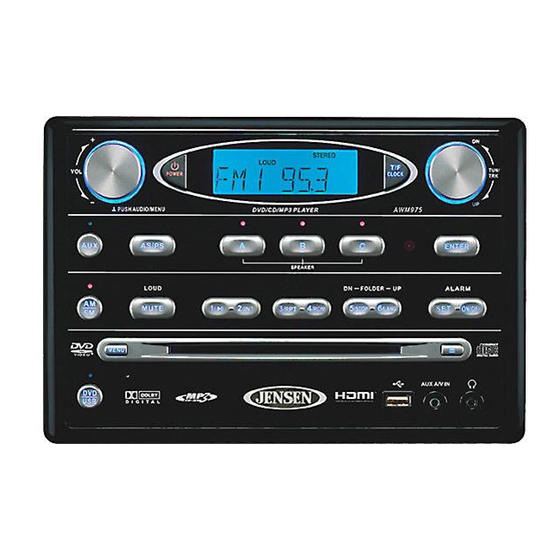
Page 5: Basic Operation
A/V cable "standards". The AWM975 is designed to support the Apple Video iPod cable type, as shown in the inset drawing. USB Interface Connector You can connect a USB device directly to USB interface (7) on the front of the AWM975 for AM/FM AM/FM playback of compatible files. - Page 6 The new time will be saved five seconds after the last adjustment is made. Setting the Sleep Time The Sleep Timer will automatically turn off the AWM975 in the designated number of minutes. To set the Sleep Time, press the ALARM SET button (9a) and the sleep time will appear in the display with the number representing the minutes (SLEEP 0).
-
Page 7: Tuner Operation
AWM975 AM/FM Tuner Operation Preset Stations Six numbered preset buttons store and recall stations for each AM and FM band. Selecting a Band Press the AM/FM/WB button (11) to directly access tuner mode from any other function mode or to change between two AM bands (AM1 and AM2) and three FM bands (FM1, FM2 and FM3). -
Page 8: Weatherband Operation
AWM975 Weatherband Operation What is the NOAA Weather Radio/Weatheradio Canada? This is a nationwide system that broadcasts local weather emergency information 24 hours a day. The U.S. network has more than 530 stations covering the 50 states as well as the adjacent costal waters, Puerto Rico, the U.S. -
Page 9: Cd Operation
AWM975 CD Operation Intro Scan (INT) Press the 2/INT button (17) during disc play to play the first 10 seconds of each track on the current disc. Press 2/INT again to end the scan and play the selected track. Inserting a CD Insert a CD label-side up into the disc slot (14) and the disc will begin to play. - Page 10 AWM975 CD Operation (continued) CD Playback Information The following information is displayed at the top of the screen during CD playback: • TRK ##/## – “1/18” indicates the first of 18 tracks on the CD is currently playing. • – “X” indicates repeat play is OFF, “1” indicates repeat track, and “A” indicates repeat disc.
-
Page 11: Dvd/Vcd Operation
AWM975 DVD/VCD Operation Playback Control (VCD Only) Press the MENU button (6) on the remote control to turn Playback Control on/off when this feature is available on your VCD. Inserting a Disc Insert a disc label-side up into the disc slot (14) and the disc will begin to play. - Page 12 AWM975 Remote Control Direct Track Entry DVD/VCD Operation (continued) To select a track directly, use the number pad on the remote control (10). For single digit entries, press the corresponding number. For two digit entries, press the 10+ button followed Playback Information by the last digit (i.e., for track 16, press 10+ and then 6).
-
Page 13: Mp3/Usb Operation
AWM975 MP3/USB Operation Track Select When playback is stopped, rotate the TUN/TRK control (12) to search in current folder. During playback, rotate the TUN/TRK control to access the previous/next file. The selected file Insert/Eject Disc number will appear on the display. - Page 14 AWM975 MP3/USB Operation (continued) MP3 Playback Information The following information is displayed at the top of the screen during CD playback: Fast Forward/Reverse Rotate the TUN/TRK control for more than three seconds or press the >> or << buttons on the remote control (17) to fast forward or fast reverse.
-
Page 15: Ipod Operation
AWM975 iPod® Operation Controlling Playback • Access iPod Menu – Press the MENU button (21). ® This unit is equipped with an iPod ready function that will allow you to control your iPod (if Albums • Pause/Play – During playback, compatible) using the control panel buttons. -
Page 16: Remote Control Operation
AWM975 Remote Control Operation REF DESCRIPTION TUNER WEATHERBAND CD/MP3/USB Power Turn radio on/standy mode. Turn radio on/standy mode. Turn radio on/standby mode. Turn radio on/standby mode. LOUD VOL +/- Adjust volume up/down. Adjust volume up/down. Adjust volume up/down. Adjust volume up/down. -
Page 17: Setup Menu
AWM975 Setup Menu Language Setup The Language Setup menu controls the following features: Press the (setup) button (11) on the remote control to access the SETUP menu and adjust system settings for the following categories: LANGUAGE SETUP • System Setup... - Page 18 AWM975 Setup Menu (continued) Digital Setup The Digital Setup menu controls the Audio Setup following features: The Audio Setup menu controls the DIGITAL SETUP following features: LINE OUT OP MODE AUDIO SETUP RF REMOD DYNAMIC RANGE SPDIF/OFF AUDIO OUT DUAL MONO...
-
Page 19: Specifications
AWM975 Specifications General Power Supply Requirements......DC 12 Volts, Negative Ground Operating Voltage ..........10-16VDC Overall Dimensions . - Page 20 www.asaelectronics.com www.jensenrvdirect.com © 2011 ASA Electronics Corporation v.021111...
Need help?
Do you have a question about the AWM975 and is the answer not in the manual?
Questions and answers