Table of Contents
Advertisement
quick start guide/user manual
Singlebeam survey image courtesy of
Rice Associates, Manassas, VA.
Above, Right:
Singlebeam images courtesy
cbec Inc. eco engineering,
Sacramento, CA.
HydroLite-TM
A quick start guide/user manual.
HydroLite-TM surveying in lake using a GPS antenna and
hand-held data collector.
™
Advertisement
Table of Contents

Related Manuals for Seafloor HydroLite-TM


Summary of Contents for Seafloor HydroLite-TM
- Page 1 HydroLite-TM ™ A quick start guide/user manual. Singlebeam survey image courtesy of Rice Associates, Manassas, VA. HydroLite-TM surveying in lake using a GPS antenna and hand-held data collector. Above, Right: Singlebeam images courtesy cbec Inc. eco engineering, Sacramento, CA.
- Page 2 3. Options ..................1 4. Getting Started .................2 5. Things to check before calling Technical Support ....2 6. Troubleshooting ..............3 7. Removing the transducer from HydroLite-TM ......3 8. Contacting Technical Support ..........3 Appendices—List of Reference Tools HydroLite-TM Schematic SonarMite MILSpec/SonarM8 User Manual...
- Page 3 ™ 1. Introduction The HydroLite-TM (Transom Mount) Survey Pole Kit provides an integrated survey solution, allowing easy mounting of the SonarMite echosounder. The YouTube setup video demonstrates how to assemble the HydroLite-TM pole kit. At the very least, purchasing the mounting bracket makes faster surveys.
- Page 4 5.6 Data format: Ensure you are using the correct data output format—should be “Old SonarMite Format”. Refer to SonarMite User Manual. Be patient with the data collector—multiple taps could freeze it up. Page 2 HydroLite-TM Quick Start Guide/User Manual | Rev 08/11/2016...
-
Page 5: Troubleshooting
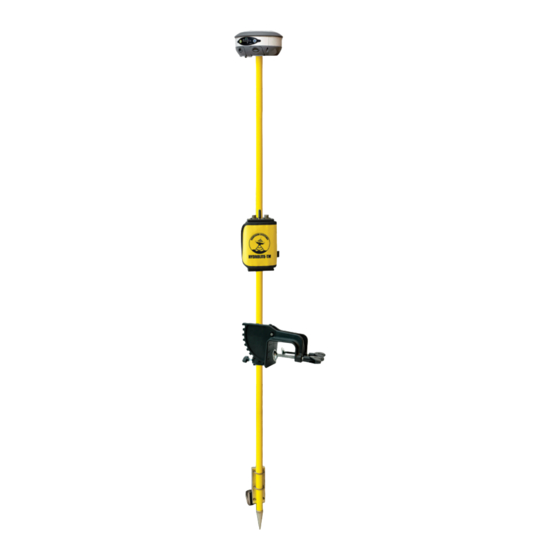
7. Contacting Technical Support Call (530) 677-1019 or Email: info@seafloorsystems.com Monday - Friday, 8:30 a.m. - 5:00 p.m. Pacific Time Seafloor Systems, Incorporated 4415 Commodity Way, Shingle Springs, CA 95682 · USA (530) 677–1019 | info@seafloorsystems.com | www.seafloorsystems.com ©2016 Seafloor Systems, Inc. All rights reserved. Page 3 HydroLite-TM Quick Start Guide/User Manual | Rev 08/11/2016... - Page 6 GPS Antenna (optional) SonarMite-MILSpec singlebeam echosounder 2-Foot Pole Section SonarMite Echosounder Transducer in Velcro Pouch ™ Transom Mount 2-Foot Pole Section Pole Transducer Mounting Bracket HydroLite-TM in rugged carry case with Quick Start Manual Survey Point Pg 1 of 1...
- Page 7 SonarMite MILSpec/SonarM8 Introduction The SonarMite MILSpec and HydroLite-TM were designed to be an ultra-portable, survey-grade, self-contained bathymetric survey system. The internal battery, Bluetooth, and easy integration make it popular with survey and engineering companies. Equipment Supplied • SonarMite MILSpec Bluetooth echosounder...
- Page 8 Step 1—Switching the system on Step 6—Internal battery charging Plug in the transducer cable to the control box; look for Fully charge the battery, overnight, prior to using a blinking red LED light. Red light indicates the system the system. A full discharge and recharge should be is on and outputting depths. The transducer MUST be in conducted every six months.
- Page 9 Step 7—SonarMite settings 7d2. Format ASCII mode (example below) The next few pages describe several output data formats as well as how to change them and change the sound 0.48 velocity. 0.48 0.48 7a. Place transducer in water, such as a small bucket. 0.48 0.48 7b.
- Page 10 SYS> 54 0.48 109 109 0 116 1500 0.2 0 www.youtube.com/watch?v=SmnCkbmXiGI SYS> 54 0.48 109 109 0 116 1500 0.2 0 8a. After the HydroLite-TM has been assembled, it SYS> 54 0.48 109 109 0 116 1500 0.2 0 is important to find the best location to mount on SYS>...
- Page 11 Transducer Removal from HydroLite-TM To remove the transducer, unscrew the section containing the transducer from the remaining pole kit. At a 45-degree angle, place the transducer head on a protective pad, and press firmly until it releases. A—Place transducer on a protective pad. B—Press down firmly until it releases. Page 5 SonarMite MILSpec/M8 User Manual | Rev 07/22/2016...
- Page 12 F.A.Q. Is dual frequency required? Dual frequency echosounders were originally designed for use by sea going vessels to report reliable, low frequency depths in deep water situations, and more accurate, high frequency navigation within shallow areas. Low frequency is of limited use in shallow hydrographic surveys Reasons are as follows: •...
- Page 13 Should pitch/roll angle be applied to the depth? Many surveyors assume that sonar is like a laser being shone through the water and that the distance measured should be assumed is a hypotenuse measurement to be trigonometrically corrected by any pitch/roll angle that has been measured. The best physical analogy of the echo sounder beam would be a torch light beam that is shone over an area, within that area there is a small piece of mirror that reflects the light at that point, sonar is very similar except that the reflected point is normally the closest point within the beam.
- Page 14 Monday - Friday, 8:30 a.m. - 5:00 p.m. Pacific Time Seafloor Systems, Incorporated 4415 Commodity Way, Shingle Springs, CA 95682 · USA (530) 677–1019 | info@seafloorsystems.com | www.seafloorsystems.com ©2016 Seafloor Systems, Inc. All rights reserved. Page 8 SonarMite MILSpec/M8 User Manual | Rev 07/22/2016...
- Page 15 Speed of Sound — Freshwater Source: UNESCO equation provided by National Physical Laboratory. Pg 1 of 2...
- Page 16 Speed of Sound — Seawater Source: UNESCO equation provided by National Physical Laboratory. Pg 2 of 2...
- Page 17 Seafloor quick start guide SonarMite Android Bluetooth App Ver 2.1 Pg 1 of 5...
- Page 18 Pg 2 of 5...
- Page 19 Pg 3 of 5...
- Page 20 Pg 4 of 5...
- Page 21 Pg 5 of 5...
- Page 22 Seafloor quick start guide Trimble Survey Controller/Access Pg 1 of 4...
- Page 23 Pg 2 of 4...
- Page 24 Pg 3 of 4...
- Page 25 Data Collection Tip: When starting Data Collection, it should be configured as follows: · Continuous Topo · by Time Pg 4 of 4...
- Page 26 Seafloor quick start guide Trimble Terrasync Setup Trimble Terrasync Setup Summary 1. Name your sensor 2. Select port #, baud 9600 or 4800, Data bits 8, Stop bits 1, Parity none 3. Define prefix and suffix- prefix and suffix examples are below, as well as your desired Sonar- mite output string 4.
- Page 27 Seafloor quick start guide Trimble SCS900 with SonarMite ™ ™ Pg 1 of 6...
- Page 28 Pg 2 of 6...
- Page 29 Pg 3 of 6...
- Page 30 Pg 4 of 6...
- Page 31 Pg 5 of 6...
- Page 32 Pg 6 of 6...
- Page 33 Seafloor quick start guide Trimble Access Drivers for SonarMite ™ Pg 1 of 3...
- Page 34 3) In the Settings Menu screen choose SURVEY STYLES 4) in the Styles screen select a style 5) Within the Style properties select ECHO SOUNDER Pg 2 of 3...
- Page 35 Pg 3 of 3...
- Page 36 Seafloor quick start guide SonarMite with ™ Carlson SurvCE Data Collection Tip: When starting Data Collection, it should be configured as follows: · Auto by Interval · by Time Pg 1 of 1...
- Page 37 Connecting Viva controller to SonarMite Echosounder CS1O/CS15 Settings - - ..• • ;feic<! - when it has to be right Pg 1 of 13 Geosystems Pg 2 of 13...
- Page 38 Pg 3 of 13 Pg 4 of 13...
- Page 39 Pg 5 of 13 Pg 6 of 13...
- Page 40 Pg 7 of 13 Pg 8 of 13...
- Page 41 Pg 9 of 13 Pg 10 of 13...
- Page 42 Pg 11 of 13 Pg 12 of 13...
- Page 43 Pg 13 of 13 Tips on Data Collection: Surveys must be performed using the following setting: · AUTO tab (stores shots at intervals) · AUTO POINTS (log every 1 or 5 seconds)
- Page 44 Seafloor quick start guide SonarMite with ™ Leica 1200 GPS System Pg 1 of 3...
- Page 45 Pg 2 of 3...
- Page 46 Pg 3 of 3...
- Page 47 Seafloor quick start guide Topcon Magnet Pg 1 of 1...
- Page 48 Seafloor Systems, Incorporated 4415 Commodity Way, Shingle Springs, CA 95682 · USA (530) 677–1019 | info@seafloorsystems.com | www.seafloorsystems.com ©2016 Seafloor Systems, Inc. All rights reserved.
Need help?
Do you have a question about the HydroLite-TM and is the answer not in the manual?
Questions and answers