Table of Contents
Advertisement
Advertisement
Table of Contents

Related Manuals for Universal Remote Contorl MXHP-R500


Summary of Contents for Universal Remote Contorl MXHP-R500
- Page 1 MX-HomePro MXHP-R500 (Remote) Owner’s Manual v. 1.0 Universal Remote Control Inc.
- Page 2 ERRORS/OMISSIONS MADE IN THIS MANUAL. The information in this manual is subject to change without prior notice. MXHP-R500 Owner’s Manual © 2016 Universal Remote Control, Inc. URC - Control the Experience is a registered trademark of Universal Remote Control, Inc.
-
Page 3: Table Of Contents
MX-HomePro MXHP-R500 (Remote) Introduction.........................1 Features and Benefits....................1 Parts List........................1 Getting Started......................2 Connecting the Lithium Polymer Battery..............2 Using the Micro USB Charger..................2 Using the MXHP-R500 (Remote)................3 Displaying the Settings Screen..................4 Settings Menu......................5 Network Settings....................5 TRF-ZW Z-Wave Accessory Account Info............6 Sleep Timer......................7 Brightness.......................8 System........................9... -
Page 4: Introduction
MX-HomePro MXHP-R500 (Remote) Congratulations! Thank you for purchasing the MXHP-R500 Wi-Fi based remote for your MX-HomePro system. This remote offers live two-way on all of the smart devices throughout the home or small office space. Controlling and monitoring the home’s devices is as simple as a click on the remote. -
Page 5: Getting Started
MX-HomePro MXHP-R500 (Remote) Before Getting Started Prior to installing an MX-HomePro system, there are a few things to remember: ● MX-HomePro systems are designed for use on the home’s local network. The hub can be connected to the home network through an Ethernet cable or wirelessly using Wi-Fi. -
Page 6: Using The Mxhp-R500 (Remote)
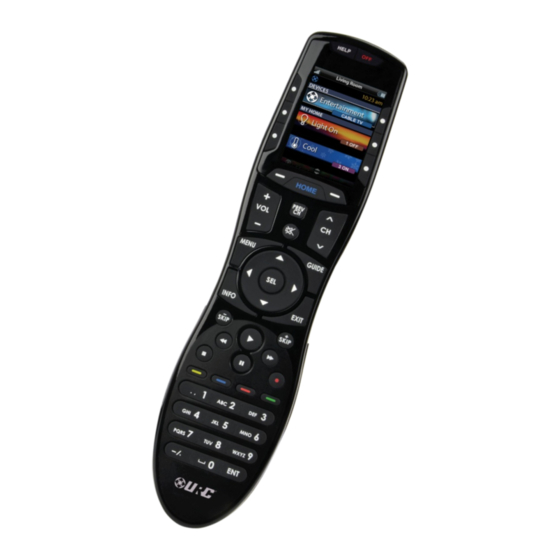
MX-HomePro MXHP-R500 (Remote) Using the MXHP-R500 (Remote) The Home menu pages display all the programmed activities and devices within the MX-HomePro system. To navigate to this, simply press the Home button and use the Up and Down buttons to move throughout the menu. -
Page 7: Displaying The Settings Screen
(SEL) button when the item is highlighted. To go back a step or get out of the Settings menu, press Home. Shown below is an expanded view of the MXHP-R500’s Settings menu Note: not all options on this image are available on the screen at once. -
Page 8: Settings Menu
The following sections covers essential sub-menus within the Settings menu: Network Settings This menu displays the network information about the MXHP-R500 and the network it is connected to. From this screen scan for different Wi-Fi networks, select a network to connect to, and enter any custom settings (see MX-HomePro Installation Guide). -
Page 9: Trf-Zw Z-Wave Accessory Account Info
MX-HomePro MXHP-R500 (Remote) TRF-ZW Z-Wave Accessory Account Info When using smart home devices that use Z-Wave, it is necessary to log the Accessory Account info onto the remote (see MX-HomePro Installation Guide): The Accessory Account info item allows the entry of a URC TRF-ZW account username and password. -
Page 10: Sleep Timer
MX-HomePro MXHP-R500 (Remote) Sleep Timer This setting item allows the user to adjust the amount of time the LCD remains On when not in use. The time can be set independently based on whether the remote is using battery power or connected to the charger. -
Page 11: Brightness
MX-HomePro MXHP-R500 (Remote) Brightness This item allows the user to adjust the brightness of the LCD screen’s backlight. Use the “-” and “+” buttons to decrease or increase the LCD’s brightness. Once complete, press Save. Pressing Go Back button returns to the remote’s last saved setting. -
Page 12: System
MX-HomePro MXHP-R500 (Remote) System This menu displays data about the remote’s operating system, memory, and other information. Press the More button to view further system information or press Go Back to exit to the Setting’s menu. Page 9... -
Page 13: Power
MX-HomePro MXHP-R500 (Remote) Power Displays the remaining battery level of the remote. The low battery warning message can be adjusted from this section. Adjust the battery percentage using the “-” and “+” buttons to do so. Once adjusted, press Save. Pressing Go back reverts to the remote’s last saved setting. -
Page 14: Sound
MX-HomePro MXHP-R500 (Remote) Sound Through this menu, adjusting the sound on button presses can be changed. Press the adjacent hard buttons to increase or decease the button volume. Once adjusted, press the Save button. Pressing the Go Back button returns to the remote’s last saved setting. -
Page 15: Pickup
MX-HomePro MXHP-R500 (Remote) Pickup This menu allows the user to adjust the sensitivity of the remote when reacting to being picked up. Increase or decrease the sensitivity using the “-” and “+” buttons. Once adjusted, press the Save button. Pressing the Go Back button returns to the remote’s last saved setting. -
Page 16: Firmware Update
MX-HomePro MXHP-R500 (Remote) Firmware Update Selecting this makes the remote search for any firmware updates. If a firmware update is available this screen appears. Select Yes to begin updating the firmware. Otherwise, select No to return to the previous scree. -
Page 17: Factory Default
MX-HomePro MXHP-R500 (Remote) Factory Default WARNING! Selecting this option returns the MXHP-R500 to its factory default settings. All programming is lost and the system requires re-programming. Selecting Yes started the factory reset process. This should only be done when instructed by URC Technical Support or by the smart home professional installer. -
Page 18: Specifications
MX-HomePro MXHP-R500 (Remote) Specifications 2” (240x320) LCD backlight by LED Devices Supports up to 255 devices with text, less with heavy graphics Usage Pages Supports up to 255 pages on each device with text, less with heavy graphics. Macro Capability Up to 255 steps each;... -
Page 19: Limited Warranty Statement
MX-HomePro MXHP-R500 (Remote) Limited Warranty Statement Click on the section title above to read the full terms and conditions of the Limited Warranty Statement. Also available publicly on the URC home page. End User Agreement Click on the section title above to read the full terms and conditions of the End User Agreement. -
Page 20: Fcc Caution
MX-HomePro MXHP-R500 (Remote) FCC Caution This device complies with Part 15 of the FCC Rules. Operation is subject to the following two conditions: 1. This device may not cause harmful interference 2. This device must accept any interference received, including interference that may cause undesired operation.
Need help?
Do you have a question about the MXHP-R500 and is the answer not in the manual?
Questions and answers