Table of Contents
Advertisement
Quick Links
Download this manual
See also:
User Manual
Advertisement
Table of Contents

Related Manuals for Eltek R3601-W2

Summary of Contents for Eltek R3601-W2
- Page 1 Eltek R3601-W2 SFP Gigabit Ethernet WLAN 11n Gateway Eltek R3601-W2 User Manual...
-
Page 2: User Manual
No Part of this document may be reproduced or transmitted in any form or by any means without prior written consent of Eltek Technologies Ltd., Switzerland Disclaimer Eltek Technologies Ltd., Switzerland reserves the right to change the document from time to time at its sole discretion, and not to make the notice to anyone in advance. -
Page 3: Intended Audience
Brief Introduction This manual provides technical information on how to configure and operate application for your R3601-W2 unit. Chapter 1: Provides an overview of R3601-W2 Chapter 2: Introduces the product Chapter 3: Introduces the configuration via WEB-based Management Intended Audience System administrators, Network engineers and Maintenance technicians. -
Page 4: Table Of Contents
CONTENTS Eltek R3601-W2 ................1 Overview ..................1 Product Introduction ..............2 2.1 Appearance ................2 2.2 Hardware Interface ..............3 2.3 Features ................3 2.4 Working Environment .............. 4 Configuration Introduction ............5 3.1 Login ..................5 3.2 Home ..................5 3.3 Network Configuration ............. - Page 5 3.5.4 Backup/Restore ......................74 3.5.5 Diagnostic ........................74 3.5.6 User Management....................76 3.5.7 System Log ........................ 77 3.5.8 TR069 ........................... 78 3.5.9 SNMP ..........................80 3.5.10 User Access Right ....................81 3.6 Apply ................... 82 3.7 Print Function ................ 83...
-
Page 6: Eltek R3601-W2
Eltek R3601-W2 User Manual v.1.1 1 Overview A new series of ALL IN ONE INTELLIGENT Gateway R3601-W2 is perfectly designed for SOHO, small and medium sized business (SMB) requiring application-based solutions of low-capital investment to communicate with various kinds of users. The R3601-W2 has integrated high data capacity of WIFI 300Mbps and GE LAN. -
Page 7: Product Introduction
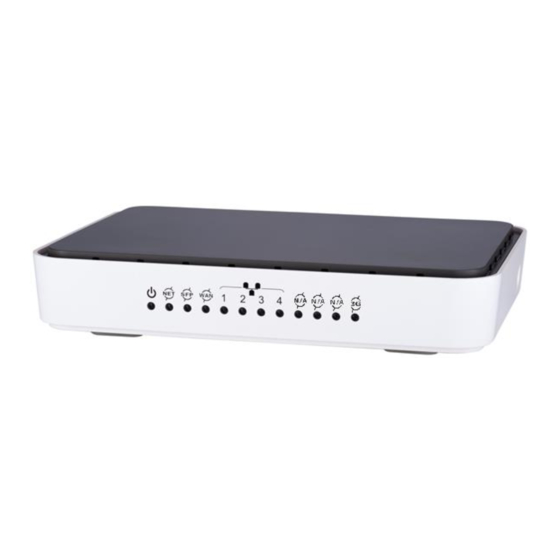
Eltek R3601-W2 User Manual v.1.1 2 Product Introduction 2.1 Appearance R3601-W2 Front View Figure 2-1 Table 2-1 Status Indication Power is off Solid Green Device is running Power is off Slow Flash INTERNET type WAN PPPoE INTERNET Green connection authenticate failed... -
Page 8: Hardware Interface
Eltek R3601-W2 User Manual v.1.1 R3601-W2 Rear View Figure 2-2 WAN: 1000/100/10Mpbs ethernet ports. LAN: 1000/100/10Mpbs ethernet ports. SFP: Gigabit fiber interface. SD: Interface for SD card. (optional) POWER: DC power input connector. Reset button: Use the button to restore the device to the factory defaults. -
Page 9: Working Environment
Eltek R3601-W2 User Manual v.1.1 VPN: IPSEC,PPTP,L2TP IPTV: IGMP Proxy/Snooping, IPTV Bridge Management Management Protocol: CLI,SNMPV1/2,Tr069,Web LED Indications: Total 12LEDS for Power, WAN/LAN, Phone Control Button: WPS Button, WLAN Button, Power Switch, Reset Button NAT & Firewall & Security ... -
Page 10: Configuration Introduction
Eltek R3601-W2 User Manual v.1.1 3 Configuration Introduction 3.1 Login The Web interface is ready for accessing about one minute after the device power on. The default LAN IP address is 192.168.100.1, you can access the Web interface via either WAN port or LAN port. Enter IP address in the address bar of web browser and then press ENTER, you can get access to the Login interface. -
Page 11: Network Configuration
Eltek R3601-W2 User Manual v.1.1 System Status Figure 3-2 3.3 Network Configuration 3.3.1 Network Status The Status page shows all WAN and LAN interfaces configuration, and all physical ports connection status related to this device. 3.3.1.1 WAN Status Choose the menu Network→Status→WAN to load the following page. -
Page 12: Wan Configuration
Eltek R3601-W2 User Manual v.1.1 LAN Status Figure 3-4 3.3.1.3 Link Status Choose the menu Network→Status→Link Status to load the following page. Link Status Figure 3-5 3.3.2 WAN Configuration The device supports 4 WAN interfaces:DATA, MGMT,OTHER1,OTHER2; Every WAN interface provides the following five Internet connection types: Static IP,DHCP,PPPoE,PPTP,L2TP. - Page 13 Eltek R3601-W2 User Manual v.1.1 WAN-Static IP Figure 3-7 The following items are displayed on this screen: Enable: Enable this WAN interface (DATA can’t be disabled). ► Type: Select Static IP if your ISP has assigned a static IP address for ►...
- Page 14 Eltek R3601-W2 User Manual v.1.1 WAN-DHCP Figure 3-8 The following items are displayed on this screen: Enable: Enable this WAN interface (DATA can’t be disabled). ► Type: Select DHCP if your ISP assigns the IP address ► automatically. VLAN Enable: Optional.
- Page 15 Eltek R3601-W2 User Manual v.1.1 ► Device Type: Optional. ► Device Version: Optional. 3) PPPoE If your ISP (Internet Service Provider) has provided the account information for the PPPoE connection, please choose the PPPoE connection type (Used mainly for DSL Internet service).
- Page 16 Eltek R3601-W2 User Manual v.1.1 Service Name /AC Name: Optional. The service name and AC (Access ► Concentrator) name, which should not be configured unless you are sure it is necessary for your ISP. In most cases, leaving these fields blank will work.
- Page 17 Eltek R3601-W2 User Manual v.1.1 Secondary DNS: Optional. If a Secondary DNS Server address is ► available, enter it. Server IP: Enter the Server IP provided by your ISP. ► Username: Enter the Account Name provided by your ISP. If you are ►...
- Page 18 Eltek R3601-W2 User Manual v.1.1 WAN-PPTP Figure 3-11 The following items are displayed on this screen: Enable: Enable this WAN interface (DATA can’t be disabled). ► Type: Select PPTP if your ISP provides a PPTP connection. ► VLAN Enable: Optional. Enable VLAN to configure VLAN ID and VLAN ►...
-
Page 19: Lan Configuration
Eltek R3601-W2 User Manual v.1.1 Enable Encryption: Enable PPTP link encryption. ► Secondary Connection: Here allow you to configure the secondary connection. DHCP and Static IP connection types are provided. If Static is selected: IP Address: If Static IP is selected, configure the IP address of WAN ►... - Page 20 Eltek R3601-W2 User Manual v.1.1 LAN page Figure 3-12 1) Part 1: Configure LAN interfaces Click the Interface Name of existent LAN interface you want to modify. If you want to delete the entry, select it and click the Del (the VLAN1 is default existed, can’t be removed).
- Page 21 Eltek R3601-W2 User Manual v.1.1 ► End IP: If Enable DHCP Server is selected, enter the End IP address to define a range for the DHCP server to assign dynamic IP addresses. This address should be in the same IP address subnet with the IP address of this LAN interface.
-
Page 22: Wlan
Eltek R3601-W2 User Manual v.1.1 ► LAN Isolate: Check the box to prohibit the access between LAN interfaces. ► Auto Bridge: Check the box to dynamically create IPTV bridge for STB. ► DHCP Vendor ID: Vendor class identifier List (DHCP 60 option), support at most two vendor IDs. - Page 23 11b/g/n Wireless mode, this configuration is required. Two values of width are provided: 20MHz and 20/40MHz. The Service Set Identifier (SSID) is used to identify an 802.11 (Wi-Fi) network and it’s discovered by network sniffing/scanning. R3601-W2 provides up to four SSID. ► Enable: Enable or disable this entry of SSID.
- Page 24 Eltek R3601-W2 User Manual v.1.1 Configure WIFI PSK Security Figure 3-15 The following items are displayed on this screen: ► SSID: The SSID enabled in WLAN→Basic Settings page.Read only ► Authentication: The authentication type selected: WPA-PSK, WPA2-PSK, WPAPSK/WPA2PSK. ► Algorithm:...
- Page 25 Eltek R3601-W2 User Manual v.1.1 ► Key: Provide up to four key. You can select the key type HEX(10/26 char) or ASCII(5/13 char)) for encryption and then enter the key. HEX(10/26 char) and ASCII(5/13 char) formats are provided. Hex(10/26 char): format stands for any combination of hexadecimal digits (0-9, a-f, A-F) in the specified length.
- Page 26 Eltek R3601-W2 User Manual v.1.1 ► Session Timeout: Specify the session timeout in seconds, Enter 0 to not limit the timeout. 3.3.4.3 WPS Wi-Fi Protected Setup (WPS; originally Wi-Fi Simple Config) is a computing standard that attempts to allow easy establishment of a secure wireless home network.WPS currently supports two methods: Personal...
- Page 27 Eltek R3601-W2 User Manual v.1.1 Configure WIFI WPS-PBC Figure 3-19 The following items are displayed on this screen: ► Enable WPS: Enable or disable the WIFI WPS function globally. ► WPS Mode: Choose the WPS mode: PBC. ► PBC Set: If PBC mode is chosen, then click Simulation Connect.
- Page 28 Eltek R3601-W2 User Manual v.1.1 ► Enable WMM: Enable or disable the WIFI WMM function globally. WMM function can guarantee the packets with high-priority messages, being transmitted preferentially. It is strongly recommended enabled. 3.3.4.5 Clients Info Choose the menu Network→WLAN→Clients Info to load the following page.
-
Page 29: Modem
Eltek R3601-W2 User Manual v.1.1 Deny: deny the stations specified by entries in the list to access. To delete Wireless MAC Address filtering entries, select the entries and click the Del button. To Add a Wireless MAC Address filtering entry, click the Add button. - Page 30 Eltek R3601-W2 User Manual v.1.1 Configure 3G Modem-Basic Settings Figure 3-24 The following items are displayed on this screen: ► SP Network: Other or Swisscom. If it is not the target user, you need to select the other. ► Connect Mode: Manual or Auto. The default is Auto.
-
Page 31: Port Management
Eltek R3601-W2 User Manual v.1.1 ► DNS: The default is obtained from the dial-up network devices automatically. You can also configure DNS manually. ► TCP MSS: Configure TCP maximum segment, we recommend using the default value. ► MTU: Configure 3G link MTU, the default value is recommended ►... - Page 32 Eltek R3601-W2 User Manual v.1.1 Port Mirror Figure 3-27 The following items are displayed on this screen: ► Enable Port Mirror: Enable or disable port mirror. ► Destination Port: The duplicate of packets from Source Port will send to this destination port.
-
Page 33: Ipv6 Configuration
Eltek R3601-W2 User Manual v.1.1 3.3.7 IPv6 Configuration Choose the menu Network→IPv6 to load the following page. Configure IPv6 Figure 3-29 The following items are displayed on this screen: ► IP Stack Version: Choose the IP stack version to use. Provides the following three types: IPv4,IPv6,IPv4/v6. -
Page 34: Data Service
Eltek R3601-W2 User Manual v.1.1 LAN Configuration ► Enable LAN: If IPv6 or IPv4/v6 is choseN, select this to enable IPv6 stack on LAN. ► Link-Local Address: Select type of Link-Local address: Auto or Manual. If Manual is selected, you should specify address manually. - Page 35 Eltek R3601-W2 User Manual v.1.1 ARP Table Figure 3-31 3.4.1.3 Route Table Choose the menu Data Service→Status→Route Table to load the following page. Route Table Figure 3-32 3.4.1.4 Net State Choose the menu Data Service→Status→Net State to load the following page.
-
Page 36: Dhcp Server
Eltek R3601-W2 User Manual v.1.1 Net State Figure 3-33 3.4.2 DHCP Server 3.4.2.1 Static Address Assign Choose the menu Data Service→DHCP Server→Static Address Assign, and then you can view and add address which is assigned for clients. When you specify a static IP address for a client on the LAN, that client will always receive the same IP address each time when it accesses the DHCP server. - Page 37 Eltek R3601-W2 User Manual v.1.1 Add or Modify An Static Address Assign Entry Figure 3-35 The following items are displayed on this screen: Client IP Addres: The IP address reserved. ► Client Mask: The subnet mask of IP address reserved.
-
Page 38: Nat Config
Eltek R3601-W2 User Manual v.1.1 DHCP Relay Overview Figure 3-37 Choose the menu Data Service→DHCP Server→DHCP Relay to load the following page. Configure DHCP Relay Figure 3-38 The following items are displayed on this screen: Enable DHCP Relay: Enable or disable DHCP Relay. - Page 39 Eltek R3601-W2 User Manual v.1.1 3.4.3.1 Basic Settings Choose the menu Data Service→NAT Config→Basic Settings to load the following page. Basic Settings Figure 3-39 The following items are displayed on this screen: Max Nat Connections: Specify the maximum number of NAT ►...
- Page 40 Eltek R3601-W2 User Manual v.1.1 Add or Modify PAT Entry Figure 3-41 The following items are displayed on this screen: Enable: Enable or disable this PAT entry. ► Internet Port: Enter the service port provided for accessing external ► network. All the requests from internet to this service port will be redirected to the specified server in local network.
- Page 41 Eltek R3601-W2 User Manual v.1.1 The following items are displayed on this screen: Enable DMZ: Enable or disable DMZ globally. ► Click the Index in the entry you want to modify. If you want to delete the entry, select it and click the Del.
-
Page 42: Firewall Config
Eltek R3601-W2 User Manual v.1.1 3.4.4 Firewall Config 3.4.4.1 Attack Defense With Attack Defense function enabled, the device can distinguish the malicious packets and prevent the port scanning from external network, so as to guarantee the network security. Configure this for abnormal packets defense and flood attack defense. - Page 43 Eltek R3601-W2 User Manual v.1.1 host - set from a host to any port that is open and listening. If the packet is programmed to have the same destination and source IP address, when it is sent to a machine, via IP...
- Page 44 Eltek R3601-W2 User Manual v.1.1 Click the Add button to add a new entry. Add or Modify Service Type Entry Figure 3-47 The following items are displayed on this screen: Name: Name of this entry, it will be list in Internet Access-Ctrl page.
- Page 45 Eltek R3601-W2 User Manual v.1.1 Add or Modify Access Control Entry Figure 3-49 The following items are displayed on this screen: Action: The policy of this entry, Allow or Deny. It is the inverse of ► Policy. Read only. Enable Rule: Enable or disable this rule.
- Page 46 Eltek R3601-W2 User Manual v.1.1 Enable User Authentication: Enable or disable user authentication ► globally. If enabled, only the following list of users and passwords can access the Internet. Press Save button if you have modified this parameter. Click the Index in the entry you want to modify. If you want to delete the entry, select it and click the Del.
- Page 47 Eltek R3601-W2 User Manual v.1.1 Configure Page Push Figure 3-52 The following items are displayed on this screen: Enable Page Push: If enabled, push specified HTTP page to the browser ► when accessing the Internet for the first time. Push Http Url: Specifies the HTTP URL of the page you want to push.
- Page 48 Eltek R3601-W2 User Manual v.1.1 IP Limit: If enabled, allow only specific IP range to access the device ► from the Internet via WEB. IP Range: If IP Limit enabled, specifies the IPv4 address range that is ► only allowed to access to the device from the Internet via WEB.
- Page 49 Eltek R3601-W2 User Manual v.1.1 Intranet Web Access: Allow Access: If enabled, allow access to the device from the Intranet via ► telnet. IP Limit: If enabled, allow only specific IP range to access the device ► from the Intranet via telnet...
- Page 50 Eltek R3601-W2 User Manual v.1.1 IP Range: If IP Limit enabled, specifies the IPv4 address range that ► only allow access to the device from the Intranet via SSH. IPv6 Range: If IP Limit enabled, specifies the IPv6 address range that ►...
- Page 51 Eltek R3601-W2 User Manual v.1.1 Configure IP Filter Figure 3-57 The following items are displayed on this screen: IP Filter: If enabled, packet filtering is enabled by IP address. ► Policy: The policy for IP address list. Deny and Allow.
- Page 52 Eltek R3601-W2 User Manual v.1.1 If you want to delete an entry, select it and click the Del. Click the Add button to add a new entry. There are two ways to add MAC: Artificial designated MAC: You can manually enter a MAC.
-
Page 53: Qos
Eltek R3601-W2 User Manual v.1.1 Configure IP&MAC Binding Figure 3-60 3.4.5 QoS 3.4.5.1 Basic Settings QOS feature is enabled by default, based on 802.1P, strict priority scheduling mode. The device supports four priority queues, when QOS feature enabled. Choose the menu Data Service→QoS→Basic Settings to load the following page. - Page 54 Eltek R3601-W2 User Manual v.1.1 Scheduling Mode: PQ: PQ means strict priority, that is, when ► congestion occurs, first sending packets of high priority queue. WRR: All queues use weighted fair queuing scheme which is defined in Weight Ratio PQ+WRR: Only highest queue use strict priority;...
- Page 55 Eltek R3601-W2 User Manual v.1.1 3.4.5.2 Port Rate Limit Rate limit for physical LAN ports, you can select the package type restrictions limiting the entrance. All multiples of 32kbps speed requirements Choose the menu Data Service→QoS→Port Rate Limit to load the following page.
- Page 56 Eltek R3601-W2 User Manual v.1.1 Configure Qos Flow Rate Limit Figure 3-64 The following items are displayed on this screen: IP Range: The IP range of LAN’s PC. ► Active Time: If not configured, which means that all time are in ►...
- Page 57 Eltek R3601-W2 User Manual v.1.1 Port Range: Set port range. ► 3.4.5.4 Service The device supports to remap scheduling priority and remark the value of DSCP or 802.1P according to the service type. Choose the menu Data Service→QoS→Service to load the following page.
- Page 58 Eltek R3601-W2 User Manual v.1.1 Modify Qos ACL Figure 3-68 The following items are display on this page: Condition: ► Rule Name: The custom name. ► Physical Port: Rule’s source port ► Rule Type: Type of rule: L2 data or L3 data.
-
Page 59: Ddns
Eltek R3601-W2 User Manual v.1.1 L2 Data Rule Type Figure 3-70 The following items are display on this page: ► SRC MAC: Source MAC address of packets. ► DEST MAC: Destination MAC address of packets. ► Ether Type: The ether type of packets. - Page 60 Eltek R3601-W2 User Manual v.1.1 Configure DDNS Figure 3-71 The following items are display on this page: ► DDNS Enable: Active or inactive dynamic DNS service. ► Username: Enter account name of your DDNS account. ► Password: Enter password of your DDNS account.
-
Page 61: Vpn
Eltek R3601-W2 User Manual v.1.1 ► DDNS Status: Display the status of DDNS service. Read only. Click the Save button when finished. Click Refresh button to refresh the web page. 3.4.7 VPN VPN (Virtual Private Network) is a private network established via the public network, generally via the Internet. - Page 62 Eltek R3601-W2 User Manual v.1.1 L2TP IP network of UDP Multiple 4 bytes at Supported tunnels least Difference between L2TP and PPTP Figure 3-73 Choose the menu Data Service→VPN→PPTP Server to load the following page. Configure PPTP Server Figure 3-74...
- Page 63 Eltek R3601-W2 User Manual v.1.1 Password: Enter the password of PPTP tunnel. It should be configured ► identically on server and client. Binding IP: Enter the IP address of the client which is allowed to connect to ► this PPTP server.
- Page 64 Eltek R3601-W2 User Manual v.1.1 Add or Modify L2TP Client Entry Figure 3-77 The following items are displayed on this screen: Username: Enter the account name of L2TP tunnel. It should be configured ► identically on server and client. Password: Enter the password of L2TP tunnel. It should be configured ►...
- Page 65 Eltek R3601-W2 User Manual v.1.1 information in Phase 2. During phase 2, the IKE peers use the ISAKMP SA established in Phase 1 to negotiate the parameters for security protocols in IPSEC and create IPSEC SA to secure the transmission data.
- Page 66 Eltek R3601-W2 User Manual v.1.1 SHA1: SHA1 (Secure Hash Algorithm) takes a message less than 2^64 (the 64th power of 2) in bits and generates a 160-bit message digest. DH Group: Select the DH (Diffie-Hellman) group to be used in key ►...
- Page 67 Eltek R3601-W2 User Manual v.1.1 Main: Main mode provides identity protection and exchanges more information, which applies to the scenarios with higher requirement for identity protection. Challenge: Challenge Mode establishes a faster connection but with lower security, which applies to scenarios with lower requirement for identity protection.
- Page 68 Eltek R3601-W2 User Manual v.1.1 Proposal Name: Specify a unique name to the IPSEC Proposal for ► identification and management purposes. The IPSEC proposal can be applied to IPSEC policy. IPSec Protocol: Select the security protocol to be used. Options ►...
- Page 69 Eltek R3601-W2 User Manual v.1.1 Add or Modify IPSEC Safety Policy Entry Figure 3-85 The following items are displayed on this screen: Enable Ipsec: Enable or disable this IPSEC entry. ► IPSEC Policy Name: Specify a unique name to the IPSEC policy.
-
Page 70: Routing
Eltek R3601-W2 User Manual v.1.1 3.4.8 Routing 3.4.8.1 Static Route 3.4.8.1.1 IPv4 Choose the menu Data Service→Routing→Static Route→IPv4 to load the following page. Configure IPv4 Static Route Figure 3-86 The following items are displayed on this screen: ► Enable: Select it to add and modify the current route. Conversely, disable the current route. - Page 71 Eltek R3601-W2 User Manual v.1.1 Configure IPv6 Static Route Figure 3-87 The configuration options of Ipv6 is similar to Ipv4, the prefix length is equal to mask of Ipv4 address. 3.4.8.2 Policy Route Choose the menu Data Service→Route→Policy Route to load the following page.
- Page 72 Eltek R3601-W2 User Manual v.1.1 Add or Modify Policy Route Figure 3-89 The following items are displayed on this page: ► Enable PoliceRoute: Enable or disable the entry ► Next Hop Type: Select from pull-down list: Interface, Address. ► Interface: Specify the interface of next hop for the entry.
- Page 73 Eltek R3601-W2 User Manual v.1.1 Add or Modify RIP Service Entry Figure 3-91 The following items are displayed on this page: ► Interface: Specify the interface for the entry. ► Receive RIP Version: Specify receiving RIP version for the entry.
-
Page 74: Advanced Parameters
Eltek R3601-W2 User Manual v.1.1 Add or Modify RIP Key Chain Entry Figure 3-93 The following items are displayed on this page: ► Key ID: Enter the ID of the entry. ► Key String: Enter the Key of the entry. -
Page 75: Multicast
Eltek R3601-W2 User Manual v.1.1 Enable UPnP: Enable or disable the UPnP function globally. ► Upstream Interface: The network interface connected to the DLNA ► server. Downstream Interface: The network interface connected to the DLNA ► client. 3.4.10 Multicast Choose the menu Data Service→Multicast to load the following page. -
Page 76: System
Eltek R3601-W2 User Manual v.1.1 Access Right: Select access right from pull-down list, Read or ► Read/Write. 2) USB Storage Scan the partitions of USB Storage by click Rescan button and umount specified partition by clicking Umount button. Click start to start service, click stop to stop service. - Page 77 Eltek R3601-W2 User Manual v.1.1 Time Manual Configuration Figure 3-100 The following items are displayed on this screen: Configuration mode: Specify configuration mode of time, Auto ► Configuration or Manual Configuration, default is Manual Configuration. System Time: Enter the system time under Manual Configuration.
-
Page 78: Upgrade
Eltek R3601-W2 User Manual v.1.1 Auto Configuration Choose Auto Configuration to load the following page: Time Auto Configuration Figure 3-101 The following items are displayed on this screen: Enable NTP: Enable or disable NTP service. ► NTP Service Mode: Specify CPE role as NTP Client or both Client and ►... -
Page 79: Reboot System
Eltek R3601-W2 User Manual v.1.1 1) Choose menu “SystemUpgrade”, then select the right configuration file, click Upgrade, wait a seconds for downloading and programming. 2) Choose menu“System Reboot”, then click Reboot button to reset the device. 3.5.2.2.2 Export Configuration Configuration exporting via WEB interface is available. Click the "Export Configuration File"... - Page 80 Eltek R3601-W2 User Manual v.1.1 Ping Diagnostic Figure 3-103 The following items are displayed on this screen: ► Ping: Enter the IP Address or Domain Name of the PC whose connection you wish to diagnose. ► Ping Count: Specifies the number of Echo Request messages sent.
-
Page 81: User Management
Eltek R3601-W2 User Manual v.1.1 ► Interface: By selecting the interface, only packets through this interface will be captured. ► Protocol: By selecting the protocol, only packets of this protocol will be captured. ► Tcpdump: Enter some options of tcpdump(e.g. -n -s0 -c 100) ►... -
Page 82: System Log
Eltek R3601-W2 User Manual v.1.1 ► Username: You can select the user with different permissions. However, you can not select the user whose permission is higher than your permission. ► New Password: Enter the new password for specified user, not more than 32 characters, and the space is not supported. -
Page 83: Tr069
Eltek R3601-W2 User Manual v.1.1 Display System Log Figure 3-108 Click the Export button to export all the local logs as a file. Click the Clear button to clear all the local logs from the device permanently, not just from the page. - Page 84 Eltek R3601-W2 User Manual v.1.1 Configure TR069 Figure 3-109 The following items are displayed on this screen: ► Serial Number: The serial number of device. Read only. ► Enable: Enable or disable the TR069 function globally. ► ACS Address: Enter the IP address or domain name of ACS.
-
Page 85: Snmp
Eltek R3601-W2 User Manual v.1.1 ► Connection Request Password: Password used to authenticate an ACS making a Connection Request to the CPE. ► CPE Server Name: A part of the HTTP URL for an ACS to make a Connection Request notification to the CPE. In the form:http://host:port/path ►... -
Page 86: User Access Right
Eltek R3601-W2 User Manual v.1.1 ► Backup Server Address or Domain: Enter the IP Address or Domain Name of Backup Register Server. ► Backup Server Port: Enter the port of Backup Register Server. ► Registration Status: The status of registration. Read only. -
Page 87: Apply
Eltek R3601-W2 User Manual v.1.1 Modify User Access Right Figure 3-112 3.6 Apply Follow the prompts,Some parameters will take effect after click the button of “Apply”. Page 82 of 82... -
Page 88: Print Function
Eltek R3601-W2 User Manual v.1.1 Apply Figure 3-113 3.7 Print Function The device supports to link printer port and provides share printing capabilities to other computers. To use print function, you need do the following steps. 1. Add Printer Open the windows of the Control Panel, select Printers and Faxes, and add the... - Page 89 Eltek R3601-W2 User Manual v.1.1 Connecting local printer Figure 3-115 3. Create a new port Select "Create a new port" and select "Standard TCP / IP Port" Create a new port Figure 3-116 Page 84 of 82...
- Page 90 Eltek R3601-W2 User Manual v.1.1 4. Add print device Click Next, and add IP devices, assuming the device IP is 192.168.1.1. Add IP LAN devices Figure 3-117 5. Configure printer port Select "Custom", click "Settings" to confirm the agreement as "RAW (R)"...
- Page 91 Eltek R3601-W2 User Manual v.1.1 Configuer printer port Figure 3-118 6. Add Printer Driver According to the printer manufacturer and printer type, select the appropriate driver. If the computer has not printer driver, you need to install the printer driver.
- Page 92 Eltek R3601-W2 User Manual v.1.1 Add Printer Driver Figure 3-119 Page 87 of 82...
Need help?
Do you have a question about the R3601-W2 and is the answer not in the manual?
Questions and answers