Table of Contents
Advertisement
Advertisement
Table of Contents

Related Manuals for no!no! Micro


Summary of Contents for no!no! Micro
-
Page 1: Getting Started
Getting Started Visit www.HowToNoNo.com for Videos, Tips & Tricks... -
Page 2: Table Of Contents
Contents Gliding no!no! Getting to Know no!no! About Blue and Red Light Getting to Know no!no! Treating Facial Hair Safety Warnings After Every Treatment: Buff Cautions Taking Care of Your no!no! What to Expect Where to Use Troubleshooting and Technical Specifications How to no!no! Troubleshooting... -
Page 3: Getting To Know No!No
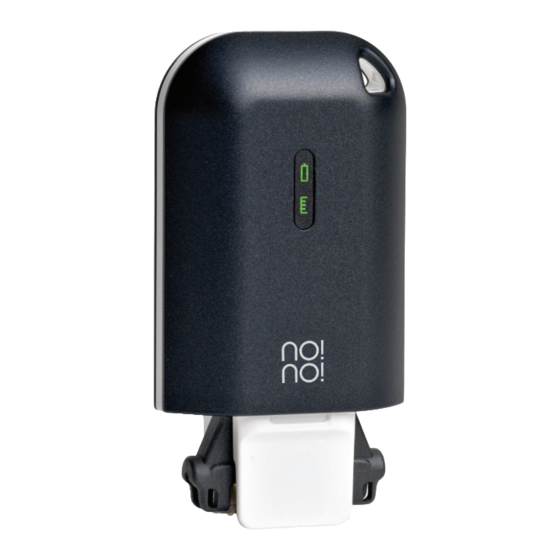
The no!no! Device Treatment Level Icon Battery Icon On/Off Button Cover Getting to Know no!no! is suitable for home use on all skin types and hair colors. no!no! ® It is intended for both women and men, and is designed for the Power Supply Connection removal of body and facial hair through sustained periodic treatment. -
Page 4: Safety Warnings
Safety Warnings Do not allow the thermodynamic wire inside the Thermicon Tip to touch your skin. When using this product... Only use this device for its intended purpose as described in this Do not use this device on the genitals or nipples. Getting Started guide. -
Page 5: Cautions
Cautions To reduce the risk of fire, electrical shock, etc. > Do not use this device near or rest it on flammable objects such as paper, cloth etc. > Do not reach for a device that has fallen into water while it was plugged in. Unplug the Charger before removing the device from the water. -
Page 6: What To Expect
Where to Use no!no! WOMEN can use on: WOMEN DO NOT use on: Face Nipples Genitals Around the Eye Area or Eyebrows Underarms Arms Bikini Line Legs MEN can use on: DO NOT use on: What to Expect While Using the no!no! Face Nipples Neck... -
Page 7: Quick Introduction To No!No
A Quick Introduction to no!no! READ this entire GETTING STARTED guide before using the no!no! to ensure safety and results. Wide Get Started Narrow Charge Choose Insert Tip Turn On Glide Buff & Uncover... -
Page 8: Before Your First Treatment
Select Your Thermicon Tip Before Your First Treatment Full Icon CHARGE the device for at least 5 hours. > Charging is complete when the green Battery icon on the Status Screen stops blinking. > Unplug the Charger from the wall and the device once charging is complete. - Page 9 Insert the Thermicon Tip INSERTING the Thermicon Tip When to REPLACE the Thermicon Tip > Make sure the device is > If the guiding light turns red. turned off. > If it is no longer working > Hold no!no! in one hand and efficiently.
-
Page 10: Gliding No!No
It is best to glide towards your body against the grain of the hair growth. > However, if it is more comfortable you may glide in other directions, but always in the direction of the Status Screen. > Use a STEADY, SMOOTH and EVEN motion. If you move too slowly, the device will not activate;... -
Page 11: About Blue And Red Light
Glide no!no! on Rounded Areas About the Blue and Red Light The Blue Light under the Thermicon Tip will guide you > Make sure you practice on smooth even skin like your legs or arms throughout your treatment. It is visible only when you before moving to the face, knees, underarms or bikini line. -
Page 12: Treating Facial Hair
Treating Facial Hair [FIGURE E] > TEST no!no! on a small, discreet > If you need to, pull your skin area of the face to see how your tight and/or purse your lips skin reacts. inward to help create a smooth, straight surface. -
Page 13: After Every Treatment: Buff
Taking Care of Your no!no! After Every Treatment: Buff Buffing exfoliates, removes treated hair and leaves your skin feeling smooth. NOTE: Do not use any liquid to clean the device, Thermicon Tips or Rollers. Without buffing, treated hair remains on the skin leaving a prickly feeling. Keep the Thermicon Tips and Roller clean to lower the risk of malfunction Hold the Buffer and prolong the life of the Tips. -
Page 14: Troubleshooting
Design and technical specifications > Increase gliding speed. are subject to change without notice. Manufacturer Charger Rating: Input no!no! MICRO complies with the If the Red Light comes on: 100-240VAC/50-60Hz. 0.2A Output Radiancy (Israel) Ltd. following international standards 8.4VDC 0.5A... -
Page 15: Customer Support
Warranty Symbols on Device Manufacturer Customer Support On/Off Switch Radiancy (Israel) Ltd. US & Canada Customer Support: 5 Hanagar Street 888.525.7580 Limited Warranty: verify the date of purchase. Any at the time the product was Hod Hasharon, 4501307 CE mark represents alteration or amendment of the received;... - Page 16 implied in law, including the where the manufacturer is located. warranties of merchantability and For more information visit fitness for a particular purpose. www.my-no-no.com. Manufacturer shall not be liable for any incidental or consequential damages that result from the use of this device.
- Page 18 LIT-00393/Rev. A01/December 2015 WY1720C...
Need help?
Do you have a question about the Micro and is the answer not in the manual?
Questions and answers