Table of Contents
Advertisement
Quick Links
Download this manual
See also:
Service Manual
Advertisement
Chapters
Table of Contents

Related Manuals for Panasonic NV-MD10000GC


Summary of Contents for Panasonic NV-MD10000GC
-
Page 1: Operating Instructions
使用說明書 Operating Instructions 數位攝錄影機 Digital Video Camera NV-MD10000GC Model No. 使用前,請仔細閱讀本說明書。 Before use, please read these instructions completely. VQT0S76... -
Page 2: 安全注意事項
安全注意事項 ª 警告 請勿卸下機身的前蓋 ( 或後蓋 ); 機身內沒有用戶可維修的部 件。 需要維修時、請聯係授權的維修人員。 由於本設備使用時會變熱、請在空氣流通的地方進行操 作、不要將此設備安置在狹窄的空間內、例如書櫃或類似 請僅使用推薦的附件。 的地方。 若想降低火災、電擊或產品損壞的危險、請勿將本設備暴 露於雨中、潮濕、滴水或濺水的環境中、並確保勿將盛滿 電源插座應當安置在本設備附近、並便於連接、或者電源 液體的物體 ( 如花瓶 ) 放在本設備上。 插頭或電器耦合器保持在隨時可以使用的狀態。 攝錄影機 ≥標牌位於攝錄影機下部。 ª 如何更換保險絲 保險絲的位置根據 AC 電源線類型的不同而有所不同 AC 適配器 (圖 A 與 B) 。 ≥標牌位于 AC 適配器的下面。 確保使用合適的... -
Page 3: Table Of Contents
中文 目錄 安全注意事項 ................2 重播模式 重播錄影帶 ................24 使用之前 慢動作重播 / 逐格重播 ............24 變速搜索功能................25 附件..................4 在電視機上重播 ..............25 可選件 ..................4 部件的識別和操作 ..............4 編輯模式 鏡頭蓋和手執帶................ 6 安裝肩背帶 ................6 複製到 DVD 錄影機或 VCR 中 ( 配音 ) ........26 使用... -
Page 4: 可選件
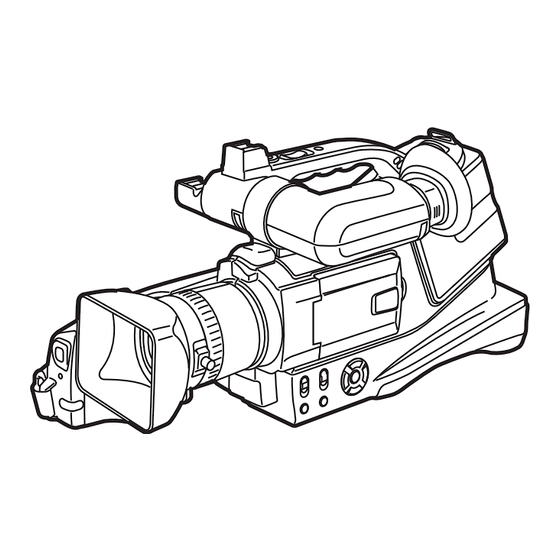
使用之前 部件的識別和操作 使用之前 附件 攝錄放影機 ª 隨本攝錄放影機共有下列附件一起提供。 (6) (7) (10) CAMERA AUTO MANUAL FOCUS POWER MENU (11) (12) 聚焦環 -23- 白色平衡傳感器 -22- 錄影指示燈 -30- 遙控傳感器 -13- 鏡頭 鏡頭遮光罩 鏡頭遮光罩安裝鈕 ≥勿在鏡頭罩前面安裝其他轉換鏡頭。鏡頭罩上沒有供安裝的底 1) AC 適配器、DC 輸入線、AC 電源線 座。 A 中華人民共和國香港特別行政區以及沙烏地阿拉伯 ≥當您打算將廣角轉換鏡頭 (VW-LW4307ME; 選購件 )、MC 保 B 中華人民共和國香港特別行政區以及沙烏地阿拉伯以外... - Page 5 使用之前 (13) (25) (26) (27) (18) (14) (15) (28) (19) (16) (29) (17) (30) (31) (32) (33) 眼罩 (13) -36- 取景器 (14) -36- 肩背帶 (25) 次變焦桿 [W/T] (26) -18- -24- 由於 LCD 生產技術的限制、在取景器熒屏上 次拍攝開始 / 停止鍵 (27) -17- 可能會有一些微小的亮點或者暗點。 但這不 電池推出鍵...
-
Page 6: 鏡頭蓋和手執帶
使用之前 鏡頭蓋和手執帶 安裝肩背帶 進行室外拍攝之前、建議您裝上肩背帶、以免摔落攝錄影機。 安裝鏡頭蓋 ª 把肩背帶的一端穿到攝錄影機的肩背帶安裝槽內。 為保護鏡頭表面、本機裝備了鏡頭蓋。 再把肩背帶的一端穿入肩背帶長度調節器中、拉出此端頭。 手執帶的調節 ª 請調節手執帶的長度、以適合您手的大小。 拉開手執帶的頂端。 ≥拉出的端頭長度距離肩背帶長度調節器要在2 釐米以上1 以 防止帶子滑出來。 使用 顯示屏 可以在打開的 LCD 顯示屏上一邊觀看影像、一邊進行拍攝 。 一邊按 [PUSH OPEN] 鍵、一邊同時依箭頭所示、將 LCD 顯示 屏外撥約 90o。 調節長度。 重新裝好手執帶。 PUSH OPEN ≥取景器將關閉。 調整 LCD 顯示屏的角度、達到您滿意的程度。 1 180o 2 90o ≥它能朝鏡頭方向轉動... -
Page 7: 使用取景器
使用之前 使用取景器 電源 使用取景器 電池的充電 ª ª 拉出取景器,捏住取景器延長部分上下轉動。 當您買到本產品時、電池是未充電的。 在使用本產品前、請先 給電池充電。 ≥電池的充電時間 ( ≥我們建議使用松下的電池。 ≥如果使用了其他品牌的電池、我們不能保證本產品的質量。 ≥如果 DC 輸入線被連接到 AC 適配器、則電池將不能被充電。 從 AC 適配器上取下 DC 輸入線。 把 AC 電源線連接到 AC 適配器和 AC 電源插座。 對准標記把電池放到電池安裝座上、然後再把電源插頭牢牢 地插進去。 調整視野 ª 滑動目鏡校正器的旋鈕調整焦距。 充電指示燈 ª 點亮: 充電正在進行... -
Page 8: 充電時間和可拍攝時間
使用之前 充電時間和可拍攝時間 裝入電池 ª 把電池頂靠在電池座上、並滑動電池、直到發出哢噠一聲。 下表所列出的時間為在 25 oC 的溫度下和 60% 的濕度下的時 間。 該表謹作為指導。 如果溫度高於或低於規定值、則充電時 間將會變長。 1 h 30 min 提供的電池 (7.2 V/1350 mAh) 2 h 40 min (2 h 25 min) 1 h 20 min (1 h 15 min) CGR-D08S (7.2 V/800 mAh) 1 h 50 min (1 h 45 min) 55 min (55 min) -
Page 9: 插入 / 取出錄影帶
使用之前 插入 取出錄影帶 插入 / 取出錄影帶 ª ≥當錄影帶倉正在運作時、不要觸動任何部分、除 [PUSH] 標記 滑動 [OPEN/EJECT] 桿、打開錄影帶倉蓋。 以外。 ≥當插入先前已經錄製過的錄影帶時、請使用空白搜索功能找出 您想繼續進行錄製的位置。 如果在一個先前錄製過的錄影帶上 進行覆蓋錄製、一定要找到您想繼續進行錄製的位置。 ≥請關嚴錄影帶倉蓋。 ≥在關閉錄影帶倉蓋時、不能讓任何物品、如電纜、捲入到倉蓋 內。 防止意外擦除 ª 如果打開了錄影帶上的防止意外擦除滑塊 1 ( 朝 [SAVE] 箭頭方 向滑動 )、就不能在這個錄影帶上進行拍攝。 當拍攝時、要關閉 錄影帶的防止意外擦除滑塊 ( 朝 [REC] 箭頭方向滑動 )。 ≥當倉蓋完全打開時、將露出錄影帶倉。 在錄影帶倉打開後、插入 / 取出錄影帶。 R E C SAVE ≥在插入錄影帶時、請按圖示方向插入、然後牢牢插入直到不... -
Page 10: 打開攝錄放影機
使用之前 打開攝錄放影機 使用螢幕顯示 如果在鏡頭蓋未取下的情況下打開攝錄放影機、自動白平衡調 按游標鍵中間的 [ 進入 ] 鍵、螢幕上將出現圖示。 根據模式的不 整可能無法正常工作。 請取下鏡頭蓋後、再打開攝錄放影機。 同、每按一次顯示將如下所示進行切換。 (在錄影帶重播模式中、圖示將自動顯示在螢幕上。) 接通電源的方法 ª 將 [OFF/ON] 開關設置為 [ON]。 ≥電源指示燈點亮。 1) 錄影帶拍攝模式 ([AUTO/MANUAL/FOCUS] 開關設置為 [AUTO]) 關閉電源的方法 ª 將 [OFF/ON] 開關設置為 [OFF]。 ≥電源指示燈熄滅。 長焦微距 -20- 肌膚柔和模式 -20- 漸變 -20- 逆光補償 -19- 夜視... -
Page 11: 轉換語言
使用之前 轉換語言 按 [3] 或 [4] 鍵選擇要設定的項目。 可以在熒屏的顯示上或菜單熒屏上轉換語言。 設置 [LANGUAGE] >> [ 中文 ( 繁 )]。 按 [ 進入 ] 鍵確定設定。 使用菜單熒屏 關於每個單獨的菜單、請參見 。 -29- 按 [MENU] 鍵。 ª 退出菜單熒屏 按 [MENU] 鍵。 回到前一個熒屏 ª 按 [2] 鍵。 MENU ≥顯示出與模式開關所選模式相對應的功能表。 ≥當顯示功能表時、不要切換模式開關。... -
Page 12: 設置日期和時間
使用之前 設置日期和時間 調整 顯示屏 取景器 如果熒屏顯示出不正確的日期 / 時間、則請進行調整。 調整亮度及色彩級別 ª ≥設置為錄影帶拍攝模式。 設置 [ 設定 ] >> [LCD 設定 ] 或 [EVF 設定 ] >> [ 是 ]。 設置 [ 基本功能 ] >> [ 時鐘設定 ] >> [ 是 ]。 按 [3] 或 [4] 鍵選擇要調整的項目。 按... -
Page 13: 使用遙控器
使用之前 使用遙控器 安裝鈕扣型電池 ª 使用前要把提供的鈕扣型電池安裝到遙控器內。 遙控器 ª 在按下止動鍵 1 的同時、拖出電池座。 使用隨機提供的遙控器可以控制本攝錄放影機幾乎所有的功能。 START/ DATE/ PHOTO STOP TIME SHOT ZOOM 安裝鈕扣型電池時要使 (i) 標記朝上、然後再把電池座放回原 ¥ A.DUB 處。 /REW PLAY STILL ADV PAUSE STILL ADV STOP VAR. MENU SEARCH ENTER 注意事項 如果更換電池的操作方法不正確、會有發生爆炸的危險。 日期 / 時間鍵 [DATE/TIME] -30- 更換時、只允許使用由設備製造廠推薦的相同或同等型號... -
Page 14: 使用外部立體聲麥克風
使用之前 使用外部立體聲麥克風 選擇遙控模式 ª 如果同時使用 2 台攝錄放影機、把其中一套攝錄放影機和遙控 外部立體聲麥克風 器設置為 [VCR1]、另一套設置為 [VCR2]。 這將防止 2 套攝錄 ª 放影機之間互相干擾。 ( 缺省設置是 [VCR1]。 當更換鈕扣型電 可以將附帶的外部立體聲麥克風切換至立體聲或單聲錄音狀態。 池時、設置將恢復為缺省值 [VCR1]。) (2) (3) (4) 在攝錄放影機上設置: 設置 [ 設定 ] >> [ 遙控 ] >> [VCR1] 或 [VCR2]。 在遙控器上設置: STILL ADV PAUSE STILL ADV STOP... - Page 15 使用之前 將麥克風安裝在攝錄影機上 切換 [WIND CUT OFF/ON] 開關時 ª ª 將麥克風安裝在攝錄影機底座上。 該麥克風裝備了風聲抑制功能。這種設計雖然可遮斷風聲噪音、 但是當風太大、而風聲抑制功能仍無法降低噪音時、請將 [WIND CUT OFF/ON] 開關切換至 [ON]、以進一步減少風聲噪 音。 [OFF]: 一般情況下、應該在該位置來使用麥克風。 將 [WIND CUT OFF/ON] 開關設定在該位置、可減少風 [ON]: 聲噪音或低頻噪音。 ≥儘管您可以在拍攝中改變 [WIND CUT OFF/ON] 開關的設定 值、但可能會記錄下切換聲。在改變該開關的設定值之前、請 暫停拍攝。 1) 鬆開底座鎖頭。 關於外部立體聲麥克風 ª 2) 裝上麥克風。 ≥勿將殺蟲劑或揮發物噴灑在麥克風上。...
-
Page 16: 拍攝前的檢查
拍攝模式 拍攝模式 為了獲得更穩定的畫面時。 拍攝前的檢查 在給重大的事件進行拍攝時、如在婚禮等場合、為了確保能夠 正常拍攝影像和聲音、並知道如何使用攝錄放影機、請先進行 試拍。 握住攝錄影機進行拍攝 ª 普通拍攝。 ≥請將手肘放在桌子或其它穩定的水平表面來穩定攝錄影機。 檢查要點 ª ≥取下鏡頭蓋。 ( ( 如果在鏡頭蓋未取下的情況下打開攝錄放影機、自動白平衡 調整可能無法正常工作。 請取下鏡頭蓋後、再打開攝錄放影 機。) ≥手柄帶的調整 ( ≥電源 ( ≥插入錄影帶 ( ≥當邊行走邊拍攝時、請始終掙開雙眼、以便能夠看清行走路線 ≥設置日期 / 時間 ( -12- 和周圍發生的情況。 ≥調整 LCD 顯示屏 / 取景器 ( -12- ≥將攝錄影機擱在右肩上、然後用雙手牢固地將其握住。... -
Page 17: 在錄影帶上錄製
拍攝模式 拍攝模式 在錄影帶拍攝模式下熒屏上的顯示內容 ª ª 可以切換錄影帶拍攝模式。 ≥設置為錄影帶拍攝 / 重播模式。 設置 [ 基本功能 ] 或 [ 進階功能 ] >> [ 拍攝速度 ] >> [SP] 或 [LP] 。 0h00m10s00f 如果選擇了 LP 模式、則攝錄時間將會是 SP 模式的 1.5 倍、但 R 0:30 是有一些功能將不能使用。 ≥對於重大事件的拍攝、我們建議使用 SP 模式。 ≥為了完全發揮... -
Page 18: 放大 / 縮小功能
拍攝模式 放大 縮小功能 調節麥克風靈敏度級 光學放大可達 10k。 您可調節錄音用麥克風的靈敏度。 ≥設置為錄影帶拍攝模式。 設定 [ 進階功能 ] >> [ 麥克風聲量 ] >> [ 自動 ] 、 [ 設定 rAGC] 或 廣角拍攝 ( 縮小 ): [ 設定 ]。 向 [W] 方向推動 [W/T] 桿 (或次變焦桿) 。 特寫拍攝 ( 放大 ): 向... -
Page 19: 逆光補償功能
拍攝模式 自拍 夜視功能 可以一邊看著 LCD 顯示屏、一邊拍攝自己。 可以拍攝位於攝錄 本項功能可使您拍攝暗處的彩色物體、使它在背景上突出出來。 放影機前的人物、同時給他們提供影像。 影像成水平反轉的形 將攝錄放影機安裝到三腳架上、就可以拍攝到沒有振動的影像。 ≥只能使用手動對焦。 式、就好像您從鏡子裏面所看到的影像是一樣的。 ( 打算拍攝的 ≥所拍攝的場景看起來似乎是缺少了邊框。 影像就是那個正在拍攝的影像。) 把 LCD 顯示屏轉向鏡頭的一側。 彩色夜視功能 可以把黑暗的地方拍攝得色彩明亮。 0 勒克斯夜視功能 可以使用 LCD 顯示屏上的照明來拍攝完全黑暗的地方。 ≥設置為錄影帶拍攝模式。 按 [ 進入 ] 鍵直到圖示 1 出現。 按 [3] 鍵選擇夜視圖示 [ ]。 ≥當... -
Page 20: 肌膚柔和模式
拍攝模式 肌膚柔和模式 淡入 淡出功能 這種模式可以使皮膚的色彩拍攝得更柔和一些。在拍攝人物的 淡入 半身像時、這一模式更加有效。 影像和聲音漸漸出現。 ≥設置為錄影帶拍攝模式。 淡出 按 [ 進入 ] 鍵直到圖標 1 出現。 影像和聲音漸漸消失。 ≥設置為錄影帶拍攝模式。 按 [4] 鍵選擇肌膚柔和圖示 [ ]。 按 [ 進入 ] 鍵直到圖標 1 出現。 按 [2] 鍵選擇漸變圖示 [ ]。 ª 取消肌膚柔和模式 再次選擇 [ ] 指示。... -
Page 21: 錄製供寬銀幕電視使用的影像
拍攝模式 錄製供寬銀幕電視使用的影像 在不同情況下拍攝 場景模式 這種操作方法可以使您錄製出與寬銀幕電視相兼容的影像。 在各種不同情況下拍攝影像時、此模式可自動將快門速度和光 寬屏電影功能 圈設置為最佳值。 ≥設置為錄影帶拍攝模式。 拍攝的影像的銀幕的上、下兩處帶有黑色的條帶、所以看起來 就像是電影一樣。 將 [AUTO/MANUAL/FOCUS] 開關設置為 [MANUAL]。 ≥設置為錄影帶拍攝模式。 設置 [ 進階功能 ] >>[ 寬屏電影模式 ] >> [ 開 ]。 CINEMA AUTO MANUAL 取消寬屏電影功能 ª FOCUS 設置 [ 進階功能 ] >>[ 寬屏電影模式 ] >> [ 關 ]。 設置... -
Page 22: 用自然色彩拍攝 ( 白平衡 )
拍攝模式 用自然色彩拍攝 白平衡 關於白平衡感測器 ª 白平衡感測器能在拍攝時檢測光源的類型。 根據場景或照明條件的不同、自動白平衡功能可能不能再現自 ≥拍攝時不要遮蓋白平衡感測器、否則將無法正常工作。 然的色彩。 在這種情況下、可以手動調整白平衡。 ª 關於黑平衡調整 ≥設置為錄影帶拍攝模式。 這是 3CCD 系統功能之一、當白平衡在手動調整模式下設置時 將 [AUTO/MANUAL/FOCUS] 開關設置為 [MANUAL]。 自動調整黑色。 當調整黑平衡時、熒屏將暫時變黑。 AUTO MANUAL 1 黑平衡調整 ( 閃爍。) FOCUS 2 白平衡調整 ( 閃爍。) 3 調整完成 ( 點亮。) 按 [4] 鍵直到出現白色平衡指示。 ([ ] 等... -
Page 23: 手動對焦調整
拍攝模式 手動對焦調整 手動快門速度 光圈調整 如果因條件所致難以自動對焦、可以手動調整焦距。 快門速度 ≥設置為錄影帶拍攝模式。 當拍攝快速移動的物體時、需要調整快門速度。 將 [AUTO/MANUAL/FOCUS] 開關設置為 [MANUAL]。 光圈 當熒屏太亮或太暗時、需要調整光圈。 ≥設置為錄影帶拍攝模式。 將 [AUTO/MANUAL/FOCUS] 開關設置為 [MANUAL]。 AUTO MANUAL FOCUS AUTO 將 [AUTO/MANUAL/FOCUS] 開關設置為 [FOCUS]。 MANUAL FOCUS 按 [4] 按鈕直到出現快門速度指示或光圈值指示時為止。 AUTO 1/50 OPEN MANUAL FOCUS 1/50 1/1000 F2.0 ≥將顯示... -
Page 24: 重播錄影帶
重播模式 慢動作重播 逐格重播 重播模式 ≥設置為錄影帶重播模式。 ( 只能用遙控器進行慢動作重播。) 重播錄影帶 慢動作重播 ≥設置為錄影帶重播模式。 如果影像是以 SP 模式錄製的、則將以正常速度的 1/5 重播。 如果影像是以 LP 模式錄製的、則將以正常速度的 1/3 重播。 在重播過程中、按遙控器上的 [E] 鍵或 [D] 鍵。 /REW PLAY CAMERA STILL ADV PAUSE STILL ADV STOP 用游標鍵操作。 ≥如果慢動作重播持續 10 分鐘以上、重播將自動停止。 (10 分 鐘的慢動作重播相當於... -
Page 25: 變速搜索功能
重播模式 變速搜索功能 在電視機上重播 快進搜索 / 回捲搜索重播的速度是可以改變的。 用本攝錄放影機拍攝的影像可以在電視機上重播。 ≥在本攝錄放影機上插入一盤錄製好的錄影帶。 ( 只能使用遙控器來進行這一操作。) ≥設置為錄影帶重播模式、重播錄影帶。 連接攝錄放影機和電視機。 按遙控器上的 [VAR. SEARCH] 鍵。 [S-VIDEO IN] [AUDIO IN] 按 [π] 鍵或 [∫] 鍵改變速度。 [VIDEO IN] VAR. MENU SEARCH ENTER AUDIO –R S-VIDEO OUT VIDEO OUT L– ≥快進搜索/回捲搜索重播的速度為1/5k(僅限SP模式慢動作重播) 、 1/3k( 僅限... -
Page 26: 複製到 Dvd 錄影機或 Vcr 中 ( 配音 )
編輯模式 ≥有關更詳細的說明、請參見電視機和錄影機的使用說明書。 編輯模式 ≥不需要功能指示或日期 / 時間指示時 、 可以按遙控器上的 [OSD] 複製到 錄影機或 中 配音 鍵、用以取消指示。 ( 用 DV 電纜連接攝錄放影機和錄影機時、 這些指示不會出現。) 用攝錄放影機拍攝的圖片可以保存在 DVD-RAM 或其他媒體中 。 攝錄放影機既沒有影像也沒有聲音輸出到電視機中時 ª 有關錄影機的說明、請參見說明書。 ≥檢查插頭的插入深度是否足夠。 ≥將已錄製好的錄影帶放入攝錄放影機中、將未錄製的 ≥檢查連接端子。 DVD-RAM 或錄影帶放入 DVD 錄影機或 VCR 中。 連接攝錄放影機和錄影機。 用 AV 電纜連接起來 [S-VIDEO IN] [AUDIO IN] [VIDEO IN] AUDIO... -
Page 27: 用 Dv 電纜錄製 ( 數位配音 )
編輯模式 用 電纜錄製 數位配音 取消拍攝待機狀態 ª 當攝錄影機處於拍攝待機狀態時、按 [4] 鍵選擇 [∫] 圖示。 用 DV 電纜 VW-CD1E( 可選件 )1 來連接帶 DV 插孔的其他數 位視頻設備和本攝錄放影機時、會以數位格式獲得影像優質的 ≥在複製過程中、不要插拔 DV 電纜、否則複製會無法正常完成。 複製。 ≥如果被複製的圖片 ( 雙語視頻等 ) 中含有主音和次音、 重播時要 ≥設置為錄影帶重播模式。 ( 放像機 / 錄影機 ) 用 [ 設定 ] >> [ 音頻輸出 ] 選擇需要的聲音。 用... - Page 28 編輯模式 配音 配音錄製前 ª ≥設置為錄影帶拍攝模式。 可以在所錄製的錄影帶上加上音樂或解說。 ≥在錄製的過程中如果需要保留原來的聲音、則在拍照時設置為 ≥設置為錄影帶重播模式。 [ 設定 ] >> [ 音效選擇 ] >> [12bit]。 ( 如果設置 [16bit]、則在配 將外置麥克風牢牢插入 [EXT MIC] 插孔、插入深度要儘量地 音後、拍照時錄製的聲音將被擦除。) 深。 ≥拍照時、設置 [ 基本功能 ] >> [ 拍攝速度 ] >> [SP]。 重播用配音錄製的聲音 ª 可以在用配音錄製的聲音和原來的聲音之間進行轉換。 設置 [ 設定 ] >> [12bit 音頻 ] >> [ST2] 或 [ 混合 ]。 [ST1]: 只回放原來的聲音。...
-
Page 29: 菜單列表
菜單 菜單 [ 錄影帶重播菜單 ] ª 菜單列表 菜單的圖形和說明採用便於理解的解釋方式、所以不同於實際 菜單指示。 [ 錄影帶拍攝菜單 ] ª 1) [ 基本功能 ] [ 日期 / 時間 ] -30- 2) [ 進階功能 ] [ 空白尋像 ] -17- [ 拍攝速度 ] -17- 1) [ 基本功能 ] [ 拍攝待機 ] -27- [ 場景模式... -
Page 30: 與照相有關的菜單
菜單 與照相有關的菜單 與重播有關的菜單 [ 日期 / 時間 ] [ 拍攝資料 ] ª ª 在日期指示和時間指示之間轉換。 設置為 [ 開 ]、回放時將顯示錄製時採用的設置 ( 快門速度、光 ≥攝錄放影機將自動錄製錄影帶中圖片上的日期和時間。 圈/ 增益值和白平衡設置 ( ) 等 )。 -22- ≥也可以反復按動遙控器上的 [DATE/TIME] 鍵、用以顯示或改變日 ≥當 [AUTO/MANUAL/FOCUS] 開關設置為 [AUTO] 、 出現 [AUTO] 期 / 時間指示。 指示。... -
Page 31: 指示內容
其他方面 警告 報警指示 其他方面 如果以下指示亮起或閃爍、請檢查攝錄放影機。 指示內容 確認性指示 各種功能和攝錄放影機的狀態可以在熒屏上顯示出來。 Y: 插入的錄影帶的防意外擦除滑塊位於 [SAVE] 位置。 基本指示 沒有插入錄影帶。 剩餘的電池電量 [--]/0: 0h00m00s00f: 時間碼 內置電池的電量不足。 -12- 日期 / 時間指示 15:30:45: °: 自拍時出現警告 / 報警指示。 將 LCD 顯示屏轉向取景器方 拍攝指示 向、檢查警告 / 報警指示。 剩餘的錄影帶時間 R0:45: REMOTE: ≥剩餘錄影帶時間按分鐘顯示 。 ( 不足 3 分鐘時、指示開始閃爍。) 選擇的遙控模式不正確。... -
Page 32: 無法同時使用的功能
其他方面 無法同時使用的功能 請求修理前 問題和解決方法 因攝錄放影機的規格問題有些功能被禁止或無法選擇。 下表所 電源 / 機身 示為被條件限制功能的例子。 1: 攝錄放影機的電源不能打開。 0 電池是否充足電? 請使用充足電的電池。 功能 禁止功能的條件 0 電池的保護電路已經可能啟動。 請將電池裝在 AC 適配器上停 留 5 至 10 秒。 如果攝錄放影機仍不能使用、說明電池已經失 ≥畫面穩定器 ≥當使用彩色夜視功能時 效了。 ≥逆光補償 ≥當設置光圈 / 增益時 2: 攝錄放影機電源自動關閉。 ≥當使用彩色夜視功能時 0 如果將 [ 節電 ] 設置為 [5 分鐘 ] 並連續 5 分鐘未使用攝錄放影機 、 電源會自動關閉、以保護錄影帶和節省電量。... - Page 33 其他方面 拍攝 重播 ( 聲音 ) 1: 儘管攝錄放影機有電、而且錄影帶也正確插入、但也不能開 1: 不能從攝錄放影機的內置揚聲器或耳機中重播聲音。 始拍攝。 0 音量是否太低? 重播時、推動 [W/T] 桿顯示音量指示並進行調 0 錄影帶上的防止意外擦除滑塊是否打開? 如果打開 ( 設置為 整。 ( -24- [SAVE])、則無法進行拍攝。 ( 2: 同時再現不同的聲音。 0 錄影帶是否到達了終點? 請插入新的錄影帶。 0 是否設置為 [ 設定 ] >> [12bit 音頻 ] >> [ 混合 ]? 如果設置為 0 是否設置了拍攝模式?...
-
Page 34: 使用注意事項
其他方面 使用注意事項 其他方面 1: 指示消失、熒屏凍結或無法進行操作。 0 關閉攝錄放影機的電源。 如果電源無法關閉、請按復位鍵、 有關水汽凝結 ª 或者拆下電池或 AC 適配器後、再重新安裝。 然後重新打開 如果磁頭或錄影帶發生水汽凝結時打開攝錄放影機、在取景器 電源。 如果仍不能恢復正常的操作、則拔下電源線、向出售 或 LCD 顯示屏上顯示水汽凝結顯示 [3]( 黃色或紅色 ) 並出現 攝錄放影機的經銷商諮詢。 [3 檢測到露水 ] 或 [3 取出錄影帶 ]( 僅在錄影帶插入時 ) 資 2: 顯示 “請按重置鍵” 。 訊。 在這種情況下、按以下的步驟進行操作。 0 自動檢測到攝錄影機有缺陷。... - Page 35 其他方面 即使清潔磁頭後也不能正常重播 不要使用汽油、稀釋劑或酒精清洗攝錄放影機。 ≥清洗前要拔下電池或從 AC 電源插座上拔下 AC 電源線。 一個可能的原因是拍攝時磁頭是髒的、所以無法正常拍攝。 請 ≥機體會褪色、表皮會剝落。 清潔磁頭、重新拍攝和重播。 如果可以正常重播、說明磁頭是 ≥要用軟的幹布擦掉攝錄放影機上的灰塵和指印。 祛除頑固性的 乾淨的。 重要拍攝前一定要進行試拍、以保證拍攝的正常進行。 ≥如果清潔後磁頭很快又變髒、問題可能出在錄影帶上。 在這種 汙漬時、要用水稀釋中性清潔劑後浸濕抹布、用力擰幹、用它 情況下、請用其他的錄影帶。 來擦拭攝錄放影機。 然後再用幹布擦一遍。 ≥重播時圖片或聲音可能會暫時中斷、但這不是攝錄放影機的故 ≥如果使用化纖防塵布、須遵守說明書的要求。 障。 ( 一個可能的原因是有汙物或灰塵黏在磁頭上、造成重播 不要用此攝錄放影機作監視用或用於其他商業用途。 ≥如果長時間使用攝錄放影機、內部溫度會升高、從而會造成故 中斷。) 障。 關於攝錄放影機 ª ≥本攝錄放影機不能用於商業用途。 ≥長時間使用攝錄放影機、機體會變熱、但這不是故障。 關於電池 ª 要使攝錄放影機遠離蜂窩電話、微波爐、電視機和視頻遊戲機 等帶有磁性的設備。 攝錄放影機所用的電池為可充電的鋰離子電池。...
- Page 36 其他方面 不要將舊電池丟到火中。 LCD 顯示屏 / 取景器 ª ≥加熱電池或將電池丟到火中、會引起爆炸。 LCD 顯示屏 ≥如果即使電池充完電後、操作時間仍很短、說明電池已用壞。 ≥LCD 顯示屏變髒時、要用軟的幹布擦拭。 請購買新的電池。 ≥在溫度急劇變化的地方、LCD 顯示屏上會出現水汽凝結。 要用 軟的幹布擦拭。 關於 AC 適配器 ª ≥如果攝錄放影機處於非常寒冷的地方、剛打開電源時、LCD 顯 ≥如果電池發熱、充電時間會比平時長。 示屏會比平時暗。 但隨著內部溫度的升高、其將恢復正常的亮 ≥如果電池溫度極高或極低、[CHARGE] 指示燈會持續閃爍、電 度。 池可能沒有被充電。 電池溫度降低或升高到一定程度後、充電 將自動進行。 因此、請等待一會兒。 如果即使充電後指示燈仍 LCD 顯示屏熒屏的製造採用了極高的精密技術、總像素 持續閃爍、電池或 AC 適配器可能失效。 此時應向經銷商咨 約達到...
-
Page 37: 術語解釋
其他方面 術語解釋 白平衡 ª 用攝錄放影機拍攝的影像受光源的影響會發藍或發紅。 為避免 自動白平衡 ª 這種現象、應調整白平衡。 白平衡調整可以識別光色並進行調整、所以白色會變成純白色。 白平衡調整決定不同光源下的白色。 通過識別陽光下的白色和 攝錄放影機可以測定通過鏡頭和白平衡感測器的色調、從而判 熒光燈下的白色、攝錄放影機可以在其他顏色之間調整平衡。 由於白色是所有顏色 ( 光 ) 的基準色、攝錄放影機如果能識別基 斷拍攝條件、選擇最接近的色調設置。 這被稱為自動白平衡調 整。 由於攝錄放影機只保存了幾種光源時的白色資訊、所以自 準色白色、就可以在自然色調下攝像。 動白平衡調整在其他的光源下不能正常工作。 ª 自動對焦 自動對焦功能可使對焦鏡頭在攝錄放影機內自動前後移動、將 10 000K 物體調到焦點處。 9 000K 8 000K 自動對焦具有如下特點 7 000K ≥進行調整、使物體的豎線看得更清晰。 6 000K ≥使具有較高對比度的物體處於焦點處。... - Page 38 規格 規格 AC 適配器 VSK0644 安全注意事項 規格 電源: AC 110 V 至 240 V、50/60 Hz 數位攝錄放影機 耗電量: 安全注意事項 20 W DC 輸出: DC 7.9 V、9 W ( 攝錄放影機工作時 ) 電源: DC 8.4 V、1.2 A ( 電池充電時 ) DC 7.9/7.2 V 耗電量:...
-
Page 39: Information For Your Safety
ENGLISH ª Warning Information for your safety Do not remove the cover (or back); there are no user serviceable parts inside. Refer servicing to qualified service personnel. As this equipment gets hot during use, operate it in a well-ventilated place; do not install this Use only the recommended accessories. - Page 40 Contents Information for your safety ..........39 Playback mode Playing back tape ............. 61 Before using Slow-motion playback/frame-by-frame playback ....61 Variable-speed search function ........62 Accessories ..............41 Playback on TV..............62 Optional ................41 Parts identification and handling........41 Lens cap and grip belt ............
-
Page 41: Before Using
Before using Before using Parts identification and handling Accessories ª Camera The followings are the accessories supplied with this product. (6) (7) (10) CAMERA AUTO MANUAL FOCUS POWER MENU (11) (12) Focus ring -60- White balance sensor -59- Recording lamp -67- Remote control sensor -50-... - Page 42 Before using (13) (25) (26) (27) (18) (14) (15) (28) (19) (16) (29) (17) (30) (31) (32) (33) (13) Eyecup -73- (14) Viewfinder -44- -73- (25) Shoulder strap holders -43- (26) Sub zoom lever [W/T] -55- -61- Due to limitations in LCD production (27) Sub recording start/stop button -54-...
-
Page 43: Lens Cap And Grip Belt
Before using Lens cap and grip belt Attaching the shoulder strap We recommend that you attach the shoulder strap before going ª Attach the lens cap out of doors to record so as to avoid dropping the movie To protect the lens surface, attach the lens cap. camera. -
Page 44: Using The Viewfinder
Charge the battery before using this product. ≥Battery charging time ( -45- ≥We recommend using Panasonic batteries. ≥If you use other batteries, we cannot guarantee the quality of this product. ≥If the DC input lead is connected to the AC adaptor, then the battery will not get charged. -
Page 45: Charging Time And Recordable Time
Before using ª Fitting the battery Charging time and recordable time Push the battery against the battery holder and slide it until it The times shown in the table below show the times at a clicks. temperature of 25 oC and a humidity of 60%. This is just a guide. -
Page 46: Inserting/Removing A Cassette
Before using Inserting/removing a cassette ª Inserting/removing the cassette ≥When the cassette holder is in action, do not touch anything Slide the [OPEN/EJECT] lever and open the cassette except the [PUSH] mark. cover. ≥When inserting a previously recorded cassette, use the blank search function to find the position where you want to continue recording. -
Page 47: Turning The Camera On
Before using Turning the camera on Using the screen display When the camera is turned on with the lens cap fitted, the Press the [ENTER] button at the centre of cursor buttons, and automatic white balance adjustment may not function properly. icons will be displayed on the screen. -
Page 48: Switching The Language
Before using Switching the language Press the [3] or [4] button in order to select the item to be set. You can switch the language on the screen display or the menu screen. Set [LANGUAGE] >> select the desired language. Press the [ENTER] button to determine the setting. -
Page 49: Setting Date And Time
Before using Setting date and time Adjusting LCD monitor/viewfinder If the screen shows the incorrect date/time, then adjust it. ª Adjusting the brightness and colour level ≥Set to Tape Recording Mode. Set [SETUP] >> [LCD SET] or [EVF SET] >> [YES]. Set [BASIC] >>... -
Page 50: Using The Remote Control
Before using Using the remote control ª Install a button-type battery Install the button-type battery supplied in the remote control ª Remote control before using it. Using the remote control supplied will enable controlling almost While pressing the stopper 1, pull out the battery holder. -
Page 51: Using The External Stereo Microphone
Before using ª Selecting the remote control mode Using the External Stereo Microphone If 2 cameras are used simultaneously, set the mode for one pair ª External stereo microphone of movie camera and remote control to [VCR1] and that of the other pair to [VCR2]. - Page 52 Before using ª Attaching the microphone to the movie camera ª Changing the [WIND CUT OFF/ON] switch Attach the microphone to the movie camera shoe. The microphone is equipped with a wind shield that is designed to cut down wind noise, but when the wind is so strong that even the wind shield is not adequate to keep down the noise, set the [WIND CUT OFF/ON] switch to [ON] to further reduce the wind noise.
-
Page 53: Record Mode
Record mode Record mode For more stable pictures. Check before recording Check the following by trying recording before important events such as weddings in order to verify that the image recording and audio recording work properly and that you know how to use the movie camera. -
Page 54: Recording On A Tape
≥We recommend using the SP mode for important recording. ≥In order to fully exhibit the performances of the LP mode, we recommend using Panasonic cassettes marked LP mode. ≥It is not possible to dub audio onto image recorded in the LP 1) Recording time elapse mode. -
Page 55: Zoom In/Out Function
Record mode Zoom in/out function Adjusting the Microphone Sensitivity Level You can zoom in up to 10koptically. You can adjust the microphone sensitivity for recording. ≥Set to Tape Recording Mode. Set [ADVANCE] >> [MIC LEVEL] >> [AUTO], [SETrAGC] Wide-angle recording (zoom out): or [SET]. -
Page 56: Recording Yourself
Record mode Recording yourself Night view functions You can record yourself while viewing the LCD monitor. You This function allows you to record colour subjects in dark can record persons in front of the camera while presenting locations to stand out against the background. them the image. -
Page 57: Soft Skin Mode
Record mode Soft skin mode Fade in/fade out function This allows the skin colour to be recorded in a softer tone. This Fade in is more effective if you record the bust image of a person. The image and audio gradually appear. ≥Set to Tape Recording Mode. -
Page 58: Recording Images For Wide-Screen Tvs
Record mode Recording images for wide-screen TVs Recording in various situations (Scene mode) This allows you to record images compatible with wide-screen When you record images in different situations, this mode TVs. automatically sets optimum shutter speeds and apertures. ≥Set to Tape Recording Mode. Cinema Function Images are recorded with a black belt appearing along the top Set the [AUTO/MANUAL/FOCUS] switch to [MANUAL]. -
Page 59: Recording In Natural Colours (White Balance)
Record mode Recording in natural colours (White balance) ª About the white balance sensor The white balance sensor detects the type of light source The automatic white balance function may not reproduce during recording. natural colours depending on the scenes or lighting conditions. ≥Do not cover the white balance sensor during recording, or it If so, you can adjust the white balance manually. -
Page 60: Manual Focus Adjustment
Record mode Manual focus adjustment Manual shutter speed/aperture adjustment If auto focusing is difficult due to the conditions, then manual Shutter Speed focusing is available. Adjust it when recording fast-moving subjects. ≥Set to Tape Recording Mode. Aperture Set the [AUTO/MANUAL/FOCUS] switch to [MANUAL]. Adjust it when the screen is too bright or too dark. -
Page 61: Playback Mode
Playback mode Playback mode Slow-motion playback/frame-by-frame playback Playing back tape ≥Set to Tape Playback Mode. (Slow-motion playback can ≥Set to Tape Playback Mode. only be performed by using the remote control.) Slow-motion playback If the image is recorded in the SP mode, then it will be played back at a speed approx. -
Page 62: Variable-Speed Search Function
Playback mode Variable-speed search function Playback on TV The speed of cue/review playback can be varied. Images recorded by this camera can be played back on a TV. ≥Insert a recorded tape into this camera. (This operation is only available when using the remote control.) Connect the movie camera and a TV. -
Page 63: Edit Mode
Edit mode ≥For more information, refer to the operating instructions for Edit mode your TV set and recorder. Copying onto a DVD recorder or a VCR ≥When you do not need functional indications or date and time (Dubbing) indications, press the [OSD] button on the remote control for no indication. -
Page 64: Using The Dv Cable For Recording (Digital Dubbing)
Edit mode Using the DV Cable for Recording ª To cancel the standby for recording When the camera is standby for recording, press the [4] button (Digital Dubbing) and select the [∫] icon. By connecting other digital video equipment with DV terminal ≥Do not plug or unplug the DV cable during dubbing, or the and the movie camera by using the DV cable VW-CD1E (optional) 1, high-image-quality dubbing can be done in digital... -
Page 65: Audio Dubbing
Edit mode Audio dubbing ª Before recording with audio dubbing ≥Set to Tape Recording Mode. You can add music or narration to the recorded cassette. ≥When you want to preserve the original sound taken during ≥Set to Tape Playback Mode. recording, set [SETUP] >>... -
Page 66: Menu
Menu Menu ª [TAPE PLAYBACK MENU] Menu list Menu figures and illustrations are provided for easy-to-understand explanations, and so they are different from the actual menu indications. ª [TAPE RECORDING MENU] 1) [BASIC] [DATE/TIME] -67- 2) [ADVANCE] [BLANK SEARCH] -54- [REC SPEED] -54- [REC STDBY]... -
Page 67: Menus Related To Taking Pictures
Menu Menus related to taking pictures Menus related to playback ª ª [DATE/TIME] [REC DATA] This switches between date and time indications. Set to [ON] and the settings (shutter speed, iris/gain values, ≥The movie camera automatically records the date and time of and white balance settings ( ), etc.) used during the -59-... -
Page 68: Others
Others Others Warning/alarm indications If any one of the following indications lights up or flashes, Indications please check the movie camera. Various functions and the movie camera status are shown on Confirmatory indications the screen. Y: A cassette with the accidental erasure prevention slider Basic indications placed in the [SAVE] position is inserted. -
Page 69: Functions Cannot Be Used Simultaneously
Others Functions cannot be used simultaneously Before requesting repair (Problems and solutions) Some functions in the movie camera are disabled or cannot be selected due to its specifications. The table below shows Power/Body examples of functions restricted by conditions. 1: The movie camera power cannot be turned on. •... - Page 70 Others Recording Playback (Sound) 1: Recording does not start although power is supplied to 1: Sound is not played back from the built-in speaker of the the movie camera and the cassette is correctly inserted. movie camera or the headphones. •...
-
Page 71: Cautions For Use
Others Others Cautions for Use 1: The indication disappears, the screen is frozen, or no ª operation can be performed. About condensation • Turn off the power to the movie camera. If the power cannot If you turn the movie camera on when condensation occurs on be turned off, press the reset button, or detach the battery or the head or the tape, condensation Indication [3] (yellow or AC adaptor and then reattach it. - Page 72 Others When normal playback cannot be performed even after the Do not use benzine, paint thinner or alcohol for cleaning head cleaning the movie camera. ≥Before cleaning, detach the battery or pull out the AC mains One possible cause is that normal recording could not be performed because the heads were dirty at the time of lead from the AC mains socket.
- Page 73 Others Do not throw old battery into fire. ª LCD monitor/viewfinder ≥Heating a battery or throwing it into a fire may result in an LCD monitor ≥When the LCD monitor gets dirty, wipe it with a dry soft cloth. explosion. ≥If the operating time is very short even after the battery has ≥In a place with drastic temperature changes, condensation been recharged, the battery has worn out.
-
Page 74: Explanation Of Terms
Others Explanation of terms ª White balance The image recorded by the movie camera may become bluish ª Automatic white balance or reddish under the influence of light sources. To avoid such White balance adjustment recognizes the colour of light and phenomena, adjust the white balance. -
Page 75: Specifications
Specifications Specifications AC adaptor VSK0644 Information for your safety Specifications Power source: Digital Video Camera AC 110 V to 240 V, 50/60 Hz Information for your safety Power consumption: 20 W DC output: Power source: DC 7.9 V, 9 W (Movie camera operation) DC 7.9/7.2 V DC 8.4 V, 1.2 A (Battery charging) Power consumption:... - Page 76 VQT0S76 F0705Nm0 ( 3000 A ) Matsushita Electric Industrial Co., Ltd. Web site: http://www.panasonic.co.jp/global/...
Need help?
Do you have a question about the NV-MD10000GC and is the answer not in the manual?
Questions and answers