Table of Contents
Advertisement
Quick Links
Advertisement
Table of Contents

Subscribe to Our Youtube Channel
Related Manuals for Maximum 054-1359-4


Summary of Contents for Maximum 054-1359-4
-
Page 3: Table Of Contents
TABLE OF CONTENTS TECHNICAL SPECIFICATIONS GENERAL POWER TOOL SAFETY WARNINGS SYMBOLS PARTS LIST ACCESSORIES KNOW YOUR DRILL OPERATING INSTRUCTIONS WORKING HINTS FOR YOUR DRILL MAINTAIN TOOLS WITH CARE TROUBLESHOOTING WARRANTY NOTE: If any parts are missing or damaged, or if you have any ques- tions, please call our toll-free helpline at 1-888-670-6682 SAVE THESE INSTRUCTIONS This manual contains important safety and operating... -
Page 4: Technical Specifications
054-1359-4 | contact us 1-888-670-6682 TECHNICAL SPECIFICATIONS VOLTAGE 120 V 60 Hz AC CURRENT NO LOAD SPEED 0-2700 RPM KEYED CHUCK 1/2” (1.27 cm) DRILLING CAPACITY STEEL 1/2” (1.27 cm) WOOD 1-1/2” (3.8 cm) PROTECTION CLASS CORD LENGTH 10’... -
Page 5: General Power Tool Safety Warnings
WORK AREA SAFETY Keep work area clean and well lit. Cluttered or dark areas invite accidents. • Do not operate power tools in explosive atmospheres, such as in the presence • of flammable liquids, gases or dust. Power tools create sparks which may ignite the dust or fumes. -
Page 6: Electrical Safety
054-1359-4 | contact us 1-888-670-6682 ELECTRICAL SAFETY Power tool plugs must match the outlet. Never modify the plug in any way. Do • not use any adapter plugs with grounded power tools. Unmodified plugs and matching outlets will reduce risk of electric shock. - Page 7 Do not use the power tool if the switch does not turn it on and off. Any power • tool that cannot be controlled with the switch is dangerous and must be repaired. Disconnect the plug from the power source and/or the battery pack from the •...
-
Page 8: Symbols
054-1359-4 | contact us 1-888-670-6682 SYMBOLS To reduce the risk of injury, user must read instruction manual Double insulation Warning Wear ear protection Wear eye protection Wear dust mask Don’t use in the rain... -
Page 9: Parts List
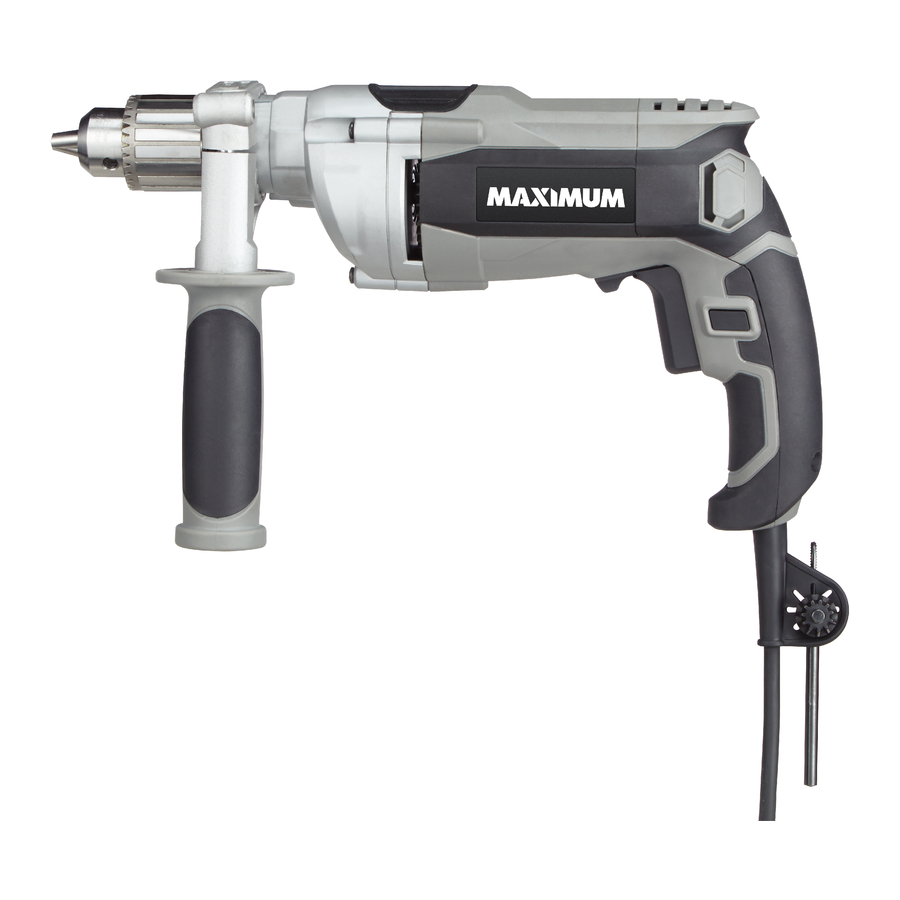
No. Description No. Description Keyed chuck On/off switch with variable speed Forward and reverse Switch lock-on button rotation Auxiliary handle Not all the accessories illustrated or described are included in standard delivery. -
Page 10: Accessories
054-1359-4 | contact us 1-888-670-6682 ACCESSORIES Chuck key Auxiliary handle We recommend that you purchase your accessories from the same store that sold you the tool. Use good quality accessories marked with a well-known brand name. Choose the type according to the work you intend to undertake. -
Page 11: Know Your Drill
9 10 28 29 22 23 24 25 No. Description No. Description Auxiliary handle Oil shield Screw Ball bearing race Chuck Motor Self-tapping screw Dustproof ring Ring Ball bearing race Washer Bearing race sleeve Baffle Output spindle Self-tapping screw Ball bearing race Stator Ring Cover... -
Page 12: Operating Instructions
054-1359-4 | contact us 1-888-670-6682 INSTALLING THE AUXILIARY HANDLE (Fig. For your personal safety we recommend using the auxiliary handle at all times. To fit the handle, loosen the bottom of the handle counter-clockwise and slide the clamping loop over the handle collar. - Page 13 Fig. B OPERATING THE ON/OFF SWITCH (Fig. C) Depress the switch to start the tool and release it to stop your tool. Continuous use Depress on/off switch (3) then lock-on button (4), release on/off switch first and lock-on button second. Your switch is now locked on for continuous use.
-
Page 14: Working Hints For Your Drill
When drilling a large hole in tough material (i.e. steel), try drilling a small pilot hole first before using a large drill bit. • Cool the motor If your power tool becomes too hot, set the speed to maximum and run no-load for 2-3 minutes to cool the motor. -
Page 15: Maintain Tools With Care
MAINTAIN TOOLS WITH CARE Remove the plug from the socket before carrying out any adjustment, servicing or maintenance. Keep tools sharp and clean for better and safer performance. Follow instructions for lubricating and changing accessories. Inspect tool cords periodically and if damaged, have repaired by authorized service facility. -
Page 16: Troubleshooting
054-1359-4 | contact us 1-888-670-6682 TROUBLESHOOTING • If your drill will not operate, check the power at the electrical plug. • If the drill is not drilling properly, check the drill bit for sharpness and replace drill bit if worn. Check that the drill is set to forward rotation for normal use. -
Page 17: Warranty
(with the same model, or one of equal value or specification), at the sole discretion of the Maximum Canada authorized repair centre (“Service Provider”). We will bear the cost of any repair or replacement and any costs of labour relating thereto. - Page 18 This warranty applies for a period of 5 years from the date of original retail purchase, as indicated on the bill of sale. Neither the retailer, Maximum Canada, nor the manufacturer shall be liable for any other expense, loss or damage, including, without limitation, any indirect, incidental, consequential or exemplary damages arising in connection with the sale, use or inability to use this product.
- Page 19 In addition to the 5-Year Limited Warranty, this MAXIMUM product is covered by our: 1-YEAR REPAIR WARRANTY...
Need help?
Do you have a question about the 054-1359-4 and is the answer not in the manual?
Questions and answers