Advertisement
Available languages
Available languages
Table of Contents
- 1 Table of Contents
- 2 Introduction
- 3 Getting Started
- 4 Programing Your Timer
- 5 Using the Remote Control Device
- 6 Using the Optional Rain-Freeze Sensor
- 7 Installing Indoor Mount Sprinkler Timer and Remote Control Device Sleeve
- 8 Diagnostics Circuit Breaker
- 9 Glossary of Terms
- 10 Trouble Shooting
- Download this manual
ST2-RF
SPRINKLER
TIMER
MANUAL
MODELS:
94916, 94912, 94926, 94922
proof no:
date:
01.09.09
des:
SM
job no:
client:
sku:
94926
upc:
NA
p 801 295 9820
f 801 951 5815
file name:
www.fluid-studio.net
rD.indd
1065 South 500 West
software:
Bountiful, Utah 84010
signature
ACTIVE
BYPASS
1
dimensions:
flat: w: 13.76" h: 5.7"
finished: w 6.88" d: 0" h 5.7"
spck:
XX
colors
Registration
Orbit
CMYK
94926-24ES
additional instructions:
·
Font sizes cannot be smaller than 7 pt.
·
·
InDesign CS3
RF SYNC
color
color
non printing
non printing
PMS
PMS
280
????
PN 94926-24ES Rev D
Printers are responsible for
meeting print production
requirements. Any changes
must be approved by the
client and Fluid Studio.
printed piece must meet
designated specifications
on this form.
PMS
????
© 2007 Fluid Studio. This
work is the property of Fluid
Studio, and cannot be used,
reproduced or distributed
in any way without their
express permission.
Advertisement
Table of Contents

Summary of Contents for Orbit Signature ST2-RF
- Page 1 ST2-RF SPRINKLER RF SYNC TIMER ACTIVE BYPASS MANUAL MODELS: 94916, 94912, 94926, 94922 PN 94926-24ES Rev D dimensions: proof no: Printers are responsible for flat: w: 13.76" h: 5.7" meeting print production date: 01.09.09 requirements. Any changes finished: w 6.88" d: 0" h 5.7"...
-
Page 2: Table Of Contents
Table of Contents Section 1: Introduction No-Watering Days and Times Easy-to-Read Back-Lit LCD Display It’ s easy to prevent watering on one or more days of the week The timer’ s back-lit blue LCD display screen is easy to read or during specific periods of the day. -
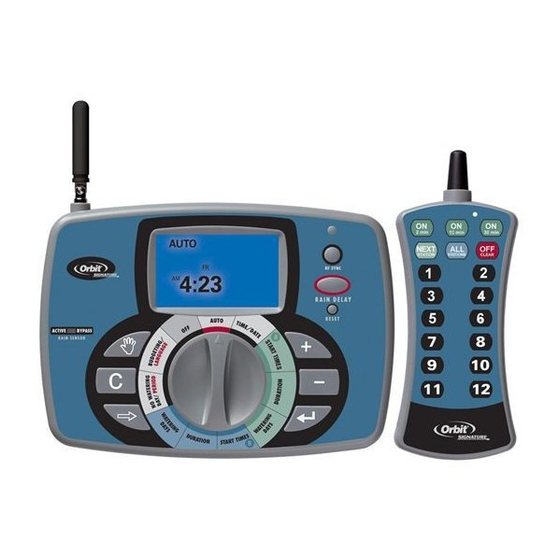
Page 3: Getting Started
Activating the Batteries Programming Buttons Selection Dial If no programming occurs after the RESET button has been These nine buttons are used for programming and other This dial is used for programming, reviewing and operating the pressed and the dial is left in the AUTO position the timer will •... -
Page 4: Programing Your Timer
• Press the • Turn the selection dial to Set Watering Days ENTER button. The display now reads “SET START TIMES for the program you CLEAR button or by selecting another watering day MONTH.” Set the current month by pressing either the wish to set (A or B). - Page 5 • Turn the selection dial to • Press the says. (For example, in some water districts, watering is duration to 20 minutes, and a setting of 10% will decrease a NO WATERING DAY/PERIOD. NEXT button. prohibited on certain days.) To cancel programmed watering on 10 minute duration to 1 minute.
-
Page 6: Using The Remote Control Device
Manual Watering - Program B: • Press the • Press the the current station to the next station in the cycle. This can buttons to select the number of min- button on the remote or depress the stem of utes to water that station (from 1 to 120 minutes). be done during scheduled, manual, or remote actuated the RF sensor (the red light should start blinking). -
Page 7: Using The Optional Rain-Freeze Sensor
• Press Installing the Sprinkler Timer 2. Mount the Docking Port the two power leads from the transformer into each ON “X” MIN to water those stations for the desired (“X”) number of minutes. terminal socket using the phillips screwdriver to depress in Five Easy Steps •... -
Page 8: Diagnostics Circuit Breaker
• To avoid electrical hazards, only one valve should be • Connect the common wire to one of the two sockets • Secure the sleeve to the wall by screwing a No. 8 screw 4. If the message continues, a short in the wiring still exists. connected to each station. -
Page 9: Glossary Of Terms
Section 8: Glossary of Terms 1. For each station (or valve) write down the watering IMPORTANT: Be aware of any watering restrictions through location, the type of sprinkler head and the types of your local water district. plants to be watered. 3. -
Page 10: Trouble Shooting
Section 9: Trouble Shooting Help Orbit Irrigation Limited Six-Year Warranty ® Orbit Irrigation Products, Inc. warrants to its customers that its ® Before returning this sprinkler timer to the store, contact Orbit ® products will be free from defects in materials and workman- Technical Service at: ship for a period of six years from the date of purchase. - Page 11 Índice Sección 1: Presentación Días y horas sin riego Útil pantalla con visualización LCD, fácil de leer Es fácil detener el riego uno o más días de la semana o La pantalla táctil con visualización LCD retroiluminada del durante períodos específicos del día. Esta función es útil si temporizador está...
- Page 12 Disminuir Reset (Reinicio) del temporizador Ingresar Puede programar el temporizador de aspersor siguiendo Siguiente RF SYNC sólo unos pasos básicos. Antes de empezar a programar, es Borrar La primera vez que programa el temporizador del aspersor, importante que: Manual ACTIVE BYPASS •...
- Page 13 Seleccione la hora y la fecha Sección 3: Cómo programar su • Salga de este modo girando la esfera de selección. través de los días de la semana [Mo (Lunes), Tu (Martes), temporizador We (Miércoles), Th (Jueves), Fr (Viernes), Sa (Sábado) and Su (Domingo)].
- Page 14 • Gire la esfera de selección a • Salga del modo de presupuesto de riego girando la esfera de Establecer los intervalos de riego aparecerá “SIN AUGA INICIO PERÍODO”. DÍA/PERÍODO SIN RIEGO. Verá en la esfera los siete días de la semana con una gota de agua selección.
- Page 15 • La esfera muestra “PROBAR TODO” a la derecha de las Riego manual – Programa B: • Presione el botón Avance manual durante el riego: SIGUIENTE para seleccionar el letras “A” y “B.” número de estación que desea regar. • Al presionar el botón SIGUIENTE adelantará...
- Page 16 Para regar más de una estación específica: Sección 6: Instalación en interiores del sensor RF a su sistema, haga lo siguiente: temporizador del aspersor y del manguito • Con el dispositivo de remoto en mano, presione el botón • Presione los números de las estaciones que desea regar. (Por SINCRONIZACIÓN RF dispositivo de control remoto “RF Sync”...
- Page 17 • Sosteniendo el cable del aspersor, pele 1/2 in (12 mm) alimentación del transformador en cada receptáculo de la estación individual (de color gris), encajando comple- terminal usando un destornillador Phillips para presionar del aislamiento plástico de la punta de cada cable. tamente el cable pelado en la terminal debajo de cada el botón de la terminal, con el fin de introducir o extraer número.
- Page 18 Sección 8: Glosario de términos durante cada secuencia de riego. Si se detecta una estación 1. Una tormenta. averiada, el temporizador del aspersor cambiará a la próxima 2. La fuente de energía tiene una corriente de fuga eléctrica. estación de riego. Smart-Scan ®...
- Page 19 Determine un plan de riego Horario Duración del Riego ciclo Estación Programa Opción Días Área Plantas Aspersor comienzo Minutos Su temporizador tiene dos programas: Programa A y Programa Cabezal del B. La doble capacidad del programa le permite asignar ciertas L, Mierc., S 05:00 p.m 15 min...
- Page 20 Sección 9: Solución de problemas Asistencia La garantía limitada de seis años de productos de irrigación Antes de devolver el temporizador del aspersor a la tienda, Orbit ® Irrigation Products, Inc. garantiza a sus clientes que sus contáctese con el Departamento de servicios técnicos de Orbit ®...
Need help?
Do you have a question about the ST2-RF and is the answer not in the manual?
Questions and answers