Table of Contents
Advertisement
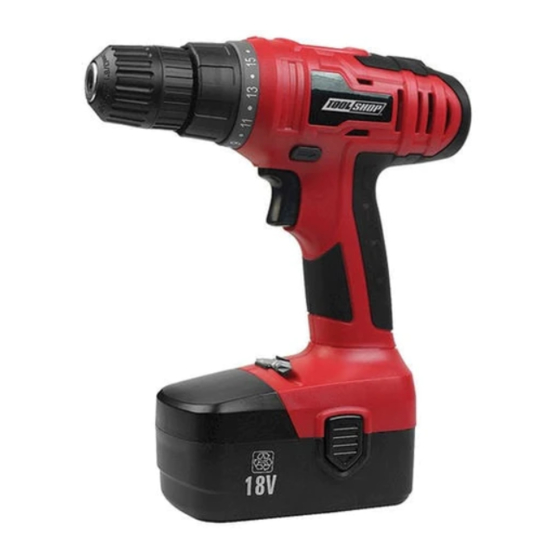
18 VOLT CORDLESS DRILL/DRIVER
DRILL/DRIVER
Variable speed range:
Torque clutch positions:
Torque:
Keyless chuck:
Maximum drilling capacity:
BATTERY & CHARGER
Battery:
Charger:
Charger input:
Charger output:
Weight:
Replacement battery:
Replacement charger assembly:
Need Assistance?
Call us on our toll free customer support line:
1-866-349-8665
Technical questions
Replacement parts
Parts missing from package
PRODUCT SPECIFICATIONS
0–550 RPM (no load)
16 + drill mode
115 in lbs
3/8" (10 mm) double sleeve keyless
1/4" (6 mm) in steel
3/4" (20 mm) in wood
18 V, Ni-Cd
5 Hour, Class 2
120 V AC, 60 Hz
22 V DC, 500 mA (maximum)
2 lb 6 oz (1.1 kg) with battery
236-9019
UL22V
241-9019
Owner's Manual
Advertisement
Table of Contents

Related Manuals for Tool Shop 241-9019


Summary of Contents for Tool Shop 241-9019
-
Page 1: Product Specifications
18 VOLT CORDLESS DRILL/DRIVER 241-9019 Owner’s Manual PRODUCT SPECIFICATIONS DRILL/DRIVER Variable speed range: 0–550 RPM (no load) Torque clutch positions: 16 + drill mode Torque: 115 in lbs Keyless chuck: 3/8" (10 mm) double sleeve keyless Maximum drilling capacity: 1/4" (6 mm) in steel 3/4"... -
Page 2: Table Of Contents
TABLE OF CONTENTS Product specifications ………….……………………………………………………. Table of contents ……………………………………………………………………... General safety warnings …………………………………………………………….. 3–4 Eye, ear & lung protection …………………………………………………………… 3–4 Electrical safety ………………………………………………………………………. Power tool safety ……………………………………………………………………... 5–6 General safety rules ………………………………………………………………….. Work area ………………………………………………………………….………….. Electrical safety ………………………………………………………………………. Personal safety ……………………………………………………………………….. -
Page 3: General Safety Warnings
GENERAL SAFETY WARNINGS WARNING: Before using this tool or any of its accessories, read this manual and follow all Safety Rules and Operating Instructions. The important precautions, safeguards and instructions appearing in this manual are not meant to cover all possible situations. It must be understood that common sense and caution are factors which cannot be built into the product. -
Page 4: Electrical Safety
GENERAL SAFETY WARNINGS WEAR A DUST MASK THAT IS DESIGNED TO BE USED WHEN OPERATING A POWER TOOL IN A DUSTY ENVIRONMENT. WARNING: Dust that is created by power sanding, sawing, grinding, drilling, and other construction activities may contain chemicals that are known to cause cancer, birth defects, or other genetic abnormalities. -
Page 5: Power Tool Safety
POWER TOOL SAFETY If operating a power tool in a damp location WARNING: Read all safety warnings is unavoidable, use a residual current device and instructions. Failure to follow the warnings (RCD) protected supply. Use of a ground fault and instructions may result in electric shock, fire circuit interrupter (GFCI) reduces the risk of and/or serious injury. -
Page 6: Power Tool Use And Care
POWER TOOL SAFETY PERSONAL SAFETY – cont’d Battery tool use and care Power tool use and care Recharge only with the charger specified by the manufacturer. A charger that is suitable for Do not force the power tool. Use the correct one type of battery pack may create a risk of fire power tool for your application. -
Page 7: Specific Safety Rules
SPECIFIC SAFETY RULES WARNING: Secure the workpiece. Use clamps or a vice to Know your cordless hold the workpiece. It is safer than using your drill/driver. Do not plug in the charger or hand and it frees both hands to operate the tool. install the battery in the tool until you have read and understand this Instruction Manual. -
Page 8: Battery & Charger Safety
BATTERY & CHARGER SAFETY WARNING: Do not use the charger to charge any batteries Only use the charger other than the cordless drill/driver batteries. supplied with this kit to charge the 18V Other batteries may explode. battery. Charging any other batteries may damage the charger and possibly cause Do not operate charger if the cord or plug is serious injury. -
Page 9: Symbols
SYMBOLS WARNING: Some of the following symbols may appear on the cordless drill. Study these symbols and learn their meaning. Proper interpretation of these symbols will allow for more efficient and safer operation of this tool. Volts Direct current Amperes No load speed Hertz Alternating or direct... -
Page 10: Know Your Cordless Drill/Driver
KNOW YOUR CORDLESS DRILL/DRIVER Horizontal level Double sleeve keyless chuck Trigger switch Torque Forward / clutch reverse switch Screwdriver bit Battery storage #236-9019 Charging Battery charger UL22V Battery Charging cap ACCESSORIES DESCRIPTION DESCRIPTION High-speed steel drill bits: 1" (25mm) screwdriver bits: 1/16", 5/64", 3/32", 7/64", 1/8", 1/8", 5/32", 3/16", 1/4", 9/32"... -
Page 11: Assembly And Operating
ASSEMBLY AND OPERATING CHARGING THE BATTERY PACK INSTALLING THE BATTERY PACK IN THE DRILL/DRIVER Place the battery (1) in a dry location near a 120 V 60 Hz electrical outlet (Fig. 1) Remove the discharged battery pack (1) from the tool by pressing the battery Place the charging cap (2) onto the battery release buttons (2) on each side of the stem (3). -
Page 12: Adjusting The Torque
ASSEMBLY AND OPERATING ADJUSTING THE TORQUE FORWARD/REVERSE SWITCH Your drill/driver is equipped with an adjustable The forward/reverse switch (1) is conveniently torque clutch for driving different types of screws mounted above the trigger switch (2) (Fig. 6). To into different types of materials. It also has a make the drill rotate clockwise (for drilling) push setting for "drilling". -
Page 13: Installing Drill Bits
ASSEMBLY AND OPERATING VARIABLE-SPEED TRIGGER SWITCH – cont’d NOTE: Hand tighten the chuck jaws. Do NOT use pliers. You will damage the chuck. Fig. 7 INSTALLING DRILL BITS Fig. 8 WARNING: Never hold the chuck body WARNING: Do not insert the drill bit into with one hand and use the drill/driver power the chuck and tighten as shown in Fig. -
Page 14: Horizontal Bubble Level
ASSEMBLY AND OPERATING HORIZONTAL BUBBLE LEVEL DRILLING This drill/driver is equipped with a bubble level When drilling into smooth, hard surfaces such to assist you in keeping the drill/driver "level" as metal, use a center punch to mark the while drilling horizontal holes. desired hole location. -
Page 15: Driving Screws
ASSEMBLY AND OPERATING DRILLING – cont’d NOTE: Do not continue to drive the screw once the clutch has released. This causes When drilling metals, use light oil on the drill bit unnecessary wear of the clutch. to keep it from overheating. The oil will prolong the life of the drill bit and improve the cutting RETIGHTENING A LOOSE CHUCK action. -
Page 16: Maintenance
MAINTENANCE GENERAL BATTERY PACK REMOVAL AND PREPARATION FOR RECYCLING WARNING: When servicing, use only To preserve our natural resources, please identical replacement parts. The use of any recycle or dispose of batteries properly. other part may create a hazard or cause product damage. - Page 17 MAINTENANCE How to care for your Nickel-cadmium battery Never allow a battery to freeze. Do NOT charge a battery when the work area or the battery temperature is at or below 0°C (32° F) or above 45°C (113° F). Allow it to sit at room temperature for at least 30 minutes before charging.
-
Page 18: Exploded View
AVAILABLE PARTS WARNING: When servicing, use only original equipment replacement parts. The use of any other parts may create a safety hazard or cause damage to the cordless drill/driver. Any attempt to repair or replace electrical parts on this multi-function power tool may create a safety hazard unless repairs are performed by a qualified technician. -
Page 19: Warranty
® TOOL SHOP 18 VOLT CORDLESS DRILL WARRANTY 1-YEAR LIMITED WARRANTY: ® TOOL SHOP This brand power tool carries a 1-Year Limited Warranty to the original purchaser. If the tool fails within one (1) year from the date of purchase, simply bring this tool with your original sales receipt back to your nearest ®...
Need help?
Do you have a question about the 241-9019 and is the answer not in the manual?
Questions and answers