Showerbuddy SB1 Owner's Manual
Shower transfer system
Hide thumbs
Also See for SB1:
- Owner's manual (35 pages) ,
- Owner's manual (35 pages) ,
- Owner's manual (32 pages)
Table of Contents
Advertisement
Quick Links
Advertisement
Table of Contents

Related Manuals for Showerbuddy SB1

Summary of Contents for Showerbuddy SB1
- Page 1 ShowerBuddy Owners Manual elimination through innovation...
-
Page 3: Table Of Contents
SB1 ShowerBuddy contents Exploded Parts ............... 3 Parts List ................ 4 Securing Clip Sizes ............4 ShowerBuddy Assembly ..........5 ShowerBuddy Setup ............12 ShowerBuddy Operation ..........16 Cleaning + Maintenance ..........Safety Information ............22 Warranty Information ............25 Registration Form ............ -
Page 4: Exploded Parts
SB1 ShowerBuddy exploded parts page 3... -
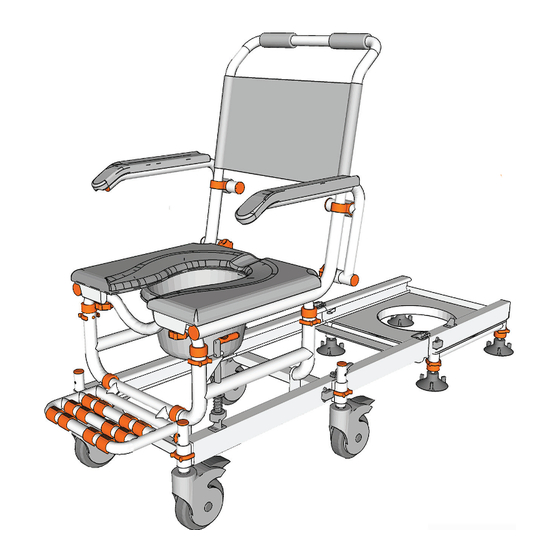
Page 5: Parts List
SB1 ShowerBuddy parts list See the exploded chair image for the location of parts. 5” Castor Wheel Primary Brake Wheeled Track Back Rest Securing Clip (Medium) Arm Rest (Right) Base Leg (Right) Arm Rest (Left) Footrest Arm Rest Knob Base Leg (Left) -
Page 6: Showerbuddy Assembly
SB1 ShowerBuddy assembly step 1 Insert each 5” castor wheel into the wheeled track. Secure each castor wheel at the required height using 1 medium securing clip. NOTE - Each height adjustment hole raises the wheeled track 1”. - Check to ensure all securing clips are fully inserted. - Page 7 SB1 ShowerBuddy step 3 Insert both height adjustment tubes into the base legs. The height adjustment tube with the ‘U’ bend should be inserted into the front. Secure both height adjustment tubes at the required height using 1 large securing clip on each base leg.
- Page 8 SB1 ShowerBuddy step 5 With the wheeled base track assembled on a flat surface apply the brakes on the 4 castor wheels. Slide the assembled seat into the wheeled track by aligning the track wheels with the grooves in the track. When inserting the...
- Page 9 SB1 ShowerBuddy step 7 Insert the arm rests into the sockets on the seat base until the clip pin clicks and locates the arm rests in position. Screw the arm rest knob into the arm rest to firmly secure the arm rest in position.
- Page 10 SB1 ShowerBuddy step 9 The armrests can be easily swung-away when required. Unlock the armrest by sliding the armrest lock away from the armrest. Once this is done the armrest can be swung away. The clip pin which secures the armrest in position stops the armrest from rotating to far.
- Page 11 SB1 ShowerBuddy step 11 Rotate the chair so that you have easy access to the underside of the seat base. From the back of the chair slide the commode bucket into the 2 brackets on the underside of the seat base.
- Page 12 SB1 ShowerBuddy step 13 On the underside of the seat base there are 4 attachment points for the lap belt. Unscrew the provided screws and washers from the front attachment points on the underside of the seat base. Choose the attachment points you prefer for your lap belt.
-
Page 13: Showerbuddy Setup
SB1 ShowerBuddy setup step 1 Align the back of your chair with the threshold of your shower. Check to ensure that the height of the bottom of the wheeled track is higher than the shower threshold If required the height of the wheeled track can be raised or lowered depending on the shower threshold height. - Page 14 SB1 ShowerBuddy step 3 Place the shower base into your shower stall. Firmly press downwards on the shower base to ensure the suction cups securely hold the shower base in position. NOTE - When positioning the shower base ensure it is located so there is enough room to allow the chair to rotate freely.
- Page 15 SB1 ShowerBuddy step 5 Align the back of your chair with the bridge which is connected to the shower base. Firmly push the wheeled base onto the tongues on the bridge so the secondary brakes are pushed out of the way.
- Page 16 SB1 ShowerBuddy step 7 If the tracks are not level horizontally, adjust the height of the shower base until the tracks are level. To do this screw the thread on the suction cups up or down depending on which way the height needs to be adjusted.
-
Page 17: Showerbuddy Operation
SB1 ShowerBuddy operation step 1 Wheel your Showerbuddy to your shower. Securely attach the bridge to the shower base using the latches. Next securely attach the bridge to the wheeled base using the latches. NOTE - Ensure all latches securely ‘snap’ into the locked position. - Page 18 SB1 ShowerBuddy step 3 With your Showerbuddy assembled you are now ready to transfer the chair into the shower. Lift and hold the primary brake lever located on the left side of your Showerbuddy to release the chair. Once the chair has begun transferring you can release the primary brake lever.
- Page 19 SB1 ShowerBuddy step 5 With your Showerbuddy secured in position on the shower base remove the bridge and wheeled base. Release the latches which connect the bridge to the shower base and roll the wheeled base and bridge away. If space...
- Page 20 SB1 ShowerBuddy step 7 Rotate the chair so that you can connect the bridge to transfer your Showerbuddy back to the shower base. Reconnect the bridge to the shower base and secure in position with the latches. Reconnect the wheeled base to the bridge and secure in position with the latches.
- Page 21 SB1 ShowerBuddy step 9 Ensure the primary brake securely locks your Showerbuddy in position on the wheeled base before disconnecting the bridge. Unlock the brakes on the castor wheels. Release the latches which connect the bridge to the wheeled base and roll the wheeled base away.
-
Page 22: Cleaning + Maintenance
SB1 ShowerBuddy cleaning + maintenance It is recommended that your shower chair is serviced annually by your Showerbuddy Dealer or an authorised, competent service agent, in addition: 1. Regularly inspect all parts of the chair for defects. Any defective part should be removed promptly. -
Page 23: Safety Information
It is important that the user(s), and/or the caregivers of the user(s), learn how to safely operate the Showerbuddy shower chair. The following must be read before use of the Showerbuddy shower chair to ensure the safe operation of your Showerbuddy shower chair: The Owner(s) Manual must be read and understood before using the Showerbuddy shower chair. - Page 24 A slippery floor can be caused by dust, water, soap or any substance that doesn’t Transfers should never be attempted with the Showerbuddy allow the tires (tyres) to grip. shower chair positioned on slippery surfaces since the wheel locks can only prevent the wheels from rotating.
- Page 25 SB1 ShowerBuddy Showerbuddy shower chairs are supplied with chest and lap restraining straps which ensure the correct and safe operation of the shower chair for both the user(s) and the caregiver. It is important Showerbuddy that these straps are used every time the shower chair is operated. Your shower chair is equipped with fitting points so that these can be easily and effortlessly attached.
-
Page 26: Warranty Information
- Do not return the unit to Showerbuddy without first obtaining a Return Authorization Number from Customer Service - A defective unit must be shipped to Showerbuddy within 14 days of issuance of a Return Authorization Number by Customer Service... - Page 27 SB1 ShowerBuddy Our Responsibilities - Showerbuddy’s sole responsibility is to repair or replace, at our discretion, the covered components of the unit. This is the exclusive remedy for consequential or incidental damages. - Upon pre-approval, Showerbuddy may provide exchange services for Warranty returns.
- Page 28 SB1 ShowerBuddy page 27...
-
Page 29: Registration Form
SB1 ShowerBuddy registration form Register your Showerbuddy Thank you for purchasing a Showerbuddy product!! About You Salutation Name First Last Your Date of Birth Month Year Address Street Address City State / Province Zip / Postal Code Country Phone Email... - Page 30 SB1 ShowerBuddy Please send your completed Registration Form to one of the addresses below. For all USA & Canada Warranties Warranties for all Other Countries http://www.myshowerbuddy.com/resources/register Register online at Or you can fax or email it to us. Or you can fax or email it to us.
- Page 32 All rights reserved No part of the contents of this manual may be reproduced, stored in a retrieval system or transmitted in any form or by any means, electronic, mechanical, photocopying, recording or otherwise, without the written permission of Showerbuddy Global Limited.
Need help?
Do you have a question about the SB1 and is the answer not in the manual?
Questions and answers