Table of Contents
Advertisement
Quick Links
Advertisement
Table of Contents

Related Manuals for Epson PictureMate PM 215


Summary of Contents for Epson PictureMate PM 215
-
Page 3: Table Of Contents
Printing Groups of Photos ..... . . 18 Transporting PictureMate Printing Camera-Selected DPOF Photos ... 19 PictureMate PM 215... - Page 4 Options ........48 Printer Specifications PictureMate PM 215...
- Page 5 Seiko Epson Corporation. The information DPOF™ is a trademark of CANON INC., Eastman Kodak Company, contained herein is designed only for use with this Epson printer. Epson Fuji Photo Film Co., Ltd. and Matsushita Electric Industrial Co., Ltd.
-
Page 6: Safety Instructions
Also, keep the printer away from direct sunlight, strong light, and heat sources. Otherwise, the printer may be damaged or ink may leak. ❏ Avoid places subject to dust, shock, or vibration. Safety Instructions PictureMate PM 215... - Page 7 Never disassemble, modify, or attempt to repair the AC adapter, power cord, printer, and options by yourself except as specifically explained in the printer's guides. Doing so may result in injury, electric shock, or fire. Safety Instructions PictureMate PM 215...
-
Page 8: When Using The Printer
Use a double insulated flexible cord that is certified* to the ❏ Leave the photo cartridge installed. Removing the cartridge relevant IEC or BS standards. can dehydrate the print head and may prevent the printer from printing. Safety Instructions PictureMate PM 215... - Page 9 If Print Adapter you still have discomfort or vision problems, see a doctor immediately. Refer to the Bluetooth Photo Print Adapter's documentation for the safety instructions. Safety Instructions PictureMate PM 215...
-
Page 10: Printer Parts And Functions
Press to move the cursor on the LCD screen. button Stop/Clear Press to cancel printing or to clear the button number of copies and cancel selecting photos by date. z Print button Press to start printing. Printer Parts and Functions PictureMate PM 215... -
Page 11: Understanding The Lcd Screen
The number of copies for the selected photo. The number for the current photo. Total number of photos. Guidance. The icons show the buttons to press. Appears when you select Frame as the layout setting. Printer Parts and Functions PictureMate PM 215... -
Page 12: Printer Parts
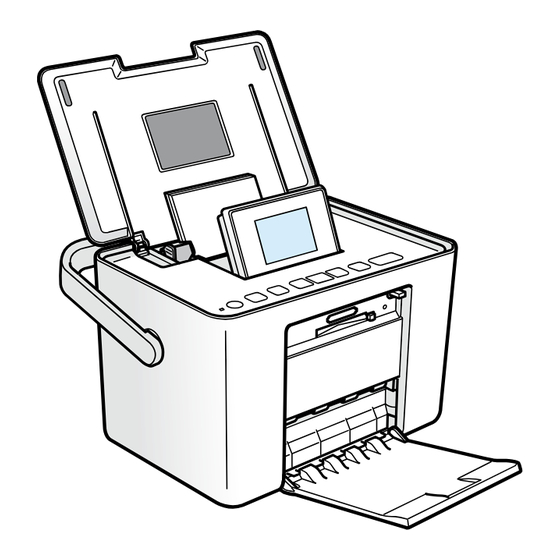
Edge guides Paper Memory card light feeder EXT. I/F (USB) port DC inlet LCD screen Memory Handle card slots Photo cartridge USB port for computer Photo cartridge lever Output tray Cartridge compartment cover Printer Parts and Functions PictureMate PM 215... -
Page 13: Preparing To Print
Preparing to Print Raise and adjust the LCD screen so that you can Inserting a Memory Card see it well. Move the handle to the back. Then open the top cover. Top cover Handle Preparing to Print PictureMate PM 215... - Page 14 Make sure you fit mini memory cards with their adapters before inserting them into the printer's memory card slots. If you do not use an adapter, the memory card and the printer may be damaged. Preparing to Print PictureMate PM 215...
- Page 15 MagicGate Memory Stick Memory Stick PRO Memory Stick Micro * CompactFlash Microdrive Memory Stick Duo * Memory Stick PRO Duo * Memory Stick PRO-HG Duo * MagicGate Memory Stick Duo * * Adapter required Preparing to Print PictureMate PM 215...
-
Page 16: Removing The Memory Card
See “Choosing a Group of Photos” on page 16". For the latest information on memory cards available for your printer, contact your dealer or regional Epson sales office. Lower slot Press the button on the Pull the memory card out. -
Page 17: Loading Paper
Loading Paper sure they are snug, but not so tight that paper cannot move. When loading special paper distributed by Epson, read the instruction sheets packed with the paper first. Follow these steps to load PictureMate Photo Paper: Glossy side Caution: Do not load plain paper;... -
Page 18: Choosing A Group Of Photos
When displaying printouts Press l or r to select the group from which you ❏ When displaying your printouts indoors, Epson want to print photos, and then press OK. Now you recommends placing your printouts in glass are ready to select and print photos. See “Basic frames to preserve the colors in your image. - Page 19 Note: You can switch which group of photos to load at any Select time by selecting Select Group from the Photos menu. Preparing to Print PictureMate PM 215...
-
Page 20: Basic Photo Printing
Select Select Photos, and then press OK. If you want to make optional settings such as color effects, see “Editing Your Photo” on page 21. Select the menu you want to use to print, and then press OK. Basic Photo Printing PictureMate PM 215... -
Page 21: Printing Camera-Selected Dpof Photos
If you want to print all of the photos on the memory card, select No, and then press OK to cancel DPOF information from your camera. After that, follow the steps in “Printing Groups of Photos” on page 18. Basic Photo Printing PictureMate PM 215... -
Page 22: Printing On Photo Stickers
Printing on Photo Stickers Select PhotoSticker, and then Press OK. You can print 1, 4, 9, or 16 photos on the Epson Photo Sticker. See “Making Paper and Print Layout Settings” Press l or r to select the layout you want, and on page 21 for the print layout. -
Page 23: Printing Options
The Frame layout is displayed when your memory card contains frame data. PhotoSticker 1 Photo 16Pht. B/less Editing Your Photo 16 Photos Press x Menu. Select Basic Print Settings or Advanced Print Settings from the Setup menu, and then press Printing Options PictureMate PM 215... - Page 24 Print data). Scene Adjust the mode according to the scene of your Detection photo. Select Standard, People, Landscape or Night Scene. This function is only available when you select Enhance as the Fix Photos option. Printing Options PictureMate PM 215...
-
Page 25: Advanced Print Settings
Borderless as the layout setting. Fix Red-Eye Select On to correct red-eyes in your photo (default: Off). Note: Depending on the type of photo, parts of the image other than the eyes may be corrected. Printing Options PictureMate PM 215... -
Page 26: Printing From An External Device
If a memory card is inserted, the printer will read camera settings generally take precedence over photos from the card, not from a camera. the print settings of PictureMate. See your digital camera's documentation for information on more detailed settings. Printing From an External Device PictureMate PM 215... -
Page 27: Printing From A Bluetooth Device
Up to 10 m Printing From an External Device PictureMate PM 215... - Page 28 Insert the Adapter connector into the EXT. I/F port the LED does not turn on, disconnect the Adapter as shown below. from PictureMate, then reconnect it. Next, make the settings for Bluetooth wireless communication. See “Bluetooth settings” on page 27. Printing From an External Device PictureMate PM 215...
-
Page 29: Bluetooth Settings
Do not disconnect this product while the printer is operating. Doing so may cause the printer to malfunction. ❏ Do not remove this product by pulling on its upper section. Doing so may damage the product. Printing From an External Device PictureMate PM 215... - Page 30 28 to set the Passkey. communicate with and print from the printer. The Bluetooth Passkey setting After you set the Printer ID, Communication Mode, and Encryption, you can set a passkey. Printing From an External Device PictureMate PM 215...
- Page 31 Use the PictureMate’s control panel to adjust the print settings. (For example Layout and Color Effect.) Note: The settings available may vary among Bluetooth wireless-capable devices. For more information, refer to your device’s documentation. Printing From an External Device PictureMate PM 215...
-
Page 32: Making Settings
10 × 15 cm (4 × 6 in). If you select photos using Select By Date or Restore Default Reset to the default settings. Select Group, only selected photos are Settings printed. PictureMate Preferences PictureMate PM 215... -
Page 33: Customizing Id Photos And Printing
Press l or r to select the photo you want to print, and then press OK. A frame is displayed on the selected photo. Move the frame using l or r to set the area you want to print. PictureMate Preferences PictureMate PM 215... -
Page 34: Replacing The Photo Cartridge
You can check the photo cartridge status at any time. Press x Menu. Select Maintenance, and then press OK. Select Photo Cartridge Status, and then press A screen is displayed showing the photo cartridge status. Press OK to close the screen. Replacing the Photo Cartridge PictureMate PM 215... - Page 35 ❏ Caution: In addition to the ink used while printing an image, ❏ Epson recommends the use of genuine ink is also used during the print head cleaning Epson photo cartridges. Epson cannot operation. guarantee the quality or reliability of ❏...
- Page 36 Do not touch the ink supply ports or Note: surrounding area. Do not take the used cartridge apart or try to refill it. Do not shake the used photo cartridge; otherwise, it may leak. Replacing the Photo Cartridge PictureMate PM 215...
- Page 37 Note: If you cannot close the cartridge compartment cover, the photo cartridge is not installed correctly. Go back to the step 3 and eject the photo cartridge. Then install the photo cartrid0ge again. Replacing the Photo Cartridge PictureMate PM 215...
-
Page 38: Transporting Picturemate
If your prints do not look as good after PictureMate the power cord from the electrical outlet. has been moved, try aligning the print head. See “Aligning the Print Head” on page 38. Remove paper from the paper feeder and output tray. Transporting PictureMate PictureMate PM 215... -
Page 39: Maintaining Picturemate
Make sure that PictureMate is turned on and no The above sample may be shown in black and white, but the actual warnings or errors are displayed on the LCD test prints in color (Black, Cyan, Magenta and Yellow). screen. Maintaining PictureMate PictureMate PM 215... -
Page 40: Aligning The Print Head
Select Head Alignment, and then press OK. for at least 6 hours - this allows any dried ink to soften-and then try cleaning the print head again. Press z to print the Head Alignment Pattern, and then follow the on-screen instructions. Maintaining PictureMate PictureMate PM 215... -
Page 41: Cleaning Picturemate
To keep your printouts at their best, and when printing on Epson Ultra Glossy Photo Paper via computer, use If the outer case or the inside of the paper feeder the following procedure to clean the roller inside is dirty, wipe it with a soft, clean cloth dampened PictureMate. -
Page 42: Troubleshooting
32 checking the error messages on the LCD screen. If The printer's ink pads are Contact Epson support to replace ink you cannot solve the problems, by checking the nearing the end of their pads before the end of their service life. -
Page 43: Printer Power Problems
LCD screen is off. service life. Please contact When the ink tubes reach the end of their Epson support. service life, the printer stops and Epson ❏ support is required to continue printing. If no buttons are pressed for 13 minutes and the &... -
Page 44: Print And Noise Problems
PictureMate. Make ❏ sure the handle is not resting on the paper. See Make sure the glossy side of the paper is face up. “Preparing to Print” on page 11. Troubleshooting PictureMate PM 215... - Page 45 ❏ ❏ The photo cartridge may be old or low on ink. To Use only paper recommended by Epson to ensure replace the photo cartridge, see “Replacing the proper saturation, ink absorption, and quality. See Photo Cartridge” on page 32.
-
Page 46: Problems With Paper Feeding
Make sure the top cover is open, and is not leaning on the handle. The handle should be back of PictureMate. Make sure the handle is not resting on the paper. See “Preparing to Print” on page 11. Troubleshooting PictureMate PM 215... -
Page 47: Miscellaneous Printout Problems
❏ If you have a border on one side of your photo but not the other, make sure the paper is placed in the center of the paper feeder. Slide the edge guides against the paper. Troubleshooting PictureMate PM 215... -
Page 48: Contacting Customer Support
❏ Your computer operating system name and Regional Customer Services version If your Epson product is not operating properly and you ❏ Names and versions of the software applications cannot solve the problem using the troubleshooting you normally use with your product information in your product documentation, contact customer support services for assistance. - Page 49 (63) 2-813-6545 Bandung: (62) 22-7303766 E-mail epchelpdesk@epc.epson.com.ph Surabaya: (62) 31-5355035/31-5477837 Medan: (62)61-4516173 Telephone Yogyakarta: (62) 274-565478 Makassar: (62)411-350147/411-350148 Hong Kong http://www.epson.com.hk Phone (852) 2827-8911 (852) 2827-4383 Malaysia http://www.epson.com.my Phone 603-56288333 India http://www.epson.co.in Phone 080-30515000 Contacting Customer Support PictureMate PM 215...
-
Page 50: Photo Cartridge, Paper, And Options
If you want to use paper other than the types listed Photo Cartridge and Paper above, refer to the online User's Guide manual. The following photo cartridge and Epson special paper are available for PictureMate. This information is only Options for standalone operation. -
Page 51: Printer Specifications
AC 100-240 V, 50-60 Hz, 0.8-0.4 A, 42 W Borderless printing: 0 mm margin Output DC 20 V, 1.68 A Paper tray capacity Photo paper: 20 sheets Photo Sticker: 1 sheet Weight Approx. 2.2 kg (4.9 lb) without AC adapter and photo cartridge Printer Specifications PictureMate PM 215... -
Page 52: Memory Card
All card types standard version compliant Humidity Operation:* Voltage Requirements 20 to 80% RH 3.3 V * Without condensation 3.3 V/5 V Combined use Maximum current is 500 mA * Maximum capacity is 128 MB. ** Adapter required. Printer Specifications PictureMate PM 215... - Page 53 Caution: ❏ For the latest information on memory cards available Epson recommends the use of genuine for your printer, contact your dealer or regional Epson Epson PictureMate photo cartridge. Other sales office. products not manufactured by Epson may cause damage that is not covered by...
-
Page 54: Standards And Approvals
The yields quoted for you do not include this reserve. Interface USB 2.0 Hi-Speed (for PictBridge compliant devices) Bluetooth Ver.2.0 + EDR compliant (Option) Standards and Approvals Printer Australian model: AS/NZS CISPR22 Class B Printer Specifications PictureMate PM 215... -
Page 55: Summary Of Panel Settings
Printout is blurred 4 Per Print 16 Photos The ink runs 1 Photo Frame Quick Guide Insert memory card Fix Photos Enhance Eject memory card P.I.M. Load paper Change Photo Cartridge Wrong card inserted Summary of Panel Settings PictureMate PM 215... - Page 56 Print Proof Sheet Custom ID Print Setup Advanced Print Expansion Standard / Middle / Settings Minimum Camera Text On / Off Fix Red-Eye On / Off Confirm Print Preview On / Off Sticker Position Language Summary of Panel Settings PictureMate PM 215...
-
Page 57: Index
Clogged nozzles, 37 Memory card, 13 Color compatibility, 50 Gaps in image, 43 problems, 44 inserting, 11 Consumables, 48 problems, 42 Control panel, 8 removing, 14 Customer support, 46 Missing colors, 44 Image quality, 42 to 44 Index PictureMate PM 215... - Page 58 Transporting PictureMate, 36 buying, 48 Troubleshooting, 40 to 45 replacing, 32 to 35 safety instructions, 7 PictBridge, 24 PictureMate PicturePack, 48 USB cable, 24 Power cable, 36 Problems memory card, 42 missing colors, 44 paper feeding, 44 Index PictureMate PM 215...
- Page 60 Printed in XXXXXX...
Need help?
Do you have a question about the PictureMate PM 215 and is the answer not in the manual?
Questions and answers