Table of Contents
Advertisement
Available languages
Available languages
Advertisement
Table of Contents

Related Manuals for Samsung HT-J5530K


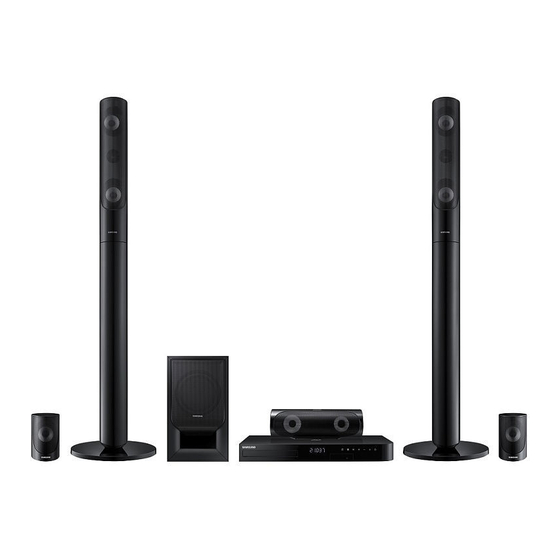
Summary of Contents for Samsung HT-J5530K
- Page 1 HT-J5530K User manual 5.1CH Blu-ray™ Home Entertainment System imagine the possibilities Thank you for purchasing this Samsung product. To receive more complete service, please register your product at www.samsung.com/register...
-
Page 2: Safety Information
Safety Information This symbol indicates that high voltage CAUTION is present inside. It is dangerous to make any kind of contact with any RISK OF ELECTRIC SHOCK. DO NOT OPEN internal part of this product. CAUTION: TO REDUCE THE RISK OF ELECTRIC SHOCK, DO This symbol indicates that important NOT REMOVE THE COVER (OR BACK). - Page 3 ~ Do not allow children to hang on the product. 3D Precautions ~ Store the accessories (battery, etc.) in a location safely out of the reach of children. IMPORTANT HEALTH AND SAFETY INFORMATION FOR ~ Do not install the product in an unstable location such 3D PICTURES.
-
Page 4: Table Of Contents
Contents GETTING STARTED NETWORK SERVICES Accessories 35 Using BD-LIVE™ Speaker Components 35 Using DLNA Front Panel 35 Apps Rear Panel 36 Using Opera TV Store Remote Control 37 Screen Mirroring CONNECTIONS APPENDIX Connecting the Speakers 38 Additional Information 11 Connecting to a TV and External Devices 39 Disk and Format Compatibility 12 Connecting to a Network Router 44 Troubleshooting... -
Page 5: Getting Started
Getting Started Check the box for the accessories and speaker components listed or shown below. Accessories ~ Remote Control ~ User Manual ~ Batteries (AAA size) Power Cable FM Antenna HDMI Cable Speaker Components Screw (5x15) x 2 Center Screw (5x20) x 8 Speaker Cable x 6 Front x 2 Stand x 2... -
Page 6: Front Panel
Getting Started Front Panel DISPLAY ICONS FUNCTION STOP PLAY/PAUSE OPEN/ VOLUME POWER CLOSE CONTROL DISPLAY 5V 0.5A MIC 1 MIC 2 DISC TRAY REMOTE CONTROL SENSOR MIC JACK ✎ When the product is on, do not let children touch the product's surface. It will be hot. ✎... -
Page 7: Remote Control
Remote Control Tour of the Remote Control Press to select Home Theater's Turn the product on and off. mode. (BD/DVD, D. IN, AUX, FUNCTION etc.). To open and close the disc tray. VOLUME MUTE Adjust the volume. Cut off the sound temporarily. Press numeric buttons to operate options. -
Page 8: Connections
Connections This section describes various methods of connecting the product to other external components. Before moving or installing the product, be sure to turn off the power and disconnect the power cord. Connecting the Speakers Position of the product Place it on a stand or cabinet shelf, or under the TV stand. -
Page 9: Installing The Speakers On The Tallboy Stand
Installing the Speakers on the Tallboy Stand Turn the Stand Base upside-down and connect Stand Base it to the Stand. Use the driver to fasten the screws (5x20) on the 4 marked holes. Stand Straighten the provided speaker cable and run it through the center hole of the Stand Base. - Page 10 Connections Front Speaker (L) Surround Speaker (L) SURROUND Surround Speaker (R) SURROUND Center Speaker SURROUND SURROUND Front Speaker (R) Subwoofer ✎ If you place a speaker near your TV set, the screen color may be distorted because of the magnetic field. | CAUTION | If you want to install the speakers on the wall, fasten screws or nails (not provided) firmly to the wall wherever you want to hang a speaker, and then, using the hole in the rear of each speaker, carefully hang each...
-
Page 11: Connecting To A Tv And External Devices
Connecting to a TV and External Devices SURROUND SURROUND White Method 1 Method 2 External Devices AUDIO OUT OPTICAL OUT HDMI IN (ARC) Connecting to a TV Connect an HDMI cable from the HDMI OUT jack on the back of the product to the HDMI IN jack on your TV. If the TV supports ARC, you can hear the audio from your TV through the home theater with only this cable connected. -
Page 12: Connecting To A Network Router
IP router is currently being used by policies may prevent the product from accessing another device nearby, it will result in interference Samsung's software update server. If this occurs, and communication failure. contact your Internet Service Provider (ISP) for ✎... -
Page 13: Settings
✎ If you use an HDMI cable to connect the product 16:9 Full - For widescreen TVs. Displays to an Anynet+ (HDMI-CEC)-compliant Samsung widescreen pictures in their original 16:9 format TV and 1.) You have set the Anynet+ (HDMI-CEC) and expands 4:3 pictures to fill the 16:9 screen. -
Page 14: The Home Screen At A Glance
Settings The Home Screen at a Glance 7 Change Device Displays a list of external devices connected to the main unit. Switch to the desired device. 8 Function PLAY DISC PHOTOS VIDEOS MUSIC Use for switching to an external device, and for radio and mode switching for a Bluetooth connection. -
Page 15: Settings Menu Functions
When you connect a Samsung product setting. and a Samsung TV with BD Wise to each other EXIT Button : Press to exit the current via HDMI, and BD Wise is on in both the product menu. - Page 16 Settings HDMI Color Format Speaker Selection Lets you set the color space format for the HDMI Lets you select which speakers you want active, output to match the capabilities of the connected either the TV's speakers or the home theater's device (TV, monitor, etc).
- Page 17 Lets you test the Internet Protocol setup to see if it the Anynet+ feature and lets you control those is working correctly. products with one Samsung TV remote. To operate this function, you must connect this product to an Network Status Anynet+ Samsung TV using an HDMI cable.
-
Page 18: Radio Setup
STEREO and MONO. For more information about this function, see page ~ In a poor reception area, select MONO for a clear, interference-free broadcast. Contact Samsung Presetting Stations Provides contact information for assistance with Example : Presetting FM 89.10 into memory. -
Page 19: Network Setup
✎ To delete all Preset FM stations at once, press the Network Setup TITLE MENU button for about 5 seconds in FM Manual mode until DEFAULT PRESET appears When you connect this product to a network, you on the display. can use network based applications and functions such as BD-LIVE and upgrade the product's software Recording FM Radio... - Page 20 Settings Wireless - Automatic Network Settings Follow the Steps 1 to 3 in "Configuring Your Network Wired network connection failed. Connection". (See page 19) MAC Address XX:XX:XX:XX:XX:XX In the Network Settings screen, change IP Address 0. 0. 0. 0 Subnet Mask 0.
- Page 21 ✎ You can get the Network parameter values from Enter your wireless network or wireless router's name. your Internet provider. ~ Enter numbers directly using the number 11. When finished, select Return ( ' ), and then buttons on your remote control. press the E button.
-
Page 22: Wi-Fi Direct
Settings You have three ways to complete the Wi-Fi Wi-Fi Direct connection: ~ Through the Wi-Fi device. The Wi-Fi Direct function allows you to connect Wi- ~ Through the product using PBC. Fi Direct devices to the product and each other using a peer-to-peer network, without a wireless router. -
Page 23: Upgrading Software
~ Never turn the product off or back on manually By USB during the update process. ~ The update is complete when the product turns Visit Samsung's website on a computer and off after restarting. Press the POWER button to download the update package to a USB device. -
Page 24: Setting Up Dlna
Settings To upgrade the firmware, select Yes. The product turns off automatically, turns on, and then begins the upgrade. The update progress popup will appear. When the update is complete, the product will turn off automatically again. Press the POWER button to turn on the product. -
Page 25: Playing Content
Playing Content Press the button to close the disc tray. Your home theater can play content located on Blu-ray/DVD/CD discs, USB devices, PCs, smart Playback starts automatically. phones, tablets, and in Apps. If playback does not start automatically, press To play content located on your PC or a mobile the 6 button on the remote. -
Page 26: Playing Files On A Usb Device
Playing Content A screen appears listing the contents of the disc. If necessary, use the ▲▼◄► buttons to select a folder, and then press the E button. Depending on how the contents are arranged, you will see either folders, individual files, or Select a file to view or play, and then press the both. -
Page 27: Controlling Video Playback
Controlling Video Playback 2 Using the disc menu, title menu, popup menu, and title list You can control the playback of video content located DISC MENU on a Blu-ray/DVD disc, USB device, mobile device, or PC. Depending on the disc or contents, some of During playback, press this button to display the the functions described in this manual may not be Disc menu. -
Page 28: Using The Tools Menu
Playing Content Menu selections that appear only when a Using the TOOLS Menu BD/DVD disc plays During playback, press the TOOLS button. Title Chapter If there is more than one title on a disk or device, Lets you move to a chapter that you want to lets you move to or select a desired title. -
Page 29: Playing A Pre-Recorded Commercial Audio Disc
Creating a Video Playlist Buttons on the Remote Control used for Music Playback You can create a playlist of video files in nearly the same way you create a playlist of music files. See page 30 for instructions. Select video files instead of music files. - Page 30 Playing Content Creating a Music Playlist Ripping If you are playing music from a commercial CD Insert a USB device into the USB jack on the or DVD, press the 5 or RETURN button. The front of the product. Music List Screen appears. If you are creating With the Playback screen displayed, use the ▲▼...
-
Page 31: Playing Photo Content
Playing Photo Content Using Karaoke You can play photo content located on a DVD, USB, You can enjoy the Karaoke with music. mobile device, or PC. Connect the microphone on the front of the product. Using the Tools Menu In the Home menu, select the Settings, and During playback, press the TOOLS button. -
Page 32: Using Bluetooth
Playing Content To Connect the Home Theater to a Bluetooth Using Bluetooth Device You can use a Bluetooth device to enjoy music with high quality stereo sound, all without wires! ~ Pairing distance : max. 2M, Operating distance : max. 10M Connect ~ Actual Bluetooth performance may differ depending on your environment, even if you... -
Page 33: Using The Special Effects Remote Control Buttons
- If the Bluetooth device is turned off, not in Using the Bluetooth Quick Start place, or malfunctions. When the home theater is turned off, connecting Note that such devices as microwave ovens, wireless your smart device to the product via a Bluetooth LAN adapters, fluorescent lights, and gas stoves use connection can turn the home theater on. - Page 34 Playing Content Use TV SOUND: 1) When you want to listen to the TV's audio through the home theater speakers. 2) When you want to listen to the audio from a USB device plugged into the TV through the home theater speakers. TV SOUND ON/OFF support specifications: Anynet+ (HDMI-CEC)
-
Page 35: Network Services
Network Services On your home theater, select Change Device. Using BD-LIVE™ Use the ▲▼ button to select your PC in the Device List. Connect the product to your network. Select the kind of file you want to view or play, (See page 12) PHOTOS, VIDEOS, or MUSIC and then press Configure the network settings. -
Page 36: Using Opera Tv Store
Network Services Using Apps Using Opera TV Store The first time you access any one of the apps, the At the Opera TV Store, you will find high-quality home theater displays two agreements. You must Internet video streaming, social network, and music accept both agreements to download and use any streaming services. -
Page 37: Screen Mirroring
The TV displays a connecting message (for Deleting Apps from MY APPS example, Connecting to Android_92gb...) and Highlight the MENU button on the top of the My then displays the connected message. Apps screen, and then press the E button on In a few moments, the screen of your device your remote. -
Page 38: Appendix
~ This function is not available if the HDMI cable does not support CEC. ~ Depending on the disc type, some aspect ratios ~ If your Samsung TV has an Anynet+ logo, then it may not be available. supports the Anynet+ function. -
Page 39: Disk And Format Compatibility
Playing JPEG files Speaker Settings ~ You can’t enlarge the subtitle and PG graphics in ~ When Speaker Selection is set to TV Speaker, the full screen mode. audio is produced by the TV speakers. Playing Content HDMI audio ~ When HDMI audio is output to the TV speakers, it is Using the TOOLS button while playing pictures... -
Page 40: Logos Of Discs The Product Can Play
Please note that this is not a defect in the product. do not match, the disc will not play. ✎ Samsung cannot guarantee that this product will The Region Number for this product is displayed on the play every disc bearing the Blu-ray Disc, DVD, or CD rear panel of the product. -
Page 41: Supported Formats
~ "x.v.Color" is a trademark of Sony Corporation. HDD manufacturer. ~ "AVCHD" and the AVCHD logo are trademarks of ~ SAMSUNG is not responsible for any data file damage Matsushita Electronic Industrial Co., Ltd. and Sony or data loss. Corporation. - Page 42 Appendix Video File Support File Extension Container Video Codec Audio Codec Resolution DivX 3.11/4/5/6 MP3, Dolby Digital, DTS, *.avi MP4v3 WMA, PCM H.264 BP/MP/HP VC-1 AP, DivX 5/6 *.mkv MP3, Dolby Digital, DTS H.264 BP/MP/HP VC-1 AP *.wmv 1920x1080 (wmv9) VC-1 SM MP4 (mp4v) *.mp4...
- Page 43 Digital Output Selections Bitstream Bitstream Bitstream Setup (Re-encoded (Unprocessed) (Re-encoded DTS) Dolby D) Connection HDMI supported AV receiver Up to PCM 7.1ch Dolby Digital Dolby Digital Dolby Digital Dolby Digital Plus Plus Audio Dolby TrueHD Dolby TrueHD Re-encoded Stream on DTS re-encoded Dolby Digital * Up to PCM 5.1ch...
-
Page 44: Troubleshooting
Refer to the table below when this product does not function properly. If the problem you are experiencing is not listed below or if the instructions below do not help, turn off the product, disconnect the power cord and contact the nearest authorized dealer or Samsung Electronics Service Center. Symptom... - Page 45 Symptom Check/Remedy ~ Is there "Dolby Digital 5.1 CH" mark on the disc? Dolby Digital 5.1 CH Surround Dolby Digital 5.1 CH Surround Sound is not Sound is produced only if the disc is recorded with 5.1 channel sound. produced. ~ Is the audio language correctly set to Dolby Digital 5.1-CH in the information display? ~ Are you operating the remote within its operational range and within the proper...
- Page 46 Appendix Symptom Check/Remedy ~ The feature is unavailable or the action cannot be completed at this time because: "Not Available" appears on screen. 1. The Blu-ray/DVD disc's software restricts it. 2. The Blu-ray/DVD disc's software doesn’t support the feature (e.g., angles) 3.
-
Page 47: Specifications
6.50 ✎ Network speeds equal to or below 10Mbps are not supported. ✎ Samsung Electronics Co., Ltd reserves the right to change the specifications without notice. ✎ Weight and dimensions are approximate. ✎ Design and specifications are subject to change without prior notice. -
Page 48: Licenses
Appendix Licenses Manufactured under license from Dolby Laboratories. Dolby and the double-D symbol are trademarks of Dolby Laboratories. For DTS patents, see http://patents.dts.com. Manufactured under license from DTS Licensing Limited. DTS, DTS-HD, the Symbol, & DTS and the Symbol together are registered trademarks, and DTS-HD Master Audio | Essential is a trademark of DTS, Inc. -
Page 49: Manual Del Usuario
Blu-ray™ de 5,1 canales Sistema de entretenimiento imagine las posibilidades Gracias por adquirir un producto Samsung. Para recibir un servicio más completo, registre su producto en www.samsung.com/register Para evitar cualquier avería o daños, lea detalladamente este manual de instrucciones antes de conectar... - Page 50 Información de seguridad Este símbolo indica la presencia de alto PRECAUCIÓN voltaje en el interior. Es peligroso entrar en contacto con cualquier pieza interior NO ABRIR, PELIGRO DE DESCARGAS ELÉCTRICAS de este producto. PRECAUCIÓN: PARA REDUCIR EL PELIGRO DE DESCARGA Este símbolo indica que con este ELÉCTRICA, NO RETIRE LA TAPA (NI LA PARTE TRASERA).
- Page 51 • No permita que los niños se cuelguen del producto. Utilización de la función 3D • Guarde los accesorios (pila, etc.) en un lugar seguro fuera del alcance de los niños. INFORMACIÓN IMPORTANTE SOBRE SALUD Y • No instale el producto en un sitio inestable como SEGURIDAD CON RESPECTO A IMÁGENES EN 3D.
- Page 52 Índice general INTRODUCCIÓN SERVICIOS DE RED Accesorios 35 Utilización de BD-LIVE™ Componentes de las bocinas 35 Utilización de DLNA Panel frontal 35 Apps Panel posterior 36 Utilización de Opera TV Store Mando a distancia 37 Screen Mirroring CONEXIONES APÉNDICE Conexión de las bocinas 38 Información adicional 11 Conexión a un TV y dispositivos externos 39 Compatibilidad de discos y formatos...
- Page 53 Introducción Compruebe si la caja incluye los accesorios y los componentes de los altavoces que se enumeran y se muestran a continuación. Accesorios • Mando a distancia • Manual del usuario • Pilas (tamaño AAA) Cable de alimentación Antena FM Cable de HDMI Componentes de las bocinas 2 Tornillo (5x15)
-
Page 54: Panel Frontal
Introducción Panel frontal ICONOS DE PANTALLA FUNCIÓN DETENER REPRODUCIR/PAUSA ABRIR/CERRAR CONTROL DE VOLUMEN ALIMENTACIÓN PANTALLA 5V 0.5A MIC 1 MIC 2 BANDEJA DE DISCO SENSOR DE MANDO A MICRÓFONO DISTANCIA ✎ Cuando el producto está encendido, no deje que los niños toquen la superficie del producto. Es probable que esté... -
Page 55: Mando A Distancia
Mando a distancia Guía del mando a distancia Se presiona para seleccionar Enciende o apaga el producto. el modo del sistema de cine en casa. (BD/DVD, D. IN, AUX, etc.). FUNCTION Se presiona para abrir y cerrar la VOLUME MUTE bandeja del disco. - Page 56 Conexiones En esta sección se describen diversos métodos de conexión del producto a otros componentes externos. Antes de trasladar o instalar el producto, asegúrese de apagar y desconectar el cable de alimentación. Conexión de las bocinas Posición del producto Colóquelo en un soporte o en un estante, o bien debajo del soporte del televisor.
- Page 57 Instalación de las bocinas en el pie de soporte Coloque la base del soporte boca arriba y fíjela Base de soporte al soporte. Utilice el destornillador para apretar los tornillos (5x20) en los 4 orificios marcados. Soporte Enderece el cable de la bocina que se suministra e introdúzcalo por el orificio central de la base del soporte.
- Page 58 Conexiones Bocina delantera (I) Bocina Surround (I) SURROUND Bocina Surround (D) SURROUND Bocina central SURROUND SURROUND Bocina delantera (D) Subwoofer ✎ Si coloca la bocina cerca del equipo de televisión, es posible que se distorsione el color de la pantalla debido al campo magnético.
- Page 59 Conexión a un TV y dispositivos externos SURROUND SURROUND Rojo Blanco Método 1 Método 2 Dispositivos externos AUDIO OUT OPTICAL OUT HDMI IN (ARC) Conexión a un TV Conecte un cable HDMI desde la toma HDMI OUT de la parte trasera del producto a la toma HDMI IN del TV.
- Page 60 Internet (ISP) para más información. certificación Wi-Fi más recientes, el sistema de ✎ cine en casa de Samsung no admite cifrado de Para usuarios de DSL, utilice el enrutador para seguridad WEP, TKIP o TKIP-AES (WPS2 Mixto) realizar una conexión de red.
-
Page 61: Procedimiento De Ajustes Iniciales
✎ Si utiliza el cable HDMI para conectar el producto 16:9 Completo - para TV panorámicos. Muestra a un TV Samsung compatible con Anynet+ imágenes panorámicas en su formato 16:9 (HDMI-CEC) y 1. Ha definido la función Anynet+ original y amplía las imágenes 4:3 hasta ocupar (HDMI-CEC) en On (Encendido) tanto en el TV la pantalla 16:9. - Page 62 Configuración Visión general de la pantalla de inicio 7 Cambiar dispositivo Muestra una lista de dispositivos externos conectados a la unidad principal. Cambia al dispositivo que desee. REPRODUCIR DISCO FOTOS VIDEOS MÚSICA 8 Función Se utiliza para cambiar a un dispositivo externo, y para radio y el cambio de modo para una conexión Bluetooth.
- Page 63 Botón EXIT: se presiona para salir del menú reciente de Samsung. Cuando conecte entre sí actual. un producto Samsung y un TV Samsung con BD Wise a través de HDMI, y BD Wise esté activado Información detallada de las funciones en el producto y el TV, el producto genera la Cada función de Config., opción de menú...
- Page 64 Configuración Formato color HDMI Selección de altavoz Permite definir el formato de espacio de color para la Permite seleccionar las bocinas que desee activar, salida HDMI para que coincida con las capacidades bien las bocinas del TV o las bocinas del sistema de del dispositivo conectado (TV, monitor, etc).
- Page 65 TV Permite comprobar la configuración del Protocolo remoto. Para utilizar esta función, debe conectar de Internet para ver si funciona correctamente. este producto a un TV Samsung Anynet+ con un cable HDMI. Estado de red Gestión de datos BD Permite comprobar el estado actual de la red y de Internet.
-
Page 66: Preajuste De Emisoras
Para más información sobre esta función, consulte Preajuste de emisoras la página 23. Ejemplo: preajuste de FM 89.10 en la memoria. Contacto con Samsung Presione el botón FUNCTION para seleccionar Proporciona información de contacto para obtener asistencia sobre su producto. - Page 67 ✎ Para eliminar todas las emisoras de presintonías Configuración red FM al mismo tiempo, presione el botón TITLE MENU por unos 5 segundos en modo FM Cuando conecte este producto a una red, puede Manual hasta que aparezca DEFAULT PRESET utilizar las aplicaciones y funciones de red como BD- en la pantalla.
- Page 68 Configuración Inalámbrico - Automática Configuración de red Siga los pasos del 1 al 3 de “ Configuración de la No se pudo realizar la conexión a la red cableada. conexión de red". (Consulte la página 19) Dirección MAC XX:XX:XX:XX:XX:XX En la pantalla Configuración de red, cambie Dirección IP 0.
- Page 69 ✎ Puede obtener los parámetros de red del Ingrese el nombre del enrutador inalámbrico o de la red inalámbrica. proveedor de Internet. • Ingrese directamente los números utilizando 11. Una vez hecho, seleccione Regresar ( ' ) y, a los botones numéricos del mando a distancia. continuación, presione el botón E .
- Page 70 Configuración Una vez completado el procedimiento, debe ver Wi-Fi directa un mensaje emergente en la pantalla del TV que indique que un dispositivo que admite La función Wi-Fi directa le permite conectar Wi-Fi directa ha solicitado conectar. Confirme dispositivos Wi-Fi directa al producto y entre sí que el dispositivo que realice la solicitud sea utilizando una red "igual a igual"...
- Page 71 En el menú de inicio, seleccione Config. y, a Por USB continuación, presione el botón E . Seleccione Soporte técnico y, a continuación, Visite el sitio web de Samsung con una presione el botón E . computadora y descargue el paquete de actualización en un dispositivo USB.
- Page 72 Configuración Para actualizar el firmware, seleccione Sí. El producto se apaga automáticamente, se enciende e inicia la actualización. Aparecerá la ventana de progreso de la actualización. Una vez completada la actualización, el producto se apagará automáticamente de nuevo. Pulse el botón ALIMENTACIÓN para encender el producto.
-
Page 73: Almacenamiento Y Manejo De Discos
Reproducción de contenido Presione el botón para cerrar la bandeja Su sistema de cine en casa puede reproducir contenido de discos Blu-ray/DVD/CD, dispositivos de disco. La reproducción se inicia USB, PC, smartphones, tabletas yen Apps. automáticamente. Para reproducir contenido del PC o de un dispositivo Si la reproducción no se inicia automáticamente, móvil, debe conectar el PC o el dispositivo móvil y el pulse el botón 6 del mando a distancia. - Page 74 Reproducción de contenido Aparece una pantalla con el contenido del Si es necesario, utilice los botones ▲▼◄► dispositivo. Según la forma en que se organice para seleccionar una carpeta y, a continuación, presione el botón E . el contenido, verá carpetas, archivos individuales o ambos.
- Page 75 Control de reproducción de video 2 Uso del menú de disco, menú de título, menú emergente y lista de títulos Puede controlar la reproducción del contenido de DISC MENU video de un disco Blu-ray/DVD, dispositivo USB, dispositivo móvil o PC. Según el disco o el contenido, Durante la reproducción, presione este botón para es posible que no estén disponibles algunas de las ver el menú...
- Page 76 Reproducción de contenido Selecciones de menú que aparecen solo Utilización del menú Herramientas cuando se reproduce un disco BD/DVD Durante la reproducción, presione el botón TOOLS. Título Capítulo Si hay más de un título en un disco o dispositivo, Permite seleccionar para ir a un capítulo que desee vaya al título que desee o selecciónelo.
- Page 77 Creación de una lista de reproducción Botones del mando a distancia de vídeo utilizados para reproducción de música Puede crear una lista de reproducción de archivos de video casi de la misma forma que se crea una lista de reproducción de archivos de música. Consulte la página 30 para obtener instrucciones.
- Page 78 Reproducción de contenido Creación de una lista de reproducción de Copia música Inserte un dispositivo USB en la toma USB del Si va a reproducir música de un CD o DVD frontal del producto. comercial, pulse el botón 5 o RETURN. Con la pantalla de reproducción en pantalla.
- Page 79 Reproducción de contenido fotográfico Utilización de Karaoke Puede reproducir contenido fotográfico de un DVD, Puede disfrutar del Karaoke con música. USB, dispositivo móvil o PC. Conecte el micrófono en el frontal del producto. En el menú de inicio, seleccione Config. y, a Utilización del menú...
- Page 80 Reproducción de contenido Para conectar el Sistema de cine en casa a un Utilización de Bluetooth dispositivo Bluetooth Puede utilizar el dispositivo Bluetooth para poder disfrutar de la música con un sonido estéreo de gran calidad, sin necesidad de cables. Conectar •...
- Page 81 - Si el dispositivo Bluetooth está desactivado, no Utilización del Inicio rápido Bluetooth está en su sitio o sufre una avería. Cuando el sistema de cine en casa está apagado, Tenga en cuenta que dispositivos como hornos conectar el dispositivo inteligente al producto a microondas, adaptadores de LAN inalámbrica, luces través de una conexión Bluetooth puede encender el fluorescentes y hornos de gas utilizan el mismo rango...
- Page 82 Reproducción de contenido Usar TV SOUND: 1) Cuando desee escuchar el audio del TV a través de las bocinas del sistema de cine en casa. 2) Cuando desee escuchar el audio desde un dispositivo USB enchufado al TV a través de las bocinas del sistema de cine en casa.
-
Page 83: Servicios De Red
Servicios de red En el sistema de cine en casa, seleccione Utilización de BD-LIVE™ Cambiar dispositivo. Utilice el botón ▲ % para seleccionar el PC en la Conectar el reproductor a la red. lista de dispositivos. (Consulte la página 12) Seleccione el tipo de archivo que desea ver o Configurar los ajustes de red. - Page 84 Servicios de red Utilización de Apps Utilización de Opera TV Store La primera vez que acceda a cualquiera de las apps, En Opera TV Store, encontrará emisión de vídeo el sistema de cine en casa muestra dos acuerdos. continuo por Internet de alta calidad, redes sociales y Debe aceptar ambos acuerdos para descargar y servicios de emisión de música.
- Page 85 El TV muestra un mensaje de conexión (por Eliminación de Apps desde MIS ejemplo, Conectando a Android_92gb...) y APLICACIONES muestra el mensaje de que está conectado. Resalte el botón MENÚ en la parte superior de Trascurridos unos segundos, la pantalla de su dispositivo aparece en la pantalla de TV.
- Page 86 • La función no está disponible si el cable HDMI no Formato de TV admite CEC. • Si el televisor Samsung tiene un logotipo Anynet+, • Según el tipo de disco, es posible que no estén admite la función Anynet+.
-
Page 87: Compatibilidad De Discos Y Formatos
Reproducción de archivos JPEG Altavoz • No puede ampliar los subtítulos ni el gráfico PG en • Cuando Selección de altavoz se establece en el modo de pantalla completa. Altavoz de TV, el audio se produce a través de los altavoces del TV. - Page 88 Taiwán, Hong Kong y Sureste de ✎ Asia. Póngase en contacto con el Servicio de atención al cliente de SAMSUNG en el número si tiene preguntas Europa, Groenlandia, Territorios Disco o encuentra dificultades al reproducir discos Blu-ray, franceses, Oriente Próximo, África, DVD o CD en este producto.
- Page 89 Ltd. y Sony Corporation. disco duro USB. ✎ Es posible que algunos discos con formato AVCHD • SAMSUNG no se hace responsable de ningún daño no se reproduzcan, según las condiciones de en los archivos ni de la pérdida de datos. grabación.
- Page 90 Apéndice Soporte de archivos de video Extensión de archivo Contenedor Códec de video Códec de audio Resolución DivX 3.11/4/5/6 MP3, Dolby Digital, DTS, *.avi MP4v3 WMA, PCM H.264 BP/MP/HP VC-1 AP, DivX 5/6 *.mkv MP3, Dolby Digital, DTS H.264 BP/MP/HP VC-1 AP *.wmv WMV (wmv9)
- Page 91 Selección de salida digital Bitstream Bitstream Bitstream Configuración (recodificación (recodificación (sin procesar) DTS) Dolby D) Conexión Receptor de AV que admita HDMI Hasta PCM 7,1 can. Dolby Digital Dolby Digital Dolby Digital Dolby Digital Plus Plus Flujo de datos de Dolby TrueHD Dolby TrueHD Dolby Digital...
- Page 92 Samsung Electronics. Síntoma Comprobación/Remedio...
- Page 93 Síntoma Comprobación/Remedio No se genera el sonido • ¿Tiene el disco la marca "Dolby Digital 5.1 CH"? El sonido Surround Dolby Digital Surround Dolby Digital 5.1 de 5,1 canales sólo se genera si el disco se graba con sonido de 5,1 canales. •...
- Page 94 Apéndice Síntoma Comprobación/Remedio Aparece en pantalla "No • En este momento no puede realizarse la función o acción porque: Disponible". 1. El software del disco Blu-ray/DVD los restringe. 2. El software del disco Blu-ray/DVD no admite la función (por ej.: ángulos) 3.
- Page 95 6,50 ✎ No se admiten velocidades de red iguales o inferiores a 10 Mbps. ✎ Samsung Electronics S.A. reserva los derechos para cambiar las especificaciones sin el aviso previo. ✎ El peso y dimensiones son aproximados. ✎ El diseño y las especificaciones están sujetos a cambio sin aviso.
- Page 96 Apéndice Licencia Fabricado con licencia de Dolby Laboratories. Dolby y el símbolo de la doble D marcas comerciales de Dolby Laboratories. Para patentes de DTS, consulte http://patents.dts.com. Fabricado con licencia de DTS Licensing Limited. DTS, DTS-HD, el símbolo y DTS y el símbolo juntos son marcas comerciales registradas y DTS-HD Master Audio es una marca comercial de DTS, Inc.
- Page 97 © 2015 Samsung Electronics Co., Ltd. Reservados todos los derechos. Contacte con SAMSUNG WORLD WIDE Si tiene alguna pregunta o comentario acerca de productos Samsung, por favor contacte con el servicio de atención al cliente de SAMSUNG. Contact Center ...
Need help?
Do you have a question about the HT-J5530K and is the answer not in the manual?
Questions and answers