Advertisement
I
NSTALLATION
F
OR ALL
1. Keep out of reach of children. Seek medical advice if taken.
2. Avoid exposure to direct sunshine and don't keep it at high or freezing temperatures.
3. Avoid Knocks and bumps.
4. Please avoid taking out the cartridges after installing the CIS ink system, where possible.
5. This product is designed to operate within 10-40 degrees Celsius.
6. The CIS ink system has passed strict compatibility check, so we suggest using our ink and cartridges to
maintain printer quality.
7. Mixing two different brands of ink into the CISS is not recommended
8. Keep the tank and printer at the same level. Do not place the tanks higher or lower than their
printer.
I
NSTRUCTIONS
E
P
PSON
RINTERS
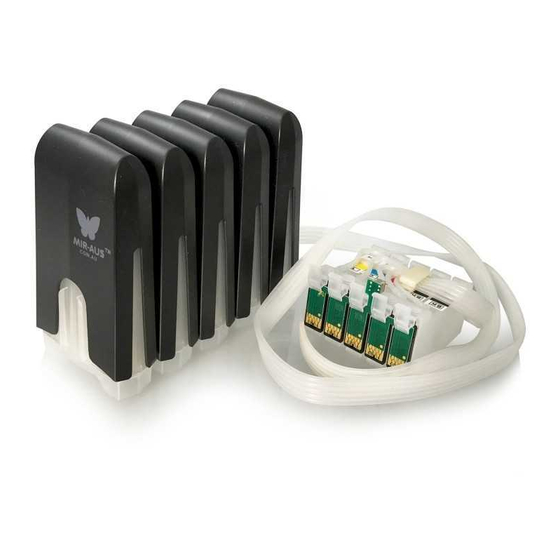
CISS
FLY V.3
Tel: 02 80 6556 14
1300 213 589
www.mir-aus.com.au
info@mir-aus.com.au
Advertisement
Table of Contents

Related Manuals for Mir-Aus CISS FLY V.3

Summary of Contents for Mir-Aus CISS FLY V.3
- Page 1 Tel: 02 80 6556 14 1300 213 589 www.mir-aus.com.au info@mir-aus.com.au NSTALLATION NSTRUCTIONS OR ALL PSON RINTERS CISS FLY V.3 1. Keep out of reach of children. Seek medical advice if taken. 2. Avoid exposure to direct sunshine and don’t keep it at high or freezing temperatures.
- Page 2 CISS FLY V.3 STEP ONE When you first install a CISS unit into your printer (and before using it), you must create an appropriate air balance inside your tank. Please see the photos below. Remove all the plugs from the tanks.
- Page 3 Trouble shooting: It is very important that there is mostly air in the air balance compartment (so not more than 2cm of ink). After shipping and handling, if there is more than 2 cm of ink in the air balance compartment, make sure the holes are plugged and sit the unit on its side (reserve ink compartment side down) for five seconds or so to let the ink drain out of the air balance compartment into the reserve ink compartment.
- Page 4 CISS FLY V.3 NSTALLATION NSTRUCTIONS NEXT STEP Install the ink system Manually move ink cartridge holder to the left. (if your printer has a middle bar) Install the ink System Component into the left side of the printer frame, through the frame divider and Place it to the right of printer as shown above.
- Page 5 Looking into the printer from above, install the support clip(s) as shown. The one on the left (in the photos below) is called a T-bar clip and the one on the right is called a square clip. We have attached some photos below of various printers.
- Page 6 It is also important that you place the external tanks next to (so level with) your printer. Don’t put them at a higher or lower elevation than your printer as this may affect the flow of your ink from the tanks to the cartridges inside the printer) Reset cartridges There are chips on the end of each cartridge which have a 'memory' of how...
Need help?
Do you have a question about the CISS FLY V.3 and is the answer not in the manual?
Questions and answers