
Related Manuals for JohnnyVac JVC50BC

Summary of Contents for JohnnyVac JVC50BC
- Page 1 Floor Scrubber JVC50BC / JVC56BT Operator Manual Please read this manual before operating the machine.
-
Page 4: Table Of Contents
INDEX 1. IDENTIFYING THE MACHINE......................5 2. GENERAL INFORMATION......................8 3. TECHNICAL INFORMATION ......................8 3.1. General description..........................8 3.2. Danger zones ............................8 Tank assembly: when using detergent, user should be careful not to spray some over is skin or eyes; be aware of danger of germs or chemical substance from the dirt; danger of being crushed in between two tanks when the dirty water tank is replaced on the solution tank.... 8 Control panel: danger of short-circuits......................8 Bottom of washing head: danger due to rotating brush................8 Rear wheels: danger of being crushed in between the wheel and chassis........8 Battery compartment: danger of short-circuits between the battery poles and presence of hydrogen during charging.............................. 8 4. SAFETY INFORMATION ........................9 5. HANDLING AND INSTALLATION .................... 10 5.1. Lifting and transportation .......................10 5.2. -
Page 5: Identifying The Machine
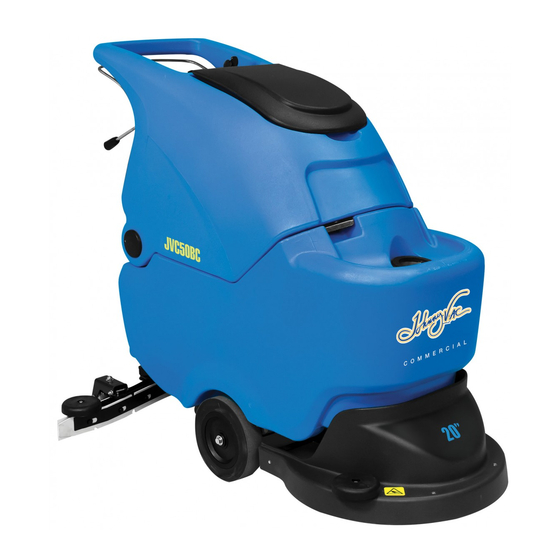
IDENTIFYING THE MACHINE Recovery tank cover Power switch Brush motor switch Vacuum motor switch Battery meter Fig. 1 Recovery tank Uncovered handle Solution tank Brush guard cover Fig. 2 10. ?? 11. ?? 12. ?? - 5 -... - Page 6 13. Water inlet filter net Fig. 3 14. Wheel Fig. 4 15. Squeegee blades Fig. 5 - 6 -...
- Page 7 16. Vacuum motor 17. Suction canal 18. Exhaust outlet 19. Power control board 20. Battery Fig. 6 21. Driven lever 22. Tap lever 23. Drain hose 24. Squeegee lever 25. Recharger connector plug 26. Lowering and raising pedal 27. Squeegee bracket 28.
-
Page 8: General Information
GENERAL INFORMATION This manual has been written by the manufacturer. It contains all the details required by operators. Respect these instructions; not only it will help to guarantee the operator’s safety and machine’s good function but it will also prolong its lifetime and get better performance. Parts of the text illustrated and described by bold words, preceded by symbols, should be given high attention: DANGER Warn of hazards or unsafe practices that could result in sever personal injury or death. -
Page 9: Safety Information
SAFETY INFORMATION The manufacturer declines all liability for damage to people or property resulting from failure to observe the instructions. IMPORTANT This machine must be exclusively operated by trained and authorized people. • This machine must not be operated by minors. •... -
Page 10: Handling And Installation
HANDLING AND INSTALLATION 5.1. Lifting and transportation IMPORTANT During all lifting operations, make sure the packaged machine is firmly fastened to avoid being accidentally tipped of dropped. The machine should be loaded by lorries in the circumstance of sufficient light. The machine, packaged on a wooden pallet by the manufacturer, must be loaded onto the transporting vehicle. At destination, it must be unloaded using similar means. -
Page 11: Battery Installation (Battery)
5.5. Battery Installation (battery) Two different types of battery may be installed: Leak proof battery: the electrolyte level must be checked regularly. When necessary, please fill up with distilled water until the plates are covered. Gel battery: this type of battery is maintenance free. The type of battery used must correspond to machine’s technical specifications. -
Page 12: Operation
OPERATION 6.1. Controls description The machine is equipped with the following controls and indicator lights: Three LED lights indicate the battery charge level. They may be: GREEN LED light on: batteries are 100% charged • GREEN & RED LED lights are flashing: batteries are almost flat •... -
Page 13: Preparation Before Operation
6.5. Preparation before operation Perform the following steps before operating the machine: Battery model: Check the battery charge (recharge it if necessary). Lower the head using the pedal. Make sure the recovery tank is empty. If necessary please empty it. Confirm the solution tank is filled with clear water or detergent. Mount the most suitable brush, drive disk. -
Page 14: Useful Cleaning Tips
6.7. Useful cleaning tips In the event of particularly stubborn dirt on the floor, washing and drying can be performed in two separate operations. 6.7.1. Prewashing by brushes or pads Adjust the water flow switch Place the brush switch in position “l”. Lower the head. Operate the drive lever to rotate the brush. Raise the squeegee. -
Page 15: Maintenance Instructions
MAINTENANCE INSTRUCTIONS Before any maintenance performance, power supply should be cut off. Specialised personnel only, in compliance with current safety legislation and user manual, must perform maintenance on the electrical circuit and all other operations. 9.1. Maintenance - General rules Performing regular maintenance according to the manufacturer instructions improves performance and extends the machine working life. -
Page 16: Troubleshooting
9.2.4. Fuse changing The fuse, protecting the brush and the suction motors, is located in the fuse holder attached to the recovery tank, above the machine battery compartment. To replace the fuse: Make sure the dirty water is emptied. Raise the recovery tank. Open the fuse holder cover and remove the fuse by unscrewing the fixing screws. - Page 17 Problem Cause Solution You are working with a dry brush on a Open the detergent tap very rough floor You are working with power cable Avoid the use of inappropriate The brush motor has trouble in extensions with an inadequate section, extensions.
- Page 18 Problem Cause Solution motor is faulty the main wiring and that the fuse is not blown. Or have the motor replaced. The machine tends to pull to one The direction adjustment knob must be Regulate the direction of movement side adjusted appropriately for the floor by adjusting the direction adjustment konb...
-
Page 19: Technical Specifications
TECHNICAL SPECIFICATIONS ITEM Power: 24 V DC Traction : With brush rotation Dimensions : 49’’ x 21’’ x 39’’ 123 x 53 x 98 cm Weight with batteries: 386 lbs. 175 kg Tank construction: Polyethylene Solution tank: 13 gal 50 L Recovery tank: 13 gal 50 L...
Need help?
Do you have a question about the JVC50BC and is the answer not in the manual?
Questions and answers