
Related Manuals for KGuard Security QRT-301


Summary of Contents for KGuard Security QRT-301
- Page 1 QRT-301 Web Client user name: admin P2P user name: admin Web Client default password: admin P2P default password: 123456 Day & Night WI-FI Network Camera User's Manual...
-
Page 2: Table Of Contents
Contents Introduction Features ..........4 Configure the Camera Settings ..26 Package Contents ........4 Device ..........27 Product Overview ........5 Video ..........27 Connection Diagram .......6 Audio ..........28 Motion Detection ......28 Making Connection Alarm ..........29 Network Configuration ......7 Network ..........30 Wireless Router ........7 Wireless Lan ........32 Wireless Router With WPS UPNP ..........32 Function ...........7... -
Page 3: Safety Information
Safety and Regulatory Info Safety Information FCC Compliance Statement This equipment has been tested and found to comply with the limits for a Class C digital device, pursuant to Part Warning 15 of the FCC Rules. These limits are designed to provide reasonable protection against harmful interference when This is the symbol for indicating any potential hazard, the equipment is operated in a commercial environment. -
Page 4: Introduction
Introduction Thank you for choosing our Wi-Fi Network Camera. The QRT-301 features an easy-to-configure network interface, allowing you to access the camera on your mobile/pad anywhere at any time. If you are using a wireless router with the WPS function, all you need to do is to pair the router with the camera, download the Kview QR application on your portable device, scan the QR code to add the camera, and start viewing the remote live view. -
Page 5: Product Overview
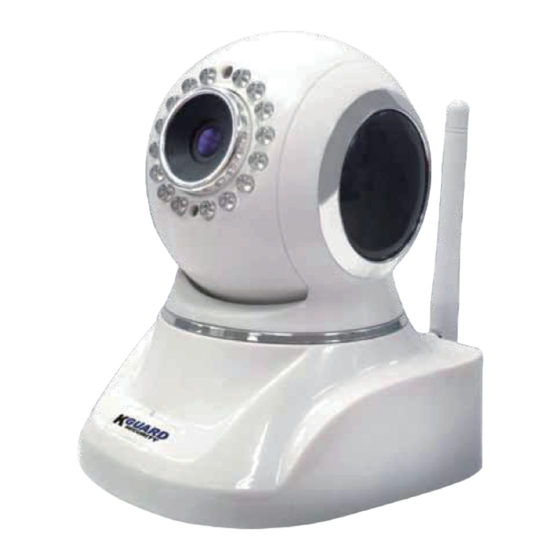
Introduction Product Overview Lens Status LED (red) WiFi Antenna QR Code Label WI-FI Network Camera User’s Manual... -
Page 6: Connection Diagram
Introduction Connection Diagram WiFi Antenna Electrical Outlet RESET DC IN Internet Microphone LAN Port (RJ45) SD Card Alarm Out Speaker Sensor In *Pin Tool NOTE: The Pin tool can be used to start the WPS function (see “Wireless Router With WPS Function” on page 7) or to reset the camera (insert and hold in the reset hole for 15 seconds until the LAN port LEDs switch off). -
Page 7: Making Connection
Making Connection Network Configuration Procedures of Network Configuration depend on the type of Router/Modem you are using. For Wireless router, check if your wireless router supports WPS function. For Wired router/modem, confirm which type of internet connection (DHCP, Static IP and PPPoE) you are using with your Internet Service Provider (ISP) to complete the setup. -
Page 8: Wireless Router Without Wps Function
Making Connections When the red status LED (see “Product Overview” on page 5) turns off, wait for 10 seconds until the Camera boots up and starts rotating. NOTE: When the red status LED starts blinking with a second interval, it means the wireless network connection is successful. - Page 9 Making Connections Insert the CD (supplied) to your PC’s CD drive. Click on Search The program lists the camera by IP address. Double-click on the camera’s IP address field. The camera’s web client opens in your PC’s default web browser. NOTE: The available functions/menu options may vary depending on the type of web browser.
- Page 10 Making Connections Click on the router name and modify the following. • Check Using Wireless LAN option. • Enter the wireless router’s password in Key field. Click Save. Disconnect the RJ45 Ethernet cable from the camera. RESET DC IN Internet Disconnect and connect the power adapter, to restart the camera.
-
Page 11: Wired Router/Modem
Making Connections Wired Router/Modem If you are using a wired router/modem, confirm the type of internet connection you are using and the related network connection parameters with your Internet Service Provider (ISP), to complete the setup. Dynamic Host Configuration Protocol (DHCP): Select this connection if your camera is connected to a router and DHCP is enabled. - Page 12 Making Connections Insert the CD (supplied) to your PC’s CD drive. Click on Search The program lists the camera by IP address. Double-click on the camera’s IP address field. The camera’s web client opens in your PC’s default web browser. NOTE: The available functions/menu options may vary depending on the type of web browser.
-
Page 13: Static Ip And Pppoe
Making Connections Static IP and PPPoE To establish a connection from the camera to the wired router or modem with a static IP or PPPoE, perform the following: Connect the camera to the power socket, using the power adapter. Connect one end of the RJ45 cable (supplied) to the camera and the other end to the wired router or modem. RESET DC IN Internet... - Page 14 Making Connections On Network and Sharing Center click Local Area Connection Status > Details and write down the network parameters (IP Address, Subnet Mask, Gateway, and DNS Servers). Insert the CD (supplied) to your PC’s CD drive. Click on Search The program lists the camera by IP address.
- Page 15 Making Connections • Enter the user name and password. NOTE: The default user name and password are “admin”. Click OK. Wait for a minute until the camera’s IP address is listed on the screen. Double-click on the camera’s IP address field to open the camera’s web client on your PC’s default web browser.
-
Page 16: Connect To Camera
Making Connections On Network screen, do the following modifications: • Depending on the Internet connection you are using, select Static Address or PPPoE as the network type. • Do the necessary modifications to the network parameters. Click Save. Disconnect and connect the power adapter, to restart the camera. When the red status LED (see “Product Overview”... -
Page 17: Using A Portable Device
Making Connections When the network connection to the camera is complete, use the methods described in this section to start reviewing the remote live view. P2P user name: admin P2P default password: 123456 Using a Portable Device To access remotely your camera from a smart phone/pad, perform the following: Open the App Store (iOS) or Play Store (Android). - Page 18 Making Connections Do the following: iOS devices: a) Enter the default camera password: “123456”. b) Tap OK. c) Change the device name if necessary. d) Tap Save. Android devices: a) Enter the default camera password: “123456” and change the device name if necessary. WI-FI Network Camera User’s Manual...
-
Page 19: Using A Pc
Making Connections b) Tap OK. On Devices screen, tap camera to start viewing the live video from the camera. Using a PC WI-FI Network Camera User’s Manual... -
Page 20: Install Camera
Making Connections To access remotely your camera from a PC, follow the steps: Insert the CD (supplied) to your PC’s CD drive. Click on Setup. Follow the on-screen instructions and install the application on your PC. Double-click to open the KGard_IPCamClient. Enter the user name and password. -
Page 21: Before Installation
Making Connections Follow the instructions in this section to install the camera and perform the cable connections. Before Installation It is recommended to complete the camera network connection (Camera to Router) and portable device connection (Smart Phone/Pad to Camera) prior mounting the camera. Installation Procedures Fixed Mounting Dynamical Mounting... -
Page 22: Web Client
Web Client Use Web Client to remotely access the Camera and configure the settings of Camera. Before accessing Web Client for first time: • Ensure that the Network settings of the Camera is properly configured. See “Network Configuration” on page •... -
Page 23: Main Screen
Web Client Open your computer web browser and enter the domain name you set for the camera or the designated DDNS address in the URL box. You can find the designated DDNS address on the sticker or > DDNS > DDNS Hostname. NOTE: : Be sure to perform port forwarding first before browsing using the domain name or designated DDNS address. -
Page 24: Task Bar
Web Client Task Bar To access the common functions, click the respective icon shown on the task bar. • Click to play the live video. • Click to stop the live video. • Click to take a snapshot. The snapshot appears on the screen. Click Save to save the picture on your computer. -
Page 25: Right Panel Control
Web Client Right Panel Control You can use the Panel Control to access the PTZ Control panel and customize the display settings. Set a preset point. To set a preset point: Click the direction arrow to select 1. Click the direction arrow to the direction of the PTZ camera. -
Page 26: Configure The Camera Settings
Web Client Configure the Camera Settings Click tab to remotely configure the Camera. Main menu Menu option/setting NOTE: When all settings are complete, do the following: • Click Save to save all the settings. • Click Update to refresh the settings. WI-FI Network Camera User’s Manual... -
Page 27: Device
Web Client Device View the Camera information including the device ID, Client version, and Host version, IP address, UPnP status, and DDNS status. The default device name is “IP CAMERA”. To customize the camera name, enter the new name in Description. Video Customize the video stream settings. -
Page 28: Audio
Web Client Frame Rate: Select the video stream frame rate. Bit Rate: Select the video stream bit rate. NOTE: Higher bit rate produce better quality images, but occupy more bandwidth. Image Quality: Select the video stream quality. Audio Customize the audio settings. External Headset: Check this option to use the external microphone. -
Page 29: Alarm
Web Client Linkage With Alarm: Check this box to activate the following action when the motion is detected. • Alarm Output: Check this option to enable alarm output. See “Alarm” on page • SD-Card Record: Check this option to save the recorded videos directly into the SD card. See “SD Card”... -
Page 30: Network
Web Client Alarm Duration: Set the external alarm output duration. Lose SD-Card Alarm: Select on to automatically trigger the alarm if the Camera cannot detect the memory card. Alarm Input1: Check the Enable box to enable alarm input. Select the alarm type in Mode. NOTE: N.O. - Page 31 Web Client • DHCP: Select this connection if your camera is connected to a router and DHCP is enabled. Media Port: Enter the port number that the device will use to send Camera command and video stream. Web Port: Enter the port number that you will use to log in to the device via the web. Phone Port: Enter the monitoring port of your mobile device.
-
Page 32: Wireless Lan
Web Client Wireless Lan Configure wireless network settings. Search: Click to search for available wireless router(s). Using Wireless Lan: Check the box to use Wi-Fi function. SSID: Enter the router name. Network Type: Select the type of wireless network connection you are using. NOTE: Select Adhoc if you using point-to-point transmission AP. -
Page 33: Ddns
Web Client DDNS DDNS (Dynamic DNS) is a service that registers a domain name and the floating IP address with a DDNS server so that the domain name can be routed to the IP address even if the IP is changed in a dynamic IP system. Enable DDNS: Select open to enable the DDNS function. -
Page 34: Indicator
Web Client Name: Enter the cruise name. Status: Check to enable the current cruise mode. Serial Number: Check the box to activate the selected preset mode. Preset: Select the preset point that you have set with Right Panel Control. See “Right Panel Control”... -
Page 35: Log
Web Client Configure Other Users You can specify up to 9 users. Only the Super administrator (Super Admin) can create an account and grant access rights to users. To create a new user, enter the user name and password. Then select one of the access rights: •... -
Page 36: Date & Time
Web Client Date & Time Configure the date and time settings. Datetime: Display the current date and time. Time Zone Setttings: Select the time zone in your location. Timing Mode: Select the time mode. NTP Server: Select the NTP server. NOTE: This option is only available when the Timing Mode setting is set to NTP Timing. -
Page 37: Ftp
Web Client SMTP Port: Enter the SMTP port of the sending email server. Auth User: Check the box to verify the user settings. SMTP User: Enter the user name of the sender. SMTP Password: Enter the password of the sender. Configure the FTP server settings. -
Page 38: Sd Card
Web Client SD Card Manage the memory card and configure the recording settings to be stored in the memory card. Device Name: Display the name of the memory card. Total Size: Display the total size of the memory card. Available Space: Display the available storage size of the memory card. Status: Display the state of the memory card. -
Page 39: P2P Settings
Web Client P2P Settings P2P password is the password that you enter after you have complete scanning the QR code or manually entering the GUID via portable device/computer. Default is 123456. We suggest you change the password to protect your privacy. GUID: Display the GUID (QR Code). -
Page 40: System
Web Client System Reboot the Camera, load factory defaults, or update the firmware and Web UI settings. Reboot Device: Click to reboot the Camera. Restore Factory Settings: Click to restore all parameters to the factory default settings. Upgrade Device Firmware: Click the corresponding Browse button to select the latest firmware file. Then click Start to update the firmware. -
Page 41: Playback
Web Client Playback Click tab to search and play the recorded files stored in the memory card. Searching and Playing Videos Click to search the video. A search window appears. Search Mode: Specify the search mode. File Type: Specify the file type. Begin Time/End time: Filter the search by time period. - Page 42 Web Client Double-click the file that you want to play. The playback automatically starts. Click to download the video. Click to select the video. Playback Control Search results Indicate Motion Detection video. WI-FI Network Camera User’s Manual...
-
Page 43: Appendix
Appendix Specifications Item Description Video Compression H.264 Image Frame Rate • 1280x720 pixels @30fps • 640x368 pixels @30fps Video • 320x208 pixels @30fps Day / Night Mode Color during day, switches to B&W at night Frame Rate Auto, 1fps ~ 30fps Maximum Streams 2 Simultaneous Streams Image Sensor... -
Page 44: Web Client Browser Compatibility
Appendix Web Client Browser Compatibility See the following table for reference of the Web Client features supported by different web browsers Browser Type Function/Menu Option Windows IE Chrome / Firefox / Safari Live View Live Snapshot Live Recording Live 2-Way Audio PTZ Controls Preset Surveillance Position Preset Cruise... - Page 45 Customer Support KGUARD INFORMATION CO., LTD. USA Technical Support Contact Address: 4F, No.113, Jian 2nd Road, TEL: 1-949-450-0052 Jhonghe District, New Taipei City 23585, Taiwan Email: support@kworldcomputer.com TEL: +886-2-8228-6080 FAX: +886-2-8221-6857 Email: support@kguardsecurity.com...
Need help?
Do you have a question about the QRT-301 and is the answer not in the manual?
Questions and answers