Advertisement
Quick Links
Advertisement

Related Manuals for W Audio SPEA43


Summary of Contents for W Audio SPEA43
- Page 1 Order Code: SPEA43 ENGLISH...
-
Page 2: Unpacking Instructions
WARNING FOR YOUR OWN SAFETY, PLEASE READ THIS USER MANUAL CAREFULLY BEFORE YOUR INITIAL START-UP! Unpacking Instructions Immediately upon receiving this product, carefully unpack the carton and check the contents to ensure that all the parts are present, and have been received in good condition. Notify the dealer immediately and retain the packaging material for inspection if any parts appear damaged from shipping or the carton itself shows signs of mishandling. -
Page 3: Operating Determinations
IMPORTANT: The manufacturer will not accept liability for any resulting damages caused by the non-observance of this manual or any unauthorised modification to the equipment. • Never let the power-cable come into contact with other cables. Handle the power-cable and all mains voltage connections with particular caution! • Never remove warning or informative labels from the equipment. • Do not open the equipment and do not modify the equipment. • Do not connect this equipment to a dimmer-pack. • Do not switch the equipment on and off in short intervals, as this will reduce the system’s life. • Only use the equipment indoors. - Page 4 Please note that speaker systems can move due to bass beats and vibrations. Furthermore, unintended pushing on the speakers present a further risk. The speaker system must always be secured against moving or the respective area has to be blocked. The given maximum power of the speaker system describes short term peaks the system can handle as a maximum. The corresponding RMS power is - as of all comparable systems (also from other manufactures) - significantly lower. The maximum power of the speaker system must never be exceeded. When operating the speaker system, please make sure that the system always sounds clear. When distortion can be heard, either the amplifier or the loud speaker is being overdriven. Overloads can quickly lead to amplifier or speaker damage. In order to avoid damage, please reduce the volume immediately when distortion can be heard. When speaker systems are damaged by overdriving, the guarantee becomes void. The ambient temperature must always be between -5˚ C and +45˚ C. Keep away from direct sunlight (particularly in cars) and from heaters.
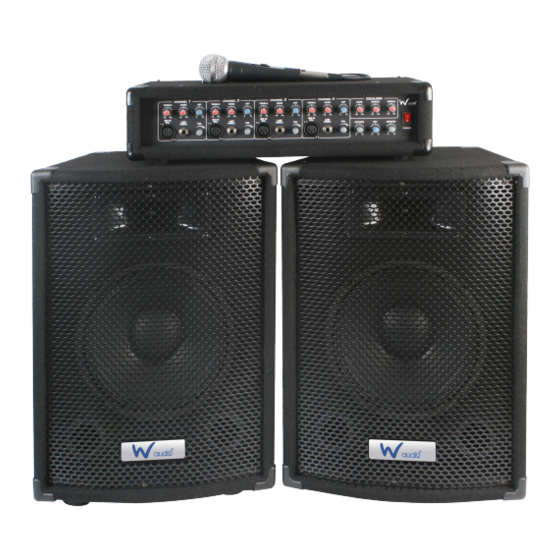
- Page 5 Make sure that the area below the installation place is blocked when rigging, derigging or servicing the system. Please note: W Audio cannot be made liable for damages caused by incorrect installations and excessive noise levels. Gig Rig Performer Mixer Amplifier Features: • Four channel mixer amplifier • Rugged, carpet covered housing complete with steel corner guards and a rubber carry handle • Balanced XLR microphone inputs • 1/4” 6.35mm line level inputs • CD/TAPE input located on rear panel • Master volume & effects controls • Speaker output sockets - 6.35mm (1/4”) jack • Effects loop - enables use of external processing • Record output - ideal for use with external audio recorders • 3 band EQ on main output • 2 band EQ on each input channel • Convection cooled • 2 x 75Wrms (2 x 100W peak) power output • Dimensions: 490 x 270 x138mm • Weight: 7.3Kgs Gig Rig Performer Speaker features: • Continuous (RMS) power: 75W • Peak power: 100W • Efficiency (1watt/1metre): 93dB • Frequency range (-3dB): 60Hz - 18kHz • Low frequency transducer: 10”/250mm • High frequency transducer: 3” x 7” Piezo Horn • Crossover frequency: 4kHz • Nominal impedance: 4 Ohms • 6.35mm Jack Socket x 2...
- Page 6 Overview: Mixer Amplifier: EQUALISER EQUALISER CHANNEL 1 CHANNEL 2 CHANNEL 3 CHANNEL 4 EQUALISER TREBLE BASS TREBLE BASS TREBLE BASS TREBLE BASS BASS MIDDLE TREBLE GIG RIG PERFORMER MIXER CHANNEL 1 CHANNEL 2 CHANNEL 3 CHANNEL 4 EQUALISER TREBLE BASS TREBLE BASS TREBLE...
- Page 7 7, Master Equaliser (EQ) Controls - (TREBLE / BASS) – A 3-band equaliser for adjusting different frequency bands within the main mix output. The BASS control is centered at 80Hz, MIDDLE centered at 2.5kHz and the TREBLE centered at 12.5kHz. 8, CD/TAPE Line Input - Linked directly to the CD/TAPE Line input on the rea r panel this controls the level for the CD/TAPE Line input within the main/master mix. 9, EFF Return Control (EFF RETURN) - This adjusts the level of signal returned from the built-in Effects processor to the main mix output. 10, MASTER - The MASTER is for overall control of the level or volume of the amplifier. This should be adjusted slowly as introducing too much gain to the system can cause feedback and damage speakers/amplifiers and also produce high frequencies at high sound levels and may damage your hearing. 11, MAINS Input - The mixer amplifier requires a standard 220-240Vac ~ 50Hz mains supply. The mixer amplifier is supplied with a BS1363A UK type 13A fused plug fitted. The plug contains a fuse – should this blow the fuse should be replaced with one of the exact same rating. Do not fit a fuse with a higher rating. 12, FUSE - Should the mains fuse fail this can indicate a problem with the mixer amplifier or the speakers connected. The mains fuse should only be replaced after the product has been checked for damage the fuse should be replaced with the exact same type. This unit uses a T1.6A 250V 20x5mm glass fuse.
- Page 8 Start Up Make sure that the power switch is set to “OFF” before you connect the speakers. Inputs A good quality cable run improves the sound quality considerably. Input cables should be short and direct, since high frequencies may be absorbed if the cables are unnecessarily long. Also a longer cable may lead to humming and noise problems. If long cables runs are unavoidable, you should use balanced cables. In order to obtain the highest sound quality, only use high quality cables for connecting the units. Balanced XLR Connection Connection With The Mains Connect the unit to the mains with the power plug.
- Page 9 Connections This speaker system is equipped with 2 pole 6.35mm jack speaker sockets. Speaker connections should only be made while the mixer amplifier is powered off. Installing the speaker cables Connect the speakers to the left and right speaker sockets. The signal will be transmitted to the individual speakers. Always treat the cables carefully and protect them from damage during transportation. Always install the cables in a structured way and protect them from damage. The cables must be installed in a way that no person can trip over them. Always fix the cables with an appropriate tape etc. Should the supplied speaker cables need replacement, please ensure good quality speaker cable is used (ie. CABL28). Do not use guitar cables or signal cables. Installation Stacking This speaker system may only be installed on top of another speaker system if both systems are clamped up to each other via appropriate clamping belts and protected against tilting over.
- Page 10 Installation on a Speaker Stand The speaker system may only be installed on a speaker stand if the original speaker system is equipped with an appropriate stand adaptor. Stands or satellite systems must only be installed on a plane area with a maximum inclination angle of 5˚.
Need help?
Do you have a question about the SPEA43 and is the answer not in the manual?
Questions and answers