
Related Manuals for Pro'sKit SS-989

Summary of Contents for Pro'sKit SS-989
- Page 1 SS-989 2 IN 1 SMD HOT AIR REWORK STATION User’s Manual Edition 2015 © 2015 Copyright by Prokit’s Industries Co., Ltd.
-
Page 2: Safety Instructions
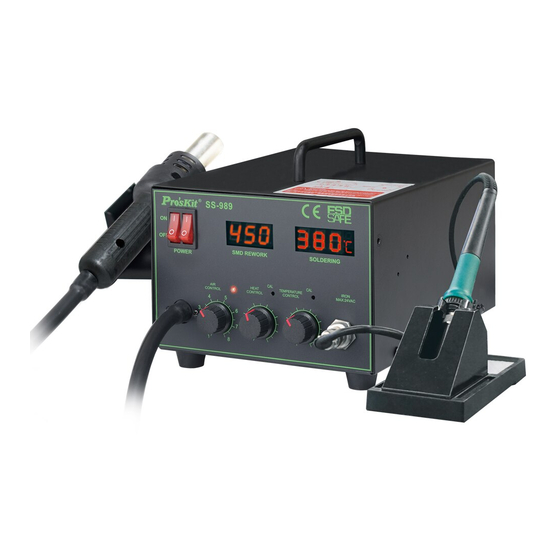
Thank you for purchasing Pro’sKit product. The SS-989 2in1 SMD Hot Air Rework Station has been designed to meet high quality standards. Please properly use and care of your product for prolonging service life. For the complete user manual downloading,... - Page 3 _ Make sure the work area is well ventilated. _The Pro’sKit SS-989 is not intended for use by children or infirm persons without supervision. _ Children should be supervised to ensure that they do not play with the SS-989. Packing list and name of parts Name of Parts...
-
Page 4: Specifications
Features and Specifications Features: • 2 In 1 rework station to save cost. • Alumina ceramic soldering iron heating element is more durable and long service lifetime. • Microprocessor-controlled with Calibration function features accurate temperature control and easy to repair. •... - Page 5 Assembly A. Station assembly ● Attach the Heat Gun holder Remove the heat gun holder screw from the side of the station; attach the heat gun holder to the station (Fig. 1) Fig. 1 B. Attach the nozzle ● Loosen the nozzle mounting screw, attach the nozzle on heat gun then screw Show as the figure 2 Fig.
- Page 6 ●Turn on the power switch and the lamp will be lit ●Don‘t pull out the power plug instantly after turning off the power switch, because the fan keeps operating to protect heat element. Until the fan stops operation completely, the power plug should not be pulled out. III.
- Page 7 lifting the pick up puller (Fig. 5) Fig. 5 5. After removing SMD components, remove residual soldering solder tin with desoldering tool. ●SMD rework operation instructions 1. Apply proper quantity of solder paste and install the SMD components on PCB. 2.
- Page 8 Fig. 8 ***ATTENTION*** Sponge will swell when wet. Dampen the sponge with water and squeeze dry before using. The tips may be damaged when used with dry sponge. 2. Insert soldering iron into the stand. (Fig. 9) 3. Take out the protection tube on the top of soldering iron. 4.
- Page 9 which sensitive to temperature. ***ATTENTION*** Always put soldering iron into holder after use. ***ATTENTION*** Always clean the soldering iron tip after use and coat it with fresh solder to prevent oxidation and prolong tip life. 7. Soldering iron tip maintenance and operation ●...
-
Page 10: Troubleshooting
Put the fuse holder back in place. Trouble shooting VII. Warning: Before checking the inside of the SS-989 or replacing parts, be sure to disconnect the power plug. Failure to do so may result in electric shock. Defect Situation Possible Problem... - Page 11 SS-989 2 合 1 SMD 吹焊烙鐵組 使用說明書 警告 警告本說明書之注意事項,區分為如下的 ”警告” 及 “注意” 二者加以表示。請充分理 解其內容後再閱讀本文。 警告: 濫用可能導致使用者死!亡或是重傷。 注意: 可能導致使用者受傷或對涉及物體造成實質破壞,為了使用者的安全著想,請嚴格遵 守 ”注意事項”。下面舉二個例子說明之。 備註 : 備註是在指示一個步驟或是在指出敘述那是一個重要的程序。 舉例 : 舉例是在證明一個特別的步驟、重點或是程序。 _ 為了您的安全,請務必遵守下面的 ”警告” 及 ”注意” 事項。 警告 確定不去操作與任何與溫度相關及設定風量溫度保護行程的組裝的元件(當使用的時後, 溫 度開關燈號為滅的時候)。可能會損壞這些元件。 注意 當電源是”開”的狀況,熱風槍噴嘴的溫度範圍約在室溫到 480°C ( 896°F) 之間。為了避免...
- Page 12 _ 不要弄濕產品或是用濕的手去使用產品。 _ 拔掉插頭時請拉插頭不要拉電線。 _ 請確任工作的區域通風良好。 _ 不熟悉 SS-989 產品的人員使用時, 旁邊必須有熟悉操作的人指導使用。 _ 兒童必須被監督以確保他們不會玩弄機台。 產品特點: 熱風槍、控溫烙鐵一體設計,節省空間、方便實用。 精密高效率控溫烙鐵,內埋感測器,採用氧化鋁陶瓷發熱芯,升溫快速、更耐用,比傳 統發熱芯壽命增長 1 倍。 全新單片 SMD 電路板,搭配精密 CPU 和智慧軟體,控溫精準、風量穩定、維修容易。 雙電源開關設計,熱風槍、控溫烙鐵可自由選擇獨立運作。 數位溫度與風量顯示。 熱風採用溫度感測器前置與電子式閉迴路溫度控制,風溫更準確。 靜音式大風量膜片式空氣幫浦,噪音低、風量穩定。 自動冷卻系統,具有安全與延長發熱體壽命的優點。 熱風槍、烙鐵線採用矽膠線,耐溫達 200℃,不易因誤觸.而損壞。...
- Page 13 2. 包裝清單: SS-989 吹焊台主機 使用說明書 烙鐵 烙鐵座 噴氣嘴配件 x 3pcs 熱風槍架 二、規格 產品規格 SS-989E SS-989E7 SS-989B SS-989H 總消耗功率 700W 烙鐵消耗功率 200˚C ~ 480˚C (392˚F ~ 896˚F) 烙鐵溫度範圍 室溫 ~ 480˚C ( 896˚F) 熱風溫度範圍 烙鐵發熱芯 氧化鋁陶瓷發熱芯 熱風槍發熱芯 鎳鉻絲發熱芯 空氣幫浦 膜片式 空氣量...
- Page 14 B.組裝噴氣嘴 ●鬆開噴氣嘴的安裝用螺絲,安裝噴氣嘴鎖緊噴氣嘴的螺絲(圖 2) 圖 2 ●將熱風槍放到熱風槍支架上(圖 3) 圖 3 ●將緊泵螺絲拆下(如下方照片) ●將電源插頭插入插座 ●打開電源開關電源燈就會亮起 ●關閉電源開關後, 風扇會繼續運轉冷卻以保護發熱元件, 請勿將插頭拔起. 待風扇靜止後才可以拔掉插頭. 四. 使用方法 (SMD.吹焊作業) ●取下(QFP) 1.調節氣量及溫度控制旋鈕 2.安裝起拔器(選配) 將起拔器套入元器件底下(圖 4)如果元器 件寬度不適合起拔鋼線尺寸,可擠壓鋼線寬 圖 4...
- Page 15 度以適應之。PLCC,積體電路電阻等部件時,請用小鑷子拆下部件 3.加熱 將熱風槍放在積體電路正上面,用噴氣嘴對準所要熔化焊錫部份, 讓噴出熱風熔化焊錫。噴氣嘴不可觸及元器件引線 4.拆下部件 焊錫熔化時,提起起拔器移開部件 圖 5) 圖 5 5.清除焊錫 移開部件後,使用吸錫器或除錫工具清除殘餘焊錫 ●安裝(QFP) 1.塗抹適量錫膏 塗抹適量錫膏,將部件放在線路板上 2.預備加熱 參閱(圖 6)預熱部件 圖 6 3.焊接 向引線框平均噴出熱風(圖 7) 圖 7 4.清理 焊接完畢,清除殘餘助焊劑...
- Page 16 四. 校準烙鐵和熱風槍溫度: 每次更換烙鐵、烙鐵發熱體、烙鐵頭、熱風槍、熱風槍發熱體後,應重新校準溫度。 1. 將烙鐵電線的插頭插入焊台插座或熱風槍裝妥後。 2. 利用控溫旋鈕設定所需溫度並鎖定該溫度點。 3. 當使用溫度與所定溫度有小量誤差時,請以"一"字螺絲起子旋轉焊台上帶有 CAL 字樣的 校準計,順時針方向扭轉是升溫,反時針方向是降溫。 五、 使用方法 (烙鐵座) 1. 組裝烙鐵座 ●將清潔海綿放置在底座上 (圖 8) 圖 8 ***注意*** 海綿是壓縮物體,沾水後會膨脹,使用海綿時,先沾水再擠乾否則 會損壞烙鐵頭 2. 取下烙鐵保護套 3. 將烙鐵手柄塞進底座上的焊台支架(圖 9) 4. 將電線元件上的插頭插進控制臺上的五芯插座上(圖 9) ***注意*** 插入或拔出插頭之前,注意要關掉電源 圖 9 5. 打開電源開關...
- Page 17 6. 以溫度控制鈕設置溫度 ***注意*** 溫度過高會減弱烙鐵的功能,因此請選擇焊接適合的溫度,適當的溫度也可充分 的焊接並保護對溫度敏感的元件 ***注意*** 使用完畢後,必須將烙鐵放置烙鐵座上 ***注意*** 使用完後,應抹淨烙鐵頭,鍍上新的錫層以防止烙鐵頭引起氧化作用 7. 烙鐵頭的維護和使用 ●應定期使用清潔海綿清理烙鐵頭。焊接後烙鐵頭殘餘焊劑的氧化物和碳化物會損害 烙鐵頭,造成烙鐵頭導熱功能減退 ●不使用電焊台時,不可讓電焊台長時間處在高溫狀態,會使烙鐵頭上的焊劑轉化為 氧化物,致使烙鐵頭導熱功能大為減退 ●使用後,應抹淨烙鐵頭。鍍上新錫層,以防止烙鐵頭引起氧化作用 檢查和清理烙鐵頭 ***注意事項*** ◆切勿用刀片削除烙鐵頭的氧化物 ◆設定溫度為攝氏 250 度(華氏 482 度)溫度穩定後,以清潔海綿清理烙鐵頭, 並檢查烙鐵頭狀況 ◆ 如果烙鐵頭的鍍錫部分含有黑色氧化物時可鍍上新錫層,再用清潔海綿抹淨 烙鐵頭,如此重複清理,直到徹底除去氧化物為止,然後再鍍上新錫層 ◆ 如果烙鐵頭變形,必須替換新的 六、更換保險管 當有誤用的狀況而造成保險絲燒斷時, 可以自行更換新的保險絲, 以一字起子拆下電源 座下方保險絲座後,裝上新的保險絲再裝回保險絲座即可。...
- Page 18 SS-989 故障排除說明 警告:檢查前請先移除插頭 故障現象 可能原因 解決方法 打開電源不工作 保險絲燒毀 更換相同型號保險絲 SS-989E(110V) 250V8A SS-989B(220V) 250V 5A SS-989A7(127V) 250V 8A SS-989H(220V) 250V 5A 烙鐵不正常 顯示 S-E,插頭連接不良 重新連接烙鐵插頭 發熱芯燒毀 更換發熱芯 熱風溫度不正常 發熱芯燒毀 更換發熱芯 熱風風量不正常 內部器件異物阻礙或管通路開 清除雜物,接好開裂處 裂漏氣 氣泵底部螺絲未鬆脫 拆解底部運輸螺絲 顯示不正常 因為運輸振動造成接觸不良 重新插接 PCB 板插頭...
- Page 19 © 2015 Prokit’s Industries Co., LTD. All rights reserved 2015001(C)
Need help?
Do you have a question about the SS-989 and is the answer not in the manual?
Questions and answers
I need the soldering iron element for the pro kit 989. Can I buy a replacement separately?