Table of Contents
Advertisement
Quick Links
OWNER MANUAL
PLEASE SAVE THIS MANUAL
FOR FUTURE REFERENCE
Chair 9622
Chair 9620-1
Chair 9640
®
®
Cleanjet MAX
, La Plumeria
, Gulfstream Inc.
are trademarks of Gulfstream Inc.
™
Patent #D709619, #8726430, #8680699, #D701318, #8662848, #8531048, #8366418, #D670938, #D670354, #D662340, #D660444,
#D650084, #D646082, #D636090, #D632798, #D628704, #D615326, #D613099, #D612509, #D610697, #D600950, #D596883, #D596882,
#D590188, #D589285, #D588844, #D583960, #D583576, #D583171, #D565739, #D556480, #7111334, #6991182
© 2015 All rights reserved. Design and Specifications are subject to change without notice.
Advertisement
Table of Contents

Related Manuals for Gulfstream La Plumeria


Summary of Contents for Gulfstream La Plumeria
- Page 1 ® Cleanjet MAX , La Plumeria , Gulfstream Inc. are trademarks of Gulfstream Inc. ™ Patent #D709619, #8726430, #8680699, #D701318, #8662848, #8531048, #8366418, #D670938, #D670354, #D662340, #D660444, #D650084, #D646082, #D636090, #D632798, #D628704, #D615326, #D613099, #D612509, #D610697, #D600950, #D596883, #D596882, #D590188, #D589285, #D588844, #D583960, #D583576, #D583171, #D565739, #D556480, #7111334, #6991182...
-
Page 2: Table Of Contents
Table of Contents Owner Manual Safety and Precautions ..................1-2 Identifying Parts....................3-4 Foot-Spa Clearance ................... 5 INSTALLATIONS Attaching Seat ....................6 Jet Assembly ...................... 7-8 Plumbing Connections ..................9-10 Operations and Use ................... 11-12 Cleaning & Maintenance ..................13-14 Warranty &... -
Page 3: Safety And Precautions
SAFETY & PRECAUTION Thank you for purchasing the La Plumeria spa from Gulfstream Inc. Please carefully read the instructions before installing the spa. Carefully follow the instructions and your spa will give you years of beauty and service. This product is to be connected to a branch circuit outlet protected by a Class A GROUND FAULT CIRCUIT INTERRUPTER (GFCI), and the GFCI shall be tested regularly for continued protection and correct operation. -
Page 4: Safety And Precautions
SAFETY & PRECAUTION GROUNDING METHODS Because this unit must be connected to a circuit with a ground-fault circuit interrupter (GFCI), DO NOT use a grounding adapter. The use of a grounding adapter is prohibited in Canada by Part I of the Canadian Electrical Code. GROUNDING INSTRUCTIONS This appliance must be plugged into an outlet equipped with a ground-fault circuit interrupter. -
Page 5: Identifying Parts
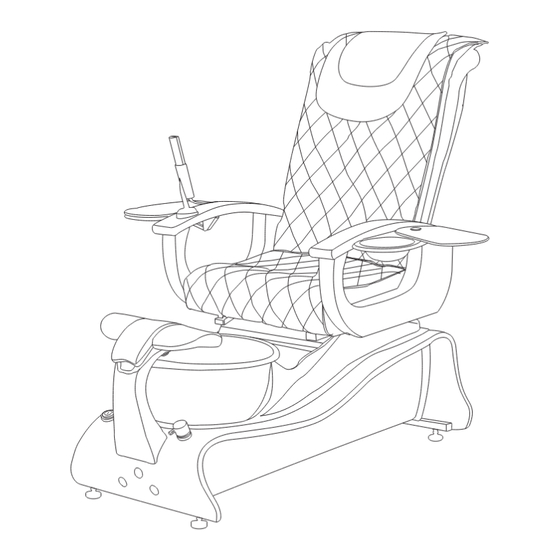
IDENTIFY YOUR FOOT-SPA Heat Surface Control Panel 1. Chair Remote Control 7. Drain Sink 2. Headrest Pillow 8. Contemporary Base with Height Adjustable Feet 3. Back Cushion & Massage 9. Removable Plastic Bowl 4. Seat Cushion Jet Control (ON/OFF) 5. Wooden Armrest 11. - Page 6 IDENTIFY YOUR FOOT-SPA SEAT OPERATION Reclining 25° Swing out manicure tray to use accessories bowl Armrest can be raised up/down (Swing-out Accessories Bowl Access is Manicure tray can be folded up/down available in the 9622 and 9620-1 chairs.) Chair Sliding SPA DIMENSION 5’’...
-
Page 7: Foot-Spa Clearance
FOOT-SPA CLEARANCE Reclining 25° WALL CLEARANCE Wall Distance from center drain to the back of the spa TYPICAL FOOT-SPAS Center Center 60’’ Foot-spa #2 Foot-spa #1 16’’ 16’’ 16’’ 16’’ 28’’ Clearance 60’’ 26’’ 26’’... -
Page 8: Installations
INSTALLATIONS Attach The Seat to The Base Backrest installation Backrest Armrest attachment here Rod located on the bottom of the Backrest Backrest anchor located on the seat frame Lock-Latch Frame You may have to secure the seat frame on the base frame unit with ‘light silver’ nuts and bolts provided before installation of the backrest. -
Page 9: Jet Assembly
INSTALLATIONS Cleanjet Unit Removal To remove the jet unit from tub/bowl. To remove the jet unit components. Pull-out Banana Plug then Gently pull out the jet unit from the anchor pegs turn the top plate counter-clockwise in the arrow direction Jet Unit Components Stingray Cover Banana Plug... - Page 10 INSTALLATIONS Poly Liner Installation Fig.2 Fig.1 Soft Plastic Liner on the Plastic Bowl Plastic Bowl Impeller Housing Soft Plastic Liner Fit elastic edge over bowl rim and form liner to bowl contours as shown in the Fig.1 Align the impeller unit onto the anchor pegs and pushit onto the base plate as shown in Fig.2 Plastic Bowl To remove, gently pull the impeller unit as shown in Fig.3...
-
Page 11: Plumbing Connections
INSTALLATIONS Plumbing Connections 1. Discharge pump may be connected to an existing sink drain or floor drain. It can also pump up to 7 ft high, but this will increase the length of the drain time. The drain connection is at the rear of the unit by a 3/4” fitting. 2. - Page 12 INSTALLATIONS Typical Discharge Pump Installation Wall Drain Sink GFI Outlet Required 3/4’’ Discharge Pipe Backwater Valve sold separately Existing Drain Pipe 16’’ - 24’’ Existing ½’’ Hot & Cold Discharge Pump Water Supply ½” Hot & Cold Hoses Backwater valve sold separately Floor Typical Gravity Sink (Direct Drain)
-
Page 13: Operations And Use
OPERATIONS & USE Control Panel Footrest Footrest Lock Fig.1 Jet Control Fig.2 Discharge Pump Switch Drain Sink (Optional) Heat Surface 1. To fill water: Simply fill the water inside the plastic bowl. CAUTION: DO NOT USE FOAMING, SUDSING OR MINERAL OIL BASED ADDITIVES IN THE WATER. 2. -
Page 14: Operations And Use
OPERATIONS & USE Shiatsu Remote Control Please refer to instruction manual for operations power timing auto programs pause auto neck&shoulder back&waist position upper manual modes lower KNEAD percussion+knead KNEAD FLAP & F LAP UPPER BODY PRESS KNOCK speed MANUAL kneading NECK SHOULDER SPEED... -
Page 15: Cleaning & Maintenance
The use of oil based products can build up in the whirlpool system, causing clogging in the jets. Adherence to the above cleaning will minimize build up. Gulfstream Inc. does not recommend the use of mineral oil based products. TESTING/FLUSHING FOOT SPA After the foot spa has been installed, fill tub with water just above the jets. -
Page 16: Cleaning & Maintenance
CLEANING & MAINTENANCE& USE Cleaning The Magnet Jet (Step by Step) ® - Do not run Cleanjet MAX without water. This will void your warranty - Do not place two wet ends in the same bowl when cleaning Warning the jet’s strong magnets could cause injury (pins your fingers) - Do not attach two wet ends to each other. -
Page 17: Warranty & Service
8. Each service call from the customer will be assigned a Claim Number. The Claim Number will stay open until the problem is resolved. No dealer or other person has any authority to bind Gulfstream Inc. to changes or additions to this warranty or its products. Accordingly, Gulfstream Inc. Is not responsible for such warranties or representations. - Page 18 ® Cleanjet MAX , La Plumeria , Gulfstream Inc. are trademarks of Gulfstream Inc. ™ Patent #D709619, #8726430, #8680699, #D701318, #8662848, #8531048, #8366418, #D670938, #D670354, #D662340, #D660444, #D650084, #D646082, #D636090, #D632798, #D628704, #D615326, #D613099, #D612509, #D610697, #D600950, #D596883, #D596882, #D590188, #D589285, #D588844, #D583960, #D583576, #D583171, #D565739, #D556480, #7111334, #6991182...
Need help?
Do you have a question about the La Plumeria and is the answer not in the manual?
Questions and answers