
Related Manuals for miniDSP C-DSP 6X8


Summary of Contents for miniDSP C-DSP 6X8
-
Page 1: User Manual
C-DSP 6 UDIO ROCESSOR User Manual miniDSP Ltd, Hong Kong / www.minidsp.com / Features and specifications subject to change without prior notice... - Page 2 Revision history Revision Description Date V0.1 Preliminary version 28 August 2015 V1.0 First release 9 September 2015 miniDSP Ltd, Hong Kong / www.minidsp.com / Features and specifications subject to change without prior notice...
-
Page 3: Table Of Contents
CE Mark Statement ............................6 A note on this manual ............................6 Product Overview ............................7 Sample usage ............................7 The miniDSP concept ..........................8 Plugin feature summary ........................8 The miniDSP workflow........................... 9 Installation and setup ..........................11 Software installation .......................... 11 3.1.1... - Page 4 4.5.4 Loading configurations from microSD card .................. 31 4.5.5 Restoring to defaults........................32 Keyboard shortcuts ..........................32 Using the C-DSP 6x8 ............................ 33 Status indicators ..........................33 Controls ............................. 33 Infrared remote control ........................34 Additional information ..........................35 Specifications ............................. 35 Troubleshooting ..........................
-
Page 5: Important Information
YSTEM EQUIREMENTS To configure the miniDSP audio processor, you will require a Windows PC or Apple Mac OS X computer with the following minimum specification: Windows PC with 1GHz or higher processor clock speed. Intel® Pentium®/Celeron® family, or AMD K6®/AMD Athlon®/AMD Duron®... -
Page 6: Warranty Terms
Finally, note that the miniDSP audio processor is a very flexible device, and many of the questions we receive at the tech support department are already answered in this user manual and in the online application notes the miniDSP.com website. So please take the time to carefully read this user manual and the online technical support. -
Page 7: Product Overview
The C-DSP 6x8 typically connects to a head unit with four output channels, and directly drives power amplifiers for multiple loudspeakers or drivers. Because of its flexible internal routing, the C-DSP 6x8 can be used in a variety of situations involving a mix of passive speakers, active speakers, and subwoofers. -
Page 8: The Minidsp Concept
1.2 T HE MINI CONCEPT The miniDSP concept is “one hardware unit + one software plugin = audio processing solution.” This concept leverages the inherent flexibility of DSP (digital signal processing) to deliver a range of flexible but cost-effective solutions. -
Page 9: The Minidsp Workflow
6. Make audio connections With the initial configuration done and now that you are familiar with the various controls, it’s time to connect the miniDSP C-DSP 6x8 into your system. Ensure that all power is turned off when making audio connections. See Hardware connectivity on page 13. - Page 10 Power on your connected equipment, first on the input side (e.g. head unit), then on the output side (e.g. power amps). Turn the volume on your C-DSP 6x8 down low (view the Master Volume display in the plugin while turning the knob counter-clockwise) and start playing music or a pink noise test signal.
-
Page 11: Installation And Setup
6x8.exe program. We recommend accepting the default installation settings. Once installation is complete, the C-DSP 6x8 plugin will automatically start. Since the plugin checks for a network connection when starting up, a warning such as the following may appear. In this case, click on Allow access. -
Page 12: Mac Os X
To install the miniDSP software, open the Mac folder of the download, and double-click on the C-DSP-6x8.dmg file to open it in a new window. Then double-click on the installer program, Install-C-DSP 6x8.app. Once installation is complete, the C-DSP 6x8 plugin will automatically start. -
Page 13: Hardware Connectivity
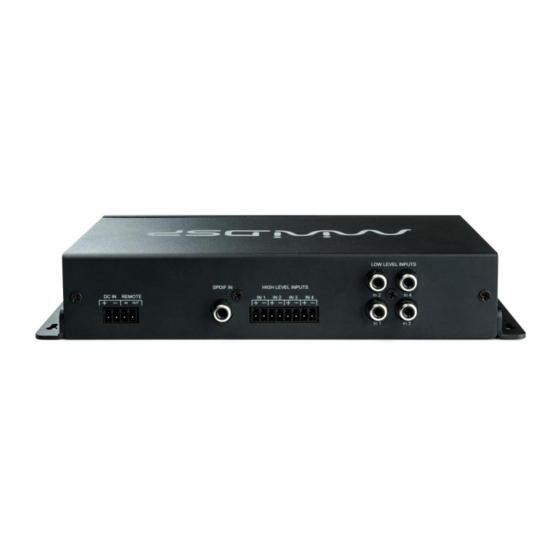
3.2 H ARDWARE CONNECTIVITY Connections to the C-DSP 6x8 are made on the front and rear panels. 3.2.1 Analog inputs There are four analog output channels. Unbalanced connections can be made directly to the RCA jacks on the front panel. Be sure to take careful note of the channel numbering shown in this diagram and on the front panel. -
Page 14: Digital Input
There are eight analog output channels. Unbalanced connections are made from the RCA jacks on the rear panel to the power amplifiers. Be sure to take careful note of the channel numbering shown in this diagram and on the rear panel. miniDSP Ltd, Hong Kong / www.minidsp.com / Features and specifications subject to change without prior notice... -
Page 15: Dc Power
3.2.4 DC power The C-DSP 6x8 incorporates an isolated DC power convertor and is designed for direct connection to the vehicle's power supply (nominally 12V). Power is connected via the four-way terminal block: The terminal block also provides two pins for remotely switching power on and off. To enable the remote enable, a jumper inside the unit needs to be moved. -
Page 16: Remote
The wire remote can be positioned anywhere in the vehicle and is connected via the supplied cable. The RJ11 plugs on each end simply plug into the base of the remote and into the rear panel of the C-DSP 6x8. The wired remote also contains the receiver for infrared remote control. -
Page 17: Synchronizing With The Processor
Cancel This option cancels the attempt to connect to the processor. The plugin will remain in offline mode. miniDSP Ltd, Hong Kong / www.minidsp.com / Features and specifications subject to change without prior notice... -
Page 18: Configuring The Processor
ONFIGURING THE PROCESSOR The C-DSP 6x8 processor is configured with the C-DSP 6x8 plugin / user interface program. Once fully configured, the computer is no longer required, as source and preset selection can be done with the wired remote or an infrared remote control—see Using the C-DSP 6x8. -
Page 19: Input Tab
EQ filters on each input channel. For more details, see Parametric EQ on page 24. Mute Press this button to mute that input channel. A visual indicator shows that the channel is muted. miniDSP Ltd, Hong Kong / www.minidsp.com / Features and specifications subject to change without prior notice... -
Page 20: Routing Tab
This can be used, for example, to mix left and right inputs for a subwoofer feed. 4.3 O UTPUT TAB The Output tab displays a row of output channel control strips. All channels are identical. miniDSP Ltd, Hong Kong / www.minidsp.com / Features and specifications subject to change without prior notice... -
Page 21: Channel Strip Layout
The meters can also be used during normal operation to monitor for or to help locate level or gain structure problems. miniDSP Ltd, Hong Kong / www.minidsp.com... -
Page 22: Crossover
Hovering the mouse over the curve brings up an overlay showing the frequency and the attenuation at that frequency. miniDSP Ltd, Hong Kong / www.minidsp.com / Features and specifications subject to change without prior notice... - Page 23 To link a channel, select the other channel from the drop-down menu at the top left of the Xover screen, and click the Link checkbox. miniDSP Ltd, Hong Kong / www.minidsp.com...
-
Page 24: Parametric Eq
To link a channel, select the other channel from the drop-down menu at the top left of the PEQ screen, and click the Link checkbox. miniDSP Ltd, Hong Kong / www.minidsp.com... - Page 25 (Note that all other filters are still operational unless individually bypassed.) A filter will also have no effect if its gain is set to 0.0. miniDSP Ltd, Hong Kong / www.minidsp.com / Features and specifications subject to change without prior notice...
-
Page 26: Time Delay
Each channel can be inverted in polarity, and individually muted. When either of these options is selected, the display changes color and the label of the button reflects the current state. miniDSP Ltd, Hong Kong / www.minidsp.com / Features and specifications subject to change without prior notice... -
Page 27: Custom Biquad Programming
In advanced mode, the biquad coefficients can be pasted directly into the user interface. These coefficients must be calculated using a design program – see Biquad design software below for suggestions. miniDSP Ltd, Hong Kong / www.minidsp.com / Features and specifications subject to change without prior notice... - Page 28 (Click on the IMPORT button.) This file can be generated by Room EQ Wizard (REW) or by other programs. The design program must be set for a 48 kHz sample rate if using the C-DSP 6x8 plugin. The number of filters is limited to a maximum of six.
-
Page 29: Biquad Design Software
It includes the ability to automatically generate a bank of parametric EQ biquads based on a measurement. These coefficients can be saved to a file from REW and loaded directly into a PEQ bank in a miniDSP plugin. Room EQ Wizard can be downloaded here: ... -
Page 30: Working With Configurations
(as long as the Synchronize Config button is selected). The configuration contained in the miniDSP hardware unit cannot be uploaded back to the computer. Therefore, you must save your configuration to a file if you wish to recover from any changes you make while in offline mode. -
Page 31: Saving And Loading Configurations
4.5.4 Loading configurations from microSD card The C-DSP 6x8 can load a set of configurations from a microSD card. This can be used to load new configuration sets without requiring a computer connection. -
Page 32: Restoring To Defaults
6. The C-DSP will load all four configurations. Each button on the wired remote will light as that configuration is loaded. 7. Eject the microSD card. (Push it in gently to unlatch it, then pull it out.) The C-DSP 6x8 is ready for use with a new configuration set. -
Page 33: Using The C-Dsp 6X8
The preset cannot be changed from the wired remote while there is a USB connection to the computer. To change presets while connected via USB, connect via the plugin and use the Config selectors. miniDSP Ltd, Hong Kong / www.minidsp.com / Features and specifications subject to change without prior notice... -
Page 34: Infrared Remote Control
Many standard and programmable remote control units can be used with the C-DSP 6x8. Rather than make you acquire yet another remote, the C-DSP 6x8 can “learn” the control codes of your current remote if it supports one of the following remote control codes: ... -
Page 35: Additional Information
Controls master volume, mute, preset selection. Power supply Isolated DC-DC conversion for Car Audio environment Dimensions (H x W x D) 41 x 205 x 122 mm miniDSP Ltd, Hong Kong / www.minidsp.com / Features and specifications subject to change without prior notice... -
Page 36: Troubleshooting
Check the output meter and ensure that you are not overloading the outputs. If necessary, reduce the output gain miniDSP Ltd, Hong Kong / www.minidsp.com / Features and specifications subject to change without prior notice... -
Page 37: Mcu Firmware Update
2. Power off the C-DSP 6x8. Insert the microSD card into the slot. (It pushes in and latches.) Power on the C-DSP 6x8. 3. The C-DSP will load new firmware. 4. Eject the microSD card. (Push it in gently to unlatch it, then pull it out.) The C-DSP 6x8 is ready for use with new firmware. 6.4 O BTAINING SUPPORT 1.
Need help?
Do you have a question about the C-DSP 6X8 and is the answer not in the manual?
Questions and answers